微服务架构--SpringCloud(9)
SpringCloud Config 分布式配置中心
*微服务意味着要将单体应用中的业务拆分成一个个子服务,每个服务的粒度相对较小,因此系统中会出现大量的服务。由于每个服务都需要必要的配置信息才能运行,所以一套集中式的动态的配置管理设施是必不可少的。SpringCloud提供了ConfigServer来解决这个问题,我们每一个微服务自己带着一个application.yml,上百个配置文件的管理...
*是什么?
*SpringCloud Config 为微服务架构中的微服务提供集中化的外部配置支持,配置服务器为各个不同微服务应用的所有环境提供了一个中心化的外部配置
*玩法?
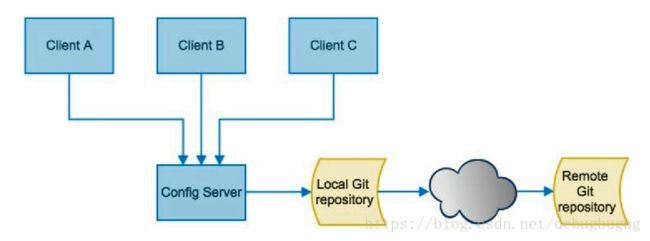
*SpringCloud Config分为客户端和服务端两部分
*服务端也成为分布式配置中心,它是一个独立的微服务应用,用来连接配置服务器并为客户端提供获取配置信息,加密/解密信息等访问接口。
*客户端则是通过指定的配置中心来管理应用资源,以及与业务相关的配置内容,并在启动的时候凑够配置中心获取和加载配置信息,配置服务器默认采用git来存储配置信息,这样就有助于对环境配置进行版本管理,并且可以通过git客户端工具来方便的管理和访问配置内容。
*由于SpringCloud Config默认使用Git来存储文配置文件(也有其他方式,比如支持SVN和本地文件),但最推荐的还是Git,而且使用的是http/https访问的形式
*各个具体的微服务,不再各自为战,由Config Server代理(管家),去GitHub获取相关的信息
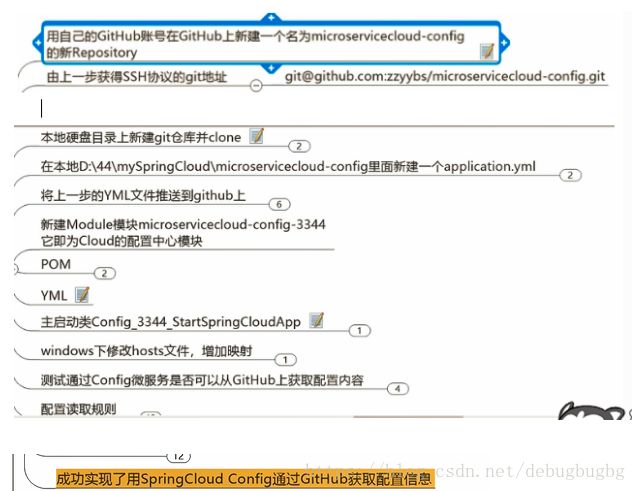
*[email protected]/micrlservicecloud-config.git
*2.在本地路径下新建application.yml 注意一定保存为UTF-8格式
spring:
profiles:
active:
- dev
---
spring:
profiles: dev #开发环境
application:
name: microservicecloud-config-*-dev
---
spring:
profiles: test #测试环境
application:
name: microservicecloud-config-*-test
#请保存为UTF-8格式
3.新建模块 microservicecloud-config-3344
4.修改pom.xml
xsi:schemaLocation="http://maven.apache.org/POM/4.0.0 http://maven.apache.org/xsd/maven-4.0.0.xsd">
5.修改yml
server:
port: 3344
spring:
application:
name: microservicecloud-configh
cloud:
config:
server:
git:
uri: git@github.*/micrlservicecloud-config.git
*6.主启动类
*加上@EnableConfigServer
*7.修改C:\Windows\System32\drivers\etc hosts映射
127.0.0.1 config-3344.com
*8.启动3344
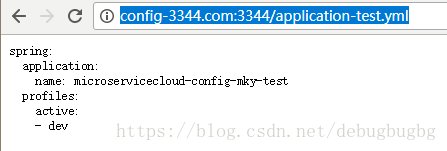
*第一种方式:
*http://config-3344.com:3344/application-test.yml
*http://config-3344.com:3344/application-dev.yml
*第二种方式:
*http://config-3344.com:3344/application/dev/master
*第三种方式:
*http://config-3344.com:3344/master/application-dev.yml
*配置读取规则:
*SpringCloud Config服务端配置:
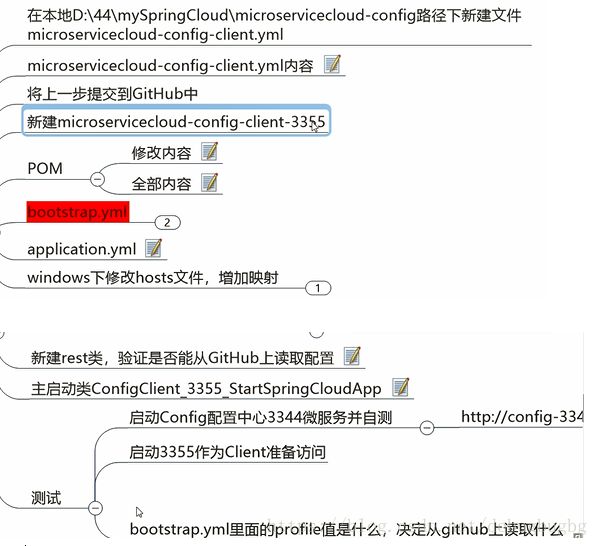
1.新建microservicecloud-config-client.yml 并编写 提交到GitHub中
spring:
profiles:
active:
- dev
---
server:
port: 8201
spring:
profiles: dev
application:
name: microservicecloud-config-client
eureka:
client:
service-url:
defaultZone: http://eureka-dev.com:7001/eureka/
---
server:
port: 8202
spring:
profiles: test
application:
name: microservicecloud-config-client
eureka:
client:
service-url:
defaultZone: http://eureka-dev.com:7001/eureka/
2.创建microservicecloud-config-client-3355
3.修改pom 新增
4.添加bootstrap.yml
*application.yml 是用户级的资源配置项
*bootstrap.yml是系统级的,优先级更加高
*SpringCloud会创建一个'Bootstrap Context',作为Spring应用的'Application Context'的父上下文。初始化的时候,'Bootstrap Context'负责从外部源加载配置属性并解析配置。这两个上下文共享一个从外部获取的‘Environment’。‘Bootstrap’属性有高优先级,默认情况下,它们不会被本地配置覆盖。'Bootstrap Context'和'Application Context'有着不同的约定。
*所以新增了一个'bootstrap.yml'文件,保证'Bootstrap Context'和'Application Context'配置的分离。
*配置:
spring:
cloud:
config:
name: microservicecloud-config-client #需要从github上读取的资源名称,注意没有yml后缀名
profile: dev #本次访问的配置项
label: master
uri: http://config-3344.com:3344 #本微服务启动后先去找3344号服务,通过SpringCloudConfig获取GitHub的服务地址
username: yourusername
password: yourpassword
5.配置application.yml
spring:
application:
name: microservicecloud-config-client
6.修改映射文件 C:\Windows\System32\drivers\etc
127.0.0.1 client-config.com
7.新建ConfigClientRest类
@RestController
public class ConfigClientRest {
@Value("${spring.application.name}")
private String applicationName;
@Value("${eureka.client.service-url.defaultZone}")
private String eurekaServers;
@Value("${server.port}")
private String port;
@RequestMapping("/config")
public String getConfig(){
String str = "applicationName: " + applicationName + "\t eurekaServers:" + eurekaServers
+ "\t port: " + port;
System.out.println("*********str: " + str);
return "applicationName: " + applicationName + "\t eurekaServers" +eurekaServers
+ "\t port: " + port;
}
}
8.启动3344
访问http://config-3344.com:3344/application-test.yml
启动3355
访问http://client-config.com:8201/config
*启动出现
成功!


