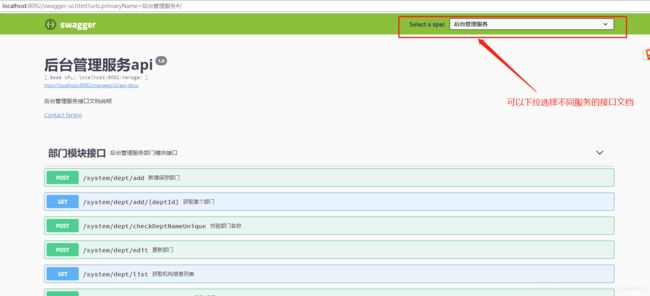
SpringCloud Zuul网关整合Swagger在网关swagger-ui.html查看各个服务的接口文档
一.背景
微服务服务众多,在测试接口时每个服务整合Swagger要单独去访问每一个服务获取接口文档有点繁琐,现在利用网关的也整合Swagger访问网关就可以获取到所有服务的接口文档就大大的便利了我们的开发
二.使用
1.对于Zuul 网关配置
添加pom依赖:
    io.springfox
    springfox-swagger2
    RELEASE


    io.springfox
    springfox-swagger-ui
    RELEASE
Swagger配置类:

/**
 * Swagger配置类
 */
@Configuration
@EnableSwagger2
public class SwaggerConfig {

    //是否开启swagger
    @Value("${swagger.enable}")
    private boolean enableSwagger;

    @Bean
    public Docket createRestApi() {
        return new Docket(DocumentationType.SWAGGER_2)
                .apiInfo(apiInfo())
                .enable(enableSwagger);
    }

    private ApiInfo apiInfo() {
        return new ApiInfoBuilder()
                .title("xxxx系统")
                .description("xxxxx接口文档说明")
                .termsOfServiceUrl("http://localhost:8092")
                .contact(new Contact("xx", "", "[email protected]"))
                .version("1.0")
                .build();
    }

    @Bean
    UiConfiguration uiConfig() {
        return new UiConfiguration(true, false, -1, -1,
                ModelRendering.MODEL, true, DocExpansion.LIST, null, null,
                OperationsSorter.ALPHA, true, TagsSorter.ALPHA, null);
    }
}
swagger Docm文档资源配置类:
/**
* swagger文档资源配置类 (重点swagger整合zuul配置)
*/
@Component
@Primary
public class DocumentationConfig implements SwaggerResourcesProvider {
// 自动获取系统配置的路由资源集合
@Override
public List get() {
List resources = new ArrayList<>();
List routes = routeLocator.getRoutes();
routes.forEach(route -> {
resources.add(swaggerResource(route.getId(),
route.getFullPath().replace("**", "v2/api-docs")));
});
return resources;
}
// 获取对应的路由资源
private SwaggerResource swaggerResource(String name, String location, String version) {
SwaggerResource swaggerResource = new SwaggerResource();
swaggerResource.setName(name);
swaggerResource.setLocation(location);
swaggerResource.setSwaggerVersion(version);
return swaggerResource;
}
}
其中网关配置文件需要注意配置的 eureka:
client:
serviceUrl:
defaultZone: http://localhost:8090/eureka/ (注册中心ip端口)
instance:
instance-id: ${spring.cloud.client.ip-address}:${server.port}
status-page-url: http://localhost:8092/swagger-ui.html ?urls.primaryName=fastdfs 这里可以从Eureka链接到具体服务的Swagger上 (网关服务自己的ip端口)
prefer-ip-address: true
routes: #多路径映射
manage:
serviceId: hsdfas-manage
path: /manage/**
sensitiveHeaders: "*"
fastdfs:
serviceId: hsdfas-fastdfs
path: /fastdfs/**
sensitiveHeaders: "*"
#是否启用swagger
swagger:
enable: true
2.对于其他服务(这里我只列出一个例子)后台管理服务manage
pom依赖添加:
    io.springfox
    springfox-swagger2
    RELEASE


    io.springfox
    springfox-swagger-ui
    RELEASE
Swagger配置类:

/**
 * Swagger配置类
 */
@Configuration
@EnableSwagger2
public class SwaggerConfig {
    //是否开启swagger
    @Value("${swagger.enable}")
    private boolean enableSwagger;

    @Bean
    public Docket createRestApi() {
        return new Docket(DocumentationType.SWAGGER_2)
                .apiInfo(apiInfo())
              .enable(enableSwagger)
                .select()
                .apis(RequestHandlerSelectors.basePackage("com.huajie.manage"))  (扫描自己项目包)
                .apis(RequestHandlerSelectors.withClassAnnotation(Api.class))
                .apis(RequestHandlerSelectors.withMethodAnnotation(ApiOperation.class))
                .paths(PathSelectors.any())
                .build();
    }

    private ApiInfo apiInfo() {
        return new ApiInfoBuilder()
                .title("后台管理服务api")
                .description("后台管理服务接口文档说明")
                .contact(new Contact("your name", "", "[email protected]"))
                .version("1.0")
                .build();
    }
    @Bean
    UiConfiguration uiConfig() {
        return new UiConfiguration(true, false, -1, -1,
                ModelRendering.MODEL, true, DocExpansion.LIST, null, null,
                OperationsSorter.ALPHA, true, TagsSorter.ALPHA, null);
    }
}
#是否启用swagger
swagger:
enable: true
对于controller接口
/**
 * 部门信息
 */
@RestController
@Api(tags = "部门模块接口", description = "后台管理服务部门模块接口")
@RequestMapping("/system/dept")
public class DeptController extends BaseController {

    @Autowired
    private IDeptService deptService;


    /**
     * @param dept 部门查询信息
     * @param nowUserId 目前用户id
     * @return AjaxResult 结果
     * @description 获取机构信息列表
     * @author xxx
     * @date 2019/1/9
     */
    @ApiOperation(value = "获取机构信息列表")
    @GetMapping("/list")
    public AjaxResult list(Dept dept, @RequestParam("nowUserId") Long nowUserId) {
        List deptList = deptService.selectDeptList(dept, nowUserId);
        return toAjaxList(deptList);
    }

其中配置配件需要注意的是:
eureka:
  client:
    serviceUrl:
      defaultZone: http://localhost:8090/eureka/ (注册中心ip端口)
  instance:
    instance-id: ${spring.cloud.client.ip-address}:${server.port}
    status-page-url: http://localhost:8092/eureka//swagger-ui.html (这里要注意 网关的ip端口信息)
    prefer-ip-address: true
访问:http://localhost:8092/swagger-ui.html
以上就是基本使用步骤,大致满足开发需求,下面仅仅是补充其它注解标签:@Api() 用于类;表示标识这个类是swagger的资源
tags–表示说明
value–也是说明,可以使用tags替代
@ApiOperation() 用于方法;表示一个http请求的操作
value用于方法描述
notes用于提示内容
@ApiParam() 用于方法,参数,字段说明;表示对参数的添加元数据(说明或是否必填等)
name–参数名
value–参数说明
required–是否必填
@ApiModel()用于类 ;表示对类进行说明,用于参数用实体类接收
value–表示对象名
@ApiModelProperty()用于方法,字段; 表示对model属性的说明或者数据操作更改
value–字段说明
name–重写属性名字
dataType–重写属性类型
required–是否必填
example–举例说明
hidden–隐藏
@ApiImplicitParam() 用于方法
表示单独的请求参数
@ApiImplicitParams() 用于方法,包含多个 @ApiImplicitParam
name–参数ming
value–参数说明
dataType–数据类型
paramType–参数类型
example–举例说明
@ApiIgnore
作用于方法上,使用这个注解swagger将忽略这个接口
