用TensorFlow构建基础的神经网络(三):AlexNet
参考文献:ImageNet Classification with Deep Convolutional NeuralNetworks
中文翻译:AlexNet论文翻译 (翻译作者:liumaolincycle)
作者:XJTU_Ironboy
时间:2017年8月
三、AlexNet
1.介绍
AlexNet 可以说是具有历史意义的一个网络结构,可以说在AlexNet之前,深度学习已经沉寂了很久。AlexNet是在2012年被发表的一个经典之作,并在当年取得了ImageNet最好成绩,它在当年的ImageNet图像分类竞赛中,top-5错误率比上一年的冠军下降了十个百分点,而且远远超过当年的第二名。同时该网络结构也是开启ImageNet数据集上更大,更深CNN的开山之作,之后在Imagenet上取得更好结果的ZF-net,SPP-net,VGG等网络,都是在其基础上修改得到。
2.网络结构
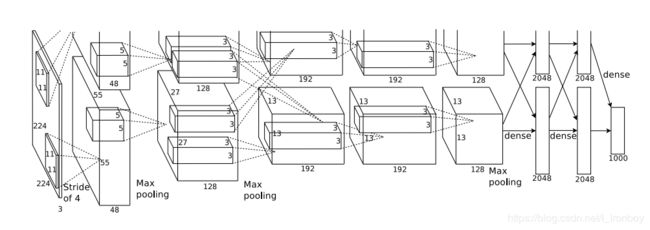
(1) 废话少说,我们直接上图。
从上图我们可以看出,AlexNet是一个由5层卷积层和3个全连接层构成的总共8层的神经网络。
(2) 构成细节
| Layers | Cell Num | Input Size | Step1 | Step2 | Step3 | Step4 | Output Size |
| Conv1 | 96 | 227*227*3 | Conv Size:11*11 Strides:4 Padding:VALID | ReLU | Pool Size:3*3 Strides:2 Padding:VALID | LRN Size:5 | 27*27*96 |
| Conv2 | 256 | 27*27*96 | Conv Size:5*5 Strides:1 Padding:SAME | ReLU | Pool Size:3*3 Strides:2 Padding:VALID | LRN Size:5 | 13*13*256 |
| Conv3 | 384 | 13*13*256 | Conv Size:3*3 Strides:1 Padding:SAME | ReLU | 13*13*384 | ||
| Conv4 | 384 | 13*13*384 | Conv Size:3*3 Strides:1 Padding:SAME | ReLU | 13*13*384 | ||
| Conv5 | 256 | 13*13*384 | Conv Size:3*3 Strides:1 Padding:SAME | ReLU | Pool Size:3*3 Strides:2 Padding:VALID | LRN Size:5 | 6*6*256(9216) |
| FC6 | 4096 | 6*6*256(9216) | Full Connect | 4096 | |||
| FC7 | 4096 | 4096 | Full Connect | 4096 | |||
| FC8 | 1000 | 4096 | Full Connect | 1000 |
3.TensorFlow上实现
提前声明:由于是放暑假在家,身边并没有合适的硬件设备(主要指:NVIDIA TITAN X GPUs)来跑这种ImageNet上的大型程序(原论文的作者用GPU都跑了5-6天),所以这里只介绍如何构建AlexNet,并没有运行结果,望读者见谅!
① 开始定义AlexNet的整体结构
# 定义AlexNet的所有层的结构
in_units =154587    # 227x227x3=154587
C1_units = 96
C2_units = 256
C3_units = 384
C4_units = 384
C5_units = 256
F6_units = 4096
F7_units = 4096
output_units = 1000
② 输入层
# 定义输入
x = tf.placeholder(tf.float32,[None,in_units],name = "x_input")
y_= tf.placeholder(tf.float32,[None,output_units],name = "y_input")
keep_prob = tf.placeholder(tf.float32)
input_data = tf.reshape(x,[-1,227,227,3])
③ 卷积层
# 定义可配置卷积层函数
def conv(layer_name,input_x,Filter_size,activation_function = None):
    with tf.name_scope("conv_%s" % layer_name):
        with tf.name_scope("Filter"):
            Filter = tf.Variable(tf.random_normal(Filter_size,stddev = 0.1),dtype = tf.float32,name = "Filter")
            tf.summary.histogram('Filter_%s'%layer_name,Filter)
        with tf.name_scope("bias_filter"):
            bias_filter = tf.Variable(tf.random_normal([Filter_size[3]],stddev = 0.1),dtype = tf.float32,name = "bias_filter")
            tf.summary.histogram('bias_filter_%s'%layer_name,bias_filter)
        with tf.name_scope("conv"):
            conv =  tf.nn.conv2d(input_x,Filter,strides = [1,1,1,1],padding = "SAME")
            tf.summary.histogram('conv_%s'%layer_name,conv)
        temp_y = tf.add(conv,bias_filter)
        with tf.name_scope("output_y"):
            if activation_function is None:
                output_y = temp_y
            else:
                output_y = activation_function(temp_y)
            tf.summary.histogram('output_y_%s'%layer_name,output_y)
        return output_y
④ 池化层
# 定义可配置最大池化层函数
def max_pool(layer_name,input_x,pool_size):
    with tf.name_scope("max_pool_%s" % layer_name):
        with tf.name_scope("output_y"):
            output_y = tf.nn.max_pool(input_x,pool_size,strides = [1,2,2,1],padding = "SAME")
            tf.summary.histogram('output_y_%s'%layer_name,output_y)
        return output_y
⑤ 全连接层
# 定义可配置全连接层函数
def full_connect(layer_name,input_x,output_num,activation_function = None):
    with tf.name_scope("full_connect_%s" % layer_name):
        with tf.name_scope("Weights"):
            Weights = tf.Variable(tf.random_normal([input_x.shape.as_list()[1],output_num],stddev = 0.1),dtype = tf.float32,name = "weight")
            tf.summary.histogram('Weights_%s'%layer_name,Weights)
        with tf.name_scope("biases"):
            biases = tf.Variable(tf.random_normal([output_num],stddev = 0.1),dtype = tf.float32,name = "biases")
            tf.summary.histogram('biases_%s'%layer_name,biases)
    output_temp = tf.add(tf.matmul(input_x,Weights) , biases)
    with tf.name_scope("output_y"):
        if activation_function is None:
            output_y = output_temp
        else:
            output_y = activation_function(output_temp)
        tf.summary.histogram('output_y_%s'%layer_name,output_y)
    return output_y
⑥ 构建整体结构
# 第一层卷积层
layer1_Conv = conv("layer1",input_data,[11,11,3,96],4,activation_function = tf.nn.relu)
layer1_Pool = max_pool("layer1",layer1_Conv,[1,3,3,1])
layer1_lrn = tf.nn.local_response_normalization(layer1_Pool,5,bias = 1.0,alpha = 0.001/9,beta = 0.75,name = "lrn")
# 第二层卷积层
layer2_Conv = conv("layer2",layer1_lrn,[5,5,96,256],1,activation_function = tf.nn.relu)
layer2_Pool = max_pool("layer2",layer2_Conv,[1,3,3,1])
layer2_lrn = tf.nn.local_response_normalization(layer2_Pool,5,bias = 1.0,alpha = 0.001/9,beta = 0.75,name = "lrn")
# 第三层卷积层
layer3_Conv = conv("layer3",layer2_lrn,[3,3,256,384],1,activation_function = tf.nn.relu)
# 第四层卷积层
layer4_Conv = conv("layer4",layer3_Conv,[3,3,384,384],1,activation_function = tf.nn.relu)
# 第五层卷积层
layer5_Conv = conv("layer5",layer4_Conv,[3,3,384,256],1,activation_function = tf.nn.relu)
layer5_Pool = max_pool("layer5",layer5_Conv,[1,3,3,1])
layer5_lrn = tf.nn.local_response_normalization(layer5_Pool,5,bias = 1.0,alpha = 0.001/9,beta = 0.75,name = "lrn")
# 将特征图reshape为向量
layer5_vector = tf.reshape(layer5_lrn,[-1,tf.cast(layer5_Conv.shape[1]*layer5_Conv.shape[2]*layer5_Conv.shape[3],tf.int32)])
# 第六层全连接层
layer6_FC = full_connect("layer6",layer5_vector,4096,activation_function = tf.nn.relu)
# 第七层全连接层
layer7_FC = full_connect("layer7",layer6_FC,4096,activation_function = tf.nn.relu)
# 第八层全连接层输出
with tf.name_scope("output_y"):
	y = full_connect("output_layer",layer7_FC,1000,activation_function = tf.nn.relu)
4.总结
AlexNet 之所以能够成功,深度学习之所以能够重回历史舞台,原因在于:
1. 非线性激活函数:ReLU
2. 防止过拟合的方法:Dropout,Data augmentation
3. 大数据训练:百万级ImageNet图像数据
4. 其他:GPU实现,LRN归一化层的使用
