致力于打造最详细的Requests使用(不定期补充)
Python 2.7
IDE Pycharm 5.0.3
Requests 2.10
是时候静心下来好好研究一下Requests了
安装方法
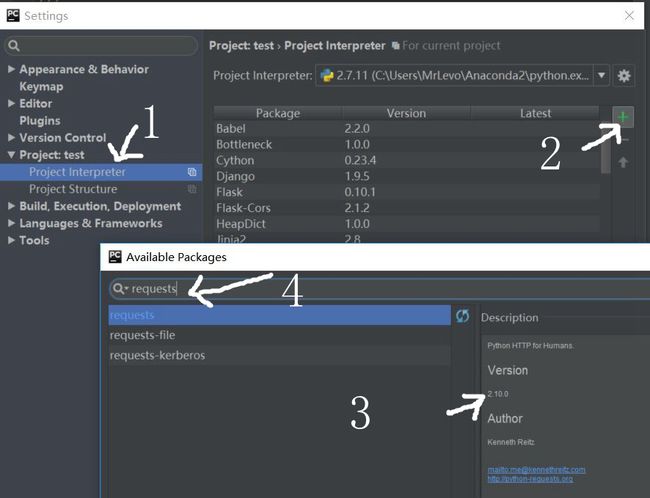
我这里只说在Pycharm+Anaconda2下怎么添加requests包,至于如何在Pycharm下安装Anaconda2,请看@zhusleep 和@木子岚的回答
然后安装大概是这样的,简单快捷,不用pip,不用easy install,anaconda2就是那么强大,吼吼吼
使用案例
获取Github的公共时间线,网址是https://github.com/timeline.json
如果你打开这个链接,那么应该是这样的

ok,在没有遇到Requests之前我们是怎么处理的呢
当然是用urllib2,urllib啦
import urllib2
url='https://github.com/timeline.json'
req=urllib2.Request(url)
response = urllib2.urlopen(req)
html = response.read()
print html难道是代码问题?
再试
import urllib2
url='http://www.bing.com'
req=urllib2.Request(url)
response = urllib2.urlopen(req)
html = response.read()
print html难道网页是动态的?那我换selenium来抓
from selenium import webdriver
url='https://github.com/timeline.json'#Github时间线
#driver = webdriver.Firefox()
driver = webdriver.PhantomJS(executable_path='phantomjs.exe')
driver.get(url)
pre = driver.find_element_by_xpath('//body/pre')
print pre.text
成功抓取,所以说,到底是什么问题呢,是不是动态网页搞得鬼呢。。。下次知道了我再补充。
补充一
首先对410 gone做个介绍
410 gone 过时
请求资源在源服务器上不再可得并且也没有转发地址可用。此条件被认为是永久的。具有链接编辑能力的客户端应该在用户确认后删除请求URI的引用。如果服务器不知道或不容易去确定条件是否是永久的,那么此404(没有发现)状态响应将被代替利用。响应是可缓存的,除非另外申明。410响应主要的目的是为了web维护任务,这通过告诉接收者资源已经不可得了并且告诉接收者服务器拥有者已经把那个资源的远程连接给移除了。对有时间限制的,推销性的服务,和对不再继续工作在服务器站点人员的资源,这个事件(410响应)是非常普遍的。它不需要把所有长久不可得的资源标记为“gone”或者保持任意长时间—这需要服务器拥有者自己的判断
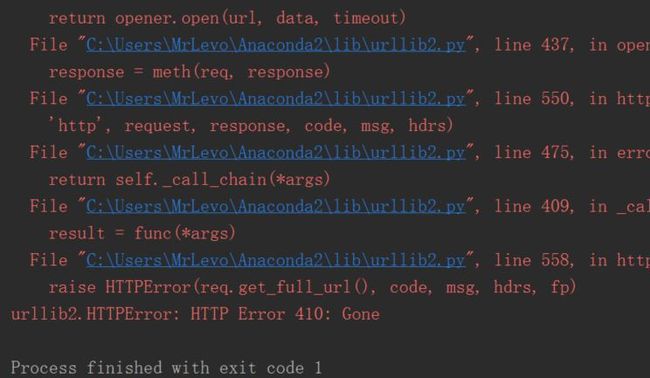
对url = 'https://github.com/timeline.json'网页,其实urllib2并没有处理出错,状态410,之后我用requests来测试状态也是如此
import requests,os,time
url = 'https://github.com/timeline.json'
start = time.clock()
html = requests.get(url,allow_redirects=True)
end = time.clock()
print html.status_code
print html.text
结果
410
{"message":"Hello there, wayfaring stranger. If you’re reading this then you probably didn’t see our blog post a couple of years back announcing that this API would go away: http://git.io/17AROg Fear not, you should be able to get what you need from the shiny new Events API instead.","documentation_url":"https://developer.github.com/v3/activity/events/#list-public-events"}
但对于requests能抓到东西urllib2表示不服,但是我仍然不清楚requests为什么能抓到东西而且这个网址的确能在浏览器打开,github真是个神奇的地方,下次知道了再进行补充
静态网页和动态网页补充
传统爬虫利用的是静态下载方式,静态下载的优势是下载过程快,但是页面只是一个枯燥的html,因此页面链接分析中获取的只是< a >标签的href属性或者高手可以自己分析js,form之类的标签捕获一些链接。在python中可以利用urllib2模块或requests模块实现功能。 动态爬虫在web2.0时代则有特殊的优势,由于网页会使用javascript处理,网页内容通过Ajax异步获取。所以,动态爬虫需要分析经过javascript处理和ajax获取内容后的页面。目前简单的解决方法是通过基于webkit的模块直接处理。PYQT4、Splinter和Selenium这三个模块都可以达到目的。对于爬虫而言,浏览器界面是不需要的,因此使用一个headless browser是非常划算的,HtmlUnit和phantomjs都是可以使用的headless browser。
正题时间
采用requests抓取
import requests
url='https://github.com/timeline.json'
html=requests.get(url)
print html.text
成功抓取如下
{"message":"Hello there, wayfaring stranger. If you’re reading this then you probably didn’t see our blog post a couple of years back announcing that this API would go away: http://git.io/17AROg Fear not, you should be able to get what you need from the shiny new Events API instead.","documentation_url":"https://developer.github.com/v3/activity/events/#list-public-events"}
Requests会自动解码来自服务器的内容。大多数unicode字符集都能被无缝地解码。请求发出后,Requests会基于HTTP头部对响应的编码作出有根据的推测。当你访问r.text 之时,Requests会使用其推测的文本编码。
感觉requests非常的简便和易读,感觉和selenium差不多,直接来个get(url)就完事了,之后抓到的直接用.text打印。
二进制响应(对于非文本)
若是对文本进行操作,返回的还是str类型,和上述的并没有什么卵区别。
import requests
url='https://github.com/timeline.json'
html_content = requests.get(url).content
print type(html_content)
print html_content<type 'str'>
{"message":"Hello there, wayfaring stranger. If you’re reading this then you probably didn’t see our blog post a couple of years back announcing that this API would go away: http://git.io/17AROg Fear not, you should be able to get what you need from the shiny new Events API instead.","documentation_url":"https://developer.github.com/v3/activity/events/#list-public-events"}
如果是对图像进行操作请看
我们导入PIL模块的Image,还有StringIO来读,试试,测试网站是一个猫奴网站网址http://placekitten.com/500/700,网页打开后应该是这样的。
StringIO介绍(乱入)
因为文件对象和StringIO大部分的方法都是一样的,比如read, readline, readlines, write, writelines都是有的,这样,StringIO就可以非常方便的作为”内存文件对象”。
首先我们用传统的urllib2进行抓取试试,
import urllib2
from PIL import Image
from StringIO import StringIO
url = 'http://placekitten.com/500/700'
req = urllib2.Request(url)
response = urllib2.urlopen(req)
html = response.read()
print type(html)
print html
i = Image.open(StringIO(html))
i.show()<type 'str'>
���� JFIF �� ;CREATOR: gd-jpeg v1.0 (using IJG JPEG v62), quality = 65
�� C ......省略n乱码使用的效果如图
然后我们使用requests,content来抓取。
from PIL import Image
from StringIO import StringIO
import requests
url = 'http://placekitten.com/500/700'
html_content = requests.get(url).content#<type 'str'>
html_text = requests.get(url).text#<type 'unicode'>
print type(html_content)
print html_content
print type(html_text)
print html_text
i = Image.open(StringIO(html_content))
i.show()<type 'str'>
���� JFIF �� ;CREATOR: gd-jpeg v1.0 (using IJG JPEG v62), quality = 65
�� C ......省略n乱码
<type 'unicode'>
���� JFIF �� ;CREATOR: gd-jpeg v1.0 (using IJG JPEG v62), quality = 65
�� C ......省略n乱码效果和上述的一样,可以成功运行,但是,如果将str流换成这样
i = Image.open(StringIO((html_text)))显然会报错,可以参考@青南的小世界 –requests的content与text导致lxml的解析问题
UnicodeEncodeError: 'ascii' codec can't encode characters in position 0-3: ordinal not in range(128)
req.text返回的是Unicode型的数据,使用req.content返回的是bytes型的数据。也就是说,在使用req.content的时候,已经自带了将源代码转化成比特数组,然后再将比特数组转化成一个比特对象。
响应json内容
Requests中也有一个内置的JSON解码器,助你处理JSON数据
import requests
url='https://github.com/timeline.json'
html_json = requests.get(url).json()
print type(html_json)
print html_json
返回的是一个dict类型
'dict'>
{
u'documentation_url': u'https://developer.github.com/v3/activity/events/#list-public-events',

u'message': u'Hello there, wayfaring stranger. If you\u2019re reading this then you probably didn\u2019t see our blog post a couple of years back announcing that this API would go away: http://git.io/17AROg Fear not, you should be able to get what you need from the shiny new Events API instead.'}
不了解json的可以看下大概是个啥
JSON(JavaScript Object Notation) 是一种轻量级的数据交换格式。它基于ECMAScript的一个子集。 JSON采用完全独立于语言的文本格式,但是也使用了类似于C语言家族的习惯(包括C、C++、C#、Java、JavaScript、Perl、Python等)。这些特性使JSON成为理想的数据交换语言。 易于人阅读和编写,同时也易于机器解析和生成(一般用于提升网络传输速率)。

OK,这里和Python中的字典并没有什么实质性区别,就当做轻量级字典结构来处理吧
查看所有键、值、(键,值)对:dict.keys()、dict.values()、dict.items();返回值的类型为列表
import requests
url='https://github.com/timeline.json'
html_json = requests.get(url).json()
print type(html_json)
print html_json.keys()
for key in html_json:#遍历字典,默认为键
    print key
for values in html_json.values():
    print values
'dict'>
#--------------------------------#
[u'documentation_url', u'message']
#--------------------------------#
documentation_url
message
#--------------------------------#
https://developer.github.com/v3/activity/events/#list-public-events
Hello there, wayfaring stranger. If you’re reading this then you probably didn’t see our blog post a couple of years back announcing that this API would go away: http://git.io/17AROg Fear not, you should be able to get what you need from the shiny new Events API instead.
好吧,又跑题了。。。。
定制请求头
如果你想为请求添加HTTP头部,只要简单地传递一个 dict 给 headers 参数就可以了。
这里需要导入json,凡是和字典有关的,应该想到json,不然我上面写那么多json干啥。。。
import requests,json
url = 'https://api.github.com/some/endpoint'
payload = {'some': 'data'}
headers = {'content-type': 'application/json'}
html_json = requests.post(url,data=json.dumps(payload),headers=headers)
print html_json
print html_json.text<Response [404]>
{"message":"Not Found","documentation_url":"https://developer.github.com/v3"}
so,WTF,为什么模拟实验不成功呢@逆向行驶–Python Requests-学习笔记(4)-定制请求头和POST ,404错误,指定的网页不存在啊喂,换了个网址,这个http://httpbin.org/post
import requests,json
url = 'http://httpbin.org/post'
payload = {'some': 'data'}
headers = {'content-type': 'application/json'}
html_json = requests.post(url,data=json.dumps(payload),headers=headers)
print html_json
print html_json.text
200]>
{
"args": {},
"data": "{\"some\": \"data\"}",
"files": {},
"form": {},
"headers": {
"Accept": "*/*",
"Accept-Encoding": "gzip, deflate",
"Content-Length": "16",
#增加了Content-Type
"Content-Type": "application/json",
"Host": "httpbin.org",
"User-Agent": "python-requests/2.10.0"
},
#增加了json
"json": {
"some": "data"
},
"origin": "221.212.116.44",
"url": "http://httpbin.org/post"
} 增加Form
form 标签:用于创建 HTML 表单。
import requests,json
url = 'http://httpbin.org/post'
payload = {'key1': 'values1','key2': 'values2'}
html_json = requests.post(url,data=payload)
print html_json
print html_json.text
结果就是
200]>
{
  "args": {},
  "data": "",
  "files": {},
  #增加了表单
  "form": {
    "key1": "values1",
    "key2": "values2"
  },
  "headers": {
    "Accept": "*/*",
    "Accept-Encoding": "gzip, deflate",
    "Content-Length": "25",
    "Content-Type": "application/x-www-form-urlencoded",
    "Host": "httpbin.org",
    "User-Agent": "python-requests/2.10.0"
  },
  "json": null,
  "origin": "221.212.116.44",
  "url": "http://httpbin.org/post"
}
POST一个多部分编码(Multipart-Encoded)的文件
这里我添加了一个以前写的记录在txt文件中的一段话
import requests,json
url = 'http://httpbin.org/post'
files = {'file':open('Inception.txt','rb')}
html_file = requests.post(url,files=files)
print html_file
print html_file.text<Response [200]>
{
"args": {},
"data": "",
"files": {
"file": "\r\n-------------------------------------\u6211\u662f\u5206\u5272\u7ebf-----------------------------------------\r\nInception .............此处省略n个"
},
"form": {},
"headers": {
"Accept": "*/*",
"Accept-Encoding": "gzip, deflate",
"Content-Length": "32796",
"Content-Type": "multipart/form-data; boundary=a4ba16fec9054637b7cb6f264013988b",
"Host": "httpbin.org",
"User-Agent": "python-requests/2.10.0"
},
"json": null,
"origin": "221.212.116.44",
"url": "http://httpbin.org/post"
}
既然刚学了json,那我就把它用json保存下来,然后再用字典查询的方法,看看能不能把上传的file是不是本地的file
再上述程序下添加:
print html_file.json()
print html_file.json()['files']['file']#字典取value的结构
结果就是
{u'files': {u'file': u'\r\n-------------------------------------\u6211\u662f\u5206\u5272\u7ebf---------.........省略n个
-------------------------------------我是分割线-----------------------------------------
Inception 情节逻辑完全解析 (有不明白地方的进,没看过的别进)...省略n个字符
所以证明了,我上传成功了,只是被编码为unicode而已,而print自带将unicode转为utf-8的,so,验证成功,推荐个转码小工具编码转换工具
另一个题外话
当我自己写一个新的txt(测试那个txt是机器写的),像这样,再上传,在抓下来,发现已经被bsae64编码了,
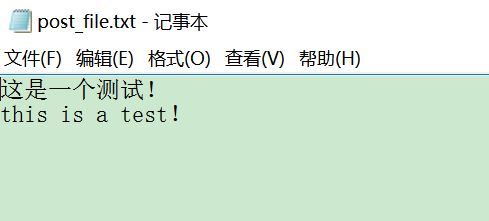
import requests,json
url = 'http://httpbin.org/post'
files = {'file':open('post_file.txt','rb')}
html_file = requests.post(url,files=files)
print html_file.text
print html_file.json()['files']['file']
结果是这样的
{
  "args": {},
  "data": "",
  "files": {
    "file": "data:application/octet-stream;base64,1eLKx9K7uPay4srUo6ENCnRoaXMgaXMgYSB0ZXN0o6E="
  },
  "form": {},
  "headers": {
    "Accept": "*/*",
    "Accept-Encoding": "gzip, deflate",
    "Content-Length": "181",
    "Content-Type": "multipart/form-data; boundary=6cd3e994e14d428e9df61d7e1aade15e",
    "Host": "httpbin.org",
    "User-Agent": "python-requests/2.10.0"
  },
  "json": null,
  "origin": "221.212.116.44",
  "url": "http://httpbin.org/post"
}

data:application/octet-stream;base64,1eLKx9K7uPay4srUo6ENCnRoaXMgaXMgYSB0ZXN0o6E=
并未如我所愿,直接打印出我上传的txt中的文件,而是还需要在解码,先看看内容是不是我想要的,上小工具Base64在线编码解码 UTF-8
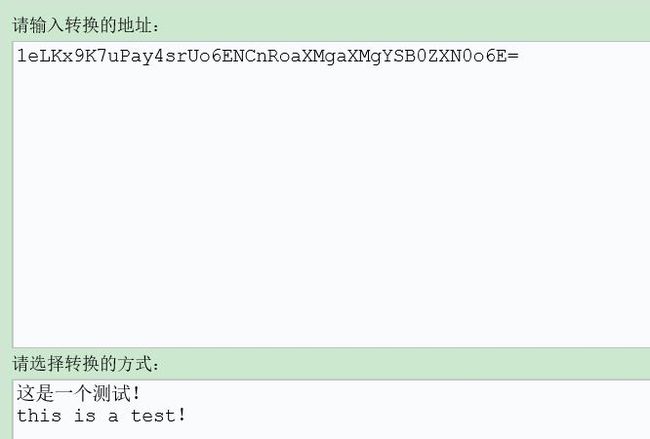
OK,说明的确是我想要的,只是被编码了而已,那就尝试自己解码
print base64.b64decode('1eLKx9K7uPay4srUo6ENCnRoaXMgaXMgYSB0ZXN0o6E=')
结果是
����һ�����ԣ�
this is a test��说好的base64解码呢!!!怎么中文和感叹号又是乱码!难道和我写入txt时候编码有关。。。神烦编码。。。
再进行测试
import base64
s = '1eLKx9K7uPay4srUo6ENCnRoaXMgaXMgYSB0ZXN0o6E='
h ='这是一个测试!this is a test!'
f = base64.b64encode(h)
print f
print base64.b64decode(f)
输出
6L+Z5piv5LiA5Liq5rWL6K+V77yBdGhpcyBpcyBhIHRlc3Qh
这是一个测试!this is a test!
这就可行??
再放到那个工具下看看
补充二
上述出现乱码的问题出在我编辑txt文件时候采用的ANSI编码
多亏[Python爬虫] 中文编码问题:raw_input输入、文件读取、变量比较等str、unicode、utf-8转换问题 的启发,我才看到原来是这样,所以我就把文件保存格式转化成utf-8,问题顺利解决,而且都不用进行base64解码
import requests

url = 'http://httpbin.org/post'
files = {'file':open('post_file.txt','rb')}
html_file = requests.post(url,files=files)
print html_file.text
print html_file.json()['files']['file']
运行结果如下
{
  "args": {},
  "data": "",
  "files": {
    "file": "\ufeff\u8fd9\u662f\u4e00\u4e2a\u6d4b\u8bd5!\r\nthis is a test!"
  },
  "form": {},
  "headers": {
    "Accept": "*/*",
    "Accept-Encoding": "gzip, deflate",
    "Content-Length": "188",
    "Content-Type": "multipart/form-data; boundary=c95fbf7e4012470792ca6db843c0b3d1",
    "Host": "httpbin.org",
    "User-Agent": "python-requests/2.10.0"
  },
  "json": null,
  "origin": "183.248.200.49",
  "url": "http://httpbin.org/post"
}

这是一个测试!
this is a test!
我们可以看到files添加部分变成了
\ufeff\u8fd9\u662f\u4e00\u4e2a\u6d4b\u8bd5!\r\nthis is a test!这是典型的unicode啊,而print unicode码是直接进行utf-8转化的,验证想法;
print type(html_file.json()['files']['file'])果然
<type 'unicode'>响应status状态,响应header
就是字典的操作而已啦。。。。
import requests
url = 'http://httpbin.org/get'

html = requests.get(url)
print html.status_code
print html.headers
print html.headers.get('Content-Length')
print html.headers['Content-Length']#采用字典形式
200
{'Content-Length': '239', 'Server': 'nginx', 'Connection': 'keep-alive', 'Access-Control-Allow-Credentials': 'true', 'Date': 'Sun, 24 Jul 2016 09:05:02 GMT', 'Access-Control-Allow-Origin': '*', 'Content-Type': 'application/json'}
239
239如果返回404,那就是无法get到网页了,也可以用这个模拟一下
import requests
url = 'http://httpbin.org/status/404'
html = requests.get(url)
print html.status_code404访问Cookies
获取cookies,以自己学校的教务处为例
import requests
url ='http://yjsymis.hrbeu.edu.cn/gsmis/Image.do'
html = requests.get(url)
print html.cookies['JSESSIONID']
因为采取的是验证码的cookies,所以每次都不一样
2D5E260E4BB9C58E9CD21792F42D14BA要想发送你的cookies到服务器,可以使用 cookies 参数:
import requests
url = 'http://httpbin.org/cookies'
html = requests.get(url)
cookies = dict(cookies_new = 'new one')
html_cookies = requests.get(url,cookies=cookies)
print html_cookies.text
{
"cookies": {
"cookies_new": "new one"
}
}补充三:处理登录和cookie
cookie简介:使用cookie跟踪用户是否已登录状态信息,一旦网站验证了你的登录权限,它就会将他们保存在你的浏览器的cookie中,里面通常包含一个服务器生成的令牌,登录有效时限和状态跟踪信息。
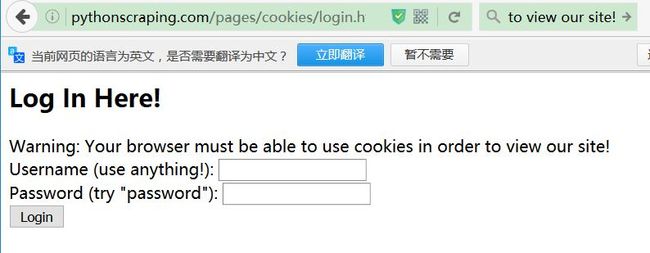
首先是三个页面,正常来说,我们进行操作的是登录页面
http://pythonscraping.com/pages/cookies/login.html但是,如果采用post填充表格的话,其实可以省去登录页面,一个post加上登录所需的账号密码即可进行填充表单。
登陆后欢迎页面是(直接输入网址因为没有登录信息所以显示未登录状态)
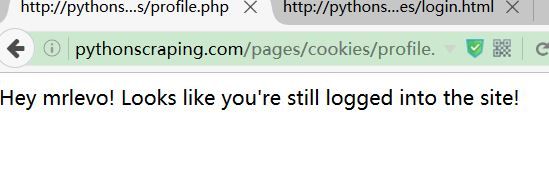
http://pythonscraping.com/pages/cookies/welcome.php最后利用刚才登录好的cookies,再获取登录简介后的页面
http://pythonscraping.com/pages/cookies/profile.php完整操作如下
import requests

url = 'http://pythonscraping.com/pages/cookies/welcome.php'
#构造表单params
params = {'username': 'mrlevo', 'password': 'password'}
#先进行提交表单,填充账号密码
r = requests.post('http://pythonscraping.com/pages/cookies/welcome.php',params)
#在利用登录后的cookies进行get内容操作
r = requests.get('http://pythonscraping.com/pages/cookies/profile.php',cookies = r.cookies)
print r.text
IDE输出结果
Hey mrlevo! Looks like you're still logged into the site!所出现的效果和自己手动操作浏览器是一样的,但是简略了很多。
如果刚开始就不需要cookies而且网站比较复杂,它会暗自调整cookie时候,采用session函数进行解决,他能持续跟踪会话信息,比如cookie,header,甚至运行HTTP协议的信息,比如HTTPAdapter
例子如下,效果同上
import requests

url = 'http://pythonscraping.com/pages/cookies/welcome.php'
#构造表单params
params = {'username': 'mrlevo', 'password': 'password'}
#先进行提交表单,填充账号密码
r = requests.Session().post(url,params)
#在利用登录后的cookies进行get内容操作
r = requests.Session().get('http://pythonscraping.com/pages/cookies/profile.php',cookies = r.cookies)
print r.text
补充四:HTTP基本接入认证
在cookie出现之前,处理网站登录最常用的方法是用HTTP基本接入认证,测试网址采用Python网络数据采集[美]Ryan Mitchell这本书采用的例子
http://pythonscraping.com/pages/auth/login.php出现的效果是这样的,需要进行用户名的登录验证
import requests
from requests.auth import AuthBase
from requests.auth import HTTPBasicAuth

url = 'http://pythonscraping.com/pages/auth/login.php'
auth = HTTPBasicAuth('mrlevo','password')
r = requests.post(url = url,auth = auth)
print r.text
在IDE中输出效果是
<p>Hello mrlevo.p><p>You entered password as your password.p>重定向,请求历史与超时
首先使用自己的图书馆登录系统来试验一下。
import requests
url = 'http://lib.hrbeu.edu.cn/'
html = requests.get(url)
print html.status_code
print html.history
200
[]第二个返回了空列表,导演,这和网上的写的不一样啊。
原来,还有这么一段话,并不是所有网页都会处理重定向的,例子中用了Github,我抖机灵的以为,所有网页都会和例子中的一样。。下面是正经例子
import requests
url = 'http://github.com'
html = requests.get(url)
print html.status_code
print html.history
标准答案
200
[301]>]
使用GET或OPTIONS时,Requests会自动处理位置重定向。Github将所有的HTTP请求重定向到HTTPS。可以使用响应对象的 history 方法来追踪重定向。
老老实实抄原话
Response.history 是一个:class:Request 对象的列表,为了完成请求而创建了这些对象。这个对象列表按照从最老到最近的请求进行排序。如果你使用的是GET或OPTIONS,那么你可以通过 allow_redirects 参数禁用重定向处理:
import requests
url = 'http://github.com'
html = requests.get(url,allow_redirects=False)
print html.status_code
print html.history
301
[]顺便说一下301错误
301代表永久性转移(Permanently Moved),301重定向是网页更改地址后对搜索引擎友好的最好方法,只要不是暂时搬移的情况,都建议使用301来做转址。
如果你使用的是POST,PUT,PATCH,DELETE或HEAD,你也可以启用重定向:
顺便说下重定向是啥-from 百度百科
import requests
url = 'http://github.com'
html = requests.get(url,allow_redirects=True)
print html.status_code
print html.url
print html.history
200
https://github.com/
[] 超时这个反而是最好理解的,如果在timeout时间还未做出响应,那就抛出错误,你时间设置的越短,响应需要越快才能不报错,也是对时间的有效利用和防止一直不断获取
import requests
url = 'http://github.com'
html = requests.get(url,allow_redirects=True,timeout=1)
print html.status_code200时间设置短一点的话,
import requests
url = 'http://github.com'
html = requests.get(url,allow_redirects=True,timeout=0.1)
print html.status_code
抛出如下错误
requests.exceptions.ConnectTimeout: HTTPConnectionPool(host='github.com', port=80): Max retries exceeded with url: / (Caused by ConnectTimeoutError(0x0000000003584550>, 'Connection to github.com timed out. (connect timeout=0.1)'))
timeout 仅对连接过程有效,与响应体的下载无关。
也就是说,你如果requests一个图片网站,图片下载并不和timeout时间有关,而是和连接到图片网址的时间有关
错误与异常
遇到网络问题(如:DNS查询失败、拒绝连接等)时,Requests会抛出一个ConnectionError 异常。
比如说,我们来访问谷歌
import requests
url = 'http://google.com'
html = requests.get(url,allow_redirects=True)
print html.status_code
很放心的抛出了ConnectionError
ConnectionError: HTTPConnectionPool(host='google.com', port=80): Max retries exceeded with url: / (Caused by NewConnectionError('0x0000000003328550>: Failed to establish a new connection: [Errno 10060] ',))
遇到罕见的无效HTTP响应时,Requests则会抛出一个 HTTPError 异常。
这个等我遇到了我再放上例子
若请求超时,则抛出一个 Timeout 异常。若请求超过了设定的最大重定向次数,则会抛出一个 TooManyRedirects 异常。所有Requests显式抛出的异常都继承自 requests.exceptions.RequestException 。
Requests的一些编码问题
在尝试用Requests+BeautifulSoup进行练习的时候发现,其解码方式和urllib2有点区别。
比如说,我采集网易主页http://www.163.com/网易采用的是gbk编码方式,使用urllib2时候,我们一般进行decode处理
就像这样
import urllib2
url='http://www.163.com'
html_url = urllib2.urlopen(urllib2.Request(url))
print html_url.read().decode('gbk')
来达到编码转换的目的,而requests则不是,刚开始我想当然的以为可以这样进行编码解码,其实不然,需要这样
html.encoding = 'gbk'来规定编码方式,完整如下
import requests
from bs4 import BeautifulSoup
url='http://www.163.com'
html = requests.get(url)
html.encoding = 'gbk'
bs = BeautifulSoup(html.text,'lxml')
print bs.prettify()
(这里编码查看建议使用360浏览器,点击页面,右键,编码,就可以看到编码格式,当然你可以看打开检查元素查看,其余的功能还是谷歌和firefox强一些,所以说,我现在有四个浏览器,各取所需吧,并不是说谷歌和firefox最好,只是某些方面)

值得注意的是,当页面是utf-8编码的时候,以http://www.feng.com/为例,采用urllib2不需要进行解码操作,本身IDE编码格式就是utf-8,但是,requests则仍要进行编码规定,(具体原因我还不是很清楚,下次补充),不然会乱码,那是相当的乱,不忍直视的乱,像这样↓
只要改这个就可以了
html.encoding = 'utf-8'其余不变(url当然得换),就可以输出中文操作,哎,又涨了点姿势
更新
1.于2016.7.24 18:12第一次撰写
2.于2016.7.25 10:25第二次撰写
3.于2016.7.27 14:13第三次撰写
4.于2016.7.28 11:02第四次撰写
5.于2016.8.31 14:18第五次撰写
致谢
Python网络数据采集[美]Ryan Mitchell
原–Python Requests快速入门
转–Python Requests快速入门
转–HTTP Get,Post请求详解
转–python模块之StringIO使用示例
@青南的小世界 –requests的content与text导致lxml的解析问题
@mmc2015–python的【字典dict】:创建、访问、更新、删除;查看键、值、键值对;遍历;排序
@我们都是从菜鸟开始–HTML table、form表单标签的介绍
@廖雪峰–base64
@上帝在云端–python爬虫 - Urllib库及cookie的使用
@百度百科–网页重定向
@Eastmount–[Python爬虫] 中文编码问题:raw_input输入、文件读取、变量比较等str、unicode、utf-8转换问题
A&Q–使用requests库抓取页面的时候的编码问题
