spring cloud bus动态更新配置
spring cloud bus动态更新配置
- 1.创建eureka-server
- 1.1 在`pom.xml`中添加`spring-cloud-starter-netflix-eureka-server`依赖
- 1.2 在application.yml中增加eureka-server配置
- 1.3 开启eureka-server
- 2.创建config-server
- 2.1 在pom.xml中添加config server依赖
- 2.2 在application.yml中指定配置文件的位置(本实例使用的是阿里云代码仓库)
- 2.3 开启配置ConfigServer
- 3. 创建测试用例
- 3.1 创建eureka-client用例(本实例使用rabbitmq自动化配置)
- 3.2 添加客户端配置
- 3.3 在代码仓库中添加配置文件
- 3.4 测试controller
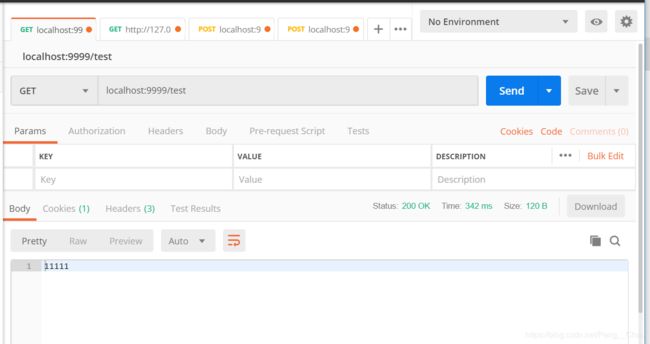
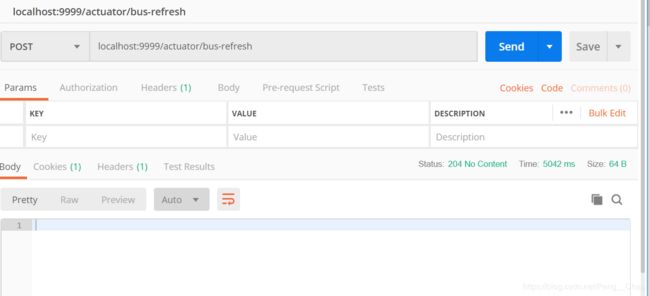
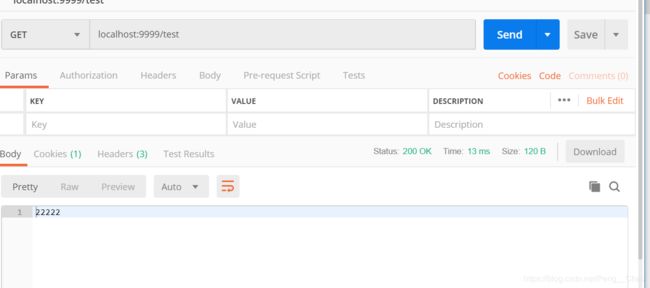
- 3.5 测试截图
1.创建eureka-server
1.1 在pom.xml中添加spring-cloud-starter-netflix-eureka-server依赖
	<dependency>
			<groupId>org.springframework.cloudgroupId>
			<artifactId>spring-cloud-starter-netflix-eureka-serverartifactId>
		dependency>
1.2 在application.yml中增加eureka-server配置
server:
  port: 8761 #端口
eureka:
  server:
    eviction-interval-timer-in-ms: 30000 #过期实例应该启动并运行的时间间隔,单位为毫秒
    enable-self-preservation: false #自我保护模式,当出现出现网络分区、eureka在短时间内丢失过多客户端时,会进入自我保护模式,即一个服务长时间没有发送心跳,eureka也不会将其删除,默认为true
  client:
    register-with-eureka: false #实例是否在eureka服务器上注册自己的信息以供其他服务发现,默认为true
    fetch-registry: false #此客户端是否获取eureka服务器注册表上的注册信息,默认为true
    filterOnlyUpInstances: false # 是否获得处于开启状态的实例的应用程序过滤之后的应用程序。默认为true
1.3 开启eureka-server
在spring boot入口类中使用@EnableEurekaServer开启eureka-server
package com.iflytek.eurekaserver;

import org.springframework.boot.SpringApplication;
import org.springframework.boot.autoconfigure.SpringBootApplication;
import org.springframework.cloud.netflix.eureka.server.EnableEurekaServer;

@SpringBootApplication
@EnableEurekaServer
public class EurekaServerApplication {

	public static void main(String[] args) {
		SpringApplication.run(EurekaServerApplication.class, args);
	}

}
2.创建config-server
2.1 在pom.xml中添加config server依赖
spring-cloud-config-server:ConfigServer依赖
spring-cloud-starter-netflix-eureka-server:eureka client配依赖
<dependencies>
		<dependency>
			<groupId>org.springframework.cloudgroupId>
			<artifactId>spring-cloud-config-serverartifactId>
		dependency>
		<dependency>
			<groupId>org.springframework.cloudgroupId>
			<artifactId>spring-cloud-starter-netflix-eureka-serverartifactId>
			<version>2.1.1.RELEASEversion>
		dependency>
		<dependency>
			<groupId>org.springframework.bootgroupId>
			<artifactId>spring-boot-starter-testartifactId>
			<scope>testscope>
		dependency>
	dependencies>
2.2 在application.yml中指定配置文件的位置(本实例使用的是阿里云代码仓库)
spring:
  application:
    name: config-service
  cloud:
    config:
      server:
        git:
          uri: https://code.aliyun.com/pengchao/spring-cloud-config.git
          username: xxxxx
          password: xxxxx

server:
  port: 8888

eureka:
  instance:
    non-secure-port: 8888
    metadata-map:
      instanceId: config-service:${random.value}
  client:
    serviceUrl:
      defaultZone: http://localhost:8761/eureka/
2.3 开启配置ConfigServer
在spring boot程序入口类中使用注解@EnableConfigServer开启ConfigServer
package com.iflytek.configserver;

import org.springframework.boot.SpringApplication;
import org.springframework.boot.autoconfigure.SpringBootApplication;
import org.springframework.cloud.config.server.EnableConfigServer;
import org.springframework.cloud.netflix.eureka.EnableEurekaClient;

@SpringBootApplication
@EnableConfigServer
@EnableEurekaClient
public class ConfigServerApplication {

	public static void main(String[] args) {
		SpringApplication.run(ConfigServerApplication.class, args);
	}

}
3. 创建测试用例
3.1 创建eureka-client用例(本实例使用rabbitmq自动化配置)
<dependencies>
		<dependency>
			<groupId>org.springframework.cloudgroupId>
			<artifactId>spring-cloud-starter-netflix-eureka-serverartifactId>
			<version>2.1.1.RELEASEversion>
		dependency>
		<dependency>
			<groupId>org.springframework.bootgroupId>
			<artifactId>spring-boot-starter-webartifactId>
		dependency>
		<dependency>
			<groupId>org.springframework.cloudgroupId>
			<artifactId>spring-cloud-starter-configartifactId>
		dependency>
		<dependency>
			<groupId>org.springframework.cloudgroupId>
			<artifactId>spring-cloud-starter-bus-amqpartifactId>
		dependency>
		<dependency>
			<groupId>org.springframework.bootgroupId>
			<artifactId>spring-boot-starter-actuatorartifactId>
		dependency>

		<dependency>
			<groupId>org.springframework.bootgroupId>
			<artifactId>spring-boot-starter-testartifactId>
			<scope>testscope>
		dependency>
	dependencies>
3.2 添加客户端配置
- (1)在
application.yml中添加rabbitmq及eureka-server配置
spring:
  rabbitmq:
    host: 127.0.0.1
    port: 5672
    username: guest
    password: guest
server:
  port: 9999

eureka:
  client:
    service-url:
      default-zone: http://localhost:8761/eureka/
- (2)在
bootstrap.yml添加config-server地址、项目名
spring:
  cloud:
    config:
      uri: http://127.0.0.1:8888
  profiles:
    active: dev
  application:
    name: eureka-client
management:
  endpoints:
    web:
      exposure:
        include: "*"
3.3 在代码仓库中添加配置文件
在https://code.aliyun.com/pengchao/spring-cloud-config.git中添加测试用例的配置文件eureka-client-dev.yml
test: 11111
3.4 测试controller
package com.iflytek.eurekaclient.controller;

import org.springframework.beans.factory.annotation.Value;
import org.springframework.cloud.context.config.annotation.RefreshScope;
import org.springframework.web.bind.annotation.RequestMapping;
import org.springframework.web.bind.annotation.RestController;

@RestController
@RefreshScope
public class TestController {

    @Value("${test}")
    private String test;

    @RequestMapping("/test")
    public String test() {
        return test;
    }
}
3.5 测试截图
test: 22222


