Android Service详解(五)---绑定服务BoundService详解之AIDL的使用
Android Service详解(五)---绑定服务BoundService详解之AIDL的使用
这是第四篇文章主要讲的是绑定服务BoundService之AIDL的使用
回顾:
回顾:
Android Service详解(一)---概述和StartService
Android Service详解(二)---StartService
Android Service详解(三)---IntentService
Android Service详解(四)---绑定服务BoundService详解之扩展Binder类
一、什么是AIDL
AIDL(Android Interface Definition Language)安卓接口定义语言
二、为什么使用AIDL呢?
如果将Service变成远程Service的话,使用扩展的Binder进行通信会报错:
这是由于在Bind Service按钮的点击事件里面我们会让MainActivity和MyService建立关联,但是目前MyService已经是一个远程Service了,Activity和Service运行在两个不同的进程当中,这时就不能再使用传统的建立关联的方式,程序也就崩溃了。
那么如何才能让Activity与一个远程Service建立关联呢?这就要使用AIDL来进行跨进程通信了(IPC)。
三、使用步骤
1.创建一个服务重写这四个方法
onServiceConnected()方法是绑定服务异常终止是调用的方法
@Override
public void onCreate() {
    super.onCreate();
}

@Override
public IBinder onBind(Intent intent) {
    // TODO: Return the communication channel to the service.
    throw new UnsupportedOperationException("Not yet implemented");
}

@Override
public boolean onUnbind(Intent intent) {
    return super.onUnbind(intent);
}

@Override
public void onDestroy() {
    super.onDestroy();
}private ServiceConnection conn = new ServiceConnection() {
@Override
public void onServiceConnected(ComponentName componentName, IBinder iBinder) {
}
@Override
public void onServiceDisconnected(ComponentName componentName) {
}
};onServiceConnected()方法是绑定服务异常终止是调用的方法
3.进行绑定
bindService(Intent,ServiceConnection对象,常量)
第一个参数:Intent指示对应的Service对象
第二个参数:实现了 ServiceConnection接口的对象
第三个参数:Flags
在进行服务绑定时,其标志位可以为BIND_AUTO_CREATE、BIND_DEBUG_UNBIND和BIND_NOT_FOREGROUND等。
Intent intent = new Intent(this, MyBoundService.class);
bindService(intent, conn, BIND_AUTO_CREATE);bindService(Intent,ServiceConnection对象,常量)
第一个参数:Intent指示对应的Service对象
第二个参数:实现了 ServiceConnection接口的对象
第三个参数:Flags
在进行服务绑定时,其标志位可以为BIND_AUTO_CREATE、BIND_DEBUG_UNBIND和BIND_NOT_FOREGROUND等。
其中BIND_AUTO_CREATE表示当收到绑定请求时,如果服务尚未创建,则即刻创建,在系统内存不足,需要先销毁优先级组件来释放内存,且只有驻留该服务的进程成为被销毁对象时,服务才可被销毁;BIND_DEBUG_UNBIND通常用于调试场景中判断绑定的服务是否正确,但其会引起内存泄漏,因此非调试目的不建议使用;BIND_NOT_FOREGROUND表示系统将阻止驻留该服务的进程具有前台优先级,仅在后台运行,该标志位在Froyo中引入。
4.解除绑定
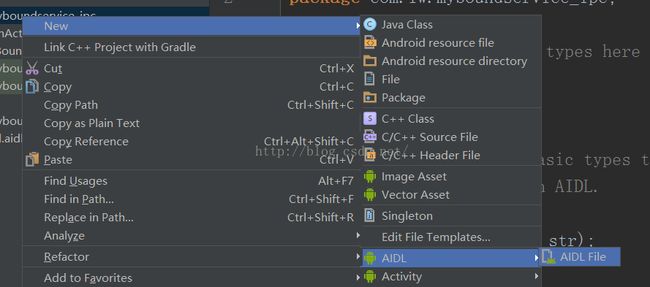
一个AIDL文件
不能有修饰符,类似接口的写法
支持类型8种基本数据类型String, CharSequence,List,Map,自定义类型
不能有修饰符,类似接口的写法
支持类型8种基本数据类型String, CharSequence,List
interface MyAidl {
    /**
     * Demonstrates some basic types that you can use as parameters
     * and return values in AIDL.
     */
     void setString(String str);
     String desc();
    void basicTypes(int anInt, long aLong, boolean aBoolean, float aFloat,
            double aDouble, String aString);
}
会自动生成一个文件切换到Project模式下可以看到
这个生成的类不要编辑
静态的抽象类Stub(存根)类集成了Binder实定义的接口
Proxy代理的设计模式,工作,去除了我们需要通讯需要的操作
Proxy代理的设计模式,工作,去除了我们需要通讯需要的操作
9.创建一个业务类实现Stub接口的方法,在这里写业务的实现方法
public class MyImpl extends MyAidl.Stub {
    private String str;
    @Override
    public void setString(String str) throws RemoteException {
        this.str = str;
    }

    @Override
    public String desc() throws RemoteException {
        return "这是传递来的数据"+str;
    }

    @Override
    public void basicTypes(int anInt, long aLong, boolean aBoolean, float aFloat, double aDouble, String aString) throws RemoteException {

    }
}
10.在创建的服务类中的
@Override
public IBinder onBind(Intent intent) {
    // TODO: Return the communication channel to the service.
    throw new UnsupportedOperationException("Not yet implemented");
}
返回实现类
@Override
public IBinder onBind(Intent intent) {
    // TODO: Return the communication channel to the service.
    return new Impl();
}
11.在Activity中创建一个通用的接口
private IMyAidlInterface iMyAidlInterface;iMyAidlInterface = IMyAidlInterface.Stub.asInterface(iBinder);
13.实例话后调用业务实现方法
private ServiceConnection conn = new ServiceConnection() {
    @Override
    public void onServiceConnected(ComponentName componentName, IBinder iBinder) {
        iMyAidlInterface = IMyAidlInterface.Stub.asInterface(iBinder);
        Log.e("ceshi", "绑定");
        Log.e("ceshi", iMyAidlInterface.toString());
        myBound = true;
    }
源码会在下一篇博客一起更新


