tensorflow2.0笔记11:误差计算之MSE,Cross Enropy!
| 误差计算! |
文章目录
- 一、误差计算
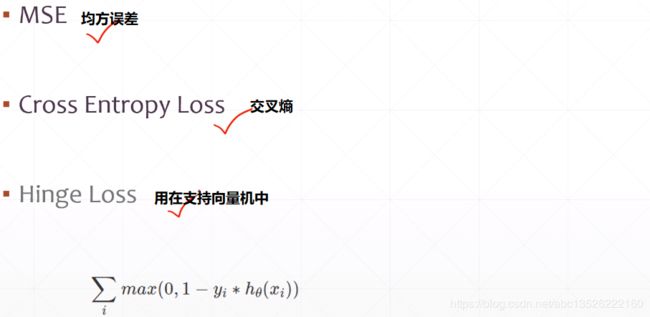
- 1.1、均方误差-MSE
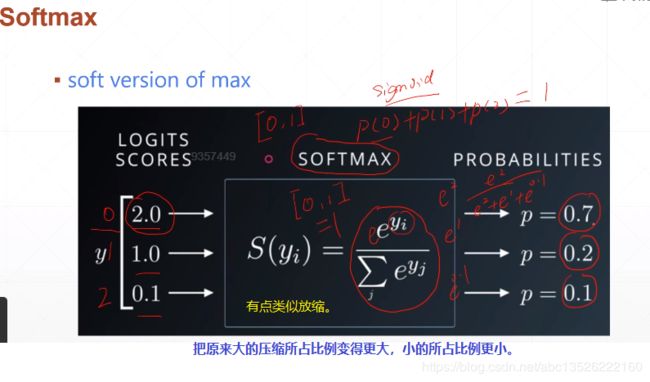
- 1.2.1、softmax
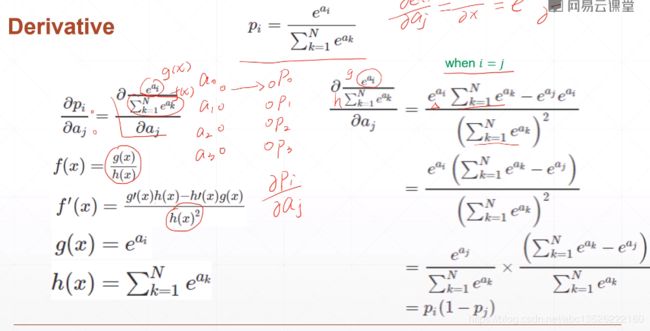
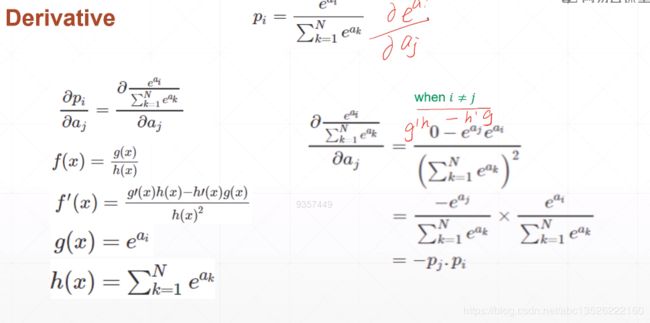
- 1.2.1、softmax函数求导。
- 1.2、交叉熵-Entropy
- 1.2.1、二分类的2中方式
- 1.3、为什么不直接MSE而是交叉熵
一、误差计算
1.1、均方误差-MSE
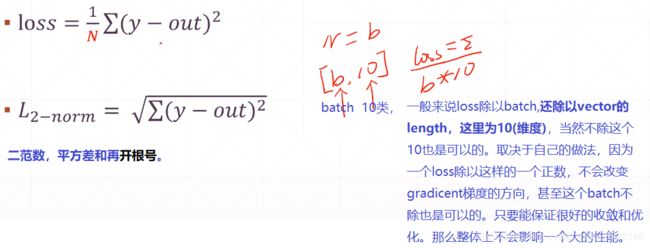
提示: 关于loss的放缩可以参考:2.3、关于loss的放缩
- 实战演练:
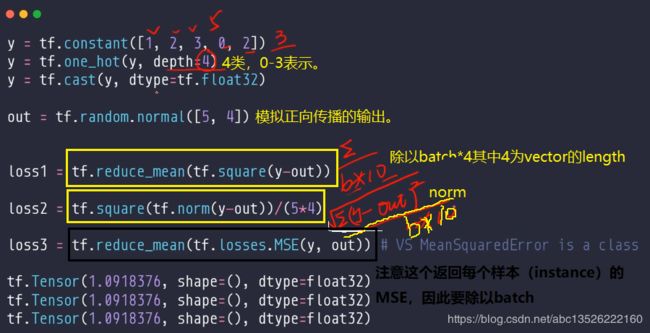
- 代码如下:
import tensorflow as tf

y = tf.constant([1, 2, 3, 0, 2])
y = tf.one_hot(y, depth=4)
y = tf.cast(y, dtype=tf.float32)
print(y.numpy())

out = tf.random.normal([5, 4])

loss1 = tf.reduce_mean(tf.square(y-out))
loss2 = tf.square(tf.norm(y-out))/(5*4)
loss3 = tf.reduce_mean(tf.losses.MSE(y, out))
print(loss1)
print(loss2)
print(loss3)
- 输出结果:这三个结果是一样的。
ssh://[email protected]:22/home/zhangkf/anaconda3/envs/tf2.0/bin/python -u
[[0. 1. 0. 0.]
 [0. 0. 1. 0.]
 [0. 0. 0. 1.]
 [1. 0. 0. 0.]
 [0. 0. 1. 0.]]
tf.Tensor(0.9701576, shape=(), dtype=float32)
tf.Tensor(0.9701576, shape=(), dtype=float32)
tf.Tensor(0.9701575, shape=(), dtype=float32)
Process finished with exit code 0
import tensorflow as tf

x = tf.random.normal([2, 4])
w = tf.random.normal([4, 3])
b = tf.zeros([3])
y = tf.constant([2, 0])  #标签值

with tf.GradientTape() as tape:
    tape.watch([w, b])
    prob = tf.nn.softmax(x@w+b, axis=1)
    loss = tf.reduce_mean(tf.losses.MSE(tf.one_hot(y, depth=3), prob))

grads = tape.gradient(loss, [w, b])
print(grads[0], '\n')
print(grads[1])
- 运行结果:
tf.Tensor(
[[-0.02337872  0.00822245  0.01515628]
 [-0.01459249  0.00248655  0.01210595]
 [ 0.00869678 -0.00946621  0.00076944]
 [-0.01448508  0.00319946  0.01128563]], shape=(4, 3), dtype=float32)

tf.Tensor([ 0.01823882  0.00851315 -0.02675199], shape=(3,), dtype=float32)

Process finished with exit code 0
1.2.1、softmax
1.2.1、softmax函数求导。
- 实战
import tensorflow as tf

x = tf.random.normal([2, 4])  #2个4维样本
w = tf.random.normal([4, 3])
b = tf.zeros([3])
y = tf.constant([2, 0])    #2个样本的实际标签

with tf.GradientTape() as tape:
    tape.watch([w, b])
    logits = x @ w + b
    loss = tf.reduce_mean(tf.losses.categorical_crossentropy(tf.one_hot(y, depth=3), logits, from_logits = True))

grads = tape.gradient(loss, [w, b])
print("w的偏导数:\n", grads[0])
print("b的偏导数:\n", grads[1])
- 结果:
w的偏导数:
 tf.Tensor(
[[-0.2897099   0.2045933   0.08511662]
 [-0.55175245 -0.22329342  0.77504593]
 [ 0.4987169   0.40529606 -0.904013  ]
 [-0.64258194  0.40637273  0.23620924]], shape=(4, 3), dtype=float32)
b的偏导数:
 tf.Tensor([-0.46214747  0.39923868  0.06290883], shape=(3,), dtype=float32)

Process finished with exit code 0
1.2、交叉熵-Entropy
- 熵的概念。

补充: 交叉熵的具体理解可以参考文档:交叉熵(Cross-Entropy):什么是信息量,什么熵,什么是交叉熵!
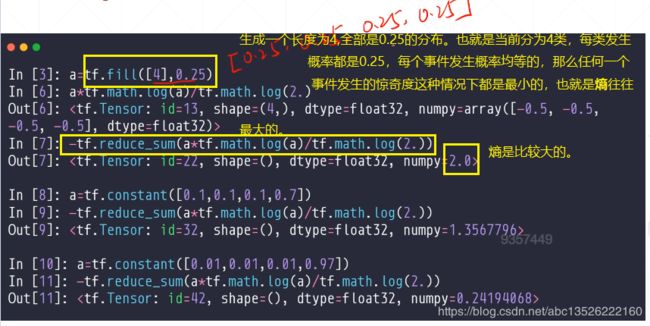
注意: 我们一般的log都是以2为底的,但是tensorflow中都是以e为底的。
- 代码
import tensorflow as tf
import os

os.environ['TF_CPP_MIN_LOG_LEVEL'] = '2'

a = tf.fill([4],0.25)
b = tf.math.log(a) / tf.math.log(2.)  #tensorflow中默认以e为底,变为2为底。
print(b)
print(-tf.reduce_sum(a*b).numpy())

a1 = tf.constant([0.1, 0.1, 0.1, 0.7])
b1 = tf.math.log(a1) / tf.math.log(2.)  #tensorflow中默认以e为底,变为2为底。
print(-tf.reduce_sum(a1*b1).numpy())

a2 = tf.constant([0.01, 0.01, 0.01, 0.97])
b2 = tf.math.log(a2) / tf.math.log(2.)  #tensorflow中默认以e为底,变为2为底。
print(-tf.reduce_sum(a2*b2).numpy())
- 测试结果:
ssh://[email protected]:22/home/zhangkf/anaconda3/envs/tf2.0/bin/python -u /home/zhangkf/tmp/pycharm_project_258/demo/TF2/out.py
tf.Tensor([-2. -2. -2. -2.], shape=(4,), dtype=float32)
2.0
1.3567797
0.24194068

Process finished with exit code 0
- 交叉熵的概念。指2个分布之间的信息的衡量标准。

1.2.1、二分类的2中方式
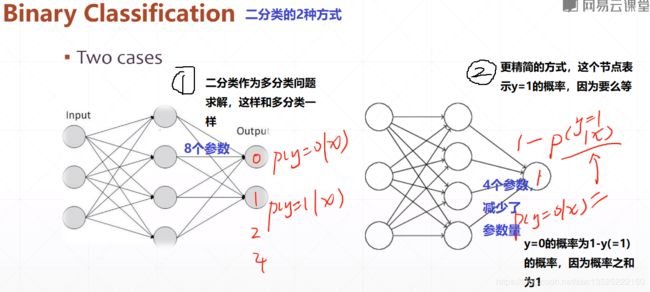
- Single output(第二种方式)
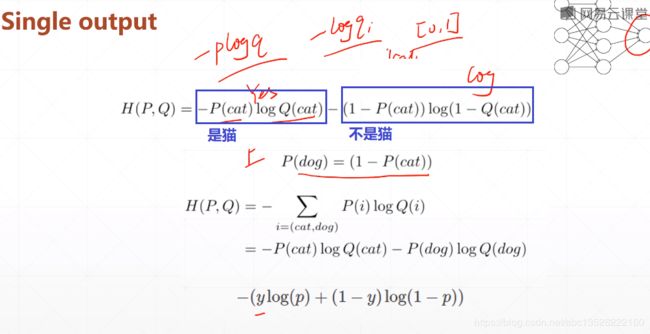
- 第一种方式;多分类一样。

以五分类为例子分析,如何优化loss。

- 实例分析1:
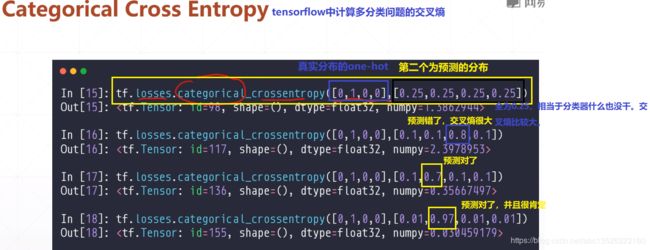
import tensorflow as tf
import os

os.environ['TF_CPP_MIN_LOG_LEVEL'] = '2'
loss = tf.losses.categorical_crossentropy([0,1,0,0],[0.25,0.25,0.25,0.25]) #tensorflow中计算多分类的交叉熵。
print(loss.numpy())    #交叉熵表示不确定度,预测概率越大越确定,交叉熵越小。

loss1 = tf.losses.categorical_crossentropy([0,1,0,0],[0.1,0.1,0.8,0.1])
print(loss1.numpy())
- 运行结果:
ssh://[email protected]:22/home/zhangkf/anaconda3/envs/tf2.0/bin/python -u /home/zhangkf/tmp/pycharm_project_258/demo/TF2/out.py
1.3862944
2.3978953

Process finished with exit code 0
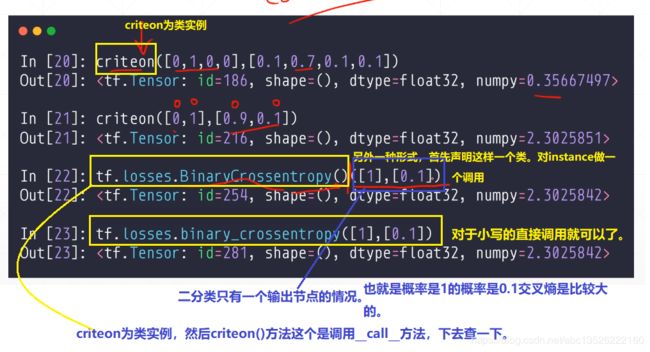
- 代码如下
import tensorflow as tf
import os

os.environ['TF_CPP_MIN_LOG_LEVEL'] = '2'

#函数大写形式
criteon = tf.losses.BinaryCrossentropy() #首先声明这样一个类,对instance做一个调用。
loss = criteon([1], [0.1])
print(loss)

#函数小写的形式。直接调用就可以了。
loss1 = tf.losses.binary_crossentropy([1],[0.1])
print(loss1)
- 测试结果:
ssh://[email protected]:22/home/zhangkf/anaconda3/envs/tf2.0/bin/python -u /home/zhangkf/tmp/pycharm_project_258/demo/TF2/out.py
tf.Tensor(2.3025842, shape=(), dtype=float32)
tf.Tensor(2.3025842, shape=(), dtype=float32)

Process finished with exit code 0
1.3、为什么不直接MSE而是交叉熵
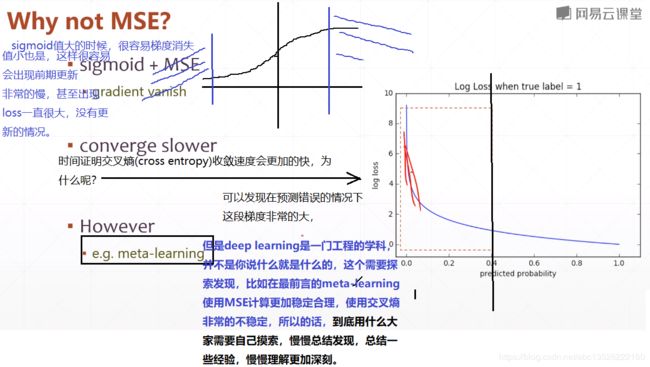

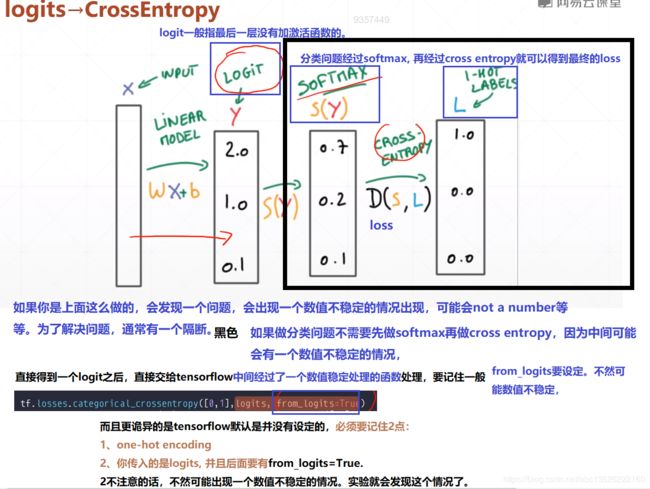
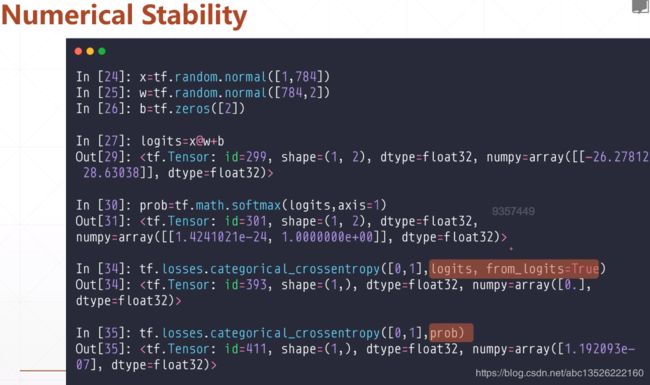
- 代码如下:
import tensorflow as tf
import os

os.environ['TF_CPP_MIN_LOG_LEVEL'] = '2'

x = tf.random.normal([1,784])
w = tf.random.normal([784,2])
b = tf.zeros(2)
logits = x@w+b
print("前向传播结果:",logits.numpy())

prob = tf.math.softmax(logits, axis=1)
print("经过softmax数值为:",prob.numpy())

loss = tf.losses.categorical_crossentropy([0,1],logits,from_logits=True)
print("交叉熵数值为:{0}".format(loss))
- 测试结果:
ssh://[email protected]:22/home/zhangkf/anaconda3/envs/tf2.0/bin/python -u /home/zhangkf/tmp/pycharm_project_258/demo/TF2/out.py
前向传播结果: [[17.160229 28.54478 ]]
经过softmax数值为: [[1.1369646e-05 9.9998868e-01]]
交叉熵数值为:[0.47073382]

Process finished with exit code 0

