SpringBoot 工程搭建
文章目录
- 简介
- 1. pom.xml
- 2. 工程结构
- 3. Entity User
- 4. Controller
- 5. Service
- 6. Repository or Mapper
- 使用Repository UserRepository
- 使用Mapper RoleMapper
- 7. YML
- 8. 拦截器
- 9. 界面
- 10. 操作验证
- 終わり
- 参考
简介
最近在学习Spring Boot,动手搭建了一个demo。打算做一个公用的工程,方便以后玩得开,目前还在学习,系统还会进一步扩展。
这是我的项目下载路径:github springboot 项目路径
下载:git clone [email protected]:NikolaZhang/SpringBoot.BookSystem.git

下面是从代码层面对项目中内容的介绍。
1. pom.xml
<project xmlns="http://maven.apache.org/POM/4.0.0" xmlns:xsi="http://www.w3.org/2001/XMLSchema-instance"
        xsi:schemaLocation="http://maven.apache.org/POM/4.0.0 http://maven.apache.org/xsd/maven-4.0.0.xsd">
   <modelVersion>4.0.0modelVersion>

   <groupId>com.demogroupId>
   <artifactId>booksysartifactId>
   <version>0.0.1-SNAPSHOTversion>
   <packaging>jarpackaging>

   <name>booksysname>
   <description>Demo project for Spring Bootdescription>

   <parent>
       <groupId>org.springframework.bootgroupId>
       <artifactId>spring-boot-starter-parentartifactId>
       <version>2.1.0.RELEASEversion>
       <relativePath/>
   parent>

   <properties>
       <project.build.sourceEncoding>UTF-8project.build.sourceEncoding>
       <project.reporting.outputEncoding>UTF-8project.reporting.outputEncoding>
       <java.version>1.8java.version>
   properties>

   <dependencies>
       <dependency>
           <version>2.0.3.RELEASEversion>
           <groupId>org.springframework.bootgroupId>
           <artifactId>spring-boot-starter-thymeleafartifactId>
       dependency>
       <dependency>
           <groupId>org.springframework.bootgroupId>
           <artifactId>spring-boot-starter-webartifactId>
       dependency>
       <dependency>
           <groupId>org.springframework.bootgroupId>
           <artifactId>spring-boot-starter-testartifactId>
           <scope>testscope>
       dependency>

       <dependency>
           <groupId>org.springframework.bootgroupId>
           <artifactId>spring-boot-autoconfigureartifactId>
       dependency>


       <dependency>
           <groupId>com.oraclegroupId>
           <artifactId>ojdbc8artifactId>
           <version>12.2.0.1.0version>
       dependency>


       <dependency>
           <groupId>org.springframework.bootgroupId>
           <artifactId>spring-boot-starter-data-jpaartifactId>
       dependency>

       <dependency>
           <groupId>org.mybatis.spring.bootgroupId>
           <artifactId>mybatis-spring-boot-starterartifactId>
           <version>1.1.1version>
       dependency>


       <dependency>
           <groupId>org.springframework.bootgroupId>
           <artifactId>spring-boot-devtoolsartifactId>
           <optional>trueoptional>
       dependency>


       <dependency>
           <groupId>com.alibabagroupId>
           <artifactId>druidartifactId>
           <version>1.1.12version>
       dependency>

   dependencies>

   <build>
       <plugins>
           <plugin>
               <groupId>org.springframework.bootgroupId>
               <artifactId>spring-boot-maven-pluginartifactId>
               <configuration>
                   <fork>truefork>
               configuration>
           plugin>
           <plugin>
               <groupId>org.apache.maven.pluginsgroupId>
               <artifactId>maven-surefire-pluginartifactId>
           plugin>
       plugins>
   build>

project>
可以看到我们的项目支持thymeleaf模板,druid数据源,oracle数据库,数据持久化可以使用mybatis(注解方式和配置xml方式)、jpa(暂时支持注解),日志,热部署。这里要单独说一下数据库的jar包如果无法下载,需要手动下载后,添加到库中。项目中另外添加了druid的sql监控,拦截器等。
2. 工程结构
e.g. 项目结构暂时就是下面这个样子,(后台很多,前台几乎没有)。不过这并不影响我们的开发。只要你有一个postman。。。

3. Entity User
先来看一下我们的实体类。
package com.demo.booksys.domin;

import javax.persistence.*;

@Entity
@Table(name = "SYS_USER_MST")
public class UserModel {
    @Id
    @Column(name = "CODE", nullable = false, unique = true)
    private String code;
    @Column(name = "NAME", nullable = false)
    private String name;
    @Column(name = "PASSWORD", nullable = false)
    private String password;
    @Column(name = "DESCRIPTION")
    private String description;

    public String getCode() {
        return code;
    }

    public void setCode(String code) {
        this.code = code;
    }

    public String getName() {
        return name;
    }

    public void setName(String name) {
        this.name = name;
    }

    public String getPassword() {
        return password;
    }

    public void setPassword(String password) {
        this.password = password;
    }

    public String getDescription() {
        return description;
    }

    public void setDescription(String description) {
        this.description = description;
    }

    @Override
    public String toString() {
        return "UserModel{" +
                "code='" + code + '\'' +
                ", name='" + name + '\'' +
                ", password='" + password + '\'' +
                ", description='" + description + '\'' +
                '}';
    }
}
这里我们需要使用@Table指定实体类对应的数据表名。在JPA中,我们可以直接使用UserModel替换sql中的SYS_USER_MST。
4. Controller
这里我们以UserController为例。
package com.demo.booksys.controller.user;

import com.demo.booksys.domin.UserModel;
import com.demo.booksys.service.user.UserService;
import org.slf4j.Logger;
import org.slf4j.LoggerFactory;
import org.springframework.beans.factory.annotation.Autowired;
import org.springframework.stereotype.Controller;
import org.springframework.web.bind.annotation.PathVariable;
import org.springframework.web.bind.annotation.RequestMapping;
import org.springframework.web.bind.annotation.RequestMethod;
import org.springframework.web.bind.annotation.ResponseBody;

import javax.servlet.http.HttpSession;
import java.util.List;
import java.util.Map;

@Controller
@RequestMapping(value = "/UserController")
public class UserController {
    Logger logger = LoggerFactory.getLogger(UserController.class);

    @Autowired
    private UserService userService;

    // 所有请求使用RESTFUL风格,不再使用?&拼接参数。 Nikola Zhang  【2018/11/22 21:50】
    // 使用GET查询数据库 Nikola Zhang  【2018/11/22 21:49】
    @RequestMapping(value = "/findUserByCode/{code}", method = RequestMethod.GET)
    @ResponseBody
    public UserModel findUserByCode(@PathVariable("code") String code) {
        logger.info("->findByCode");
        UserModel user = userService.findUserByCode(code);
        return user;
    }
    // 使用POST保存用户信息 Nikola Zhang  【2018/11/22 22:00】
    @RequestMapping(value = "/saveUser", method = RequestMethod.POST)
    @ResponseBody
    public List<UserModel> saveUser(UserModel userModel){
        userService.saveUser(userModel);
        return userService.findAll();
    }

    @RequestMapping(value = "/updateUser", method = RequestMethod.PATCH)
    @ResponseBody
    public List<UserModel> updateUser(UserModel userModel){
        userService.updateUser(userModel.getName(), userModel.getCode());
        return userService.findAll();
    }
    @RequestMapping(value = "/deleteUser/{code}", method = RequestMethod.DELETE)
    @ResponseBody
    public int deleteUserByCode(@PathVariable("code") String code){
        logger.info("->删除"+code);
        return userService.deleteUserByCode(code);
    }

    @RequestMapping(value = "/queryUserRoleInfo", method = RequestMethod.GET)
    @ResponseBody
    public Map queryUserRoleInfo() {
        return userService.queryUserRoleInfo();
    }

    @RequestMapping("/findAll")
    @ResponseBody
    public List<UserModel> findAll() {
        logger.info("->findAll");
        List<UserModel> users = userService.findAll();
        logger.info(users.size()+"");
        return users;
    }

    @RequestMapping("/login/{usercode}/{password}")
    public String toLogin(@PathVariable("usercode") String usercode, @PathVariable("password") String password, HttpSession session) {
        logger.info("->toLogin");
        int res = userService.countByCodeAndPassword(usercode, password);
        if(res == 1){
            session.setAttribute("usercode", usercode);
            return "Success";
        } else {
            return  "Error";
        }

    }

}
可以看到我们的请求和SSM框架中习惯使用的****/*.action?a=1&b=2是不同的。查询使用RequestMethod.GET;增加使用RequestMethod.POST;修改使用RequestMethod.PATCH;删除使用RequestMethod.DELETE。
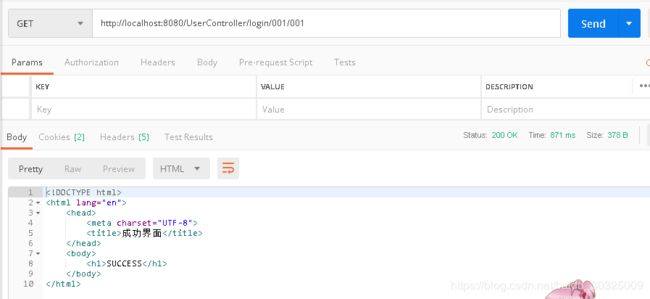
对于/login请求我们需要进行登录验证。数据库存在表单数据,则增加当前用户的code作为登录成功的标记。
5. Service
这一部分没有什么,我们还是用UserService展示。
package com.demo.booksys.service.user;

import com.demo.booksys.domin.UserModel;
import com.demo.booksys.persistence.user.UserRepository;
import org.springframework.beans.factory.annotation.Autowired;
import org.springframework.data.domain.Example;
import org.springframework.stereotype.Service;

import java.util.List;
import java.util.Map;
import java.util.Optional;

@Service
public class UserService {
    @Autowired
    private UserRepository userRepository;

    public UserModel findUserByCode(String code){
        List<UserModel> users = userRepository.findUserModelsByCode(code);
        if(users != null) {
            int userSize = users.size();
            if(userSize != 0) {
                return users.get(0);
            } else {
                return null;
            }
        } else{
            return null;
        }
    }

    public List<UserModel> findAll() {
        return userRepository.findAll();
    }

    public void saveUser(UserModel userModel){
        userRepository.save(userModel);
    }

//    public void updateUser(UserModel userModel) {
//        userRepository.updateUser(userModel);
//    }

    public void updateUser(String name, String code) {
        userRepository.updateUser(name, code);
    }

    public int deleteUserByCode(String code) {
        return userRepository.deleteUserByCode(code);
    }

    public Map queryUserRoleInfo(){
        return  userRepository.queryUserRoleInfo();
    }

    public int countByCodeAndPassword(String usercode, String password) {
        return userRepository.countByCodeAndPassword(usercode, password);
    }
}
6. Repository or Mapper
-
使用Repository UserRepository
package com.demo.booksys.persistence.user; import com.demo.booksys.domin.UserModel; import org.springframework.data.jpa.repository.JpaRepository; import org.springframework.data.jpa.repository.Modifying; import org.springframework.data.jpa.repository.Query; import org.springframework.transaction.annotation.Transactional; import java.util.List; import java.util.Map; public interface UserRepository extends JpaRepository<UserModel, Long> { @Query("select um from UserModel um where um.code = ?1") List<UserModel> findUserModelsByCode(String code); @Transactional @Modifying @Query("update UserModel set name=?1 where code=?2") int updateUser(String name, String code); @Transactional @Modifying @Query(value = "delete from UserModel where code = ?1") int deleteUserByCode(String code); // 使用JPA进行关联查询最好给查询结果设置别名 Nikola Zhang 【2018/11/24 11:28】 @Query(value = "select sumt.CODE, sumt.NAME, sumt.PASSWORD, srm.NAME rolename from sys_user_mst sumt join sys_user_role sur on sumt.code=sur.usercode join sys_role_mst srm on srm.code=sur.rolecode", nativeQuery = true) Map queryUserRoleInfo(); // 计数 int countByCodeAndPassword(String code, String password); } -
使用Mapper RoleMapper
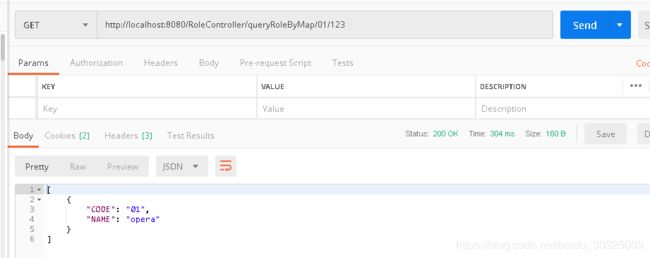
这里我们同时使用了注解和xml,只是xml需要在资源目录下增加一个xml文件。在启动类上需要增加@MapperScan("com.demo.booksys.persistence.role")去扫描我们的接口加载入上下文。
下面是对应接口中package com.demo.booksys.persistence.role; import com.demo.booksys.domin.RoleModel; import org.apache.ibatis.annotations.Delete; import org.apache.ibatis.annotations.Insert; import org.apache.ibatis.annotations.Select; import org.apache.ibatis.annotations.Update; import java.util.HashMap; import java.util.List; import java.util.Map; public interface RoleMapper { @Select("select code, name from sys_role_mst where code=#{code}") RoleModel queryRoleByCode(String code); @Insert("insert into sys_role_mst(code, name) values(#{code}, #{name})") // @Options(useGeneratedKeys=true,keyProperty="id", keyColumn="id") void saveRole(RoleModel roleModel); @Update("update sys_role_mst set name=#{name} where code=#{code}") void updateRole(RoleModel roleModel); @Delete("delete from sys_user_role where code=#{code}; " ) void deleteRole(RoleModel roleModel); @Select("select * from sys_role_mst srm join sys_user_role sur on srm.code=sur.rolecode join sys_user_mst sumt on sumt.code=sur.usercode") Map<String, String> queryUserRoleInfo(); List<HashMap> queryRoleByMap(HashMap hashMap); }List方法的Mapper xml配置。queryRoleByMap(HashMap hashMap); <mapper namespace="com.demo.booksys.persistence.role.RoleMapper"> <resultMap id="BaseResultMap" type="com.demo.booksys.domin.RoleModel" > <result column="CODE" property="code" jdbcType="VARCHAR" /> <result column="NAME" property="name" jdbcType="VARCHAR" /> resultMap> <select id="queryRoleByMap" parameterType="java.util.HashMap" resultType="java.util.HashMap"> SELECT * FROM SYS_ROLE_MST WHERE 1=1 <if test="code!=null and code!='' " > and CODE = #{code} if> select> mapper>
7. YML
这个本因该放在前面介绍的。但是由于它和我们之后说到的拦截器,druid有很大关系。所以放在了较后面的位置。
spring:
  datasource:
    url: jdbc:oracle:thin:@localhost:1521:orcl
    driver-class-name: oracle.jdbc.OracleDriver
    username: C##nikola
    password: 123654
    type: com.alibaba.druid.pool.DruidDataSource
    initialSize: 5
    maxActive: 20
    minIdle: 5
    maxWait: 60000
    poolPreparedStatements: true
    maxOpenPreparedStatements: 100
    testWhileIdle: true
    timeBetweenEvictionRunsMillis: 60000
    minEvictableIdleTimeMillis: 300000
    filters:
      commons-log.connection-logger-name: stat,wall,log4j
    userGlobalDataSource: true
    connectionProperties: druid.stat.mergeSql=true;druid.stat.slowSqlMillis=500
logging:
  level:
    org:
      hibernate:
        SQL: DEBUG
    com:
      demo:
        booksys:
          persistence: DEBUG
mybatis:
  typeAliasesPackage: comdemo.booksys.domin
  mapperLocations: classpath:/mapper/*Mapper.xml
我们在yml中配置了sql日志,druid数据源,mapper映射。
这里需要注意:

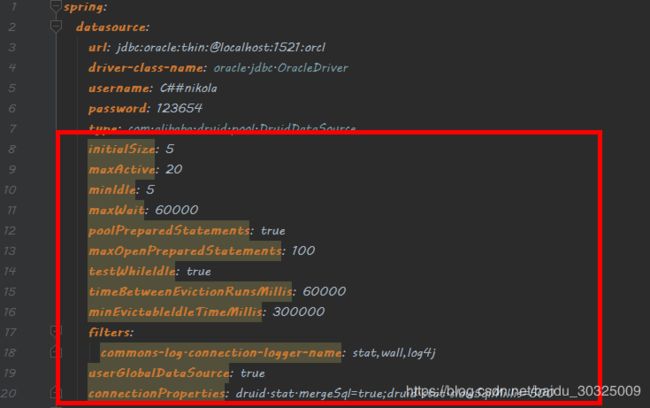
方框中的属性是spring DataSource没有的。需要我们自定义配置添加。我们使用@ConfigurationProperties将配置文件中的属性绑定到DataSource(DataSource要使用@Bean注入,毕竟我们不能再jar中标注@Component)中。
自定义配置如下:
package com.demo.booksys.webconfig;

import com.alibaba.druid.pool.DruidDataSource;
import com.alibaba.druid.support.http.StatViewServlet;
import com.alibaba.druid.support.http.WebStatFilter;
import org.springframework.boot.context.properties.ConfigurationProperties;
import org.springframework.boot.web.servlet.FilterRegistrationBean;
import org.springframework.boot.web.servlet.ServletRegistrationBean;
import org.springframework.context.annotation.Bean;
import org.springframework.context.annotation.Configuration;

import javax.sql.DataSource;
import java.util.Arrays;
import java.util.HashMap;
import java.util.Map;

/************************************************
 *@ClassName : DruidConfig
 *@Description : Druid配置,没有此配置文件yml中的属性不会生效
 *@Author : NikolaZhang
 *@Date : 【2018/11/24 20:06】
 *@Version : 1.0.0
 *************************************************/
@Configuration
public class DruidConfig {

    @ConfigurationProperties(prefix = "spring.datasource")
    @Bean
    public DataSource druid() {
        return new DruidDataSource();
    }

    // 配置Druid监控 Nikola Zhang  【2018/11/24 20:09】
    // 1. 配置一个管理后台的servlet
    @Bean
    public ServletRegistrationBean statViewServlet() {
        ServletRegistrationBean servletRegistrationBean = new ServletRegistrationBean(new StatViewServlet(), "/druid/*");
        Map<String, String> initMap = new HashMap<>();
        // 设置druid初始化参数
        initMap.put("loginUsername","admin");
        initMap.put("loginPassword","admin");
        servletRegistrationBean.setInitParameters(initMap);
        return servletRegistrationBean;
    }
    // 2. 配置一个监控的filter
    @Bean
    public FilterRegistrationBean webStatFilter() {
        FilterRegistrationBean filterRegistrationBean = new FilterRegistrationBean();
        filterRegistrationBean.setFilter(new WebStatFilter());
        Map<String, String> initMap = new HashMap<>();
        initMap.put("exclusions","*.js,*.css,/druid/*");
        filterRegistrationBean.setInitParameters(initMap);
        filterRegistrationBean.setUrlPatterns(Arrays.asList("/*"));
        return  filterRegistrationBean;
    }
}
8. 拦截器
package com.demo.booksys.webconfig;


import com.demo.booksys.util.datautil.StringUtil;
import org.slf4j.Logger;
import org.slf4j.LoggerFactory;
import org.springframework.web.servlet.HandlerInterceptor;
import org.springframework.web.servlet.ModelAndView;

import javax.servlet.http.HttpServletRequest;
import javax.servlet.http.HttpServletResponse;
import javax.servlet.http.HttpSession;
import java.io.PrintWriter;

public class InterceptorConfig implements HandlerInterceptor {

    private static final Logger logger = LoggerFactory.getLogger(InterceptorConfig.class);

    @Override
    public boolean preHandle(HttpServletRequest httpServletRequest
            , HttpServletResponse httpServletResponse, Object o) throws Exception {
        logger.info("---------------------开始进入请求地址拦截----------------------------");
        HttpSession session = httpServletRequest.getSession();
        String usercode = (String)session.getAttribute("usercode");
        logger.info("从session中获取usercode: "+ usercode);
        if(!StringUtil.isEmpty(usercode)){
            return true;
        } else {
            PrintWriter printWriter = httpServletResponse.getWriter();
            printWriter.write("{code:0,message:\"session is invalid,please login again!\"}");
            return false;
        }

    }

    @Override
    public void postHandle(HttpServletRequest httpServletRequest, HttpServletResponse httpServletResponse
            , Object o, ModelAndView modelAndView) throws Exception {
        logger.info("--------------处理请求完成后视图渲染之前的处理操作---------------");
    }

    @Override
    public void afterCompletion(HttpServletRequest httpServletRequest
            , HttpServletResponse httpServletResponse, Object o, Exception e) throws Exception {
        logger.info("---------------视图渲染之后的操作-------------------------");
    }
}
上面的拦截只是我们自定义的类,并没有添加到springboot的环境中。方法是继承WebMvcConfigurationSupport重写addInterceptors方法,使用注册我们的拦截器。注意没有@Configuration我们的WebAppConfig也不会注入到上下文中。
package com.demo.booksys.webconfig;

import org.springframework.context.annotation.Configuration;
import org.springframework.web.servlet.config.annotation.InterceptorRegistry;
import org.springframework.web.servlet.config.annotation.ViewControllerRegistry;
import org.springframework.web.servlet.config.annotation.WebMvcConfigurationSupport;

@Configuration
public class WebAppConfig extends WebMvcConfigurationSupport {

    // 定义拦截器对除进入登录界面的所有请求进行拦截 Nikola Zhang  【2018/11/24 14:41】
    // 使用localhost:8080 登录系统,通过校验设置session
    public void addInterceptors(InterceptorRegistry registry) {
        //注册自定义拦截器,添加拦截路径和排除拦截路径
        registry.addInterceptor(new InterceptorConfig()).addPathPatterns("/**")
                .excludePathPatterns("/")
                .excludePathPatterns("/UserController/login/**");
    }

    @Override
    // 定义视图跳转
    protected void addViewControllers(ViewControllerRegistry registry) {
        // 添加无业务跳转
        // 直接访问的请求进入登录界面 Nikola Zhang  【2018/11/24 14:42】
        registry.addViewController("/").setViewName("Login");
    }
}
这里简单说明一下,InterceptorConfig中的preHandle我们进行了登录用户的session验证。在WebAppConfig中对除localhost:8080和localhost:8080/UserController/login/**这样的请求进行拦截,验证其session。

9. 界面
<html lang="en">
<head>
    <meta charset="UTF-8">
    <title>登录界面title>
head>
<body>
<h1>Loginh1>
body>
html>
因为我用了postman所以整个开发过程,根本没有理会这玩意,以后再学thymeleft吧。
呵呵~~ o( ̄︶ ̄)o
10. 操作验证
終わり
Okay,总算说完了,好累。。。
参考
- 关于JPA:https://www.cnblogs.com/crawl/p/7703679.html【推荐】
- 关于druid:https://www.cnblogs.com/wuyun-blog/p/5679073.html【推荐】
以上都是不错的博文,非常推荐。


