我们首先要知道WebSocket的应用场景:
①在线股票网站
②即时聊天
③多人在线游戏
④应用集群通信
⑤系统性能及时监控
......
下面让我们开始从项目中学习WebSocket:
(一)首先创建一个Spring Boot项目,如下图,博主用的是IDEA:
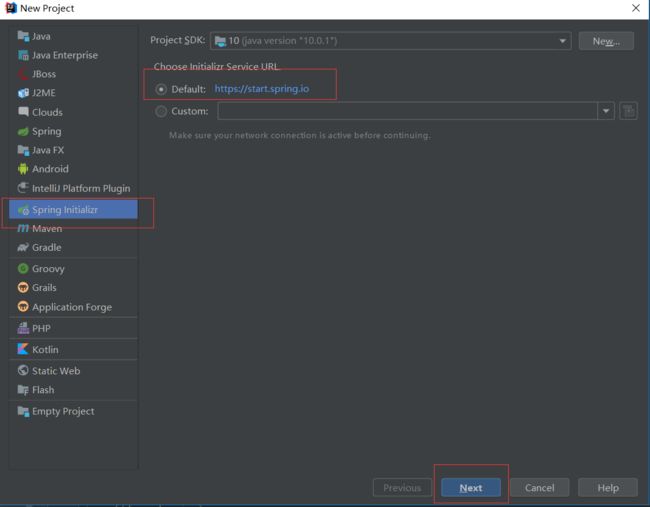
后续过程不太难,如果还是不太会的话,请看https://www.cnblogs.com/Trojan00/p/11317839.html:
(二)添加依赖:

(三)配置WebSocket(WebScoketMessageBroker.java):
 1 package com.example.demo;
 2
 3 import org.springframework.context.annotation.Configuration;
 4 import org.springframework.messaging.simp.config.MessageBrokerRegistry;
 5 import org.springframework.web.socket.config.annotation.EnableWebSocketMessageBroker;
 6 import org.springframework.web.socket.config.annotation.StompEndpointRegistry;
 7 import org.springframework.web.socket.config.annotation.WebSocketMessageBrokerConfigurer;
 8
 9 @Configuration
10 @EnableWebSocketMessageBroker
11 public class WebScoketMessageBroker implements WebSocketMessageBrokerConfigurer {
12     @Override
13     public void configureMessageBroker(MessageBrokerRegistry config){
14         config.enableSimpleBroker("/topic");
15         config.setApplicationDestinationPrefixes("/app");
16     }
17     @Override
18     public void registerStompEndpoints(StompEndpointRegistry registry){
19         registry.addEndpoint("/chat").withSockJS();
20     }
21 }
讲解时间到:
①自定义类WebSocketConfig继承自WebSocketMessageBrokerConfigurer进
行WebSocket配置,然后通过@EnableWebSocketMessageBgroker注解开启
WebSocket消息代理;
②config.enableSimpleBroker("/topic")表示设置消息代理的前缀,即如果消息的
前缀是"/topic",就会将消息转发给消息代理(Broker),再由消息代理将消息广
播给当前连接的客户端。
③config.setApplicationDestinationPrefixes("/app")表示配置一个或多个前缀,
通过这些前缀过滤出需要备注接方法处理的消息。例如,前缀为“/app”的d-
estination可以通过@MessageMapping注解的方法处理,而其他destination
(例如:"/topic" "/queue")将被直接交给broker处理。
④registry.adEndpoing("/chat").withSockJS()则表示定义一个前缀为"/chat"的
EndPoint,并开启sockjs支持,sockjs可以解决浏览器对WebSocket的兼容性
问题,客户户端将通过这里配置的URL来建立WebSocket连接。
(四)定义Controller(GreetingController.java):
 1 package org.sang.wschat.controller;
 2
 3 import org.sang.wschat.model.Chat;
 4 import org.sang.wschat.model.Message;
 5 import org.springframework.beans.factory.annotation.Autowired;
 6 import org.springframework.messaging.handler.annotation.MessageMapping;
 7 import org.springframework.messaging.handler.annotation.SendTo;
 8 import org.springframework.messaging.simp.SimpMessagingTemplate;
 9 import org.springframework.scheduling.annotation.Scheduled;
10 import org.springframework.stereotype.Controller;
11
12 import java.security.Principal;
13
14 @Controller
15 public class GreetingController {
16     @Autowired
17     SimpMessagingTemplate messagingTemplate;
18
19     @MessageMapping("/hello")
20     @SendTo("/topic/greetings")
21     public Message greeting(Message message) throws Exception {
22         return message;
23     }
24 //    @MessageMapping("/chat")
25 //    public void chat(Principal principal, Chat chat) {
26 //        String from = principal.getName();
27 //        chat.setFrom(from);
28 //        messagingTemplate.convertAndSendToUser(chat.getTo(), "/queue/chat", chat);
29 //    }
30 }
讲解时间到:
在这一段代码中我们看到@MessageMapping("/hello")注解的方法将用来接
收"/app/hello"(上一段代码讲解的第三步)路径发送来的消息,在注解方法
对消息处理后,再将消息转发到@SendTo定义的路径上,儿@SendTo路径是
一个前缀为"/topic"的路径,所以该消息将被交给消息代理的broker, 之后再
由broker进行广播(上一段代码讲解的第三步)。
快捷聊天界面构建(chat.html):
1 2 3 4 5群聊 6 //外部JS,添加依赖是有添加 7 //外部JS 8 //外部JS 9 10 11 1213 14 151617 18 1920 30 31
app.js:
 1 var stompClient = null;
 2 function setConnected(connected) {
 3     $("#connect").prop("disabled", connected);
 4     $("#disconnect").prop("disabled", !connected);
 5     if (connected) {
 6         $("#conversation").show();
 7         $("#chat").show();
 8     }
 9     else {
10         $("#conversation").hide();
11         $("#chat").hide();
12     }
13     $("#greetings").html("");
14 }
15 function connect() {
16     if (!$("#name").val()) {
17         return;
18     }
19     // registry.addEndpoint("/chat").withSockJS()中的那个"/chat"
20     var socket = new SockJS('/chat');
21     stompClient = Stomp.over(socket);
22     stompClient.connect({}, function (frame) {
23         setConnected(true);
24         // 第一个参数就是目的地地址
25         stompClient.subscribe('/topic/greetings', function (greeting) {
26             showGreeting(JSON.parse(greeting.body));
27         });
28     });
29 }
30 function disconnect() {
31     if (stompClient !== null) {
32         stompClient.disconnect();
33     }
34     setConnected(false);
35 }
36 function sendName() {
37     // 发送,第一个参数就是GreetingController中的发送源地址
38     stompClient.send("/app/hello", {}, JSON.stringify({'name': $("#name").val(),'content':$("#content").val()}));
39 }
40 function showGreeting(message) {
41     $("#greetings").append("" + message.name+":"+message.content + "");
42 }
43
44 $(function () {
45     //分别是点击连接、断开连接、发送三个事件,以及对应出发的函数
46     $( "#connect" ).click(function() { connect(); });
47     $( "#disconnect" ).click(function() { disconnect(); });
48     $( "#send" ).click(function() { sendName(); });
49 });
运行(打开两个页面,进入chat.html,并输入两个用户名,然后点击连接,就可以输入内容了
,输入好就可点击发送了):

(五) 接下来让我们看一下点对点的传送吧!点对点,所以有了用户,因此用到了spring security,故
先要添加Spring Security的依赖;
(六)配置Spring Security(WebSecurityConfig):
 1 package org.sang.wschat.config;
 2
 3 import org.springframework.context.annotation.Bean;
 4 import org.springframework.context.annotation.Configuration;
 5 import org.springframework.security.config.annotation.authentication.builders.AuthenticationManagerBuilder;
 6 import org.springframework.security.config.annotation.web.builders.HttpSecurity;
 7 import org.springframework.security.config.annotation.web.configuration.WebSecurityConfigurerAdapter;
 8 import org.springframework.security.crypto.bcrypt.BCryptPasswordEncoder;
 9 import org.springframework.security.crypto.password.PasswordEncoder;
10
11 @Configuration
12 public class WebSecurityConfig extends WebSecurityConfigurerAdapter {
13     @Bean
14     PasswordEncoder passwordEncoder() {
15         return new BCryptPasswordEncoder();
16     }
17     @Override
18     protected void configure(AuthenticationManagerBuilder auth) throws Exception {
19         auth.inMemoryAuthentication()
20         .withUser("admin")
21         .password("$2a$10$RMuFXGQ5AtH4wOvkUqyvuecpqUSeoxZYqilXzbz50dceRsga.WYiq") //即123
22         .roles("admin")
23         .and()
24         .withUser("sang")
25         .password("$2a$10$RMuFXGQ5AtH4wOvkUqyvuecpqUSeoxZYqilXzbz50dceRsga.WYiq") //即123
26         .roles("user");
27     }
28     @Override
29     protected void configure(HttpSecurity http) throws Exception {
30         http.authorizeRequests()
31                 .anyRequest().authenticated()
32                 .and()
33                 .formLogin().permitAll();
34     }
35 }
(七)改造WebSocket(WebSocketConfig.java):
 1 package org.sang.wschat.config;
 2
 3 import org.springframework.context.annotation.Configuration;
 4 import org.springframework.messaging.simp.config.MessageBrokerRegistry;
 5 import org.springframework.web.socket.config.annotation.EnableWebSocketMessageBroker;
 6 import org.springframework.web.socket.config.annotation.StompEndpointRegistry;
 7 import org.springframework.web.socket.config.annotation.WebSocketMessageBrokerConfigurer;
 8
 9 @Configuration
10 @EnableWebSocketMessageBroker
11 public class WebSocketConfig implements WebSocketMessageBrokerConfigurer {
12     @Override
13     public void configureMessageBroker(MessageBrokerRegistry config) {
14         config.enableSimpleBroker("/topic","/queue");  //就这里多加了个"/queue"
15         config.setApplicationDestinationPrefixes("/app");
16     }
17     @Override
18     public void registerStompEndpoints(StompEndpointRegistry registry) {
19         registry.addEndpoint("/chat").withSockJS();
20     }
21 }
(八)配置Controller:
 1 package org.sang.wschat.controller;
 2
 3 import org.sang.wschat.model.Chat;
 4 import org.sang.wschat.model.Message;
 5 import org.springframework.beans.factory.annotation.Autowired;
 6 import org.springframework.messaging.handler.annotation.MessageMapping;
 7 import org.springframework.messaging.handler.annotation.SendTo;
 8 import org.springframework.messaging.simp.SimpMessagingTemplate;
 9 import org.springframework.scheduling.annotation.Scheduled;
10 import org.springframework.stereotype.Controller;
11
12 import java.security.Principal;
13
14 @Controller
15 public class GreetingController {
16     @Autowired
17     SimpMessagingTemplate messagingTemplate;
18
19     @MessageMapping("/hello")
20     @SendTo("/topic/greetings")
21     public Message greeting(Message message) throws Exception {
22         return message;
23     }
24     @MessageMapping("/chat")
25     public void chat(Principal principal, Chat chat) {
26         String from = principal.getName();
27         chat.setFrom(from);
28         messagingTemplate.convertAndSendToUser(chat.getTo(), "/queue/chat", chat);
29     }
30 }
(九)创建聊天界面(类似于chat.html,此处是onlinechat.html):
1 2 3 4 5单聊 6 7 8 9 10 11 121323 24141516 请输入聊天内容: 17 18 目标用户: 19 20 2122
(十)该轮到chat.js了,类似于点对点之前的那个项目的app.js:
 1 var stompClient = null;
 2 function connect() {
 3     var socket = new SockJS('/chat');
 4     stompClient = Stomp.over(socket);
 5     stompClient.connect({}, function (frame) {
 6         stompClient.subscribe('/user/queue/chat', function (chat) {
 7             showGreeting(JSON.parse(chat.body));
 8         });
 9     });
10 }
11 function sendMsg() {
12     stompClient.send("/app/chat", {}, JSON.stringify({'content':$("#content").val(), 'to':$("#to").val()}));
13 }
14 function showGreeting(message) {
15     $("#chatsContent").append("" + message.from+":"+message.content + "");
16 }
17 $(function () {
18     connect();
19     $( "#send" ).click(function() { sendMsg(); });
20 });
注:点对点这里要注意,第6行,路径是"/user/queue/chat",因为这个destinationPrefix默认值是
"/user",也就是说消息的最终发送路径是"/user/用户名/queue.chat"
结果如下:

ADD:其实这个里面还有两个Mode,一个是Message的,另一个是Chat的,读者可以下载完整源代码自
行研究,这个项目的完整源代码地址:https://github.com/Stray-Kite/WsChat