matplotlib1. --- 几个画图之前的核心点Axes, Figure,Axis
作图环境:vscode+插件Jupyter
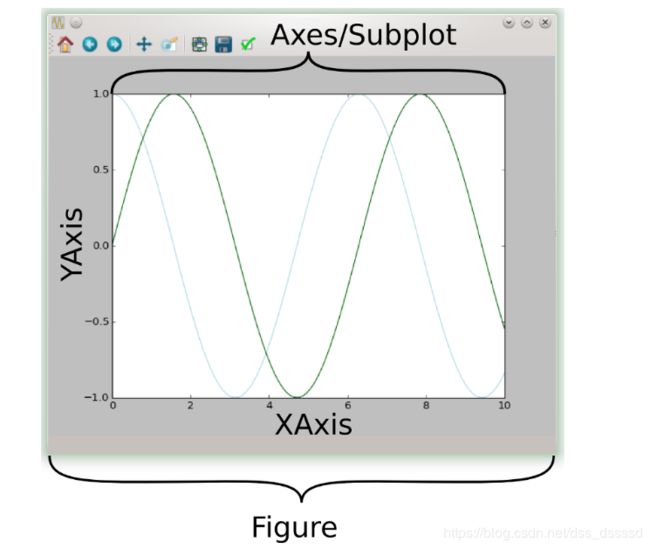
这段话很重要:
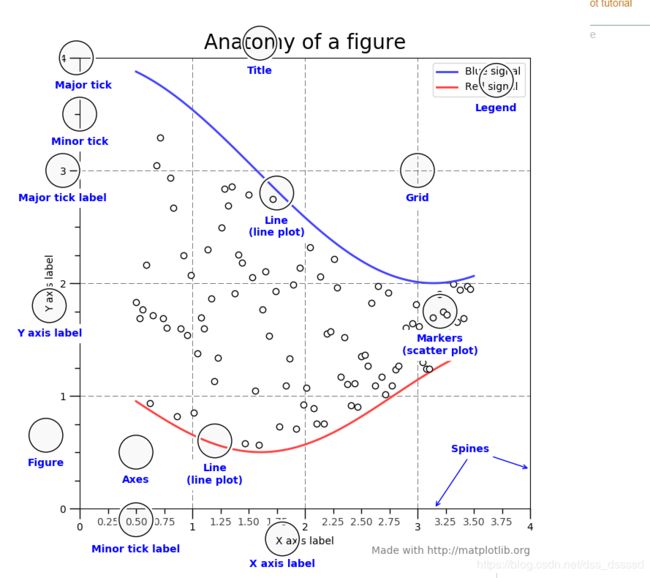
一个作图的窗口就是一个Figure, 在Figure上可以有很多个Axes/Subplot,每一个Axes/Subplot为一个单独的绘图区,可以在上面绘图,其中每一个Axes/subplot, 有XAxis,YAxis,在上面可以标出刻度,刻度的位置,以及xy轴的标签label。
- 创建Figure
plt.figure
https://matplotlib.org/api/_as_gen/matplotlib.pyplot.figure.html
- 常用的一个参数: figsize=(width, height), 可以指定(w,h),也可以用figaspect(ratio)计算。创建指定宽度和高度的Figure
- Return : 返回的是一个Figure窗体对象
函数:figaspect(ratio) https://matplotlib.org/api/_as_gen/matplotlib.figure.figaspect.html?highlight=figaspect#matplotlib.figure.figaspect
从rcParams["figure.figsize"],取出height,并利用 r a t i o = h e u g h t w i d t h ratio = \frac{heught}{width} ratio=widthheught计算出width,返回(width, height)
import matplotlib.pyplot as plt
fig = plt.figure(figsize=plt.figaspect(2.0)) # an empty figure with no axes
fig.suptitle("No axec on this figure")  # Add a title so we know which it is
- 在Figure上创建Axes
所有的画图工作都在Axes上执行,一个Figure可以有很多个Axes,但是一个Axes只能属于一个Figure.
一般来说,你会创建一个Figure,然后再将Axes添加到Figure上。
你可能会使用fig.add_axes,但是,更多的时候使用fig.add_subplot更方便。
add_subplot(*args, **kwargs)
https://matplotlib.org/api/_as_gen/matplotlib.figure.Figure.html?highlight=add_subplot#matplotlib.figure.Figure.add_subplot
- return : Axes实例
# 调用实例
add_subplot(nrows, ncols, index, **kwargs)
add_subplot(pos, **kwargs)
fig = plt.figure()
ax = fig.add_subplot(111) # We'll explain the "111" later. Basically, 1 row and 1 column.
ax.set(xlim=[0.5, 4.5], ylim=[-2, 8], title='An Example Axes',
       ylabel='Y-Axis', xlabel='X-Axis')

以上代码使用set设置了axes的很多属性值,当然可以通过set_*来设定特定属性的值,比如:
fig = plt.figure()
ax = fig.add_subplot(111) # We'll explain the "111" later. Basically, 1 row and 1 column.
ax.set_xlim([0.5, 4.5])
ax.set_ylim([-2, 8])
ax.set_title('A Different Example Axes Title')
ax.set_ylabel('Y-Axis (changed)')
ax.set_xlabel('X-Axis (changed)')
plt.show()
基本的画图函数
大多数的画图工作都在Axes上,接下来会讨论更多的绘图函数,在这主要介绍两种最基本的方法:plot和scatter
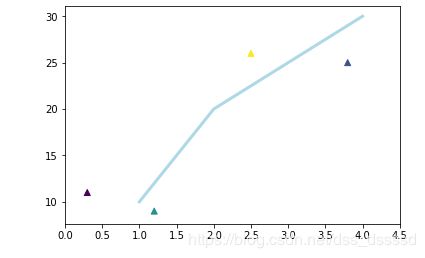
plot主要将独立的点用各种形式的线连起来,scatter画出不同的点,并根据不同的值将点画成不同大小会不同颜色。
fig = plt.figure()
ax = fig.add_subplot(111)
ax.plot([1, 2, 3, 4], [10, 20, 25, 30], color='lightblue', linewidth=3)
ax.scatter([0.3, 3.8, 1.2, 2.5], [11, 25, 9, 26], c=[1, 2, 3, 5], marker='^')
ax.set_xlim(0, 4.5)
plt.show()
画图函数调用方法 Axes or pyplot
Axes 对象的任何一种方法,都在pyplot模块中存在对象的方法,比如,plt.xlim(1, 10) pyplot讲会调用ax.set_xlim(1, 10)其中,ax是当前环境下创建的Axes,比如:
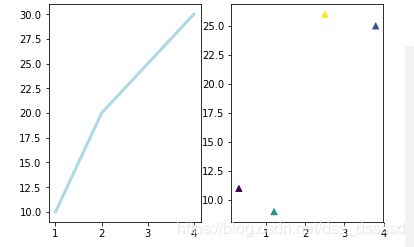
fig = plt.figure()

# 创建Axes ax1
ax1 = fig.add_subplot(121)
# 此时调用的是ax1.plot
plt.plot([1, 2, 3, 4], [10, 20, 25, 30], color='lightblue', linewidth=3)

# 创建Axes ax2
ax2 = fig.add_subplot(122)
# 此时调用的ax2.scatter
plt.scatter([0.3, 3.8, 1.2, 2.5], [11, 25, 9, 26], c=[1, 2, 3, 5], marker='^')

plt.show()
上述使用Axes的等效代码:
plt.plot([1, 2, 3, 4], [10, 20, 25, 30], color='lightblue', linewidth=3)
plt.scatter([0.3, 3.8, 1.2, 2.5], [11, 25, 9, 26], c=[1, 2, 3, 5], marker='^')
plt.xlim(0.5, 4.5)
plt.show()
在以后的代码中,基本使用Axes方法,虽然麻烦一点,但是代码表达的意思很准确,不会产生歧义。
多个Axes
plt.subplots(nrows=1, ncols=1, sharex=False, sharey=False, squeeze=True, subplot_kw=None, gridspec_kw=None)
https://matplotlib.org/api/_as_gen/matplotlib.pyplot.subplots.html?highlight=pyplot%20subplots#matplotlib.pyplot.subplots
创建含有nrows行ncols列个Axes的Figure, 返回(Figure, axes)
fig, axes = plt.subplots(nrows=2, ncols=2)
axes[0,0].set(title='Upper Left')
axes[0,1].set(title='Upper Right')
axes[1,0].set(title='Lower Left')
axes[1,1].set(title='Lower Right')

# To iterate over all items in a multidimensional numpy array, use the `flat` attribute
for ax in axes.flat: # 将Axes平铺为1维数组
    # Remove all xticks and yticks...
    ax.set(xticks=[], yticks=[])

plt.show()
plt.subplots的默认参数为nrows=1, ncols=1
所以当不传入参数调用plt.subplots()是也会创建单个Axes
所以:
fig = plt.figure()
ax = fig.add_subplot(111)
可以使用
fig, ax = plt.subplots()
代替
import numpy as np
import matplotlib.pyplot as plt


# Our data...
x = np.linspace(0, 10, 100)
y1, y2, y3 = np.cos(x), np.cos(x + 1), np.cos(x + 2)
names = ['Signal 1', 'Signal 2', 'Signal 3']

# add codes here
个人实现:
#%%
import numpy as np
import matplotlib.pyplot as plt

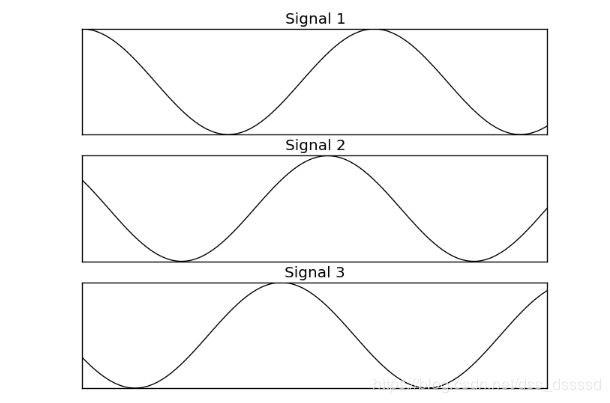
# Try to reproduce the figure shown in images/exercise_1-1.png

# Our data...
x = np.linspace(0, 10, 100)
y1, y2, y3 = np.cos(x), np.cos(x + 1), np.cos(x + 2)
names = ['Signal 1', 'Signal 2', 'Signal 3']
# add codes here
ys = [y1, y2, y3]
fig, axs = plt.subplots(nrows=3, ncols=1)

for index, ax in enumerate(axs):
    ax.plot(x, ys[index])
    ax.set_title(names[index])
    ax.set(xticks=[], yticks=[])

# 调整布局,显示不重叠
fig.tight_layout()
plt.show()
