border-image属性分析
border-image是CSS3的一个属性,由于比较复杂,总是处于一知半解的状态,今天下定决心,花时间整理了一下,供大家共勉和学习。
border-image的用处
没用border-image之前,觉得css的属性基本够用,border-image完全是将简单的工作复杂化,当学习完该属性以后,发现该属性的运用能够大大节省编码时间和效率,总结一下,大致适用于以下两个场景:
元素边框不规则的情况。这时候,就需要用设计图作为边框背景,border-image与background-image相比,好处是更具灵活性,可以用代码控制边框背景的拉伸和重复,因而能够创造出更多样的效果
按钮宽高不确定的情况。用border-image来制作按钮,可以用同一张背景图,制造出各种宽高的按钮。
border-image属性分析
border-image-source
边框背景图片。格式为:url(“…”)。
border-image-slice
图片边框向内偏移的距离。格式:border-image-slice:top right bottom left。分别指切割背景图片的四条线距离上右下左的距离。 如下图所示:

该距离接受数值,百分数。默认数值的单位是px,但是不能在数值后面加px,否则这句css将不被浏览器解析。
用法和margin,padding类似。这里以数值举例,百分数同理。
border-image-slice: 10;   /*距离上下左右均为10px;*/
border-image-slice: 10 30;   /*距离上下10px,左右30px;*/
border-image-slice: 10 30 20;   /*距离上10px,下20px,左右30px;*/
border-image-slice: 10 30 20 40;   /*距离上10px,右30px,下20px,左40px;*/
四条线将背景图分割成了9个部分,其中1,2,3,4,6,7,8,9这八个区域将会被切割,作为图片边框,如果除了设置数值或者百分数,还加了一个“fill”,那么区域5就会作为背景填充进元素content,如:
border-image-slice: 25 11 fill;注意:slice不接受负值;如果slice切割的左右距离之和大于背景图的宽,则上下边框不显示。如果slice切割的上下距离之和大于背景图的高,则左右边框不显示。
border-image-width
图片边框的宽度。只接受数值,且不能加单位。
border-image-repeat
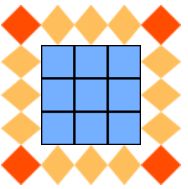
图像边框是否应平铺(repeat)、铺满(rounded)或拉伸(stretch)。而无论怎样铺,四个角,即区域1,3,7,9是不会重复铺,只会被相应拉伸。下面以最为经典的图为例吧:
原图如下:
stretch(默认值)
.box{
            width: 50px;
            height: 50px;
            border: 40px solid transparent;
            border-image-source: url("img/border.png");
            border-image-slice: 27 fill;
            border-image-repeat: stretch;
    }
<div class="box"></div>
效果如图:
repeat
.box{
            width: 100px;
            height: 100px;
            border: 40px solid transparent;
            border-image-source: url("img/border.png");
            border-image-slice: 27 fill;
            border-image-repeat: repeat;
    }
<div class="box"></div>可以看到背景在以原形状等比例缩放以后,持续平铺,容易出现断层。
round
.box{
            width: 100px;
            height: 100px;
            border: 40px solid transparent;
            border-image-source: url("img/border.png");
            border-image-slice: 27 fill;
            border-image-repeat: round;
    }
<div class="box"></div>
效果如图:

同样是重复平铺,但是round会处理得更平滑,不会出现断层情况,因此round通常比repeat更常用。
border-image-outset
边框图像区域超出边框的量。格式:border-image-outset : length | number。length是数值加单位“px”,number指的是相对于边框宽度增加的倍数。下面举例来说明:
length
box{
            width: 50px;
            height: 50px;
            border: 27px solid transparent;
            border-image-source: url("img/border.png");
            border-image-outset: 10px;
            border-image-slice: 27 fill;
            border-image-repeat: round;
    }
<div class="box"></div>number
body{
        padding: 60px;
    }
box{
            width: 50px;
            height: 50px;
            border: 27px solid transparent;
            border-image-source: url("img/border.png");
            border-image-outset: 1;
            border-image-slice: 27 fill;
            border-image-repeat: round;
    }
<div class="box"></div>
效果如图:

border的宽度是27px,设置超出1倍,就是超出27px,即图中青绿色区域。大家可以试试不加body的padding属性,会发现div显示不完整。所以,想要扩展div的大小直接设置width和height就好了,用boder-image-outset有点鸡肋。
不得不说的border-image坑
- 新版Chrome浏览器border-image属性不生效
- 在stack overflow找到答案,说是在用border-image属性之前加上该属性即可:border:27px solid transparent;后看到国内某博主说只要设置成border: 27px soild就行。后经尝试,确实如此 。
- 复合属性需要添加浏览器前缀,单个属性不需添加前缀
- 当使用复合属性时,需要添加前缀,像这样:
border-image: url("img/border.png") fill 10;    /*IE11*/
-webkit-border-image: url("img/border.png") 10;    /*Chrome和Safari*/
-moz-border-image: url("img/border.png") fill 10;    /*Firefox*/
-o-border-image: url("img/border.png") 10; /*Opera*/注意:IE和火狐都添加了fill,否则背景不会自动填充到元素的content。一旦使用了单个属性,那么就不能添加前缀,否则不生效。
按钮示例
先来一个短一点的按钮。
.box{
            width: 100px;
            height: 30px;
            border: 14px solid transparent;
            border-image-source: url("img/btn.png");
            border-image-slice: 14 fill;
       }
<div class="box"></div>
效果如图:
现在仅仅修改“width:200px”,结果按钮的长度就自动增加了,是不是很方便?


