Opencv轮廓跟踪算法源码分析并实现单步调试——icvFetchContour()
在此文章Opencv轮廓跟踪算法源码分析(1)——icvFetchContour()的基础上通过修改相关代码,实现简单集成并单步调试。
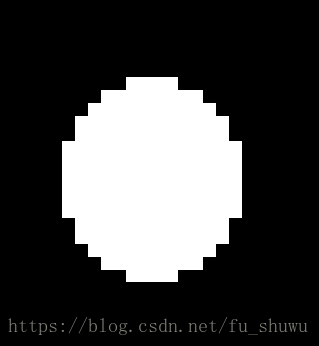
首先分析要调试的图的特性,使用画图工具手动定位到外轮廓的”起始点“在(77,126)
原图如下:
调用的修改后的fushuwu_icvFetchContour()的实参如下:
int main()
{
	Mat img0 = imread("d:/test_contour.png", 0);
	Mat img1;
	threshold(img0, img1, 1, 1, CV_THRESH_BINARY);
	imshow("img1", img1 * 255);

	vector > contours;
	vector hierarchy;
	//findContours(img1, contours, hierarchy, CV_RETR_EXTERNAL, CV_CHAIN_CODE);
	CvMat _cimage = img1;
	const CvArr* s_mat = (CvArr*)&_cimage;


	CvMat stub, *mat = cvGetMat(s_mat, &stub);
	uchar* img = (uchar*)(mat->data.ptr);

	int step = mat->step;
	schar *mmm = (schar *)img + 77 * step + 126; //the outerborder start point at(77,126)
	fushuwu_icvFetchContour(mmm, step, 0, 0);
原图展示如下:
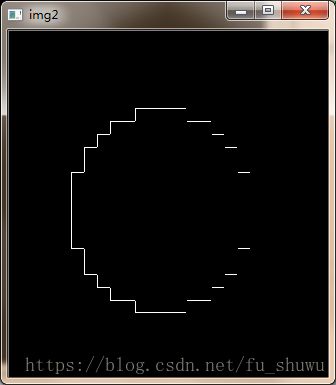
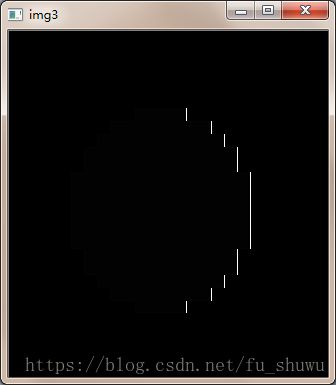
为了显示经过fushuwu_icvFetchContour()后的效果,特做了如下处理:
    Mat one = Mat::ones(img1.size(), CV_8UC1);
	Mat tt = img1 - one;
	Mat ttt = tt * 50;
	Mat sss;
	absdiff(tt * 128, ttt, sss);
	imshow("img2", sss * 40);
	imshow("img3", img1 * 2);
外轮廓的边设置为2的部分展示在img2 图上,外轮廓的边设置为2-128的部分展示在img3图上,
从上图可以看出,本修改的fushuwu_icvFetchContour()和原函数icvFetchContour()效果一致。
因此可以进行单步调试和分析了。
下面附上fushuwu_icvFetchContour()代码及部分注释:
#include "opencv2/imgproc/imgproc.hpp"
#include "opencv2/highgui/highgui.hpp"
#include
#include

using namespace cv;
using namespace std;

#define  CV_INIT_3X3_DELTAS( deltas, step, nch )            \
    ((deltas)[0] =  (nch),  (deltas)[1] = -(step) + (nch),  \
     (deltas)[2] = -(step), (deltas)[3] = -(step) - (nch),  \
     (deltas)[4] = -(nch),  (deltas)[5] =  (step) - (nch),  \
     (deltas)[6] =  (step), (deltas)[7] =  (step) + (nch))
const CvPoint icvCodeDeltas[8] =
{ CvPoint(1, 0), CvPoint(1, -1), CvPoint(0, -1), CvPoint(-1, -1), CvPoint(-1, 0), CvPoint(-1, 1), CvPoint(0, 1), CvPoint(1, 1) };


void
fushuwu_icvFetchContour(schar                  *ptr,
	int                    step,
	CvPoint                pt,
	int    _method)
{
	const schar     nbd = 2;
	int             deltas[16];
	CvSeqWriter     writer;
	schar           *i0 = ptr, *i1, *i3, *i4 = 0;
	int             prev_s = -1, s, s_end;
	int             method = _method - 1;


	/* initialize local state */
	CV_INIT_3X3_DELTAS(deltas, step, 1);
	memcpy(deltas + 8, deltas, 8 * sizeof(deltas[0]));


	//s_end = s = CV_IS_SEQ_HOLE(contour) ? 0 : 4;//如果是空洞,则从最右边的位置0开始,如果不是空洞,则从最左边位置的4开始。
	s_end = s = 4; //由于我们知道要调试的图不是空洞,直接写成4
	do
	{
		s = (s - 1) & 7;//减1表示顺时针。
		i1 = i0 + deltas[s];
	} while (*i1 == 0 && s != s_end); //在i0 的8个周围去找一个非零点。

	if (s == s_end)            /* single pixel domain *///没有找到,这是一个孤立点。
	{
		*i0 = (schar)(nbd | -128); //对于这个孤立点,要把这个设置为nbd-128

	}
	else   //否则i1 记录跟踪这个border 的最后要比较的点的位置,用于判断跟踪结束时候用的 //fushuwu
	{
		i3 = i0;            //fushuwu i3记录本次扫描的当前中心点的指针,在这个点周围查找是否有非零点存在,如果有,则把把i4去指向它。
		prev_s = s ^ 4;  // fushuwu 异或运算,相当于(s+4)&7,也就是 s逆时针转4格,转了180度的方向,赋给prev_s.   s 本身没有变,还是刚刚找到非零点的那个方向。


						 /* follow border */
		for (;; )
		{
			s_end = s;  //fushuwu 保存搜索的起始方向,用于判断下一个找到的点是否在这个点的最右边方位。

			for (;; )
			{
				i4 = i3 + deltas[++s]; //fushuwu //s先从当前点的当前方位开始自增,也就是方向逆时针转一格,在i3 位置上逆时针转一圈去查找非零像素值
				if (*i4 != 0)//fushuwu 找到下一个非零点的值。退出
					break;
			}
			s &= 7; //fushuwu s如果>=8, 则调整为 0-7.   此时,s保存了找到非零点的方向。

					/* check "right" bound */

			if ((unsigned)(s - 1) < (unsigned)s_end) //int 转换成 unsigned, 本来负数的第一位是符号位的,现在变成数值了。新找到非零点的方向在原来点的右边,则这个点需要设置为负nbd.
													 //if(*(i3+1)==0) //为什么不使用这个来判断呢,这个和论文表述的很一致,但是这个有一种情况是无法满足的,就是当两个轮廓公用了左边的一条线的时候,这个就无法做到,但是上面的算法就可以满足。
													 //	那上面的又是怎么满足的呢?我们知道s-1 =s_end+inc_s-1; s_end在0-7之间,
			{
				*i3 = (schar)(nbd | -128); //(-128)补=(1000,0000)补,也就是 nbd-128.
				cout << " s-1=" << s - 1 << " s_end=" << s_end << endl;
			}
			else if (*i3 == 1)
			{
				*i3 = nbd;   //如果不是轮廓的最右边且这个点当前是1,没有被标记过,则设置为nbd。
			}

			if (method < 0)
			{
				schar _s = (schar)s;


			}
			else
			{
				if (s != prev_s || method == 0)
				{

					prev_s = s;
				}

				pt.x += icvCodeDeltas[s].x;
				pt.y += icvCodeDeltas[s].y;

			}

			if (i4 == i0 && i3 == i1)  // 这个for 循环每次跟踪一个像素点。再次循环跟踪下一个点,直到跟踪到最后一个点
				break;

			i3 = i4;
			s = (s + 4) & 7;  //又转到当前点的最左边位置开始
		}                       /* end of border following loop */
	}


}


