windows下使用GRUB2 制作支持BIOS和UEFI的WINPE、LINUX、MAXDOS多引导U盘
前言:
因为对这块完全不了解,走了很多弯路。试了很多软件,包括GRUB4DOS、XORBOOT、syslinux等。这些软件各有特色,我也没能深入的了解,最终选择使用grub2也是因为感觉对BIOS和UEFI的支持都很好,缺点也很明显,就是不能直接支持iso和img等镜像的启动,可以通过加载syslinux的memdisk加载iso,但是memdisk不支持uefi,还有配置文件规则真的很变态,感觉在写一个前端代码。
定位:
本文定位于实操,按照步骤一步步操作基本能做出一个如下功能的U盘,对于具体理论方面不做深入探讨。
功能:
BIOS:winpe、Ubuntu18.04_x64 live、MAXDOS启动。
UEFI:winpe、Ubuntu18.04_x64 live启动。
一、BIOS和UEFI的启动过程区别
1、BIOS把MBR读出来交给CPU执行,做MBR做想做的事。
2、UEFI是查找磁盘里的\efi\boot\bootx64.efi文件,启动这个可执行程序,让这程序做想做的事。
具体更多的区别网上有很多的资料,上述只是与操作有关的关键点。
二、材料准备。
1、U盘。
2、grub-2.02-for-windows
3、syslinux 6.03
4、maxdos
5、winpe
6、ubuntu-18.04-desktop-amd64
7、分区工具(推荐DiskGenius)
三、U盘分区
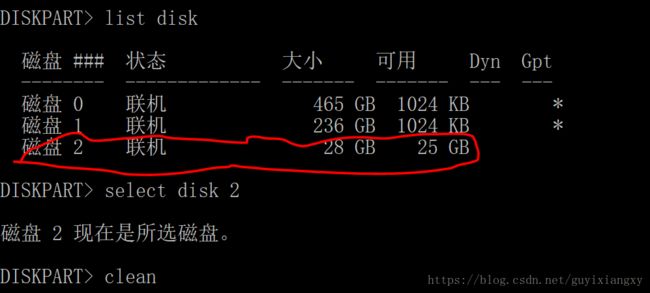
1、清空U盘,最重要的是清除MBR。U盘原来的MBR没有清除,很可能导致安装grub2失败。如果在安装过程中grub2提示“grub-install: warning: Attempting to install GRUB to a disk with multiple partition labels. This is not supported yet.. ”,一般就是因为U盘原来的MBR没有清除。清空方法:
(1)组合键win+R 运行diskpart。
(2)输入list disk,得到目前所有的磁盘。
(3)输入select disk 2 ,定位到U盘。
(4)输入命令clean,清除所有,(MBR,分区和资料)。

2、给U盘分区。我的是一个32g的U盘,分了3GB空间来做启动盘,格式为FAT32,因为要兼容UEFI,所以没有选择分区隐藏、删除等保护措施。
四、部署UEFI下的WINPE
这里说明下将部署winpe放到这么前面的原因。因为winpe启动程序寻找文件都是用的绝对路径,不是相对路径,所以下载下来的winpe镜像目录结构是怎样就必须保持绝对路径不变,这样才能使得程序顺利启动。下面是操作步骤:
1、将winpe镜像挂载或者解压。
2、全选、复制、粘贴到U盘新分的区。
五、安装grub2
1、grub-2.02-for-windows解压到C:\
2、确定磁盘号
3、管理员身份打开cmd(很重要)
4、输入cd /d C:\grub-2.02-for-windows
5、i386安装
grub-install.exe --boot-directory=G:\ --target=i386-pc //./PHYSICALDRIVE2注意下面的盘符,改成自己的。PHYSICALDRIVE2中的“2”就是第二步查到的磁盘号。
6、uefi 64为安装(注意下面的盘符,改成自己的)
grub-install.exe --boot-directory=G:\ --efi-directory=G: --removable --target=x86_64-efi7、uefi32位安装(i386安装)
grub-install.exe --boot-directory=G:\ --efi-directory=G: --removable --target=i386-efi
同样是注意盘符,改成自己的。
8、安装成功显示结果
C:\grub-2.02-for-windows>grub-install.exe –boot-directory=G:\ –target=i386-pc //./PHYSICALDRIVE2
Installing for i386-pc platform.
Installation finished. No error reported.
C:\grub-2.02-for-windows>grub-install.exe –boot-directory=G:\ –efi-directory=G: –removable –target=x86_64-efi
Installing for x86_64-efi platform.
Installation finished. No error reported.
C:\grub-2.02-for-windows>grub-install.exe –boot-directory=G:\ –efi-directory=G: –removable –target=i386-efi
Installing for i386-efi platform.
Installation finished. No error reported.
u盘根目录会生成相应的文件。
六、写grub2配置文件
1、/grub目录下新建文件grub.cfg。
2、grub.cfg内容
#
# DO NOT EDIT THIS FILE
#
# It is automatically generated by grub2-mkconfig using templates
# from /etc/grub.d and settings from /etc/default/grub
#

### BEGIN /etc/grub.d/00_header ###
if [ -s $prefix/grubenv ]; then
  load_env
fi
if [ "${next_entry}" ] ; then
   set default="${next_entry}"
   set next_entry=
   save_env next_entry
   set boot_once=true
else
   set default="0"
fi

if [ x"${feature_menuentry_id}" = xy ]; then
  menuentry_id_option="--id"
else
  menuentry_id_option=""
fi

export menuentry_id_option

if [ "${prev_saved_entry}" ]; then
  set saved_entry="${prev_saved_entry}"
  save_env saved_entry
  set prev_saved_entry=
  save_env prev_saved_entry
  set boot_once=true
fi

function savedefault {
  if [ -z "${boot_once}" ]; then
    saved_entry="${chosen}"
    save_env saved_entry
  fi
}

function load_video {
  if [ x$feature_all_video_module = xy ]; then
    insmod all_video
  else
    insmod efi_gop
    insmod efi_uga
    insmod ieee1275_fb
    insmod vbe
    insmod vga
    insmod video_bochs
    insmod video_cirrus
  fi
}

if [ x$feature_default_font_path = xy ] ; then
   font=unicode
else
    font="${prefix}/fonts/unicode.pf2"
fi


if loadfont $font ; then
    #set gfxmode=1024x768x32,1024x768x24,1024x768x16,1024x768,auto
    #set gfxpayload=keep

  loadfont /grub/fonts/dejavu-bold-16.pf2
  loadfont /gurb/fonts/dejavu-bold-14.pf2
  set gfxmode=auto

    load_video
    insmod gfxterm
    insmod png
    terminal_output gfxterm

  #set color_normal=light-gray/black
  #set color_highlight=white/black
    #background_image -m stretch $prefix/themes/splash.png
fi
if [ x$feature_timeout_style = xy ] ; then
  set timeout_style=menu
  set timeout=15
# Fallback normal timeout code in case the timeout_style feature is
# unavailable.
else
  set timeout=15
fi


set color_normal=light-gray/black
set color_highlight=white/black

if [ -e /grub/themes/starfield/starfield.png ]; then
    # binary_syslinux modifies the theme file to point to the correct
    # background picture
    set theme=/grub/themes/starfield/theme.txt
else
    set menu_color_normal=cyan/blue
    set menu_color_highlight=white/blue
fi

### END /etc/grub.d/00_header ###

### BEGIN /etc/grub.d/10_linux ###

### END /etc/grub.d/10_linux ###

### BEGIN /etc/grub.d/20_linux_xen ###
### END /etc/grub.d/20_linux_xen ###

### BEGIN /etc/grub.d/30_os-prober ###
### END /etc/grub.d/30_os-prober ###

### BEGIN /etc/grub.d/40_custom ###
# This file provides an easy way to add custom menu entries.  Simply type the
# menu entries you want to add after this comment.  Be careful not to change
# the 'exec tail' line above.
### END /etc/grub.d/40_custom ###

### BEGIN /etc/grub.d/41_custom ###
if [ -f  ${config_directory}/custom.cfg ]; then
    source ${config_directory}/custom.cfg
elif [ -z "${config_directory}" -a -f  $prefix/custom.cfg ]; then
    source $prefix/custom.cfg;
fi
### END /etc/grub.d/41_custom ###

menuentry "Restart(重启)" {
    reboot
}

menuentry "Power Off(关机)" {
    halt
}
可以测试下grub能否再BIOS和UEFI下启动。
七、提取MAXDOS镜像
1.首先安装好MaxDOS8。
2.打开 “我的电脑”→点击C盘并打开→在文件夹菜单栏点击”工具”→ 文件夹选项 → 取消“隐藏已知文件类型的扩展名”的勾选→保存确认
3.进 C:\MaxDOS\
找到 Maxs.sys 重命名为 Maxs.rar 然后解压得到 MaxDOS.exe文件,将其改名为MaxDOS.img即可。
4.将MaxDOS.img拷入到/maxdos下。
如果打开C盘找不到MaxDOS文件夹,只要安装确认安装了MaxDOS,请直接在地址栏输入”C:\MaxDOS\”,就能看到.
八、部署winpe、Ubuntu和maxdos。
1、winpe
(1)新建目录winpe,将winpe镜像拷入其中。这份镜像是给bios启动用的。
(2)再次挂载或解压winpe镜像(不要动上一步拷贝进去的winpe镜像),将/efi/boot目录下所有文件拷入/winpe中。这是UEFI引导winpe用的。
2、Ubuntu
将ubuntu-18.04-desktop-amd64.iso拷贝到根目录。
3、MAXDOS
新建目录maxdos,将前面提取的maxdos.img拷入其中。
九、编写grub2启动菜单
打开grub.cfg文件,添加如下菜单项
menuentry 'win10PE_X64(BIOS)'{
        set root='(hd0,msdos1)'
        echo 'Loading Memdisk...'
        #insmod memdisk
        linux16 /grub/syslinux/MEMDISK iso raw
        echo 'Loading ISO... may take several minutes'
        initrd16 /winpe/Win10PE_17134x64.iso
}

#启动efi件:
menuentry "win10PE_X64(UEFI)" {
echo "正在启动EFI SHELL,请等待...."
set root='(hd0,msdos1)'
#search --file /winpe/bootx64.efi --set=root
chainloader /winpe/bootx64.efi
}


menuentry 'ubuntu-18.04' {
insmod fat
insmod loopback
insmod iso9660
loopback loop (hd0,1)/ubuntu-18.04-desktop-amd64.iso
set root=(loop)
linux /casper/vmlinuz boot=casper iso-scan/filename=/ubuntu-18.04-desktop-amd64.iso noprompt noeject
initrd /casper/initrd.lz
}

menuentry "Maxdos(BIOS)"{
set root='(hd0,msdos1)'
linux16 /grub/syslinux/MEMDISK
initrd16 /maxdos/maxdos.img
}
保存后可以试下启动了。
十、疑问。
在制作过程中,有好些疑问,在此列出,望知道怎么弄得哥们告知一二。诸位在制作过程若出现任何问题,或有更好的办法,欢迎留言,共同探讨、共同进步。
1、UEFI下怎样启动DOS?
2、grub2不支持iso,所以只能使用syslinux的MEMDISK加载iso等镜像,但是MEMDISK也仅限BIOS中使用,不知UEFI有没有直接加载镜像的办法?
3、我试着把用DiskGenius镜像一份做好的启动分区,可是把镜像写入另外一个分区后发现还是用不了,初步看是镜像里没有包含MBR,不知有什么好的方法可以做一份镜像出来?
参考:
https://www.aioboot.com/en/install-grub2-from-windows/
https://github.com/slacka/WoeUSB/issues/61
https://blog.csdn.net/The_IT_Crowd/article/details/7676917