Android自定义控件方法详解
Android自定义控件方法详解
本文通过一个简单的例子来一步步教会大家实现android自定义控件,并详细讲解android自定义控件中的一些规则和方法,相信新入行的筒子们看完这篇文章能够对自定义控件有个较为全面的理解。
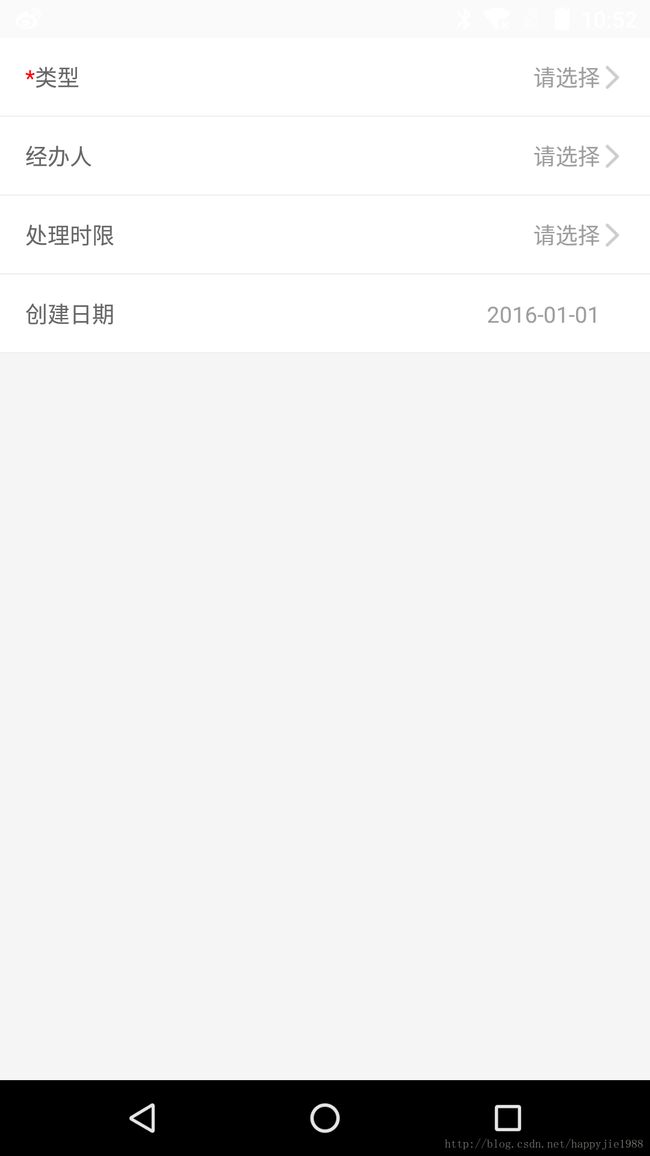
相信大家在开发过程中经常会遇到类似的布局,如下图,一般在项数不多的情况下,大家应该都会选择用LinearLayout嵌套两个TextView去实现每一项,但是如果项数很多呢?本人最近开发过程中就遇到了项数较多的情况。有人可能要说,可以用listView去实现,当然,这个问题我也想过了,如果中间又穿插着其他的布局样式,不是这么规整的一项一项摆着呢?listView实现起来恐怕就有点麻烦了。
所以,想到了用自定义控件去实现,顺便借此给大家讲讲自定义控件的具体实现方法。好了,废话不多说,直接上代码。

1.首先,你的class必须继承与View或者View的子类:
public class InputItemLayout extends LinearLayout{
}
我们可以看一下LinearLayout的继承关系:LinearLayout–>ViewGroup–>View
2.你至少需要提供一个构造函数,其中Context和AttributeSet作为参数。Context为上下文环境,AttributeSet为属性集,你在布局文件中指定的属性会包含在AttributeSet中从构造方法传入你的class中。
public InputItemLayout(Context context, AttributeSet attrs) {
        super(context, attrs);
}
3.布局文件(如果需要)
<LinearLayout xmlns:android="http://schemas.android.com/apk/res/android"
    android:layout_width="match_parent"
    android:layout_height="match_parent"
    android:gravity="center_vertical"
    android:paddingLeft="16dp"
    android:paddingRight="16dp"
    android:orientation="horizontal" >

    <TextView
        android:id="@+id/tv_star_start"
        android:layout_width="wrap_content"
        android:layout_height="wrap_content"
        android:textColor="#ff0000"
        android:text="*"
        android:visibility="gone"/>
    <TextView
        android:id="@+id/tv_name"
        android:layout_width="wrap_content"
        android:layout_height="wrap_content"
        android:singleLine="true"
        android:textSize="14sp"
        android:textColor="#666666"
        android:text="" />
    <TextView
        android:id="@+id/tv_star_end"
        android:layout_width="wrap_content"
        android:layout_height="wrap_content"
        android:textColor="#ff0000"
        android:text="*"
        android:visibility="gone"/>

    <TextView
        android:id="@+id/tv_value"
        android:layout_width="0dp"
        android:layout_height="wrap_content"
        android:layout_weight="1"
        android:gravity="center_vertical"
        android:hint="请输入"
        android:singleLine="true"
        android:ellipsize="end"
        android:textSize="14sp"
        android:textColor="#666666" />

    <ImageView
        android:id="@+id/iv_arrow"
        android:layout_width="wrap_content"
        android:layout_height="wrap_content"
        android:scaleType="matrix"
        android:src="@drawable/right_arrow" />

LinearLayout>
4.自定义控件的属性设置:
在res–>values文件家里面找到attr.xml文件(若无,可自己新建),按照规则去设置自定义控件的属性名称及类型:
<declare-styleable name="InputItemLayout">
        <attr name="keytext" format="string" />
        <attr name="texthint" format="string" />
        <attr name="keytextcolor" format="color"/>
        <attr name="contenttextcolor" format="color"/>
        <attr name="keytextwidth" format="dimension"/>
        <attr name="contenttextgravity">
            <flag name="left" value="0" />
            <flag name="right" value="1" />
        attr>
declare-styleable>
规则是固定的,name一般与自定义控件的类名相同,,name即属性名,可根据自己的喜好自由发挥,但是一般也是按照其作用来命名,这样方便使用的时候根据名字就能知道是做啥用的。format表示这个属性的值的类型,类型分为以下几种:
reference:引用资源
string:字符串
Color:颜色
boolean:布尔值
dimension:尺寸值
float:浮点型
integer:整型
fraction:百分数
enum:枚举类型
flag:位或运算
5.属性值得使用:
我们定义了属性值,在哪里使用呢?我们在第二步说过,你在布局文件中指定的属性会包含在AttributeSet中从构造方法传入你的class中。那么具体看下构造方法的代码:
public InputItemLayout(Context context, AttributeSet attrs) {
        super(context, attrs);
        LayoutInflater.from(context).inflate(R.layout.layout_input_item, this);
        TypedArray a = context.obtainStyledAttributes(attrs, R.styleable.InputItemLayout);
        tvName = (TextView) findViewById(R.id.tv_name);
        if(!isInEditMode()){
            ivArrow = (ImageView) findViewById(R.id.iv_arrow);
        }
        TextView tv_star_start = (TextView) findViewById(R.id.tv_star_start);
        TextView tv_star_end = (TextView) findViewById(R.id.tv_star_end);
        name = a.getString(R.styleable.InputItemLayout_keytext);
        if(name != null && name.startsWith("*")){
            tv_star_start.setVisibility(View.VISIBLE);
            tvName.setText(name.substring(1));
        } else if(name != null && name.endsWith("*")){
            tv_star_end.setVisibility(View.VISIBLE);
            tvName.setText(name.substring(0, name.length() - 1));
        } else {
            tvName.setText(name);
        }

        tvDisplay = (TextView) findViewById(R.id.tv_value);
        if(!TextUtils.isEmpty(a.getString(R.styleable.InputItemLayout_texthint))){
            tvDisplay.setHint(a.getString(R.styleable.InputItemLayout_texthint));
        }

        int color1 = a.getColor(R.styleable.InputItemLayout_keytextcolor, Color.parseColor("#666666"));
        int color2 = a.getColor(R.styleable.InputItemLayout_contenttextcolor, Color.parseColor("#999999"));

        keyTextWidth = a.getDimension(R.styleable.InputItemLayout_keytextwidth, dp2px(context, 70));
        ViewGroup.LayoutParams layoutParams = tvName.getLayoutParams();
        layoutParams.width = (int) keyTextWidth;

        int contenttextgravity = a.getInt(R.styleable.InputItemLayout_contenttextgravity, GRAVITY_LEFT);
        if(GRAVITY_RIGHT == contenttextgravity){
            tvDisplay.setGravity(Gravity.RIGHT|Gravity.CENTER_VERTICAL);
        } else {
            tvDisplay.setGravity(Gravity.LEFT|Gravity.CENTER_VERTICAL);
        }

        tvName.requestLayout();
        tvName.setTextColor(color1);
        tvDisplay.setTextColor(color2);
        a.recycle();
}
TypedArray a = context.obtainStyledAttributes(attrs, R.styleable.InputItemLayout);
通过上面这行代码,将我们在布局文件中设置的属性值获取并存入到TypedArray集合中,然后通过
a.getColor(R.styleable.InputItemLayout_keytextcolor, Color.parseColor(“#666666”));来获取具体的属性值,获取具体属性值有一个规则,当get属性值时,需要对应到属性的类型,如果属性是String类型的,则getString(),如果是Color类型的,则getColor();第一个参数为属性序号,格式为:R.styleable.+属性集的名称+“_”+具体的属性名称;第二个参数若有,则一般为缺省值。
自此,自定义控件的功能基本实现了,我们只需要在布局文件中使用即可。当然,你也可以在自定义控件中添加自定义方法,来实现更多的功能。
6.添加自定义方法:
比如我想显示图片中每一行右边的箭头是否显示,可以用下面的方法
public void setArrowShow(boolean isShow){
        ivArrow.setVisibility(isShow ? View.VISIBLE : View.INVISIBLE);
    }
当然,这只是一个简单的功能,你可以通过代码去实现更多复杂炫酷的功能。
7.在布局文件中使用自定义控件
<LinearLayout xmlns:android="http://schemas.android.com/apk/res/android"
    android:id="@+id/container"
    xmlns:app="http://schemas.android.com/apk/res-auto"
    android:layout_width="match_parent"
    android:layout_height="match_parent"
    android:background="#f5f5f5"
    android:orientation="vertical">

    <com.example.asus.myapplication.InputItemLayout
        android:id="@+id/ll_type"
        style="@style/inputItemLayout"
        android:clickable="true"
        app:contenttextgravity="right"
        app:keytext="*类型"
        app:texthint="请选择"
        android:onClick="doClick"/>

    <com.example.asus.myapplication.InputItemLayout
        android:id="@+id/ll_duty_people"
        style="@style/inputItemLayout"
        android:clickable="true"
        app:contenttextgravity="right"
        app:keytext="经办人"
        app:texthint="请选择"
        android:onClick="doClick"/>

    <com.example.asus.myapplication.InputItemLayout
        android:id="@+id/ll_finish_date"
        style="@style/inputItemLayout"
        android:clickable="true"
        app:contenttextgravity="right"
        app:keytext="处理时限"
        app:texthint="请选择"
        android:onClick="doClick"/>


    <com.example.asus.myapplication.InputItemLayout
        android:id="@+id/ll_create_date"
        style="@style/inputItemLayout"
        android:clickable="true"
        app:contenttextgravity="right"
        app:keytext="创建日期"
        app:texthint="2016-01-01"
        android:onClick="doClick"/>

LinearLayout>
最后附上github demo地址:https://github.com/happyjie/InputItemLayoutDemo
第一次写类似的东西,一是学习,而是帮助新入行的筒子们能够快速进入状态,文章中有错误或者不够周到的地方,还烦请各位不吝赐教,谢谢大家。