【Spring实战】----Security4.1.3实现根据请求跳转不同登录页以及登录后根据权限跳转到不同页配置
一、背景介绍
上一篇最后总结说了:
那么这里要实现题目中说的(登录后根据权限跳转到不同页是指直接点击登录的情况,如果是有原请求跳转过来的,登录成功并且认证成功后跳转到原请求页),需要如下操作
1)自定义LoginUrlAuthenticationEntryPoint实现跳转到不同登录页,如用户订单请求跳转到用户登录页,管理中心请求跳转到管理员登录页
2)自定义SavedRequestAwareAuthenticationSuccessHandler实现直接点击登录成功后跳转到指定的页,如用户登录后跳转到首页,管理员登陆后跳转到管理中心
3)此问题涉及了两种权限的用户登录,ROLE_USER及ROLE_MANAGER,还需要配置AccessDeniedHandlerImpl来处理虽然登录成功了确没有权限访问的情况。
4)还需要自定义SimpleUrlAuthenticationFailureHandler来实现登录失败的情况,主要是用户不存在或密码错误问题。这种情况下能够实现从哪个登录页面过来的还是返回原登录页,并携带错误信息
5)还需要配置login-processing-url属性,能够拦截/manager/login和/login提交,从而经过UsernamePasswordAuthenticationFilter时对其进行登录验证(requiresAuthentication(request, response)判断)
下面对其一一说明
二、全部配置如下:
三、MyAuthenticationEntryPoint配置
根据请求路径跳转到不同的登录页面(其他实现方式也可),其中key是匹配的路径,value是要跳转的登录页,关键代码如下:
/**
 * 被认证请求向登录页面跳转的控制 根据被请求所需权限向不同登录页面跳转
 *
 * @author HHL
 *
 * @date 2016年12月20日
 */
public class MyAuthenticationEntryPoint extends
		LoginUrlAuthenticationEntryPoint {

	public MyAuthenticationEntryPoint(String loginFormUrl) {
		super(loginFormUrl);
	}

	private Map authEntryPointMap;
	private PathMatcher pathMatcher = new AntPathMatcher();

	@Override
	protected String determineUrlToUseForThisRequest(
			HttpServletRequest request, HttpServletResponse response,
			AuthenticationException exception) {
		String requestURI = request.getRequestURI().replace(
				request.getContextPath(), "");
		for (String url : this.authEntryPointMap.keySet()) {
			if (this.pathMatcher.match(url, requestURI)) {
				return this.authEntryPointMap.get(url);
			}
		}
		return super.determineUrlToUseForThisRequest(request, response,
				exception);
	}


	public PathMatcher getPathMatcher() {
		return pathMatcher;
	}

	public void setPathMatcher(PathMatcher pathMatcher) {
		this.pathMatcher = pathMatcher;
	}


	public Map getAuthEntryPointMap() {
		return authEntryPointMap;
	}

	public void setAuthEntryPointMap(Map authEntryPointMap) {
		this.authEntryPointMap = authEntryPointMap;
	}

}
该类重写了父类的determineUrlToUseForThisRequest,实现了根据请求路径返回不同的登录页路径,从而在父类的commence方法中跳转到根据请求路径返回的登录页。其中spring的AntPathMatcher类及AntPathRequestMatcher可以实现路径的匹配工作。
这里实现了"/user/**"相关的路径跳转到用户登录页面"/login","/manager/**"相关的页面跳转到管理员登录页面"/manager/login",上面两者没有匹配的"/**",均跳转到用户登录页面"/login"。当然上述的前提条件是请求路径需要权限,也就是有如下配置:
四、myAuthenticationSuccessHandler配置
主要配置
其中map中的key为登录后的用户权限,value代表要直接点击登录的情况下登录成功后要跳转的页面,关键代码处理
/**
 * 登录授权成功后操作控制,如果是直接点击登录的情况下,根据授权权限跳转不同页面; 否则跳转到原请求页面
 *
 * @author HHL
 * @date
 *
 */
public class MyAuthenticationSuccessHandler extends
		SavedRequestAwareAuthenticationSuccessHandler {
	private Map authDispatcherMap;
	private RequestCache requestCache = new HttpSessionRequestCache();

	@Autowired
	private IUserService userService;

	@Override
	public void onAuthenticationSuccess(HttpServletRequest request,
			HttpServletResponse response, Authentication authentication)
			throws IOException, ServletException {
		// 获取用户权限
		Collection authCollection = authentication
				.getAuthorities();
		if (authCollection.isEmpty()) {
			return;
		}

		// 认证成功后,获取用户信息并添加到session中
		UserDetails userDetails = (UserDetails) authentication.getPrincipal();
		MangoUser user = userService.getUserByName(userDetails.getUsername());
		request.getSession().setAttribute("user", user);

		String url = null;
		// 从别的请求页面跳转过来的情况,savedRequest不为空
		SavedRequest savedRequest = requestCache.getRequest(request, response);
		if (savedRequest != null) {
			url = savedRequest.getRedirectUrl();
		}

		// 直接点击登录页面,根据登录用户的权限跳转到不同的页面
		if (url == null) {
			for (GrantedAuthority auth : authCollection) {
				url = authDispatcherMap.get(auth.getAuthority());
			}
			getRedirectStrategy().sendRedirect(request, response, url);
		}

		super.onAuthenticationSuccess(request, response, authentication);

	}


	public RequestCache getRequestCache() {
		return requestCache;
	}

	public void setRequestCache(RequestCache requestCache) {
		this.requestCache = requestCache;
	}


	public Map getAuthDispatcherMap() {
		return authDispatcherMap;
	}

	public void setAuthDispatcherMap(Map authDispatcherMap) {
		this.authDispatcherMap = authDispatcherMap;
	}

}
其中用从requestCache中获取到的savedRequest来判断是否是直接点击登录还是从其他页面跳转过来的,上一篇也说过从savedRequest获取实质上是从session中获取,因此这里的requestCache实例可以为任一实例。
这里就实现了如果是直接点击登录的成功后,用户登录的跳转到首页"/",管理员登录的就跳转到管理中心“/manager”;如果是从其他请求页过来的还是返回原请求页面。
五、myAuthenticationFailureHandler
登录失败后,没有用户或者密码错误的情况下,主要配置
其中依赖了myAuthenticationEntryPoint,就是要根据登录路径,返回到原登录页面,并携带错误信息,这里就需要管理登录的form action设置不同
<%@ page language="java" pageEncoding="UTF-8" contentType="text/html;charset=UTF-8"%>
<%@ include file="../../includes/taglibs.jsp"%>
Mango-managerLogin
请管理员登录!
其中action是/manager/login,和用户登录页中的/login是区分开的,这样利用myAuthenticationEntryPoint就可以根据路径返回到对应的登录界面,关键代码:
/**
 * 登录失败控制
 *
 * @author HHL
 *
 * @date 2016年12月20日
 */
public class MyAuthenticationFailureHandler extends
		SimpleUrlAuthenticationFailureHandler {
	private MyAuthenticationEntryPoint loginEntry;

	public MyAuthenticationEntryPoint getLoginEntry() {
		return loginEntry;
	}

	public void setLoginEntry(MyAuthenticationEntryPoint loginEntry) {
		this.loginEntry = loginEntry;
	}

	@Override
	public void onAuthenticationFailure(HttpServletRequest request,
			HttpServletResponse response, AuthenticationException exception)
			throws IOException, ServletException {
		// 从loginEntry中获取登录失败要跳转的url,并加上错误信息error
		String authenfailureUrl = this.loginEntry
				.determineUrlToUseForThisRequest(request, response, exception);
		authenfailureUrl = authenfailureUrl + "?error";
		super.setDefaultFailureUrl(authenfailureUrl);
		super.onAuthenticationFailure(request, response, exception);

	}

}
该类覆盖了父类的onAuthenticationFailure,根据请求路径,如果是“/manager/login”就和MyAuthenticationEntryPoint中的“/manager/**”相匹配,返回路径为“/manager/login”‘;“/login”的情况也类似,返回到“/login”;然后添加上?error,并设置到父类的setDefaultFailureUrl,由父类的onAuthenticationFailure执行跳转。
当然contoller中要如下配置:
/**
 * @author HHL
 *
 *
 *         管理员控制类
 */
@Controller
public class ManagerController {

	/**
	 * 管理中心首页
	 *
	 * @param model
	 * @return
	 */
	@RequestMapping("/manager")
	public String login(Model model) {
		return "manager/index";
	}

	/**
	 * 显示登录页面用,主要是显示错误信息
	 *
	 * @param model
	 * @param error
	 * @return
	 */
	@RequestMapping("/manager/login")
	public String login(Model model,
			@RequestParam(value = "error", required = false) String error) {
		if (error != null) {
			model.addAttribute("error", "用户名或密码错误");
		}
		return "manager/login";
	}
}
如果登录失败则error为"",满足不为null的条件
六、login-processing-url配置
既然两个登录页中的form action不同,那么login-processing-url配置对两者均要进行拦截:
login-processing-url="/**/login"这里的"/**/login"对"/manager/login"和"/login"均能实现拦截,由UsernamePasswordAuthenticationFilter进行拦截,match部分是由Spring中的AntPathRequestMatcher实现的。
工作在父类AbstractAuthenticationProcessingFilter的requiresAuthentication方法
/**
	 * Indicates whether this filter should attempt to process a login request for the
	 * current invocation.
	 *
	 * It strips any parameters from the "path" section of the request URL (such as the
	 * jsessionid parameter in http://host/myapp/index.html;jsessionid=blah)
	 * before matching against the filterProcessesUrl property.
	 *
	 * Subclasses may override for special requirements, such as Tapestry integration.
	 *
	 * @return true if the filter should attempt authentication,
	 * false otherwise.
	 */
	protected boolean requiresAuthentication(HttpServletRequest request,
			HttpServletResponse response) {
		return requiresAuthenticationRequestMatcher.matches(request);
	}
可见UsernamePasswordAuthenticationFilter完成了用户的登录工作(用户是否存在,密码是否正确,和数据源只能的用户信息对比)
七、access-denied-handler
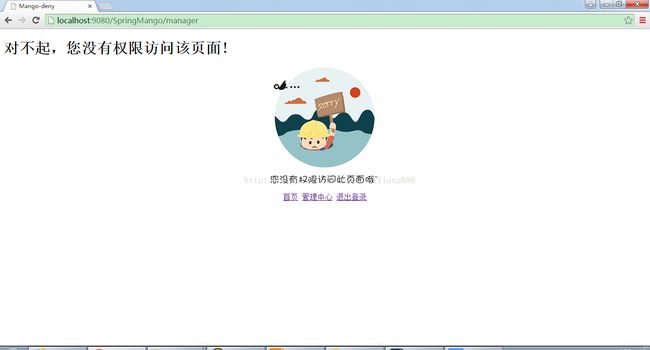
访问拒绝,该配置中有两种用户权限'ROLE_USER'和'ROLE_MANAGER',当用户登录时具有'ROLE_USER'权限,当管理员登录时具有'ROLE_MANAGER'权限;因此当用户登录的情况下访问管理中心,这个时候权限就不充分,Security系统会抛403错误,拒绝访问,那么这里就需要配置错误页,根据access-denied-handler标签就可以配置
路径为"/security/deny"
/**
 * security控制类
 *
 * @author HHL
 *
 * @date 2016年12月20日
 */
@Controller
public class SecurityController {

	/**
	 * 拒绝访问时跳转页面
	 *
	 * @param request
	 * @param response
	 * @return
	 */
	@RequestMapping("/security/deny")
	public String deny(HttpServletRequest request,HttpServletResponse response){
		return "security_deny";
	}
}
页面为security_deny.jsp
<%@ page language="java" pageEncoding="UTF-8" contentType="text/html;charset=UTF-8"%>
<%@ include file="../includes/taglibs.jsp"%>
Mango-deny
对不起,您没有权限访问该页面!
效果如下:
完整代码如下:https://github.com/honghailiang/SpringMango

