Python Excel操作模块XlsxWriter之写入富字符串worksheet.write_rich_string()
worksheet.write_rich_string()
write_rich_string(row, col, *string_parts[, cell_format])
向工作表单元格写入多格式的“富”字符串。
参数:
- row(int) - 单元格所在的行(索引从0开始计数)。
- col(int) - 单元格所在的列(索引从0开始计数)。
- string_parts(list) - 字符串-格式对。
- cell_format(Format) - 可选的格式化对象。
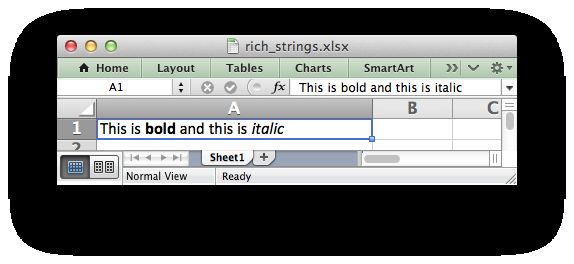
write_rich_string()方法用于写入含有多种格式的字符串。例如写入“This is bold and this is italic”你得这么做:
bold   = workbook.add_format({'bold': True})
italic = workbook.add_format({'italic': True})

worksheet.write_rich_string('A1',
                            'This is ',
                            bold, 'bold',
                            ' and this is ',
italic, 'italic')基本法则是将字符串分段并将Format对象放在你想要格式化的片段前面。比如:
# 没有被格式化的字符串。
'This is an example string'

# 将字符串分段。
'This is an ', 'example', ' string'

# 将格式对象放在你想要格式化的片段前面。
'This is an ', format, 'example', ' string'

# 在XlsxWriter里这么用。
worksheet.write_rich_string('A1',
                            'This is an ', format, 'example', ' string')
没有格式的字符串片段会给定默认格式。比如在写入字符串“Some bold text”时你下面第一个例子和第二个例子是等价的:
# bold格式和默认格式。
bold    = workbook.add_format({'bold': True})
default = workbook.add_format()

# 默认格式化:
worksheet.write_rich_string('A1',
                            'Some ',
                            bold, 'bold',
                            ' text')

# 或者更显式的写法:
worksheet.write_rich_string('A1',
                             default, 'Some ',
                             bold,    'bold',
                             default, ' text')
在Excel中只有像字体名称,样式,大小,下划线,颜色,效果这样的字体属性会被应用到富字符串中的字符串片段上。其他诸如边框,背景,文本框,对齐方式的特性必须在单元格中应用。
write_rich_string()方法允许你通过将最后一个参数作为单元格格式(如果这是个格式化对象)来写入富字符串。下面是一个在单元格居中富字符串的例子:
bold   = workbook.add_format({'bold': True})
center = workbook.add_format({'align': 'center'})

worksheet.write_rich_string('A5',
                            'Some ',
                            bold, 'bold text',
                            ' centered',
                            center)
例:写入含有多个格式的“富”字符串
这是一个向工作表单元格写入含有多个格式的富字符串的例子。
#######################################################################
#
# An example of using Python and XlsxWriter to write some "rich strings",
# i.e., strings with multiple formats.
#
# Copyright 2013-2017, John McNamara, [email protected]
#
import xlsxwriter

workbook = xlsxwriter.Workbook('rich_strings.xlsx')
worksheet = workbook.add_worksheet()

worksheet.set_column('A:A', 30)

# 设置一些格式。
bold = workbook.add_format({'bold': True})
italic = workbook.add_format({'italic': True})
red = workbook.add_format({'color': 'red'})
blue = workbook.add_format({'color': 'blue'})
center = workbook.add_format({'align': 'center'})
superscript = workbook.add_format({'font_script': 1})

# 写入几个含有多种格式的字符串
worksheet.write_rich_string('A1',
                            'This is ',
                            bold, 'bold',
                            ' and this is ',
                            italic, 'italic')

worksheet.write_rich_string('A3',
                            'This is ',
                            red, 'red',
                            ' and this is ',
                            blue, 'blue')

worksheet.write_rich_string('A5',
                            'Some ',
                            bold, 'bold text',
                            ' centered',
                            center)

worksheet.write_rich_string('A7',
                            italic,
                            'j = k',
                            superscript, '(n-1)',
                            center)

workbook.close()
例:合并含有富字符串的的单元格
这是一个合并含有富字符串单元格的例子。
使用标准XlsxWriter API我们只能将简单类型的字符串写入合并范围,所以我们先将一个空字符串写入合并范围。然后用富字符串覆盖第一个合并了的单元格。
注意我们也必须传递在最后用于合并了的单元格的单元格格式。
##############################################################################
#
# An  example of merging cells which contain a rich string using the
# XlsxWriter Python module.
#
# Copyright 2013-2017, John McNamara, [email protected]
#
import xlsxwriter


# 创建一个新Excel文件并添加一个工作表。
workbook = xlsxwriter.Workbook('merge_rich_string.xlsx')
worksheet = workbook.add_worksheet()

# 设置一些格式。
red = workbook.add_format({'color': 'red'})
blue = workbook.add_format({'color': 'blue'})
cell_format = workbook.add_format({'align': 'center',
                                   'valign': 'vcenter',
                                   'border': 1})

# 我们只能向合并范围写入简单类型,所以我们写了个空字符串。
worksheet.merge_range('B2:E5', "", cell_format)

# 然后我们用富字符串覆盖第一个合并了的单元格。
# 注意我们必须传递最后用于合并了的单元格的单元格格式。
worksheet.write_rich_string('B2',
                            'This is ',
                            red, 'red',
                            ' and this is ',
                            blue, 'blue',
                            cell_format)

workbook.close()

