OpenCV学习笔记(11):libfacedetection人脸检测的配置与使用


特别说明

  这是几年前的帖子了,当时于仕琪老师的libfacedetection库和现在有很大不同,尤其是2018年以后,引入了CNN方法,并且完全开源了。想要用最新版Demo的童鞋,直接在于仕琪老师的GitHub里面下载学习即可。需要早期版本的童鞋,可以点击下载 (百度网盘提取码: vqpd)
                               ——本文作者


1. 前言

libfacedetection库是深圳大学的于仕琪老师发布的开源人脸检测库,相比于OpenCV自带的CascadeClassifier人脸检测,无论在速度上还是精度上,都有巨大的优势,是目前已知开源库中最好用的一款。

本文通过学习libfacedetection库中的example,进行人脸检测程序的简单实现。

2. 开发环境

  • OpenCV3.3
  • Windows 10 64位
  • Visual Studio 2013 Ultimate

3. 配置过程

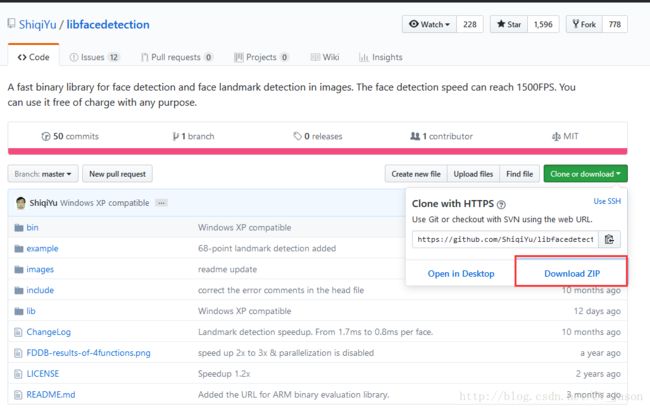
3.1 libfacedetection的下载

在GitHub上下载libfacedetection的最新库文件(https://github.com/ShiqiYu/libfacedetection)

OpenCV学习笔记(11):libfacedetection人脸检测的配置与使用_第1张图片

3.2 新建VS工程

OpenCV学习笔记(11):libfacedetection人脸检测的配置与使用_第2张图片

将下载好的libfacedetection文件夹中的几个文件拖拽到faceDetection工程的根目录,包括——

  • libfacedetect-x64.dll
  • libfacedetect-x64.lib
  • facedetect-dll.h
    ####3.3 配置VS属性
    先配置opencv

OpenCV学习笔记(11):libfacedetection人脸检测的配置与使用_第3张图片

然后在链接器中配置libfacedetection的库文件,注意,64位的要配置成libfacedetect-x64.lib
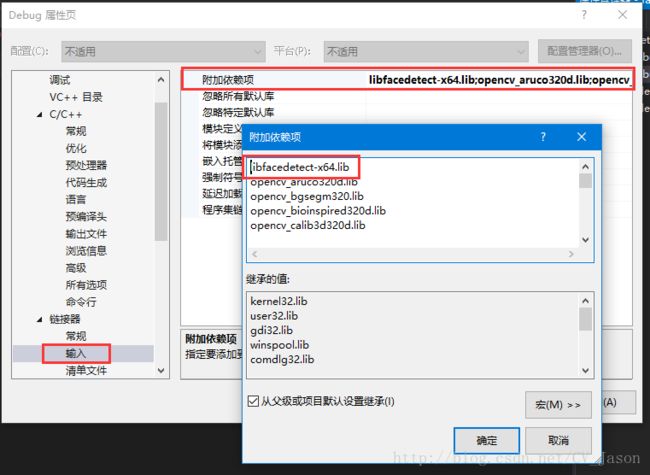
OpenCV学习笔记(11):libfacedetection人脸检测的配置与使用_第4张图片

注意,libfacedetection库中使用了比较底层的fopen函数,VS2013对fopen报编译错误,需要设置如下——

OpenCV学习笔记(11):libfacedetection人脸检测的配置与使用_第5张图片

在C++命令行中添加 /D _CRT_SECURE_NO_WARNINGS

4. 源代码示例

这是对libfacedetection文件中example进行的修改使用,example提供了4个人脸检测函数,分别是facedetect_frontal、facedetect_frontal_surveillance、facedetect_multiview、facedetect_multiview_reinforce,四个函数应该是对应不同的使用场景,性能有所不同,但参数类型完全一致,可以根据需要进行调整。

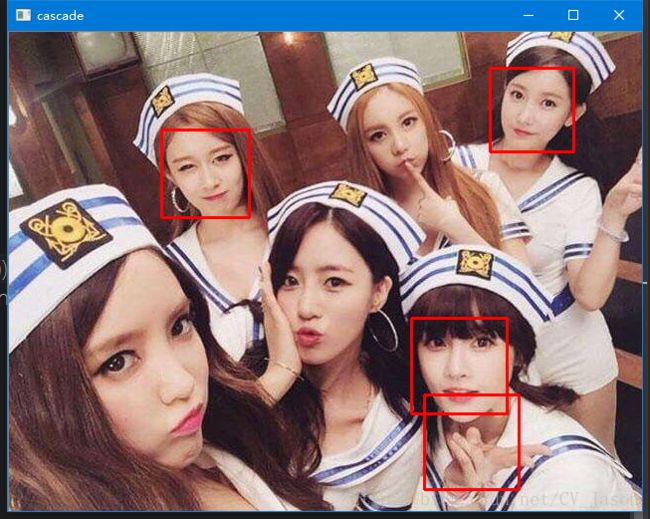
该代码使用了 facedetect_multiview 和 OpenCV自带的CascadeClassifier进行比较,可以看出于仕琪老师的libfacedetection具有更强的性能。

#include"facedetect-dll.h"
#include
#include

#define DETECT_BUFFER_SIZE 0x20000

using namespace std;
using namespace cv;

void faceDetection(const Mat&image){

	Mat gray;
	cvtColor(image, gray, CV_BGR2GRAY);

	int * pResults = NULL;
	unsigned char * pBuffer = (unsigned char *)malloc(DETECT_BUFFER_SIZE);
	int doLandmark = 1;

	pResults = facedetect_multiview_reinforce(pBuffer, 
		(unsigned char*)(gray.ptr(0)), 
		gray.cols, 
		gray.rows, 
		(int)gray.step,
		1.2f, 2, 48, 0, 
		doLandmark);

	printf("%d faces detected.\n", (pResults ? *pResults : 0));
	Mat result_multiview = image.clone();;

	for (int i = 0; i < (pResults ? *pResults : 0); i++)
	{
		short * p = ((short*)(pResults + 1)) + 142 * i;
		int x = p[0];
		int y = p[1];
		int w = p[2];
		int h = p[3];
		int neighbors = p[4];
		int angle = p[5];

		printf("face_rect=[%d, %d, %d, %d], neighbors=%d, angle=%d\n", x, y, w, h, neighbors, angle);
		rectangle(result_multiview, Rect(x, y, w, h), Scalar(0, 255, 0), 2);
	}
	imshow("face", result_multiview);
	waitKey(0);
	free(pResults);
}
int main(){
	Mat src = imread("test.png", IMREAD_COLOR);

	faceDetection(src);
	
	CascadeClassifier ccf;
	vector<Rect> faceBox;
	ccf.load("haarcascade_frontalface_default.xml");
	ccf.detectMultiScale(src, faceBox, 1.1,3, 0, Size(20, 20), Size(100, 100));
	for (vector<Rect>::const_iterator i = faceBox.begin(); i != faceBox.end(); i++)
	{
		rectangle(src, (*i), Scalar(0, 0, 255), 2);
	}
	imshow("cascade", src);
	waitKey(0);
	return 0;
}

5. 结果对比

libfacedetection识别Tara女团结果
OpenCV学习笔记(11):libfacedetection人脸检测的配置与使用_第6张图片

OpenCV CascadeClassifier 识别Tara
OpenCV学习笔记(11):libfacedetection人脸检测的配置与使用_第7张图片

你可能感兴趣的:(OpenCV)