IBM Hyperledger Fabric应用项目 --3单机手动编译部署first-network网络
1. Hyperledger Fabric自动编译部署first-network网络
上一篇博客 详细讲解了Hyperledger Fabric v1.4在Ubuntu 16.04 LTS上的安装。安装成功之后,当前用户的路径/home/$USER上面会有一个名为fabric-samples的文件夹,该文件夹存放一些Hyperledger Fabric的案例模板。本文主要讲解fabric-samples中的一个重要案例first-network。
1.1. 启动first-network
首先,我们想要自动编译运行first-network看看程序的运行结果。操作如下:进入first-network的文件夹,然后通过./byfn.sh up启动first-network应用程序,如下,
~$ cd /home/$USER/fabric-samples/first-network
~$ ./byfn.sh up
如果最后有如下输出,说明程序运行成功。
===================== Query successful on peer1.org2 on channel 'mychannel' =====================

========= All GOOD, BYFN execution completed ===========


 _____   _   _   ____
| ____| | \ | | |  _ \
|  _|   |  \| | | | | |
| |___  | |\  | | |_| |
|_____| |_| \_| |____/
1.2. 关闭first-network
为了确保能再次启动应用,我们通过下面语句关闭应用。
~$ cd /home/$USER/fabric-samples/first-network
~$ ./byfn.sh up
如果最后有如下输出,说明程序成功关闭。
proceeding ...
Stopping cli                    ... done
Stopping peer1.org1.example.com ... done
Stopping peer1.org2.example.com ... done
Stopping peer0.org1.example.com ... done
Stopping orderer.example.com    ... done
Stopping peer0.org2.example.com ... done
Removing cli                    ... done
Removing peer1.org1.example.com ... done
Removing peer1.org2.example.com ... done
Removing peer0.org1.example.com ... done
Removing orderer.example.com    ... done
Removing peer0.org2.example.com ... done
...
...
...
Deleted: sha256:65e8d9877ca0f15c8e29322f2da76b432f142c8344095be6354cf166891c0c77
Deleted: sha256:f68e65f234b6efa74fccff99459babcdcb6eaaa1f7887770e92ac6fc1963b296
Deleted: sha256:fe2a54db40cbf724d204b1a1fde9f1125555cf7968b1ae5e5085f6e47112b1d0
Deleted: sha256:48620238fa325011b78e41331a396bdb0924a453fdbc29ce77ba44a028b9900b
Untagged: dev-peer0.org1.example.com-mycc-1.0-384f11f484b9302df90b453200cfb25174305fce8f53f4e94d45ee3b6cab0ce9:latest
Deleted: sha256:2d49e41ff20e0c502e8c8d27fefcc0f05e679b23eb668fa7e4131339d45a550d
Deleted: sha256:54a5c0ac546dbda9405394923c8447ab1b22d1c7c1833f6bb240fd84fae66e53
Deleted: sha256:cac5647c797e9445f6b207f1c22970f6cf511c133787652e3f2858cd80718258
Deleted: sha256:e037a46179576caeb8da2e1ec5ad7ea22495db63f2b25f048716d36ea6e709a8
Untagged: dev-peer0.org2.example.com-mycc-1.0-15b571b3ce849066b7ec74497da3b27e54e0df1345daff3951b94245ce09c42b:latest
Deleted: sha256:04b96b76e7535f35ab665987a0ad6c235c4b1ed47efd08182f7a5771d5770dd6
Deleted: sha256:aaf7944806faac0e6234f811f8c283ad337ca22fdb6f1fd326192862546ca4e0
Deleted: sha256:cdf3440491360eff0f458982ccdfee926eaabd170072c345cf3930b570b47849
Deleted: sha256:06b4468121ef4159c13621faca1fb132a1f66df4be64bc3c908378524bb3e55d
2. Hyperledger Fabric手动编译部署first-network网络
为了更深地理解first-network网络,我们再次编译部署first-network网络。不同的是,本次我们采用手动编译部署的方式,而非自动部署。
2.1. 清理配置环境
为了避免Hyperledger Fabric端口占用的错误,运行之后需要执行./byfn.sh up命令之后,关闭Hyperledger Fabric的镜像容器。可以通过docker ps命令校验查看容器状态。如果本地已经没有Hyperledger Fabric的镜像容器运行,显示如下,
![]()
如果显示还有Hyperledger Fabric相关的容器在运行,可以通过如下命令关闭容器。
~$ cd /home/$USER/fabric-samples/first-network
~$ rm -rf crypto-config
~$ cd /home/$USER/fabric-samples/first-network/channel-artifacts
~$ rm *
~$ docker kill $(docker ps -aq)
~$ docker rm $(docker ps -aq)
~$ docker ps
2.2. 生成网络组成的配置文件
自定义网络组成部分,为一个Orderer,两个组织Org1和Org2,其中每一个组织分别包含两个节点Peer1和Peer2。
~$ cd /home/$USER/fabric-samples/first-network
~$ touch crypto-config.yaml
将上述自定义网络组成信息写入/home/$USER/fabric-samples/first-network路径下面的crypto-config.yaml配置文件中。
OrdererOrgs:
  - Name: Orderer
    Domain: example.com
    Specs:
      - Hostname: orderer
PeerOrgs:
  - Name: Org1
    Domain: org1.example.com
    EnableNodeOUs: true
    Template:
      Count: 2
    Users:
      Count: 1
  - Name: Org2
    Domain: org2.example.com
    EnableNodeOUs: true
    Template:
      Count: 2
    Users:
      Count: 1
部署该网络配置文件命令如下,
~$ cd /home/$USER/fabric-samples/first-network
~$ ../bin/cryptogen generate --config=./crypto-config.yaml
2.3. 生成Genesis Block, Channel, Configuration Transaction
生成Genesis Block, 如下,
~$ cd /home/$USER/fabric-samples/first-network
~$ export FABRIC_CFG_PATH=$PWD
~$ ../bin/configtxgen -profile TwoOrgsOrdererGenesis -outputBlock ./channel-artifacts/genesis.block
生成Channel Transaction, 如下
~$ cd /home/$USER/fabric-samples/first-network
~$ export CHANNEL_NAME=mychannel
~$ ../bin/configtxgen -profile TwoOrgsChannel -outputCreateChannelTx ./channel-artifacts/channel.tx -channelID $CHANNEL_NAME
Channel Transaction成功生成之后,显示如下,

生成每一个Organization的Anchor Peer的Transaction
~$ cd /home/$USER/fabric-samples/first-network
~$ ../bin/configtxgen -profile TwoOrgsChannel -outputAnchorPeersUpdate ./channel-artifacts/Org1MSPanchors.tx -channelID $CHANNEL_NAME -asOrg Org1MSP
~$ ../bin/configtxgen -profile TwoOrgsChannel -outputAnchorPeersUpdate ./channel-artifacts/Org2MSPanchors.tx -channelID $CHANNEL_NAME -asOrg Org2MSP
每一个Organization的Anchor Peer的Transaction生成之后,显示如下,

Hyperledger Fabric的Genesis Block, Channel, Configuration Transaction的配置文件生成完毕。
2.4. 通过Docker Composer启动配置好的Hyperledger Fabric网络配置文件
运行网络的管理部分Command-line Interface (CLI)的配置文件docker-compose-cli.yaml,如下,
~$ cd /home/$USER/fabric-samples/first-network
~$ docker-compose -f docker-compose-cli.yaml up -d
同时,启动成功之后,网络组成部分包括Orderer, Peers,以及网络的管理部分Command-line Interface (CLI)均以Docker containers的进程形式运行在本地宿主机上,如下。

至此,整个Hyperledger Fabric的first-network网络系统成功搭建,并已经处于正常运行状态。
3. Hyperledger Composer CLI交互Hyperledger Fabric
3.1. 通过Hyperledger Composer CLI交互Hyperledger Fabric
默认情况下,Hyperledger Composer CLI交互的对象是Peer0 of Org1节点,如果要交互不同的Peer,需要更改Hyperledger Composer CLI的参数。
方法上,通过交互式地访问Hyperledge Composer CLI的Docker Compose镜像,达到交互Peer0 of Org1节点的目的,命令如下,
~$ cd /home/$USER/fabric-samples/first-network
~$ docker exec -it cli bash
成功之后,进入CLI的终端交互模式如下,交互对象默认为Peer0 of Org1,
~$ docker exec -it cli bash
root@5da812d7f425:/opt/gopath/src/github.com/hyperledger/fabric/peer#
说明成功成功交互式地访问Hyperledge Composer CLI的Docker Compose镜像。
3.2. 初始化之前声明的Channel, 根据channel.tx,生成Channel Block,节点加入Channel Block
初始化channel
root@5da812d7f425:/opt/gopath/src/github.com/hyperledger/fabric/peer# export CHANNEL_NAME=mychannel
root@5da812d7f425:/opt/gopath/src/github.com/hyperledger/fabric/peer# peer channel create -o orderer.example.com:7050 -c $CHANNEL_NAME -f ./channel-artifacts/channel.tx --tls --cafile /opt/gopath/src/github.com/hyperledger/fabric/peer/crypto/ordererOrganizations/example.com/orderers/orderer.example.com/msp/tlscacerts/tlsca.example.com-cert.pem
初始化成功,生成一个mychannel.block,显示如下,
![]()
接着,节点peer0.org1 (默认节点)加入Channel Block, 如下,
root@5da812d7f425:/opt/gopath/src/github.com/hyperledger/fabric/peer# peer channel join -b mychannel.block
节点peer0.org2 加入mychannel.block,如下,
root@5da812d7f425:/opt/gopath/src/github.com/hyperledger/fabric/peer# CORE_PEER_MSPCONFIGPATH=/opt/gopath/src/github.com/hyperledger/fabric/peer/crypto/peerOrganizations/org2.example.com/users/[email protected]/msp CORE_PEER_ADDRESS=peer0.org2.example.com:7051 CORE_PEER_LOCALMSPID="Org2MSP" CORE_PEER_TLS_ROOTCERT_FILE=/opt/gopath/src/github.com/hyperledger/fabric/peer/crypto/peerOrganizations/org2.example.com/peers/peer0.org2.example.com/tls/ca.crt peer channel join -b mychannel.block
节点peer1.org1 加入mychannel.block,如下,
root@5da812d7f425:/opt/gopath/src/github.com/hyperledger/fabric/peer# CORE_PEER_MSPCONFIGPATH=/opt/gopath/src/github.com/hyperledger/fabric/peer/crypto/peerOrganizations/org1.example.com/users/[email protected]/msp CORE_PEER_ADDRESS=peer1.org1.example.com:7051 CORE_PEER_LOCALMSPID="Org1MSP" CORE_PEER_TLS_ROOTCERT_FILE=/opt/gopath/src/github.com/hyperledger/fabric/peer/crypto/peerOrganizations/org1.example.com/peers/peer1.org1.example.com/tls/ca.crt peer channel join -b mychannel.block
节点peer1.org2 加入mychannel.block,如下,
root@5da812d7f425:/opt/gopath/src/github.com/hyperledger/fabric/peer# CORE_PEER_MSPCONFIGPATH=/opt/gopath/src/github.com/hyperledger/fabric/peer/crypto/peerOrganizations/org2.example.com/users/[email protected]/msp CORE_PEER_ADDRESS=peer1.org2.example.com:7051 CORE_PEER_LOCALMSPID="Org2MSP" CORE_PEER_TLS_ROOTCERT_FILE=/opt/gopath/src/github.com/hyperledger/fabric/peer/crypto/peerOrganizations/org2.example.com/peers/peer1.org2.example.com/tls/ca.crt peer channel join -b mychannel.block
3.3. 更新Anchor Peer
更新Org1的Anchor Peer,即peer0.org1 (默认节点)
root@5da812d7f425:/opt/gopath/src/github.com/hyperledger/fabric/peer# peer channel update -o orderer.example.com:7050 -c $CHANNEL_NAME -f ./channel-artifacts/Org1MSPanchors.tx --tls --cafile /opt/gopath/src/github.com/hyperledger/fabric/peer/crypto/ordererOrganizations/example.com/orderers/orderer.example.com/msp/tlscacerts/tlsca.example.com-cert.pem
更新Org2的Anchor Peer,即peer0.org2
root@5da812d7f425:/opt/gopath/src/github.com/hyperledger/fabric/peer# CORE_PEER_MSPCONFIGPATH=/opt/gopath/src/github.com/hyperledger/fabric/peer/crypto/peerOrganizations/org2.example.com/users/[email protected]/msp CORE_PEER_ADDRESS=peer0.org2.example.com:7051 CORE_PEER_LOCALMSPID="Org2MSP" CORE_PEER_TLS_ROOTCERT_FILE=/opt/gopath/src/github.com/hyperledger/fabric/peer/crypto/peerOrganizations/org2.example.com/peers/peer0.org2.example.com/tls/ca.crt peer channel update -o orderer.example.com:7050 -c $CHANNEL_NAME -f ./channel-artifacts/Org2MSPanchors.tx --tls --cafile /opt/gopath/src/github.com/hyperledger/fabric/peer/crypto/ordererOrganizations/example.com/orderers/orderer.example.com/msp/tlscacerts/tlsca.example.com-cert.pem
3.4. 安装和初始化chaincode
节点peer0.org1上面安装chaincode
root@5da812d7f425:/opt/gopath/src/github.com/hyperledger/fabric/peer# peer chaincode install -n mycc -v 1.0 -p github.com/chaincode/chaincode_example02/go/
节点peer0.org2上面安装chaincode
root@5da812d7f425:/opt/gopath/src/github.com/hyperledger/fabric/peer# CORE_PEER_MSPCONFIGPATH=/opt/gopath/src/github.com/hyperledger/fabric/peer/crypto/peerOrganizations/org2.example.com/users/[email protected]/msp CORE_PEER_ADDRESS=peer0.org2.example.com:7051 CORE_PEER_LOCALMSPID="Org2MSP" CORE_PEER_TLS_ROOTCERT_FILE=/opt/gopath/src/github.com/hyperledger/fabric/peer/crypto/peerOrganizations/org2.example.com/peers/peer0.org2.example.com/tls/ca.crt peer chaincode install -n mycc -v 1.0 -p github.com/chaincode/chaincode_example02/go/
节点peer0.org2上面初始化chaincode
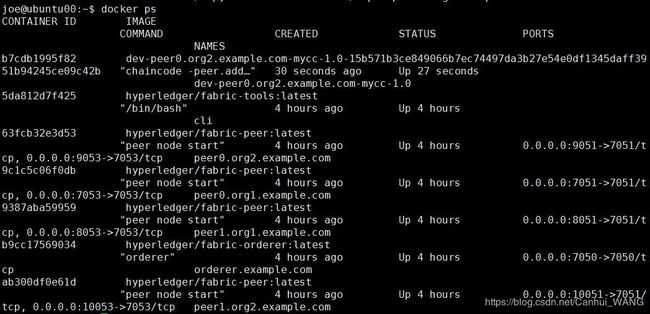
root@5da812d7f425:/opt/gopath/src/github.com/hyperledger/fabric/peer# CORE_PEER_MSPCONFIGPATH=/opt/gopath/src/github.com/hyperledger/fabric/peer/crypto/peerOrganizations/org2.example.com/users/[email protected]/msp CORE_PEER_ADDRESS=peer0.org2.example.com:7051 CORE_PEER_LOCALMSPID="Org2MSP" CORE_PEER_TLS_ROOTCERT_FILE=/opt/gopath/src/github.com/hyperledger/fabric/peer/crypto/peerOrganizations/org2.example.com/peers/peer0.org2.example.com/tls/ca.crt peer chaincode instantiate -o orderer.example.com:7050 --tls --cafile /opt/gopath/src/github.com/hyperledger/fabric/peer/crypto/ordererOrganizations/example.com/orderers/orderer.example.com/msp/tlscacerts/tlsca.example.com-cert.pem -C $CHANNEL_NAME -n mycc -v 1.0 -c '{"Args":["init","a", "100", "b","200"]}' -P "AND ('Org1MSP.peer','Org2MSP.peer')"
节点peer0.org2上面初始化chaincode成功之后,docker中多一个container如下,

3.5. Query Chaincode
节点peer0.org1进行query chaincode如下,
root@5da812d7f425:/opt/gopath/src/github.com/hyperledger/fabric/peer# peer chaincode query -C $CHANNEL_NAME -n mycc -c '{"Args":["query","a"]}'
3.6. Invoke Chaincode
节点peer0.org1进行invoke chaincode如下,
root@5da812d7f425:/opt/gopath/src/github.com/hyperledger/fabric/peer# peer chaincode invoke -o orderer.example.com:7050 --tls true --cafile /opt/gopath/src/github.com/hyperledger/fabric/peer/crypto/ordererOrganizations/example.com/orderers/orderer.example.com/msp/tlscacerts/tlsca.example.com-cert.pem -C $CHANNEL_NAME -n mycc --peerAddresses peer0.org1.example.com:7051 --tlsRootCertFiles /opt/gopath/src/github.com/hyperledger/fabric/peer/crypto/peerOrganizations/org1.example.com/peers/peer0.org1.example.com/tls/ca.crt --peerAddresses peer0.org2.example.com:7051 --tlsRootCertFiles /opt/gopath/src/github.com/hyperledger/fabric/peer/crypto/peerOrganizations/org2.example.com/peers/peer0.org2.example.com/tls/ca.crt -c '{"Args":["invoke","a","b","10"]}'
3.7. 其他
其他节点peer1.org2也安装该chaincode
root@5da812d7f425:/opt/gopath/src/github.com/hyperledger/fabric/peer# CORE_PEER_MSPCONFIGPATH=/opt/gopath/src/github.com/hyperledger/fabric/peer/crypto/peerOrganizations/org2.example.com/users/[email protected]/msp CORE_PEER_ADDRESS=peer1.org2.example.com:7051 CORE_PEER_LOCALMSPID="Org2MSP" CORE_PEER_TLS_ROOTCERT_FILE=/opt/gopath/src/github.com/hyperledger/fabric/peer/crypto/peerOrganizations/org2.example.com/peers/peer1.org2.example.com/tls/ca.crt peer chaincode install -n mycc -v 1.0 -p github.com/chaincode/chaincode_example02/go/
相应地,其他节点peer1.org2也能query
root@5da812d7f425:/opt/gopath/src/github.com/hyperledger/fabric/peer# CORE_PEER_MSPCONFIGPATH=/opt/gopath/src/github.com/hyperledger/fabric/peer/crypto/peerOrganizations/org2.example.com/users/[email protected]/msp CORE_PEER_ADDRESS=peer1.org2.example.com:7051 CORE_PEER_LOCALMSPID="Org2MSP" CORE_PEER_TLS_ROOTCERT_FILE=/opt/gopath/src/github.com/hyperledger/fabric/peer/crypto/peerOrganizations/org2.example.com/peers/peer1.org2.example.com/tls/ca.crt peer chaincode query -C $CHANNEL_NAME -n mycc -c '{"Args":["query","a"]}'
4. 关闭退出
关闭Docker Compose CLI
root@5da812d7f425:/opt/gopath/src/github.com/hyperledger/fabric/peer# exit
exit
joe@ubuntu00:~/fabric-samples/first-network$ docker-compose -f docker-compose-cli.yaml down
关闭删除docker containers
docker rm $(docker ps -aq)
参考
[1. Hyperledger Fabric之Your First Network] https://hyperledger-fabric.readthedocs.io/en/release-1.4/build_network.html
[2. 单机Hyperledger Fabric] https://medium.com/@kctheservant/understanding-first-network-example-in-hyperledger-fabric-part-2-998ace5e89cf
[3. Peer Command] https://hyperledger-fabric.readthedocs.io/en/release-1.2/peer-commands.html
[4. Peer Command Examples] https://hyperledger-fabric.readthedocs.io/en/stable/install_instantiate.html

