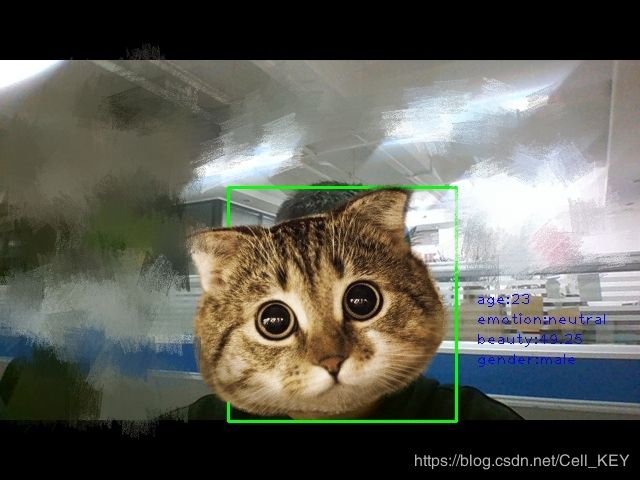
python——通过电脑摄像头采集图像实现利用百度api实现人脸检测
百度人脸检测调用方式为向API服务地址使用post发送请求,在url中需要带上access_token,所以第一步获取access_token
一、access_token获取
access_token的获取需要通过后台的API key和secret key生成,注册百度账号,在人脸识别创建应用即可得到这2个key
得到key之后,向授权服务地址 https://aip.baidubce.com/oauth/2.0/token发送post请求,在url中带上以下参数
-
grant_type: 必须参数,固定为client_credentials;
-
client_id: 必须参数,应用的API Key;
-
client_secret: 必须参数,应用的Secret Key
注:参数传递方式,须使用form表单方式,即最后生成请求url为 https://aip.baidubce.com/oauth/2.0/token?grant_type=client_credentials&client_id=Va5yQRHlA4Fq5eR3LT0vuXV4&client_secret=0rDSjzQ20XUj5itV6WRtznPQSzr5pVw2&
def get_AcessToken(fun_apikey,fun_secretkey):
	#print fun_apikey,fun_secretkey
	data = {
	"grant_type":"client_credentials",
	"client_id":fun_apikey,
	"client_secret":fun_secretkey
	}
	r = requests.post(accesstokenURL,data)
	#print (r.text)
	t = json.loads(r.text)

	#print t['access_token']
	at = t['access_token']
	return at
服务器返回的json文本中解析出access_token返回,即得到access_token
二、人脸检测方法调用
调用方式
HTTP方法:POST
请求URL: https://aip.baidubce.com/rest/2.0/face/v3/detect
URL参数:
access_token:通过上边方法获得
header:
Content-Type: application/json //通过json格式化请求体
body:
image 必选 图片信息,根据image_type判断
image_type 必选 1.BASE64:图片的base64的值 2.url:图片的url地址3.FACE_TOKEN 人脸图片唯一标识
face_field 可选 选取返回信息种类,包含年龄、颜值、性别、表情等可以根据自己需求选择
其他属性没有,用到可以到api文档了解http://ai.baidu.com/docs#/Face-Detect-V3/top
def get_face_response(fun_access_token,base64_imge):
	header = {
	"Content-Type":"application/json"
	}
	data={
	"image":base64_imge,
	"image_type":"BASE64",
	"face_field":"faceshape,facetype,age,gender,glasses,eye_status,emotion,race,beauty"
	}
	url = apiURL + "?access_token="+fun_access_token
	r = requests.post(url,json.dumps(data),header)
	#print (r.url)
	#print (r.text)
	ret=response_parse(r.text)
	return ret
这里图片类型选择BASE64,可以首先得到图片的二进制,然后用Base64格式编码即可。需要注意的是,图片的base64编码是不包含图片头的,如data:image/jpg;base64,记得去掉
Base64是一种任意二进制到文本字符串的编码方法,常用于在URL、Cookie、网页中传输少量二进制数据。Base64是一种用64个字符来表示任意二进制数据的方法。用记事本打开exe、jpg、pdf这些文件时,我们都会看到一大堆乱码,因为二进制文件包含很多无法显示和打印的字符,所以,如果要让记事本这样的文本处理软件能处理二进制数据,就需要一个二进制到字符串的转换方法。Base64是一种最常见的二进制编码方法。
def imgeTobase64():
	with open(imge_path,'rb') as f:
		base64_data = base64.b64encode(f.read())
	s = base64_data.decode()
	#print("data:imge/jpeg;base64,%s"%s)
	s = s[s.find(',')+1:]
	#print s
	return s
三,调用摄像头获取图片
调用摄像头获取图片,采用的是openCV
首先安装openCV包
pip install --upgrade setuptools
pip install numpy Matplotlib
pip install opencv-python
然后调用相关函数来获取视频
def camer_open():
	cap = cv2.VideoCapture(0)  # 默认的摄像头
	return cap

def camer_close(fun_cap):
	fun_cap.release()
	cv2.destroyAllWindows()

fourcc = cv2.VideoWriter_fourcc(*'XVID')
out = cv2.VideoWriter(avi_path,fourcc, 20.0, (640,480))

def make_photo(capp):
    """使用opencv拍照"""
    access_token=get_AcessToken(apikey,secretkey)
    while True:

        ret_cap, frame = capp.read()
	time.sleep(0.2)
        if ret_cap:
			print("read ok")
			color=(0,0,0)
			img_gray= cv2.cvtColor(frame,cv2.COLOR_RGB2GRAY)
			cv2.imwrite(imge_path, img_gray)
			image_base64=imgeTobase64()
			ret,info_list=get_face_response(access_token,image_base64)
			print ret
			if ret == 0:

				w=int(info_list[faceinfo_type.index('location')])+100
				h=int(info_list[faceinfo_type.index('location')+1])+100
				y=int(info_list[faceinfo_type.index('location')+2])-80
				x=int(info_list[faceinfo_type.index('location')+3])-50
				fun_str=[]

				fun_str.append('age:'+ str(info_list[faceinfo_type.index('age')]))
				fun_str.append('emotion:'+info_list[faceinfo_type.index('emotion')])
				fun_str.append('beauty:'+str(info_list[faceinfo_type.index('beauty')]))
				fun_str.append('gender:'+info_list[faceinfo_type.index('gender')])

				y1 = int(y+(h/2))
				dy = 20
				cv2.rectangle(frame,(x,y),(x+w,y+h),(0,255,0),2)
				for i in range(len(fun_str)):
					y2= y1+i*dy
					cv2.putText(frame,fun_str[i],(x+w+20,y2),cv2.FONT_HERSHEY_PLAIN,1, (255, 0, 0),1)
			#draw_0 = cv2.rectangle(image, (2*w, 2*h), (3*w, 3*h), (255, 0, 0), 2)

			#frame = cv2.flip(frame,0)
        # write the flipped frame
			out.write(frame)
			cv2.imshow("capture", frame)  # 弹窗口
			if cv2.waitKey(1) & 0xFF == ord('q'):
				camer_close(capp)
				break
	else:
		break
相关函数介绍
1.cap = cv2.VideoCapture(0)
VideoCapture()中参数是0,表示打开笔记本的内置摄像头,参数是视频文件路径则打开视频,如cap = cv2.VideoCapture(“../test.avi”)
2、ret,frame = cap.read()
cap.read()按帧读取视频,ret,frame是获cap.read()方法的两个返回值。其中ret是布尔值,如果读取帧是正确的则返回True,如果文件读取到结尾,它的返回值就为False。frame就是每一帧的图像,是个三维矩阵。
3、cv2.waitKey(1),waitKey()方法本身表示等待键盘输入,
参数是1,表示延时1ms切换到下一帧图像,对于视频而言;
参数为0,如cv2.waitKey(0)只显示当前帧图像,相当于视频暂停,;
参数过大如cv2.waitKey(1000),会因为延时过久而卡顿感觉到卡顿。
c得到的是键盘输入的ASCII码,esc键对应的ASCII码是27,即当按esc键是if条件句成立
4、调用release()释放摄像头,调用destroyAllWindows()关闭所有图像窗口
5.cv2.cvtColor(frame,cv2.COLOR_RGB2GRAY) 灰度转换
6.cv2.imwrite(file_name, img_gray) 写文件
7.cv2.rectangle(img,(x,y),(x+w,y+h),(0,255,0),2)
绘图函数介绍:
主要有cv2.line()//画线, cv2.circle()//画圆, cv2.rectangle()//长方形,cv2.ellipse()//椭圆, cv2.putText()//文字绘制
主要参数
-
img:源图像
-
color:需要传入的颜色
-
thickness:线条的粗细,默认值是1
-
linetype:线条的类型,8 连接,抗锯齿等。默认情况是 8 连接。cv2.LINE_AA 为抗锯齿,这样看起来会非常平滑
这里的参数分别为 rectangle(源图像,左上角坐标,右下角坐标,线条颜色,线条粗细)
8.cv2.putText(frame,fun_str[i],(x+w+20,y2),cv2.FONT_HERSHEY_PLAIN,1, (255, 0, 0),1)
绘制文字函数 putText(源图像,字符串,显示右上顶点坐标,字体类型,字体大小,字体颜色,字体粗细)
9. cv2.imshow("capture", frame) # 弹窗口 //显示图像
四:结果展示
可以视频流,动态框住人脸,显示信息,就是有点卡,原因是请求速度跟不上显示速度,帧不连续
五:完整源码
 # -*- coding: UTF-8 -*-

import requests
import urllib
import urllib2
import json
import base64
import cv2
import time
import os

apiURL = "https://aip.baidubce.com/rest/2.0/face/v3/detect"
accesstokenURL = "https://aip.baidubce.com/oauth/2.0/token"

apikey = "lY7HxTVolWntcvZv4Rvz0tWH"
secretkey = "L4ISaeGSGDMxCNZ9PR1ZkzaEvX0Dg4DM"

imge_path = os.path.dirname(os.path.abspath(__file__))+'\\img.jpg'
avi_path=os.path.dirname(os.path.abspath(__file__))+'\\output.avi'
faceinfo_type = ['face_type','face_shape','gender','emotion','age','glasses','beauty','location']

def camer_open():
	cap = cv2.VideoCapture(0)  # 默认的摄像头
	return cap

def camer_close(fun_cap):
	fun_cap.release()
	cv2.destroyAllWindows()

fourcc = cv2.VideoWriter_fourcc(*'XVID')
out = cv2.VideoWriter(avi_path,fourcc, 20.0, (640,480))

def make_photo(capp):
    """使用opencv拍照"""
    access_token=get_AcessToken(apikey,secretkey)
    while True:

        ret_cap, frame = capp.read()
	time.sleep(0.2)
        if ret_cap:
			print("read ok")
			color=(0,0,0)
			img_gray= cv2.cvtColor(frame,cv2.COLOR_RGB2GRAY)
			cv2.imwrite(imge_path, img_gray)
			image_base64=imgeTobase64()
			ret,info_list=get_face_response(access_token,image_base64)
			print ret
			if ret == 0:

				w=int(info_list[faceinfo_type.index('location')])+100
				h=int(info_list[faceinfo_type.index('location')+1])+100
				y=int(info_list[faceinfo_type.index('location')+2])-80
				x=int(info_list[faceinfo_type.index('location')+3])-50
				fun_str=[]

				fun_str.append('age:'+ str(info_list[faceinfo_type.index('age')]))
				fun_str.append('emotion:'+info_list[faceinfo_type.index('emotion')])
				fun_str.append('beauty:'+str(info_list[faceinfo_type.index('beauty')]))
				fun_str.append('gender:'+info_list[faceinfo_type.index('gender')])

				y1 = int(y+(h/2))
				dy = 20
				cv2.rectangle(frame,(x,y),(x+w,y+h),(0,255,0),2)
				for i in range(len(fun_str)):
					y2= y1+i*dy
					cv2.putText(frame,fun_str[i],(x+w+20,y2),cv2.FONT_HERSHEY_PLAIN,1, (255, 0, 0),1)
			#draw_0 = cv2.rectangle(image, (2*w, 2*h), (3*w, 3*h), (255, 0, 0), 2)

			#frame = cv2.flip(frame,0)
        # write the flipped frame
			out.write(frame)
			cv2.imshow("capture", frame)  # 弹窗口
			if cv2.waitKey(1) & 0xFF == ord('q'):
				camer_close(capp)
				break
	else:
		break


def get_AcessToken(fun_apikey,fun_secretkey):
	#print fun_apikey,fun_secretkey
	data = {
	"grant_type":"client_credentials",
	"client_id":fun_apikey,
	"client_secret":fun_secretkey
	}
	r = requests.post(accesstokenURL,data)
	#print (r.text)
	t = json.loads(r.text)

	#print t['access_token']
	at = t['access_token']
	return at


def response_parse(result_res):
	r = json.loads(result_res)
	print r
	ret = r['error_msg']
	if r['error_code'] != 0:
		print ret
		return  r['error_code'], 0

	result_parse= []
	face_list = r['result']['face_list'][0]
	#print face_list
	print len(face_list)
	for i in range(len(faceinfo_type)):
		if (faceinfo_type[i] == 'age') or (faceinfo_type[i] == 'beauty'):
			result_parse.append(face_list[faceinfo_type[i]])
		elif faceinfo_type[i] == 'location':
			result_parse.append(face_list[faceinfo_type[i]]['width'])
			result_parse.append(face_list[faceinfo_type[i]]['height'])
			result_parse.append(face_list[faceinfo_type[i]]['top'])
			result_parse.append(face_list[faceinfo_type[i]]['left'])

		else:
			result_parse.append(face_list[faceinfo_type[i]]['type'])

	print("result:%s \nface_type:%s\nface_shape:%s\ngender:%s\nemotion:%s\nglasses:%s\nage:%d\nbeauty:%d\n\
	       "%(ret,result_parse[faceinfo_type.index('face_type')],result_parse[faceinfo_type.index('face_shape')],\
			result_parse[faceinfo_type.index('gender')],result_parse[faceinfo_type.index('emotion')],
			result_parse[faceinfo_type.index('glasses')],result_parse[faceinfo_type.index('age')],result_parse[faceinfo_type.index('beauty')]))
	return 0,result_parse

def get_face_response(fun_access_token,base64_imge):
	header = {
	"Content-Type":"application/json"
	}
	data={
	"image":base64_imge,
	"image_type":"BASE64",
	"face_field":"faceshape,facetype,age,gender,glasses,eye_status,emotion,race,beauty"
	}
	url = apiURL + "?access_token="+fun_access_token
	r = requests.post(url,json.dumps(data),header)
	#print (r.url)
	#print (r.text)
	ret=response_parse(r.text)
	return ret

def imgeTobase64():
	with open(imge_path,'rb') as f:
		base64_data = base64.b64encode(f.read())
	s = base64_data.decode()
	#print("data:imge/jpeg;base64,%s"%s)
	s = s[s.find(',')+1:]
	#print s
	return s


def main():
	print ('face identification starting')
	#print access_token
	cap=camer_open()
	make_photo(cap)


if __name__ == '__main__':
	main()

