NIO编程基础
NIO编程基础
一、NIO基础介绍
1、java NIO介绍
简介:java NIO(new IO)是一个可以替代标准Java IO API的IO AIP(从Java1.4开始),Java NIO提供了与标准IO不同的IO工作方式。
2、java NIO与java IO区别
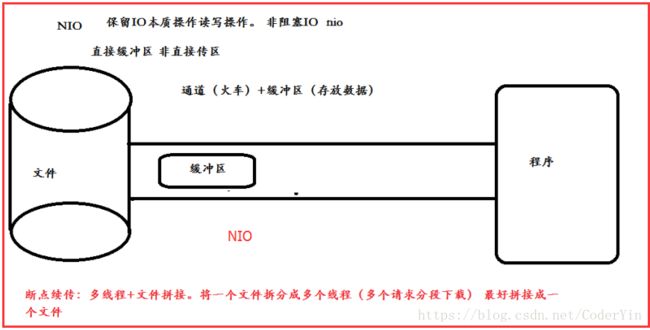
a、标准的IO基于字节流和字符流进行操作的,而NIO是基于通道(Channel)和缓冲区(Buffer)进行操作,数据总是从通道读取到缓冲区中,或者从缓冲区写入到通道中。
b、Java NIO: Non-blocking IO(非阻塞IO)而Java IO是阻塞的
Java NIO可以让你非阻塞的使用IO,例如:当线程从通道读取数据到缓冲区时,线程还是可以进行其他事情。当数据被写入到缓冲区时,线程可以继续处理它。从缓冲区写入通道也类似。
c、Java NIO: Selectors(选择器)
Java NIO引入了选择器的概念,选择器用于监听多个通道的事件(比如:连接打开,数据到达)。因此,单个的线程可以监听多个数据通道。
3、java NIO与java IO原理图
二、Buffer的数据存取
1、Buffer介绍:
Java NIO中的Buffer主要用于与NIO通道进行交互,数据是从通道读入到缓冲区,从缓冲区写入通道中的。
Buffer就像一个数组,可以保存多个相同类型的数据。根据类型不同(boolean除外),有以下Buffer常用子类:
ByteBuffer(最常用)、CharBuffer、ShortBuffer、IntBuffer、LongBuffer、FloatBuffer、DoubleBuffer
2、核心参数和方法:
参数:
position 缓冲区正在操作的位置 默认从0开始。
limit 界面(缓冲区可用大小)
capacity 缓冲区最大容量,一旦声明不能改变
方法:
put() 往buff存放数据
get() 获取数据
代码:
        //初始化byteBuffer大小
		ByteBuffer byteBuffer = ByteBuffer.allocate(1024);
		System.out.println(byteBuffer.position());
		System.out.println(byteBuffer.limit());
		System.out.println(byteBuffer.capacity());
		System.out.println("----------往bytebuff存放数据....----------");
		// 开始往byteBuffer中存放数据
		byteBuffer.put("abcd1".getBytes());
		System.out.println(byteBuffer.position());
		System.out.println(byteBuffer.limit());
		System.out.println(byteBuffer.capacity());
		System.out.println("----------读取值...----------");
		// 开启读取模式
		byteBuffer.flip();
		System.out.println("position"+byteBuffer.position());
		System.out.println(byteBuffer.limit());
		System.out.println(byteBuffer.capacity());
		byte[] bytes = new byte[byteBuffer.limit()];
		byteBuffer.get(bytes);
		System.out.println(new String(bytes,0,bytes.length));
		System.out.println("----------重复读取----------");
		//重复读取
		byteBuffer.rewind();
		System.out.println("position:"+byteBuffer.position());
	    System.out.println(byteBuffer.limit());
	    System.out.println(byteBuffer.capacity());
	    byte[] bytes2=    new byte[byteBuffer.limit()];
	    byteBuffer.get(bytes2);
	    System.out.println(new String(bytes2,0,bytes2.length));
	    System.out.println("----------清空缓冲区--------------");
	    // 清除缓冲区,注意清空缓冲区只是清空缓冲区的下标,里面的值并没有清空
	    byteBuffer.clear();
	    System.out.println("position:"+byteBuffer.position());
	    System.out.println(byteBuffer.limit());
	    System.out.println(byteBuffer.capacity());
	    System.out.println((char)byteBuffer.get());
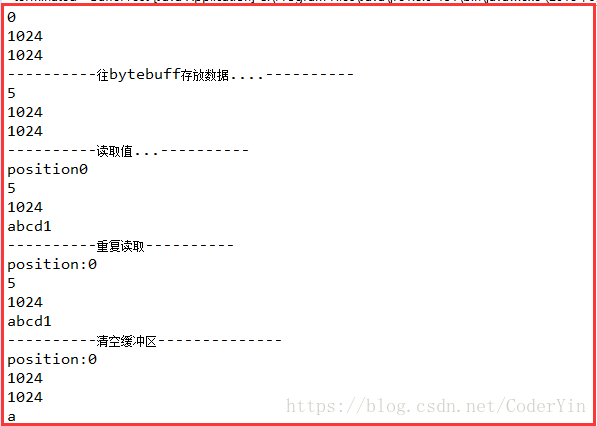
运行结果:
三、mark与reset用法
介绍:标记(mark)与重置(reset),标记是一个索引,通过Buffer 中的mark()方法指定Buffer中一个特定的position,之后可以通过调用reset()方法恢复到这个position。
代码块:
        ByteBuffer byteBuffer = ByteBuffer.allocate(1024);
		String str = "abcd";
		byteBuffer.put(str.getBytes());
		// 开启读的模式
		byteBuffer.flip();
		byte[] bytes = new byte[byteBuffer.limit()];
		byteBuffer.get(bytes, 0, 2);
		// 打印标记
		byteBuffer.mark();
		System.out.println(new String(bytes,0,2));
		System.out.println(byteBuffer.position());
		byteBuffer.get(bytes,2,2);
		System.out.println(new String(bytes,2,2));
		// 重置到mark标记处
		byteBuffer.reset();
		System.out.println("重置还原到mark标记处...");
		System.out.println(byteBuffer.position());
输出结果:
四、直接缓冲区与非直接缓冲区
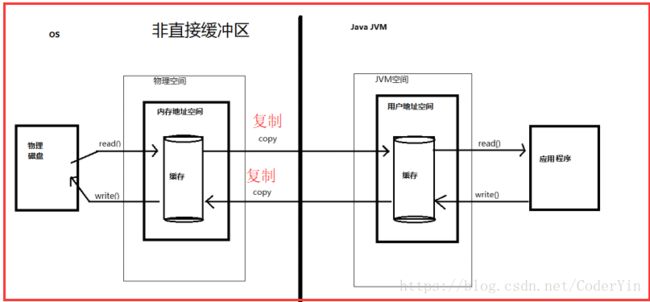
1、非直接缓冲区
(1)介绍:通过allocate()方法分配缓冲区,将缓冲区建立在JVM内存中。
(2)图示:
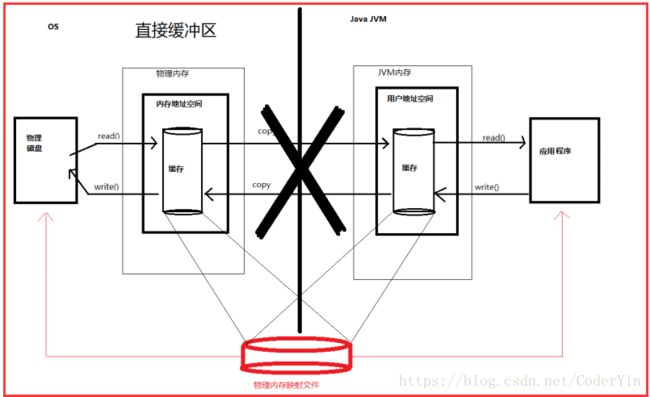
2、直接缓冲区
(1)介绍:通过 allocateDirect() 方法分配直接缓冲区,将缓冲区建立在物理内存中。
(2)图示:
3、代码介绍
// 直接缓冲区 读写操作
	@Test
	public void test002() throws IOException {

	long startTime = System.currentTimeMillis();
	// 创建管道 Paths.get("1.png")改区也可以操作电脑磁盘Paths.get("f://1.mp4")
	FileChannel inChannel = FileChannel.open(Paths.get("1.png"), StandardOpenOption.READ);
	FileChannel outChannel = FileChannel.open(Paths.get("2.png"), StandardOpenOption.READ,StandardOpenOption.WRITE,StandardOpenOption.CREATE);
	// 定义映射文件
	MappedByteBuffer inMappedByte = inChannel.map(MapMode.READ_ONLY, 0, inChannel.size());
	MappedByteBuffer outMappedByte = outChannel.map(MapMode.READ_WRITE, 0, inChannel.size());
	// 直接对缓冲区操作
	byte[] dsf = new byte[inMappedByte.limit()];
	inMappedByte.get(dsf);
	outMappedByte.put(dsf);
	inChannel.close();
	outChannel.close();
	long endTime = System.currentTimeMillis();
	System.out.println("操作直接缓冲区耗时时间:"+(endTime-startTime));
	}


// 非直接缓冲区 读写操作
	@Test
	public void test001() throws IOException {

	long startTime = System.currentTimeMillis();
	// 读入流
	FileInputStream fst = new FileInputStream("1.png");
	// 写入流
	FileOutputStream fot = new FileOutputStream("2.png");
	// 创建通道
	FileChannel inChannel = fst.getChannel();
	FileChannel outChannel = fot.getChannel();
	// 分配指定大小缓冲区
	ByteBuffer buf = ByteBuffer.allocate(1024);
	while(inChannel.read(buf) != -1) {
		// 开启读取模式
		buf.flip();
		// 将数据写入到通道中
		outChannel.write(buf);
		buf.clear();
	}
	// 关闭通道、关闭连接
	inChannel.close();
	outChannel.close();
	fot.close();
	fst.close();
	long endTime = System.currentTimeMillis();
	System.out.println("操作非直接缓冲区耗时时间:"+(endTime-startTime));
	}
介绍:如果操作本项目的其他资源直接放在项目的根目录下。
4、直接缓存区和非直接缓存区
非直接缓冲区更安全,虽然它消耗的时间比直接缓存区多好几倍。
直接缓冲区占内存,日常项目中使用最多。
四、通道(Channel):
1、介绍:通道表示打开到 IO 设备(例如:文件、套接字)的连接。若需要使用 NIO 系统,需要获取用于连接 IO 设备的通道以及用于容纳数据的缓冲区。然后操作缓冲区,对数据进行处理。Channel 负责传输, Buffer 负责存储。通道是由 java.nio.channels 包定义的。 Channel 表示 IO 源与目标打开的连接。Channel 类似于传统的“流”。只不过 Channel本身不能直接访问数据, Channel 只能与Buffer 进行交互。
2、通道接口和方法:
java.nio.channels.Channel 接口:
|--FileChannel
|--SocketChannel
|--ServerSocketChannel
|--DatagramChannel
获取通道
Java 针对支持通道的类提供了 getChannel() 方法
本地 IO:
FileInputStream/FileOutputStream
RandomAccessFile
网络IO:
Socket
ServerSocket
DatagramSocket
2. 在 JDK 1.7 中的 NIO.2 针对各个通道提供了静态方法 open()
3. 在 JDK 1.7 中的 NIO.2 的 Files 工具类的 newByteChannel()
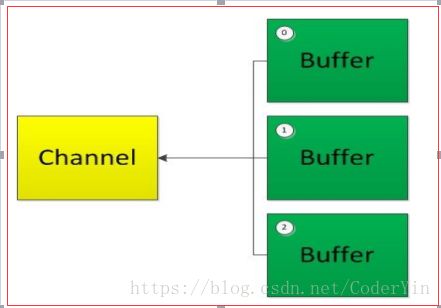
五、分散读取聚集写入
1、分散读取
介绍:分散读取(scattering Reads):将通道中的数据分散到多个缓冲区中
2、聚集写入
介绍:聚集写入(gathering Writes):将多个缓冲区的数据聚集到通道中
3、代码介绍
        // 随机访问
		RandomAccessFile raf = new RandomAccessFile("test.txt","rw");
		// 获取通道
		FileChannel channel = raf.getChannel();
		// 分配指定大小指定缓存区
		ByteBuffer buf1 = ByteBuffer.allocate(100);
		ByteBuffer buf2 = ByteBuffer.allocate(1024);
		// 分散读取
		ByteBuffer[] bufs = {buf1,buf2};
		channel.read(bufs);
		for(ByteBuffer byteBuffer:bufs) {
			// 切换成读模式
			byteBuffer.flip();
		}
		System.out.println(new String(bufs[0].array(),0,bufs[0].limit()));
		System.out.println("*************************************");
		System.out.println(new String(bufs[1].array(),1,bufs[1].limit()));
		System.out.println("------聚集读取---------");
		RandomAccessFile raf2= new RandomAccessFile("test2.txt", "rw");
		//获取通道
		FileChannel channel2 = raf2.getChannel();
		channel2.write(bufs);
		raf2.close();
		raf.close();
项目根目录下test.txt文件:

