【OpenCV学习笔记 010】提取直线、轮廓及连通区域
一、Canny算子检测轮廓
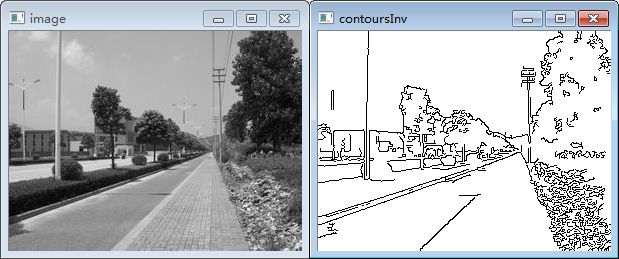
1.概念及原理
(1)之前我们是对梯度大小进行阈值化以得到二值的边缘图像。但是这样做有两个缺点。其一是检测到的边缘过粗,难以实现物体的准确定位。其二是很难找到合适的阈值既能足够低于检测到所有重要边缘,又能不至于包含过多次要边缘,这就是Canny算法尝试解决的问题。
(2)Canny算子通常是基于Sobel算子,当然也可以使用其他梯度算子。其思想是使用一个低阈值一个高阈值来确定哪些点属于轮廓。低阈值的作用主要是包括所有属于明显图像轮廓的边缘像素。高阈值的作用是定义所有重要轮廓的边缘。Canny算子是组合低阈值和高阈值这两幅边缘图以生成最优的轮廓图。这种使用双阈值以得到二值图像的策略被称为磁滞阈值化。
2.实验
使用Canny算子检测轮廓
源码示例(很简单)
#include
#include
#include
#include

using namespace std;
using namespace cv;

int main(){

	Mat image = imread("tree.jpg", 0);
	namedWindow("image");
	imshow("image", image);

	Mat contours;
	Canny(image,	//灰度图
		contours,	//输出轮廓
		125,	//低阈值
		350);	//高阈值

	//因为正常情况下轮廓是用非零像素表示 我们反转黑白值
	Mat contoursInv;	//反转后的图像
	threshold(contours,
		contoursInv,
		128,	//低于该值的像素
		255,	//将变成255
		THRESH_BINARY_INV);
	namedWindow("contoursInv");
	imshow("contoursInv", contoursInv);

	waitKey(0);
	return 0;
}
二、霍夫变换检测直线
1.概念及原理
(1)霍夫变换是检测直线的经典算法,最初只用于检测直线,后被扩展能够检测其他简单结构。在霍夫变换中,直线用方程表示为:,p是指直线到图像原点(左上角)的距离,θ则是与直线垂直的角度。
(2)霍夫变换使用二维的累加器以统计特定的直线被识别了多少次。目的是找到二值图像中经过足够多数量的点的所有直线,它分析每个单独的像素点,识别出所有可能经过它的直线,当同一条直线穿过许多点时,说明这条直线明显的存在。
2.实验
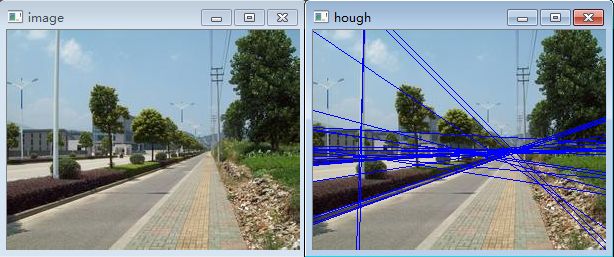
先用Canny算子获取图像轮廓,然后基于霍夫变换检测直线。
源码示例
#define _USE_MATH_DEFINES
#include
#include
#include
#include
#include

using namespace std;
using namespace cv;

int main(){

	Mat image = imread("tree.jpg");
	namedWindow("image");
	imshow("image", image);

	Mat result;
	cvtColor(image, result, CV_BGR2GRAY);
	//应用Canny算法
	Mat contours;
	Canny(result,	//灰度图
		contours,	//输出轮廓
		125,	//低阈值
		350);	//高阈值

	//Hough 变换检测直线
	vector lines;
	HoughLines(contours,	//一幅边缘图像
		lines,	//代表检测到的浮点数
		1,M_PI / 180,	// 步进尺寸
		80);	//最小投票数

	//绘制每条线
	vector::const_iterator it = lines.begin();
	while (it!=lines.end())
	{
		float rho = (*it)[0];	//距离rho
		float theta = (*it)[1];	//角度theta
		if (theta3.*M_PI / 4.)	//垂直线
		{
			//线与第一行的交点
			Point pt1(rho / cos(theta), 0);
			//线与最后一行的交点
			Point pt2((rho - result.rows*sin(theta)) / cos(theta), result.rows);
			//绘制白线
			line(image, pt1, pt2, Scalar(255), 1);
		}
		else //水平线
		{
			//线与第一列的交点
			Point pt1(0, rho / sin(theta));
			//线与最后一列的交点
			Point pt2(result.cols, (rho - contours.cols*cos(theta)) / sin(theta));
			//绘制白线
			line(image, pt1, pt2, Scalar(255), 1);
		}
		++it;
	}

	cvNamedWindow("hough");
	imshow("hough", image);
	waitKey(0);
	return 0;
} 函数原型
//! finds lines in the black-n-white image using the standard or pyramid Hough transform
CV_EXPORTS_W void HoughLines( InputArray image, OutputArray lines,
                              double rho, double theta, int threshold,
double srn=0, double stn=0 );第一个参数:一幅包含一组点的二值图像,通常是一幅边缘图像,比如来自Canny算子。
第二个参数:输出Vec2f向量,每个元素元素都是代表检测到的直线的浮点数(ρ,θ)。
第三、四个参数:直线搜索时的步进尺寸
第五个参数:能够被检测为直线所需要的最小投票数目。
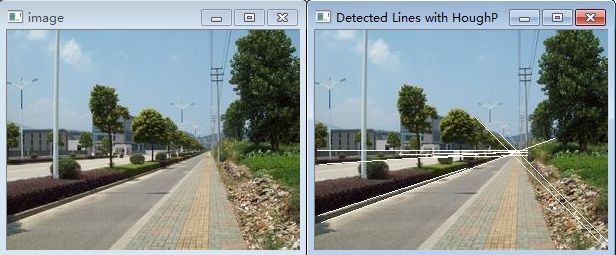
霍夫变换仅仅查找边缘的一种排列方式,因为意外的像素排列或是多条线穿过同一组像素很有可能带来错误的检测,所以对其算法进行改进即概率霍夫变换,我们将其封装到LineFinder类中进行使用。
程序源码
#define _USE_MATH_DEFINES
#include
#include
#include
#include
#include

using namespace std;
using namespace cv;

class LineFinder{

private:
	Mat img;	//原图
	vectorlines;	//向量中检测到的直线的端点
	//累加器的分辨率
	double deltaRho;
	double deltaTheta;
	int minVote;	//直线被接受时所需的最小投票数
	double minLength;	//直线的最小长度
	double maxGap;	//沿着直线方向的最大缺口
public:
	//默认的累加器的分辨率为单个像素即1  不设置缺口及最小长度的值
	LineFinder() :deltaRho(1), deltaTheta(M_PI / 180), minVote(10), minLength(0.), maxGap(0.){};

	//设置累加器的分辨率
	void setAccResolution(double dRho, double dTheta){

		deltaRho = dRho;
		deltaTheta = dTheta;
	}

	//设置最小投票数
	void setMinVote(int minv){

		minVote = minv;
	}

	//设置缺口及最小长度
	void setLineLengthAndGap(double length, double gap){

		minLength = length;
		maxGap = gap;
	}

	//使用概率霍夫变换
	vectorfindLines(Mat &binary){

		lines.clear();
		HoughLinesP(binary, lines, deltaRho, deltaTheta, minVote, minLength, maxGap);
		return lines;
	}

	//绘制检测到的直线
	void drawDetectedLines(Mat &image,Scalar color = Scalar(255,255,255)){

		//画线
		vector::const_iterator it2 = lines.begin();
		while (it2!=lines.end())
		{
			Point pt1((*it2)[0],(*it2)[1]);
			Point pt2((*it2)[2], (*it2)[3]);
			line(image, pt1, pt2, color);
			++it2;
		}
	}
};

int main(){

	Mat image = imread("tree.jpg");
	namedWindow("image");
	imshow("image", image);

	Mat result;
	cvtColor(image, result, CV_BGR2GRAY);
	//应用Canny算法
	Mat contours;
	Canny(result,	//灰度图
		contours,	//输出轮廓
		125,	//低阈值
		350);	//高阈值

	//创建LineFinder实例
	LineFinder finder;
	//设置概率Hough参数
	finder.setLineLengthAndGap(100, 20);
	finder.setMinVote(80);
	//检测并绘制直线
	vectorlines = finder.findLines(contours);
	finder.drawDetectedLines(image);
	cvNamedWindow("Detected Lines with HoughP");
	imshow("Detected Lines with HoughP", image);
	waitKey(0);
	return 0;
} 三、直线拟合一组点
1.概念及原理
(1)Hough 变换可以提取图像中的直线。但是提取的直线的精度不高。而很多场合下,我们需要精确的估计直线的参数,这时就需要进行直线拟合。直线拟合的方法很多,比如一元线性回归就是一种最简单的直线拟合方法。但是这种方法不适合用于提取图像中的直线。因为这种算法假设每个数据点的X 坐标是准确的,Y 坐标是带有高斯噪声的。可实际上,图像中的每个数据点的XY 坐标都是带有噪声的。Opencv通过最小化每个点到直线的距离之和进行求解,有多个距离函数, CV_DIST_L1 、CV_DIST_L2 、CV_DIST_C 、CV_DIST_L12、 CV_DIST_FAIR 、CV_DIST_WELSCH和 CV_DIST_HUBER ,其中最快的是欧式距离即CV_DIST_L2它对应的是标准的二乘法。
2.实验
源码示例
#define _USE_MATH_DEFINES
#include
#include
#include
#include
#include

using namespace std;
using namespace cv;

int main(){

    Mat image = imread("tree.jpg");
    namedWindow("image");
    imshow("image", image);

    Mat result;
    cvtColor(image, result, CV_BGR2GRAY);
    //应用Canny算法
    Mat contours;
    Canny(result,    //灰度图
        contours,    //输出轮廓
        125,    //低阈值
        350);    //高阈值

    //创建LineFinder实例
    LineFinder finder;
    //设置概率Hough参数
    finder.setLineLengthAndGap(100, 20);
    finder.setMinVote(80);
    //检测并绘制直线
    vectorlines = finder.findLines(contours);

    int n = 0;    //选择line 0
    //黑色图像
    Mat oneline(contours.size(), CV_8U, Scalar(0));
    //白色直线
    line(oneline,
        Point(lines[n][0], lines[n][1]),
        Point(lines[n][2], lines[n][3]),
        Scalar(255),
        5
        );

    //轮廓与白线进行AND操作
    bitwise_and(contours, oneline, oneline);

    Mat oneLineInv;    //白色直线反转后的图像
    threshold(oneline,
        oneLineInv,
        128,    //低于该值的像素
        255,    //将变成255
        THRESH_BINARY_INV);

    cvNamedWindow("One line");
    imshow("One line", oneLineInv);

    //将指定直线相关的点置入cv::Points类型的std::vector中
    vectorpoints;
    //遍历像素得到所有点的位置
    for (int y = 0; y < oneline.rows; y++)
    {
        //y行
        uchar *rowPtr = oneline.ptr(y);
        for (int x = 0; x < oneline.cols; x++)
        {
            //x列
            //如果位于轮廓上
            if (rowPtr[x])
            {
                points.push_back(Point(x, y));
            }
        }
    }

    Vec4f lineVec;
    fitLine(Mat(points),
        lineVec,
        CV_DIST_L2,    //距离类型
        0,    //L2距离不使用该参数
        0.01,0.01);    //精确值

    int x0 = lineVec[2];    //直线上的点
    int y0 = lineVec[3];
    int x1 = x0 - 200 * lineVec[0];    //使用单元向量
    int y1 = y0 - 200 * lineVec[1];    //添加长度为200的向量

    cv::line(result, Point(x0, y0), Point(x1, y1), Scalar(0), 3);

    cvNamedWindow("Estimated line");
    imshow("Estimated line", result);
    waitKey(0);
    return 0;
}
实验过程说明
(1)首先识别出可能排列成直线的点,即我们使用霍夫变换检测到的一条直线。
(2)接着得到仅包含指定直线相关的点即oneline,然后将集合中的点放置在cv::Pointdes的vector中。
(3)调用cv::fitLine函数找到最合适的线。
fitLine函数原型及说明
void fitLine( InputArray points,
    OutputArray line,
    int distType,
    double param,
    double reps,
    double aeps );
distType 指定拟合函数的类型,可以取 CV_DIST_L2、CV_DIST_L1、CV_DIST_L12、CV_DIST_FAIR、CV_DIST_WELSCH、CV_DIST_HUBER。
param 就是 CV_DIST_FAIR、CV_DIST_WELSCH、CV_DIST_HUBER 公式中的C。如果取 0,则程序自动选取合适的值。
reps 表示直线到原点距离的精度,建议取 0.01。
aeps 表示直线角度的精度,建议取 0.01。
四、提取连通区域的轮廓
1.概念及原理
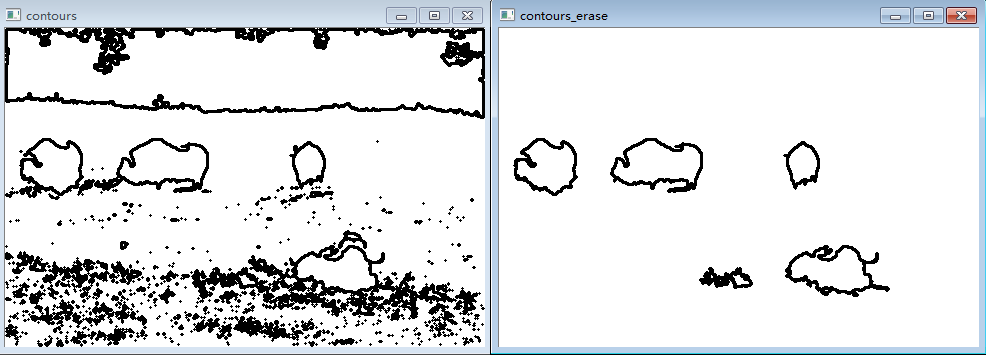
(1)Opencv中提供了一个简单的函数用于提取连通区域cv::findContours。它是通过系统的扫描图像直到遇到连通区域的一个点,以它为起始点,跟踪它的轮廓,标记边界上的元素,当轮廓完整闭合,扫描回到上一个位置,直到再次发现新的成分。
2.实验
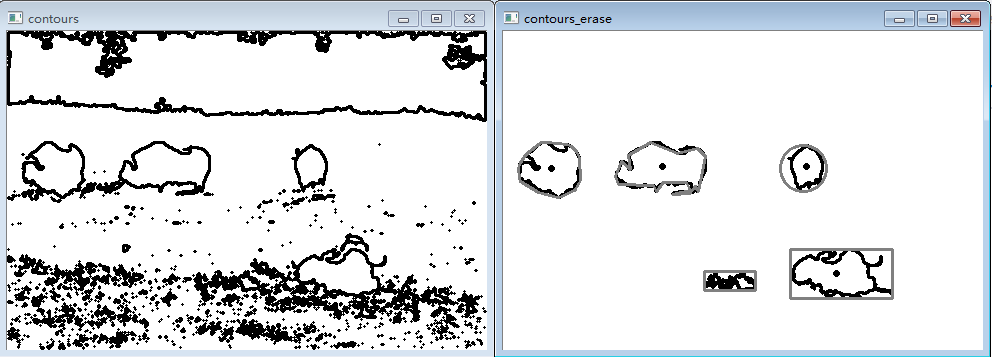
提取下图的连通区域轮廓。
程序实例
#include
#include
#include
#include

using namespace std;
using namespace cv;

int main(){

	Mat image = cvLoadImage("group.jpg");
	Mat grayImage;
	cvtColor(image, grayImage, CV_BGR2GRAY);
	//转换为二值图
	Mat binaryImage;
	threshold(grayImage, binaryImage, 90, 255, CV_THRESH_BINARY);

	//二值图 这里进行了像素反转,因为一般我们用255白色表示前景(物体),用0黑色表示背景
	Mat reverseBinaryImage;
	bitwise_not(binaryImage, reverseBinaryImage);

	vector >contours;
	findContours(reverseBinaryImage,
		contours,	//轮廓的数组
		CV_RETR_EXTERNAL,	//获取外轮廓
		CV_CHAIN_APPROX_NONE);	//获取每个轮廓的每个像素
	//在白色图像上绘制黑色轮廓
	Mat result(reverseBinaryImage.size(), CV_8U, Scalar(255));
	drawContours(result, contours,
		-1,	//绘制所有轮廓
		Scalar(0),	//颜色为黑色
		2);	//轮廓线的绘制宽度为2

	namedWindow("contours");
	imshow("contours", result);

	//移除过长或过短的轮廓
	int cmin = 100;	//最小轮廓长度
	int cmax = 1000;	//最大轮廓
	vector>::const_iterator itc = contours.begin();
	while (itc!=contours.end())
	{
		if (itc->size() < cmin || itc->size() > cmax)
			itc = contours.erase(itc);
		else
			++itc;
	}

	//在白色图像上绘制黑色轮廓
	Mat result_erase(binaryImage.size(), CV_8U, Scalar(255));
	drawContours(result_erase, contours,
		-1,	//绘制所有轮廓
		Scalar(0),	//颜色为黑色
		2);	//轮廓线的绘制宽度为2

	namedWindow("contours_erase");
	imshow("contours_erase", result_erase);
	waitKey(0);
	return 0;
} 五、计算连通区域的形状描述符
1.概念及原理
连通区域通常对应于场景中的某个物体,为了识别该物体或者将它与其他图像元素作比较,我们需要进行一些测量仪来获取它的特征,这里我们就利用Opencv中可用的一些形状描述符。
2.实验
利用Opencv中的形状描述符来描述上例提取到的轮廓。
源码示例
#include
#include
#include
#include

using namespace std;
using namespace cv;

int main(){

	Mat image = cvLoadImage("group.jpg");
	Mat grayImage;
	cvtColor(image, grayImage, CV_BGR2GRAY);
	//转换为二值图
	Mat binaryImage;
	threshold(grayImage, binaryImage, 90, 255, CV_THRESH_BINARY);

	//二值图 这里进行了像素反转,因为一般我们用255白色表示前景(物体),用0黑色表示背景
	Mat reverseBinaryImage;
	bitwise_not(binaryImage, reverseBinaryImage);

	vector >contours;
	findContours(reverseBinaryImage,
		contours,	//轮廓的数组
		CV_RETR_EXTERNAL,	//获取外轮廓
		CV_CHAIN_APPROX_NONE);	//获取每个轮廓的每个像素
	//在白色图像上绘制黑色轮廓
	Mat result(reverseBinaryImage.size(), CV_8U, Scalar(255));
	drawContours(result, contours,
		-1,	//绘制所有轮廓
		Scalar(0),	//颜色为黑色
		2);	//轮廓线的绘制宽度为2

	namedWindow("contours");
	imshow("contours", result);

	//移除过长或过短的轮廓
	int cmin = 100;	//最小轮廓长度
	int cmax = 1000;	//最大轮廓
	vector>::const_iterator itc = contours.begin();
	while (itc!=contours.end())
	{
		if (itc->size() < cmin || itc->size() > cmax)
			itc = contours.erase(itc);
		else
			++itc;
	}

	//在白色图像上绘制黑色轮廓
	Mat result_erase(binaryImage.size(), CV_8U, Scalar(255));
	drawContours(result_erase, contours,
		-1,	//绘制所有轮廓
		Scalar(0),	//颜色为黑色
		2);	//轮廓线的绘制宽度为2

	//namedWindow("contours_erase");
	//imshow("contours_erase", result_erase);

	//测试包围盒
	Rect r0 = boundingRect(Mat(contours[0]));
	rectangle(result_erase, r0, Scalar(128), 2);
	Rect r1 = boundingRect(Mat(contours[1]));
	rectangle(result_erase, r1, Scalar(128), 2);

	//测试最小包围圆
	float radius;
	Point2f center;
	minEnclosingCircle(Mat(contours[2]), center, radius);
	circle(result_erase, Point(center), static_cast(radius), Scalar(128), 2);

	//测试多边形近似
	vector  poly;
	approxPolyDP(Mat(contours[3]),
		poly,
		5,	//近似的精确度
		true);	//这是个闭合形状

	//遍历每个片段进行绘制
	vector::const_iterator itp = poly.begin();
	while (itp != (poly.end() - 1))
	{
		line(result_erase, *itp, *(itp + 1), Scalar(128), 2);
		++itp;
	}

	//首尾用直线相连
	line(result_erase, *(poly.begin()), *(poly.end() - 1), Scalar(128), 2);

	//凸包是另一种多边形近似,计算凸包
	vector  hull;
	convexHull(Mat(contours[4]), hull);

	vector::const_iterator ith = hull.begin();
	while (ith != (hull.end() - 1))
	{
		line(result_erase, *ith, *(ith + 1), Scalar(128), 2);
		++ith;
	}
	line(result_erase, *(hull.begin()), *(hull.end() - 1), Scalar(128), 2);

	//另一种强大的描述符力矩
	//测试力矩
	//遍历所有轮廓
	itc = contours.begin();
	while (itc!=contours.end())
	{
		//计算所有的力矩
		Moments mom = moments(Mat(*itc++));
		//绘制质心
		circle(result_erase,
			Point(mom.m10 / mom.m00, mom.m01 / mom.m00),	//质心坐标转换为整数
			2,
			Scalar(0),
			2);	//绘制黑点
	}

	namedWindow("contours_erase");
	imshow("contours_erase", result_erase);
	waitKey(0);
	return 0;
}
形状描述符描述轮廓实验结果
【OpenCV学习笔记 010】提取直线、轮廓及连通区域 配套的源码下载
