Windows包管理工具:Scoop 介绍
文章目录
- 前言
- 安装要求
- 自定义软件安装位置
- Scoop 安装
- Scoop 语法
- 软件安装
- Scoop 软件安装位置
- 检查更新
- 其他
- 参考
前言
平时在 Windows 下,安装软件都是在各种网站上下载,运气好的话在官网上直接可以找到正版软件,运气不好的话找半天还下载了一些乱七八糟的软件,容易中病毒还浪费时间。并且下载好后的软件,一方面要指定它的安装位置(如果自己没有指定一个固定位置的话使用默认位置,每个软件的默认位置还不一定一样),另一方面还要配置环境变量之类的信息更麻烦了,最最最后,如果你要删除该软件,使用 Windows 卸载/删除程序还不一定能删除干净。总而言之,在 Windows上缺乏一个像Ubuntu 的apt-get之类的包管理工具。
正好,最近发现了一款不错的包管理工具: Scoop
Scoop有如下优点:
- 集搜索、下载、安装、更新软件于一体:极大的降低了安装维护一个软件的成本,我们甚至不必在软件本身的复杂菜单中寻找那个更新按钮来更新软件自己
- 将软件干干净净的安装到电脑的「用户文件夹」下:这样既不会污染路径也不会请求不必要的权限(UAC)
- 在卸载软件的时候,能够尽量清空软件在电脑上存储的任何数据和痕迹
通过这款工具,我们可以轻松方便的管理Windows上的软件了
安装要求
- Windows 版本不低于 Windows 7
- 你能 正常、快速 的访问 GitHub 并下载上面的资源
- Windows 用户名为英文(Windows 用户环境变量中路径值不支持中文字符)
- 保证电脑有 Powershell 5.0 (Win10),如果是 Win7或者其他版本可能需要旧版 Powershell
可以在你的 Powershell 终端下输入如下命令查看当前版本:
$psversiontable.psversion.major # should be >= 5.0
- 确保Powershell 在你的当前 Windows 账户下是可用的,并且输入如下脚本:
set-executionpolicy remotesigned -scope currentuser
其中remotesigned当然可以换成Unrestricted,但是安全性不那么高,如果不确定的话最好还是使用remotesigned
自定义软件安装位置
    # config env
    $env:SCOOP='D:\scoop'
    [environment]::setEnvironmentVariable('SCOOP','D:\scoop','User')
全局安装目录配置:
    # config app install dir
    [environment]::setEnvironmentVariable('SCOOP_GLOBAL','D:\software','Machine')
    $env:SCOOP_GLOBAL='D:\software'
Scoop 安装
在 Powershell 命令行内执行如下脚本:
iex (new-object net.webclient).downloadstring('https://get.scoop.sh')
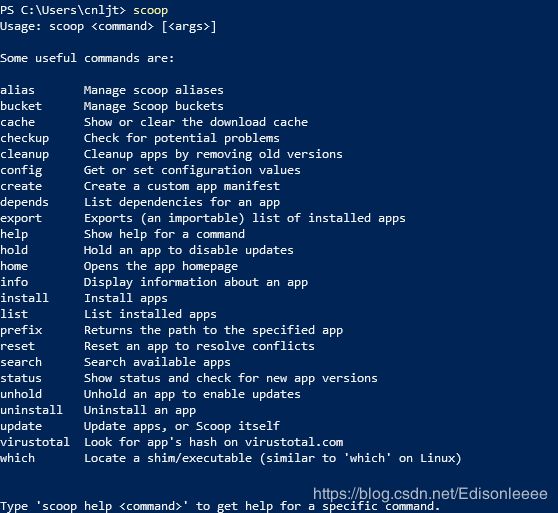
然后静待脚本执行完成即可,安装成功后,可以在终端内输入scoop,如果如下所示则说明安装成功

Scoop 语法
使用Scoop的命令十分简单,它的语法组成是:
scoop + 动作 + 对象
安装软件的方法很简单,例如需要安装’firefox和git`等软件,只需要
scoop install firefox git
可以一次性安装多个软件,只需要使用空格隔开
如果需要安装在全局位置,则需添加-g参数,即:
scoop install -g firefox git
基础语法如下:
| 命令 | 动作 |
|---|---|
| ⭕search | 搜索软件名 |
| ⭕install | 安装软件 |
| update | 更新软件 |
| status | 查看软件状态 |
| uninstall | 卸载软件 |
| info | 查看软件详情 |
| home | 打开软件主页 |
| list | 显示已安装软件 |
| cleanup | 清理旧版软件 |
其中最常用的就是search和install了
软件安装
软件安装正如上所说,只需要scoop install 即可
但是可能安装的软件有多个版本,安装前应该使用scoop search 查看各种版本,选择需要的版本
如果search不到软件,可能实在scoop中没有该软件,需要额外手动添加到scoop的bucket里,添加命令如下:
scoop bucket add
因为scoop自带的下载APP比较少,如果每遇到一个找不到的软件就自己重新添加实在是太麻烦,正巧官方已经提供了需要额外的app列表,里面涵盖了大量常用的软件,只需要执行如下命令将其全部添加到scoop中:
	# 需要提前安装 git
    scoop bucket add extras https://github.com/lukesampson/scoop-extras.git
安装好后如果需要安装该软件,只需要在软件名字前添加一个extra,比如安装Firefox
scoop install extras/firefox
更多的库:lukesampson/scoop/blob/master/buckets
    {
    "main": "https://github.com/ScoopInstaller/Main",
    "extras": "https://github.com/lukesampson/scoop-extras",
    "versions": "https://github.com/ScoopInstaller/Versions",
    "nightlies": "https://github.com/ScoopInstaller/Nightlies",
    "nirsoft": "https://github.com/kodybrown/scoop-nirsoft",
    "php": "https://github.com/ScoopInstaller/PHP",
    "nerd-fonts": "https://github.com/matthewjberger/scoop-nerd-fonts",
    "nonportable": "https://github.com/oltolm/scoop-nonportable",
    "java": "https://github.com/ScoopInstaller/Java",
    "games": "https://github.com/Calinou/scoop-games",
    "jetbrains": "https://github.com/Ash258/Scoop-JetBrains"
}
以及Github上一个收集了大量bucket及打分情况的项目,如果需要安装更多软件,可以在这里寻找需要的bucket。
添加自己的bucket:
- 新建一个自己的
GitHub仓库,例如名为my-bucket - 在你的
bucket中添加一些你需要安装的app
    git clone https://github.com/<your-username>/my-bucket
    cd my-bucket
    '{ version: "1.0", url: "https://gist.github.com/lukesampson/6446238/raw/hello.ps1", bin: "hello.ps1" }' > hello.json
    git add .
    git commit -m "add hello app"
    git push
- 配置Scoop
scoop bucket add my-bucket https://github.com/<your-username>/my-bucket
- 检查是否成功
    scoop bucket list # -> you should see 'my-bucket'
    scoop search hello # -> you should see hello listed under, 'my-bucket bucket:'
    scoop install hello
    hello # -> you should see 'Hello, !'
Scoop 软件安装位置
Scoop默认在用户根目录(C:\Users\用户名)下,创建一个名为 scoop 的文件夹,并默认将软件下载安装到该文件下。
将软件安装到一个相对隔离的环境下(Each program you install is isolated and independent),从而保证环境的统一和路径不被污染。
scoop 文件夹下的 apps 存放有安装的所有应用。值得一提的是:scoop 是通过 shim 来软链接一些应用,这样的设计让应用之间不会互相干扰,十分方便。

检查更新
需要不时检查scoop的版本状态,使用scoop status命令,如果出现
WARN Scoop is out of date. Run 'scoop update' to get the latest changes.
则需要运行scoop update更新版本
    scoop updata
    scoop updata *     # 更新所有软件
对于其他已安装的软件的更新,需要运行如下脚本:
其他
- 好多软件是从官网,github,amazon下载的,网速比较渣,可以先安装aria2 (
scoop install aira2),安装后 scoop 会优先调用 aria2 来下载软件;
aria2 一些配置:
    aria2-enabled (default: true)
    aria2-retry-wait (default: 2)
    aria2-split (default: 5)
    aria2-max-connection-per-server (default: 5)
    aria2-min-split-size (default: 5M)
- 安装之后一般系统环境变量是设置好了的,但是有些软件的文件关联,右键菜单之类需要手动添加,可以先scoop info ,看看有没有相关配置说明参考。
参考
[1] Scoop Wiki
[2] GitHub地址
[3] 再谈谈 Scoop 这个 Windows 下的软件包管理器
[4] 「一行代码」搞定软件安装卸载,用 Scoop 管理你的 Windows 软件
[5] 使用 scoop 安装管理 windows 软件
[6] 用 Scoop 改善 Windows Powershell