无人驾驶:Term-1-p5-vehicle-detection
# 简介 p5从车道检测升级为车辆检测,课程目的是检测行驶过程中遇到的车辆,属于目标检测范畴。这篇文章主要介绍如何使用传统计算机视觉方法进行车辆识别,比较基础。当然实现车辆识别的方案还有其他高大的方案,如yolo等,后面我会开另一篇文章介绍基于深度学习的车辆检测方案。 # 处理流程 本节课程处理流程如下图所示
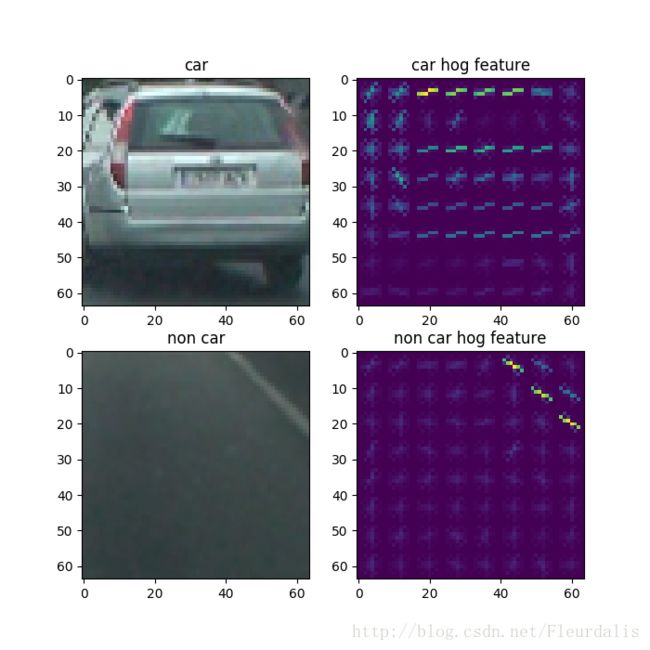
# HOG特征提取 梯度直方图(Histogram of Oriented Gradient),简称HOG,它是一种特征描述符。其原理是把图像分成很多个部分,然后计算每个部分的梯度,HOG特征描述符能为特征匹配和目标检测提供非常重要的信息。 为了判断是否是车辆,我们需要分别提取车辆的HOG和非车辆物体的HOG。这里我们使用skimage的hog方法进行图像的特征提取,经过特征提取后的效果如下
贴上这部分代码
##分类 抽取窗口内图像特征,并进行分类,若为车辆,保存其窗口坐标。
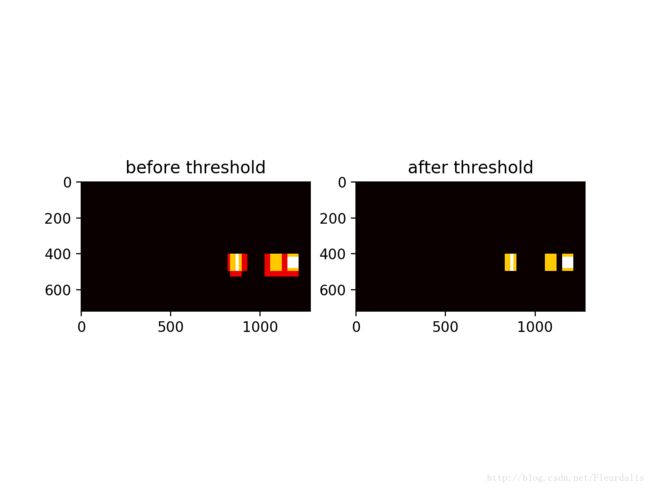
#车辆标记 有时候同一辆车可能存在于几个窗口中,需要将其合并,这个过程与非最大抑制类似。我们这里使用heatmap的方式合并窗口,即搜索到车辆的窗口内的像素点计数加1,设置一个阈值,最后只取大于阈值范围像素点构成的窗口。
import cv2
import numpy as np
from skimage.feature import hog
import glob
import matplotlib.pyplot as plt

#读取car data
def load_car_data():
    vehicles = glob.glob('./vehicles/*/*.png')
    return vehicles
#读取non car data
def load_non_car_data():
    non_vehicles = glob.glob('./non-vehicles/*/*.png')
    return non_vehicles

#提取HOG特征
def extract_feature(img,orient,pix_per_cell,cell_per_block,vis=False,feature_vec = True):
    if vis == True:
        features,hog_image = hog(img,orientations = orient,pixels_per_cell=(pix_per_cell,pix_per_cell),
            cells_per_block = (cell_per_block,cell_per_block),transform_sqrt=False,visualise=vis,feature_vector=feature_vec)
        return features,hog_image
    else :
        features = hog(img,orientations = orient,pixels_per_cell=(pix_per_cell,pix_per_cell),
            cells_per_block = (cell_per_block,cell_per_block),transform_sqrt=False,visualise=vis,feature_vector=feature_vec)
        return feature
#显示对比
def show_hog():
    vehicles = load_car_data()
    non_vehicles = load_non_car_data()
    vehicle_img = plt.imread(vehicles[5])
    non_vehicle_img = plt.imread(non_vehicles[5])
    _,vehicle_hog_image = extract_feature(vehicle_img[:,:,2],9,8,8,vis=True,feature_vec=True)
    _,non_vehicle_hog_image = extract_feature(non_vehicle_img[:,:,2],9,8,8,vis=True,feature_vec=True)
    f,((ax1,ax2),(ax3,ax4)) = plt.subplots(2,2,figsize=(7,7))
    ax1.imshow(vehicle_img)
    ax1.set_title('car')
    ax2.imshow(vehicle_hog_image)
    ax2.set_title('car hog feature')
    ax3.imshow(non_vehicle_img)
    ax3.set_title('non car')
    ax4.imshow(non_vehicle_hog_image)
    ax4.set_title('non car hog feature')
    plt.show()
def split_data():
    car_data = load_car_data()
    car_features = extract_features(car_data)
    non_car_data = load_non_car_data()
    non_car_features = extract_features(non_car_data)
    x = np.vstack((car_features,non_car_features)).astype(np.float64)
    y = np.hstack((np.ones(len(car_features)),np.zeros(len(non_car_features))))
    rand_state = np.random.randint(0,100)
    X_train,X_test,y_train,y_test = train_test_split(x,y,test_size = 0.2,random_state=rand_state)
    return X_train,X_test,y_train,y_test

def train_model(X_train,y_train):
    svc = LinearSVC()
    svc.fit(X_train,y_train)
    return svc
    #x方向上block个数
    nxblock = (ch1.shape[1]//pix_per_cell) + 1
    #y方向上block个数
    nyblock = (ch1.shape[0]//pix_per_cell) + 1
    #定义window大小
    window = 64
    #每个window的cell个数,为了后续计算,剪掉1
    nblocks_per_window = (window//pix_per_cell) - 1
    #步长
    cells_per_step = 2
    #x方向上需要移动的次数
    nxstep = (nxblock - nblocks_per_window)//cells_per_step
    #y方向上需要移动的次数
    nystep = (nyblock - nblocks_per_window)//cells_per_step
    #获取特征
    hog1 = get_hog_feature(ch1,orient,pix_per_cell,cell_per_block, feature_vec = False)
    if hog_channel == 'ALL':
        hog2 = get_hog_feature(ch2,orient,pix_per_cell,cell_per_block, feature_vec = False)
        hog3 = get_hog_feature(ch3,orient,pix_per_cell,cell_per_block, feature_vec = False)
    #滑动抽取每个窗口特征
    for xb in range(nxstep):
        for yb in range(nystep):
            ypos = yb * cells_per_step
            xpos = xb * cells_per_step
            hog_feat1 = hog1[ypos:ypos+nblocks_per_window,xpos:xpos+nblocks_per_window].ravel()
            if hog_channel == 'ALL':
                hog_feat2 = hog2[ypos:ypos+nblocks_per_window,xpos:xpos+nblocks_per_window].ravel()
                hog_feat3 = hog3[ypos:ypos+nblocks_per_window,xpos:xpos+nblocks_per_window].ravel()
                hog_features = np.hstack((hog_feat1, hog_feat2, hog_feat3))
            else : hog_features = hog_feat1

            xleft = xpos * pix_per_cell
            ytop = ypos * pix_per_cell
            hog_features = hog_features.reshape(1,-1)
            test_prediction = svc.predict(hog_features)
            #若是车辆
            if test_prediction == 1 or show_all_rectangle:
                xbox_left = np.int(xleft * scale)
                ytop = np.int(ytop * scale)
                win = np.int(window * scale)
                #保存窗口坐标
                rectangles.append(((xbox_left,ytop + ystart),(xbox_left + window,ytop+win+ystart)))
处理视频
效果见p5-vehicle-detection
总结
本节课程主要使用传统计算机视觉方法进行目标检测,其中使用到的技术与常见滑动窗口、图像金字塔和非最大抑制很相似。除了传统计算机视觉方法,还可以使用深度学习进行目标检测,后续再单独开文章进行介绍。这部分代码详见p5-vehicle-detection


