Unity3d+百度AI 实现摄像头画面实时手势识别
本文将讲到,如何利用百度ai的人体分析sdk在unity中实现摄像头实时画面的手势识别
工程链接在文末
(本人使用的是unity2018,unity2017以上都可以,不然.NET版本不支持)
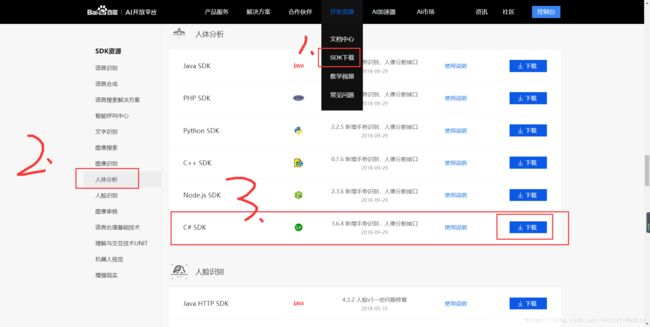
1.准备工作:首先在百度AI的官网,下载人体分析C# SDK
然后登陆控制台,新建一个人体分析的应用
然后你会获取到该应用的API_KEY和SECRET_KEY,后续开发需要使用
![]()
2.准备工作做完后,新建一个unity工程,在Asset下新建一个文件夹取名Plugins,将第一步下载的SDK中两个DLL文件复制进来
然后就可以编程了


代码很简单,注释也写的很清楚,我只讲下思路:
其实百度AI的SDK是只单纯的识别图片,而我们要做的识别摄像头实时画面中的手势,其实方法很简单
此时我们只需在固定时间截图摄像头画面就可以了,本文设定每两秒截一次图,然后调用SDK识别此图中的手势,就能实现我们所需要的实时画面中的手势
代码如下:
using System.Collections;
using System.Collections.Generic;
using UnityEngine;
using Baidu.Aip.BodyAnalysis;
using System.IO;
using UnityEngine.UI;

public class FaceDetect : MonoBehaviour
{
    public string app_id;
    public string api_key;
    public string secret_key;

    Body client;

    private string deviceName;
    private WebCamTexture webTex;

    //百度AI返回的结果数据
    public Text resultMsg;
    //提取其中的手势名称
    public Text detectedGestureMsg;


    void Awake()
    {
        System.Net.ServicePointManager.ServerCertificateValidationCallback +=
               delegate (object sender, System.Security.Cryptography.X509Certificates.X509Certificate certificate,
                           System.Security.Cryptography.X509Certificates.X509Chain chain,
                           System.Net.Security.SslPolicyErrors sslPolicyErrors)
               {
                   return true; // **** Always accept
               };
    }


    // Use this for initialization
    void Start()
    {
        api_key = "你自己的API_KEY";
        secret_key = "你自己的SECRET_KEY";
        StartCoroutine(CallCamera());
        client = new Body(api_key, secret_key);
        client.Timeout = 60000;  // 修改超时时间
    }

    // Update is called once per frame
    void Update()
    {
        CaptureScreen();
    }

    IEnumerator CallCamera()
    {
        yield return Application.RequestUserAuthorization(UserAuthorization.WebCam);
        if (Application.HasUserAuthorization(UserAuthorization.WebCam))
        {
            WebCamDevice[] devices = WebCamTexture.devices;
            deviceName = devices[0].name;
            //设置摄像机摄像的区域
            webTex = new WebCamTexture(deviceName, 1024, 768, 20);
            webTex.Play();//开始摄像
            transform.GetComponent().texture = webTex;
        }
    }


    public float timer = 0;
    //截屏
    void CaptureScreen()
    {
        timer += Time.deltaTime;
        //每隔两秒检测一次
        if (timer > 2)
        {
            //删除上一次检测的图片
            File.Delete(Application.streamingAssetsPath + "/capture.jpg");
            CapturePhoto();
            timer = 0;
        }
    }
    public int width;
    public int height;
    //截图摄像头
    public Camera cameras;
    public string fileName;

    public void CapturePhoto()
    {
        Texture2D screenShot;
        RenderTexture rt = new RenderTexture(width, height, 1);
        cameras.targetTexture = rt;
        cameras.Render();
        RenderTexture.active = rt;
        screenShot = new Texture2D(width, height, TextureFormat.RGB24, false);
        screenShot.ReadPixels(new Rect(0, 0, width, height), 0, 0);
        screenShot.Apply();

        //运行此行代码前,先手动在Asset路径下新建一个StreamingAsset文件夹
        fileName = Application.streamingAssetsPath + "/capture.jpg";
        // byte[] bytes = screenShot.EncodeToJPG();

        ScaleTextureCutOut(screenShot, 0, 0, 1024, 768);
        Debug.Log(string.Format("截屏了一张照片: {0}", fileName));

    }


    //切图

    byte[] ScaleTextureCutOut(Texture2D originalTexture, int pos_x, int pos_y, float originalWidth, float originalHeight)
    {
        Color[] pixels = new Color[(int)(originalWidth * originalHeight)];
        //要返回的新图
        Texture2D newTexture = new Texture2D(Mathf.CeilToInt(originalWidth), Mathf.CeilToInt(originalHeight));
        //批量获取点像素
        pixels = originalTexture.GetPixels(pos_x, pos_y, (int)originalWidth, (int)originalHeight);
        newTexture.SetPixels(pixels);
        newTexture.anisoLevel = 2;
        newTexture.Apply();
        //这一步把裁剪的新图片存下来
        byte[] jpgData = newTexture.EncodeToJPG();
        System.IO.File.WriteAllBytes(fileName, jpgData);
        GestureDemo(fileName);
        return jpgData;
    }


    public void GestureDemo(string filesPath)
    {
        var image = File.ReadAllBytes(filesPath);
        try
        {
            var result = client.Gesture(image);
            resultMsg.text = result.ToString();
            string[] msgArr = resultMsg.text.Split(',');
            //单独提取classname
            for (int i = 0; i < msgArr.Length; i++)
            {
                if (msgArr[i].Contains("classname"))
                {
                    string[] strArr = msgArr[i].Split(':');
                    detectedGestureMsg.text = strArr[1];
                    break;
                }
            }
        }
        catch (System.Exception)
        {
            throw;
        }


    }
}
工程结构如下:

运行前记得填写自己的API_KEY和SECRET_KEY
工程链接:
链接:https://pan.baidu.com/s/1CbGjzRHHVnt5UZ2rrGdCdQ
提取码:nu3y