双线性插值法,最邻近法 处理图片的旋转,放大 - (PIL+numpy处理)
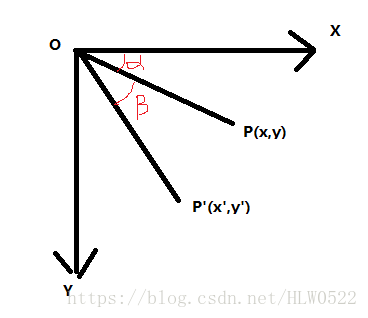
对于一张图片旋转某个角度,其实就是把每个像素计算好它的位置,再对对应的位置设置像素值即可,以顺时针为例,如下图,由P点旋转到P',
x=rcos(a)
y=rsin(a)
x'=rcos(a+b)=rcos(a)cos(b)-rsin(a)sin(b)
y'=rsin(a+b)=rsin(a)cos(b)+rcos(a)sin(b)
可得x'=xcos(b)-ysin(b) y'=xsin(b)+ycos(b)
写成矩阵形式是
然而需要考虑的是由于以图片中心点为旋转点,而图像是基于矩形图像的,所以必须将旋转后的图像放在一个能包含这个图像的矩形框中处理,称为包围盒,若只考虑最大情况,则是一个 ![]() 的正方形,而要是想刚好可以包围住整个图形,则宽度为w*cos(b) + h*sin(b),高度为w*sin(b) + h*cos(b).
的正方形,而要是想刚好可以包围住整个图形,则宽度为w*cos(b) + h*sin(b),高度为w*sin(b) + h*cos(b).
而由于在计算机中图形原点是在左上角的,所以需要变换一下坐标,即把左上角(0,0)点当做(-w/2 , -h/2)来处理变换完成后在设置处理后图片的像素颜色值的时候把计算后的位置再加上(-w/2 , -h/2)即可
矩阵形式可写成
此时,只要给出x,y的值经过矩阵运算再分别加上w/2,h/2即可得到对应点的位置,处理结果如下
发现有很多有规律的噪声,因为在处理过程中很多点计算后是浮点数,而图片中像素位置都是整数,所以有些点就没有被正确设置到。既然这样,可以反其道而行之,可以根据目标图像的大小,依次进行刚刚的逆运算,看看这个像素是不是应该由图像旋转而来的,即判断点是否在原图的范围之内。根据 2)的逆运算可以得到在原图上的位置。但是经过逆运算后往往得到的在原图位置的坐标也是一个浮点数,这时候就要用到双线性插值法来得到近似的像素值,双线性插值介绍如下:
上图中给出了公式 f(i+u ,j+v) = (1-u)(1-v)f(i,j) + u(1-v)f(i+1,j) + (1-u)vf(i,j+1) + uvf(i+1,j+1)
处理后结果如下
可以发现平滑了很多,但是此方法计算量较大,速度较慢一点。有一种简单的叫最邻近插值法,即在原图临近的四个点中取最近的一个点。
python代码如下:
from PIL import Image
import numpy as np


def rotate(img,angle):
	#maxEdge = int(np.sqrt(img.width ** 2 + img.height ** 2))
	beta = angle/180 * np.pi
	newWidth = int(img.width * np.cos(beta) + img.height * np.sin(beta))
	newHeight = int(img.width * np.sin(beta) + img.height * np.cos(beta))
	desImg = Image.new(img.mode,(newWidth,newHeight))
	#print(desImg.size)
	convertMatrix = [[np.cos(beta),-np.sin(beta),0],[np.sin(beta),np.cos(beta),0],[0,0,1]]
	#m其实是为了乘上pos使得以图片中心点为原点的,但本身前面还要乘 convertMatrix,所以在前面先乘好
	m = [[1,0,-img.width/2], [0,1,-img.height/2], [0,0,1]]
	convertMatrix = np.dot(convertMatrix,m)
	for x in range(img.width):
		for y in range(img.height):
			color = img.getpixel((x,y))
			pos = [x ,y ,1]
			pos_convert = np.dot(convertMatrix,pos)
			#print(pos_convert)
			#print(pos_convert + [maxEdge / 2,maxEdge / 2,maxEdge / 2])
			desImg.putpixel((int(pos_convert[0] + newWidth / 2),int(pos_convert[1] + newHeight / 2)),color)
	return desImg

def backRotate(img,angle):
	beta = angle/180 * np.pi
	newWidth = int(img.width * np.cos(beta) + img.height * np.sin(beta))
	newHeight = int(img.width * np.sin(beta) + img.height * np.cos(beta))
	desImg = Image.new(img.mode,(newWidth,newHeight))

	convertMatrix = [[np.cos(beta),-np.sin(beta),0],[np.sin(beta),np.cos(beta),0],[0,0,1]]
	m = [[1,0,-img.width/2], [0,1,-img.height/2], [0,0,1]]
	convertMatrix = np.dot(convertMatrix,m)
	convertMatrix_inv = np.linalg.inv(convertMatrix) #逆矩阵

	for x in range(newWidth):
		for y in range(newHeight):
            #由于之前是先转换后再加上宽高的一半得到的坐标,所以此处做逆运算时就要先减去宽高的一半
			pos = [int(x-newWidth/2) , int(y-newHeight/2) ,1]
			originPos = np.dot(convertMatrix_inv,pos)
			if (img.width >  originPos[0] + 1 and img.height >  originPos[1] + 1) and (originPos>=0).all():

				x_low = np.floor(originPos[0])
				x_up = np.ceil(originPos[0])
				y_low = np.floor(originPos[1])
				y_up = np.ceil(originPos[1])

				s = originPos[0] - x_low
				t = originPos[1] - y_low

				try:
					p1 = np.array(img.getpixel((x_low,y_low)))
					p2 = np.array(img.getpixel((x_up,y_low)))
					p3 = np.array(img.getpixel((x_low,y_up)))
					p4 = np.array(img.getpixel((x_up,y_up)))

					colorReal = np.array((1-s)*(1-t)*p1+(1-s)*t*p3+(1-t)*s*p2+s*t*p4,dtype="int")
					desImg.putpixel((x,y),tuple(colorReal))
				except:
					print(x_low," , ",x_up, " , ",y_low," , ",y_up," ",originPos)


	return desImg

img = Image.open("D:\\lena.jpg")
#rotate(img,30).save("D:\\1.jpg")
backRotate(img,45).save("D:\\2.jpg")
下面是放大,放大同样是使用下面的公式
但跟上面的旋转有同样的问题当缩放倍数大于1时,则会出现有规律的噪点,下图为常规方式放大效果
同样这个问题可以使用双线性插值法来解决,解决后的效果如下
可以看出效果好多了。
推导方式与上面旋转类似,同样是乘一下转换的逆矩阵即可得到在原图中的位置,python代码如下:
def Scale(img,sx,sy):
	desImg = Image.new(img.mode,(int(img.width * sx),int(img.height *sy)))
	convertMatrix = [[sx,0,0],[0,sy,0],[0,0,1]]
	for x in range(img.width):
		for y in range(img.height):
			color = img.getpixel((x,y))
			pos = [x,y,1]
			pos_convert = np.dot(convertMatrix,pos)
			pos_convert = np.dot(convertMatrix,pos)
			#print(pos_convert)
			desImg.putpixel((int(pos_convert[0]),int(pos_convert[1])),color)
	print("origin size: ",img.size)
	print("new size: ",desImg.size)
	return desImg
def backScale(img,sx,sy):
	desImg = Image.new(img.mode,(int(img.width * sx),int(img.height *sy)))
	convertMatrix = [[sx,0,0],[0,sy,0],[0,0,1]]
	convertMatrix_inv = np.linalg.inv(convertMatrix)
	for x in range(int(img.width * sx)):
		for y in range(int(img.height *sy)):
			 #color = img.getpixel((x,y))
			pos  = [x,y,1]
			originPos = np.dot(convertMatrix_inv , pos)
			if (img.width >=  originPos[0] + 1 and img.height >=  originPos[1] + 1) and (originPos>=0).all():
				x_low = np.floor(originPos[0])
				x_up = np.ceil(originPos[0])
				y_low = np.floor(originPos[1])
				y_up = np.ceil(originPos[1])

				s = originPos[0] - x_low
				t = originPos[1] - y_low

				try:
					p1 = np.array(img.getpixel((x_low,y_low)))
					p2 = np.array(img.getpixel((x_up,y_low)))
					p3 = np.array(img.getpixel((x_low,y_up)))
					p4 = np.array(img.getpixel((x_up,y_up)))

					colorReal = np.array((1-s)*(1-t)*p1+(1-s)*t*p3+(1-t)*s*p2+s*t*p4,dtype="int")
					desImg.putpixel((x,y),tuple(colorReal))
				except:
					print(x_low," , ",x_up, " , ",y_low," , ",y_up," ",originPos)
	return desImg
最邻近插值只需要在判断语句下面更改成找寻最邻近的点即可
简单封装后的代码如下https://download.csdn.net/download/hlw0522/10594607


