半小时搭建Spring Cloud Config(本地配置中心或git配置中心)
本文章是基于jdk1.8.0_144,spring boot 2.0.2.release和spring cloud Finchley.RC1
项目源码下载地址:https://download.csdn.net/download/hongtao_scau/10437906
一、基础准备
spring cloud是依赖于spring boot,不熟悉Spring Boot的同学可以学习以下文章:两小时学会spring boot。
spring cloud的版本学习参考:spring cloud的版本
Spring Cloud并没有熟悉的数字版本号,而是对应一个开发代号。
| Cloud代号 | Boot版本(train) | Boot版本(tested) | lifecycle |
|---|---|---|---|
| Angle | 1.2.x | incompatible with 1.3 | EOL in July 2017 |
| Brixton | 1.3.x | 1.4.x | 2017-07卒 |
| Camden | 1.4.x | 1.5.x | - |
| Dalston | 1.5.x | not expected 2.x | - |
| Edgware | 1.5.x | not expected 2.x | - |
| Finchley | 2.x | not expected 1.5.x | - |
文章用到的 Finchley.RC1是当前的稳定全面的版本,开发者可以根据自己项目的需求选择对应的版本
二、项目创建(多模块项目)
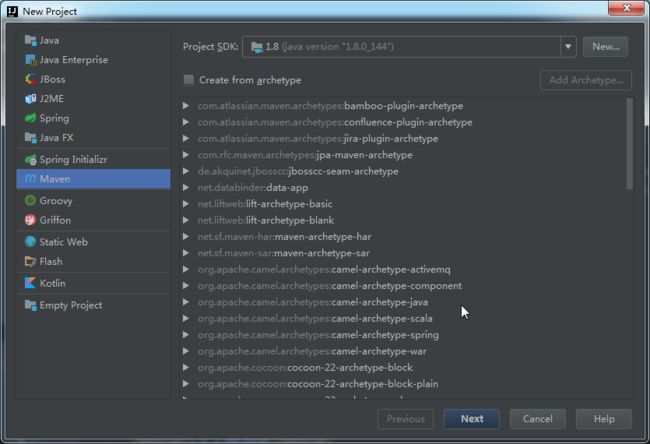
使用Idea创建maven项目,不勾选Create from archetype,选择next,填写项目名称等配置
创建完成之后删除项目中的src文件夹。
三、创建spring cloud config server 服务端
1、创建cloudserver模块
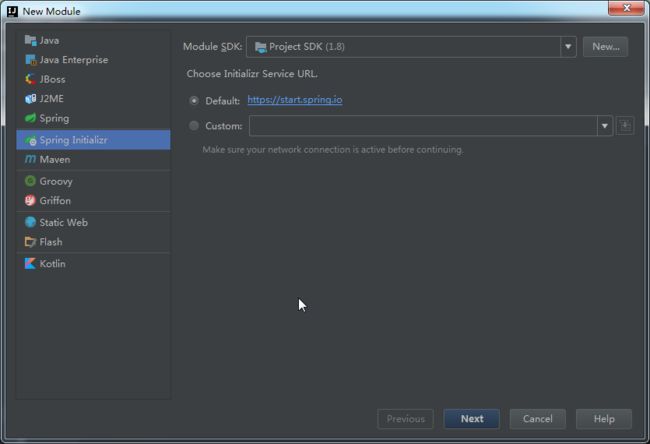
new Module :选择Spring Initalizr ,选择next,
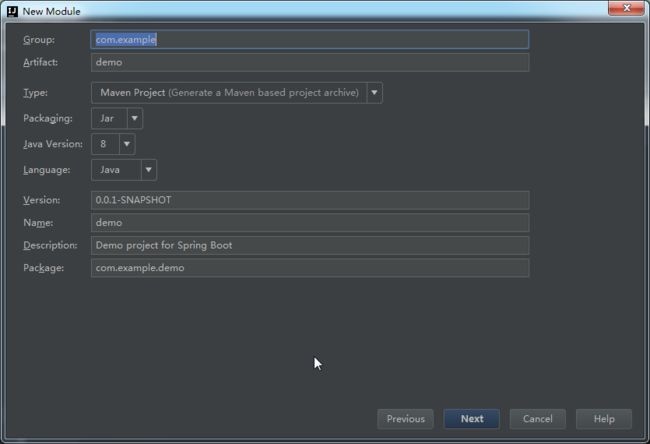
填写项目信息,Group、Artifact和刚刚第二步的填写一样,type选择maven Project
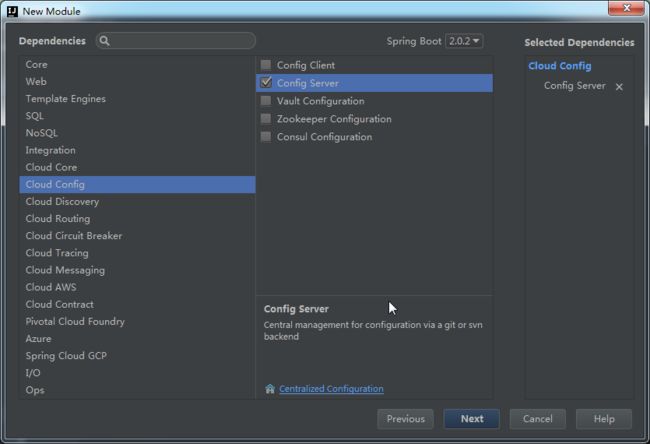
选择next后。下图界面,界面选择config server,为我们自动导入spring cloud的依赖。
最后生成项目文件 ,等待maven加载完毕。
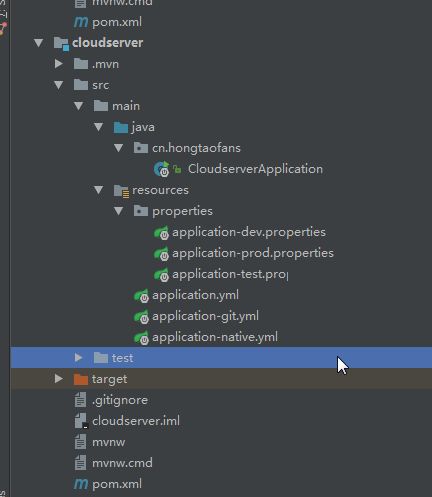
2、以下是我完成cloudserver 所有配置之后的项目结构,接下来会一一讲解
第一步,先看看我们的依赖pom文件
	4.0.0

	cn.hongtaofans
	cloudserver
	0.0.1-SNAPSHOT
	jar

	cloudserver
	Demo project for Spring Boot


		org.springframework.boot
		spring-boot-starter-parent
		2.0.2.RELEASE


		UTF-8
		UTF-8
		1.8
		Finchley.RC1


			org.springframework.cloud
			spring-cloud-config-server


			org.springframework.boot
			spring-boot-starter-actuator


			org.springframework.boot
			spring-boot-starter-test
			test


			org.springframework.cloud
			spring-cloud-starter-netflix-eureka-server


				org.springframework.cloud
				spring-cloud-dependencies
				${spring-cloud.version}
				pom
				import


				org.springframework.boot
				spring-boot-maven-plugin


			spring-snapshots
			Spring Snapshots
			https://repo.spring.io/snapshot

				true


			spring-milestones
			Spring Milestones
			https://repo.spring.io/milestone

				false
引入spring cloud,版本号为Finchley.RC1,要是不配置健康管理可以不引入actuator模块,要是不需要eureka注册中心则不需要引入这个模块,根据自己的需求引入这两个模块。不清楚dependency和dependencyManagement的区别可以在网上查看区别。
2、创建配置文件application
application.yml内容如下:
spring:
  profiles:
    active: native
native 表示读取本地文件,即会读取application-native文件,也可以配置成git来读取git文件
native 文件如下所示
server:
  port: 8888
spring:
  cloud:
    config:
      server:
        native:
search-locations: classpath:/properties/配置配置中心服务端口8888,配置文件的地址为本地的properties目录下,这是让client服务发现配置文件的地址配置
git文件如下所示
server:
  port: 8888
spring:
  application:
    name: config-server
  cloud:
    config:
      server:
        git:
          uri: https://github.com/hongtaofans/properties.git
          username:123
password:1233、配置文件:
新建properties文件,在目录下建application-dev.properties、application-prod.properties、application-test.properties文件,分别表示开发环境,生产环境、测试环境的配置文件。
application-dev.properties内容如下,简单配置
url=192.168.35.46
server.port=8081
4、项目启动
CloudserverApplication内容如下:
@SpringBootApplication
@EnableConfigServer
public class CloudserverApplication {

	public static void main(String[] args) {
		SpringApplication.run(CloudserverApplication.class, args);
	}
}
@enableConfigserver是配置项目为config中心,由此,启动项目,项目在8888端口启动,可以访问
四、client读取config server 服务
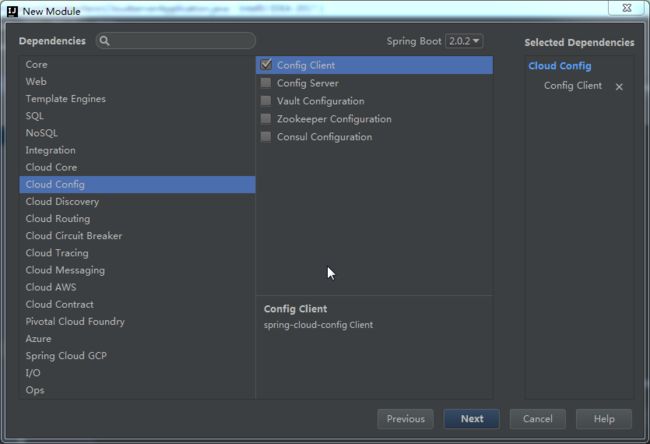
1、新建boot 模块,选择Spring initializr,勾选依赖项如下图:
2、博主最后的boot目录结构如下
	4.0.0

	cn.hongtao
	boot
	0.0.1-SNAPSHOT
	jar

	boot
	Demo project for Spring Boot


		org.springframework.boot
		spring-boot-starter-parent
		2.0.2.RELEASE


		UTF-8
		UTF-8
		1.8


			org.springframework.cloud
			spring-cloud-starter-config


			org.springframework.boot
			spring-boot-starter-web


			org.springframework.boot
			spring-boot-starter-test
			test


			org.springframework.cloud
			spring-cloud-starter-netflix-eureka-server


				org.springframework.cloud
				spring-cloud-dependencies
				Finchley.RC1
				pom
				import


				org.springframework.boot
				spring-boot-maven-plugin


			spring-milestones
			Spring Milestones
			https://repo.spring.io/milestone

				false
注意了,这里的spring cloud版本要保持一致,repository也要配置
2、新建bootstrap.properties(这里不能是yml文件,我踩过的坑)这里,需要配置在bootstrap中才能生效,而不是在application配置文件中,bootstrap配置文件会比application更加早的加载。
# 指明配置服务中心的网址
spring.cloud.config.uri=http://127.0.0.1:8888
spring.application.name=application
spring.cloud.config.profile=dev
spring.cloud.config.label=master配置中心网址uri、name、profile,读取的文件会是配置中心的uri+name-profile的路径,即http://127.0.0.1:8888/application-dev。label主要是针对git中心的配置路径:/{label}/{application}-{profile}.properties,这里不详讲。
3、BootApplication启动文件
@SpringBootApplication
@RestController
public class BootApplication {

	public static void main(String[] args) {
		SpringApplication.run(BootApplication.class, args);
	}

	@Value("${url}")
	private String datUrl;
	@RequestMapping(value = "/hi")
	public String hi(){
		return datUrl;
	}

}
通过@Value可以获取配置文件url的值
先启动cloudserver再启动boot项目
访问localhost:8081/hi 可以得到配合文件中的url,说明本地配置中心已经成功运行。
但是,我们可能不能局限于此,博主在文章的开端已经埋下伏笔,要把eureka注册中心也配置进来。
五、eureka配置
1、eureka的作用众所周知,一个注册中心的决策,对标dubbo。
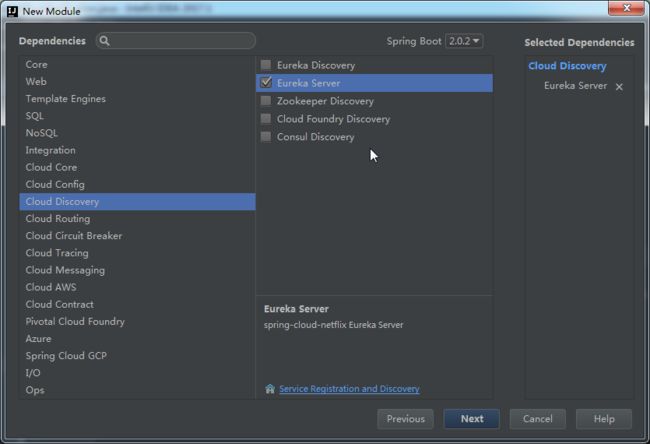
新建eureka模块,选择如下,导入eureka配置
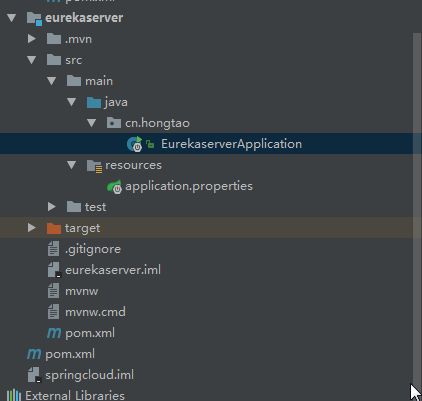
目录结构如下:
2、pom依赖,加入了eureka模块
	4.0.0

	cn.hongtao
	eurekaserver
	0.0.1-SNAPSHOT
	jar

	eurekaserver
	Demo project for Spring Boot


		org.springframework.boot
		spring-boot-starter-parent
		2.0.2.RELEASE


		UTF-8
		UTF-8
		1.8
		Finchley.RC1


			org.springframework.cloud
			spring-cloud-starter-netflix-eureka-server


			org.springframework.boot
			spring-boot-starter-web


			org.springframework.boot
			spring-boot-starter-test
			test


				org.springframework.cloud
				spring-cloud-dependencies
				${spring-cloud.version}
				pom
				import


				org.springframework.boot
				spring-boot-maven-plugin


			spring-snapshots
			Spring Snapshots
			https://repo.spring.io/snapshot

				true


			spring-milestones
			Spring Milestones
			https://repo.spring.io/milestone

				false
3、配置文件和启动文件
application文件,端口8761,service-url是注册地址,也就是localhost:8761/eureka/
server.port=8761
eureka.instance.hostname=localhost
###eureka.client.registerWithEureka:false和fetchRegistry:false来表明自己是一个eureka server
eureka.client.register-with-eureka=false
eureka.client.fetch-registry=false
eureka.client.service-url.defaultZone=http://${eureka.instance.hostname}:${server.port}/eureka/
然后就是EurekaServerApplication,enableEurekaServer是配置她是一个eureka服务
@EnableEurekaServer
@SpringBootApplication
public class EurekaserverApplication {

	public static void main(String[] args) {
		SpringApplication.run(EurekaserverApplication.class, args);
	}
}4、改造cloudserver和boot项目(pom文件已经在之前引入依赖)
cloudserver:
application-native.yml加入eureka配置
server:
  port: 8888
spring:
  cloud:
    config:
      server:
        native:
          search-locations: classpath:/properties/
  application:
    name: config-server
eureka:
  client:
    service-url:
      defaultZone: http://localhost:8761/eureka/
配置注册名为config-server,并写入注册中心的地址。
启动文件CloudseverApplication中加入注解,配置注册项目
@EnableEurekaClient
同样,在boot项目中,配置bootstrap文件
加入配置
eureka.client.service-url.defaultZone=http://localhost:8761/eureka/
spring.cloud.config.discovery.enabled=true
spring.cloud.config.discovery.service-id=config-server
service-id是发现的服务id为config-server,也是就是我们的上一步填写的cloudsever,这样一来,boot就可以使用cloudsever的服务。
在启动项中同样加上注解
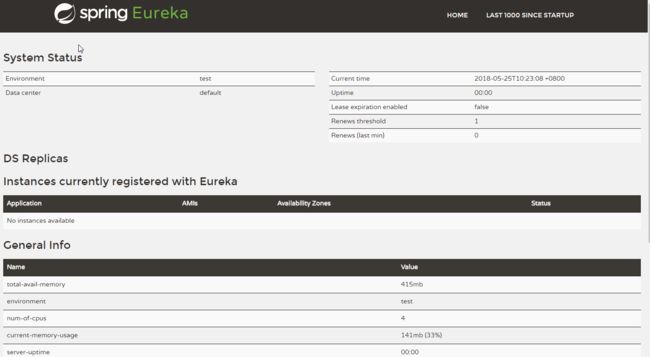
@EnableEurekaClient由此我们一次启动eurekaServer、cloudserver、boot项目,访问localhost:8761可以看到以下,config-server和application已经被注册
由此,我们完成了整个项目的配置,谢谢大家学习,希望有什么问题请多多指教。
