SSM实战之商品信息管理系统《一》
SSM实战之商品信息管理系统《一》
1.前言
本系统属于SSM的常用功能整合使用练习。
涉及到SSM框架整合+前端框Bootstrap+Ajax校验+登录拦截器+图片文件上传+日期类型转换器+json格式传参等常用功能的使用。
使用技术:
spring4.0
springmvc4.0.2
mybatis3.2.7
bootstrap3
Ajax
Jquery
拦截器
文件上传
日期转换
使用环境:
eclipse
tomcat
jdk1.8
MySql
javaweb项目
lib包请留言索取。
这些基本上是属于ssm的常用功能了。
下面以一个商品信息管理系统为背景来完成这些功能的使用。
2.SSM实战之登录模块
1.新建数据库:
SET FOREIGN_KEY_CHECKS=0;

-- ----------------------------
-- Table structure for `items`
-- ----------------------------
DROP TABLE IF EXISTS `items`;
CREATE TABLE `items` (
  `id` int(11) NOT NULL auto_increment,
  `name` varchar(32) NOT NULL COMMENT '商品名称',
  `price` float(10,1) NOT NULL COMMENT '商品定价',
  `detail` text COMMENT '商品描述',
  `pic` varchar(64) default NULL COMMENT '商品图片',
  `createtime` datetime NOT NULL COMMENT '生产日期',
  PRIMARY KEY  (`id`)
) ENGINE=InnoDB AUTO_INCREMENT=14 DEFAULT CHARSET=utf8;

-- ----------------------------
-- Records of items
-- ----------------------------
INSERT INTO `items` VALUES ('4', '美女', '1000.0', '很漂亮', 'e896c1e2-bc4d-45e6-9d45-7d08ed8e4845.jpg', '2018-03-22 00:00:00');
INSERT INTO `items` VALUES ('5', '图片测试', '12.0', '上传图片测试', '0a6b16fa-e533-4d38-b345-96087ad100eb.png', '2018-03-31 00:00:00');
INSERT INTO `items` VALUES ('6', '测试', '10.0', '图片上传测试', '127abc49-2672-4103-b435-f0abdfe9af64.png', '2018-03-31 00:00:00');
INSERT INTO `items` VALUES ('7', '测试', '12.0', '测试', '9ad09b30-190b-4421-b32e-ff6e9441661a.png', '2018-02-28 00:00:00');
INSERT INTO `items` VALUES ('8', '测试', '10.0', '测试', 'cb6d513e-d19a-4f3d-8604-dc45cd0068ab.png', '2018-04-01 00:00:00');
INSERT INTO `items` VALUES ('9', '打', '321.0', '阿达', '4520a466-281b-4874-b1cb-c133c9be349b.png', '2018-04-01 00:00:00');
INSERT INTO `items` VALUES ('10', '测试', '12.0', '大四的', 'd043aac9-1eeb-49dd-b8cb-4d0b0b669f91.png', '2018-04-01 00:00:00');
INSERT INTO `items` VALUES ('12', '测试', '13.0', '测试', 'f3ec35bc-b0f5-4f77-9001-b440584cb4dd.png', '2018-04-01 00:00:00');
INSERT INTO `items` VALUES ('13', '阿达的', '55.0', '打', 'b76f6b8b-bccd-42ce-ba5a-11b6ff36760d.jpg', '2018-04-01 00:00:00');

-- ----------------------------
-- Table structure for `user`
-- ----------------------------
DROP TABLE IF EXISTS `user`;
CREATE TABLE `user` (
  `id` int(11) NOT NULL auto_increment,
  `username` varchar(32) NOT NULL COMMENT '用户名称',
  `password` varchar(32) NOT NULL COMMENT '密码',
  `birthday` date default NULL COMMENT '注册日期',
  `sex` char(1) default NULL COMMENT '性别,"男"“女”',
  `address` varchar(256) default NULL COMMENT '地址',
  PRIMARY KEY  (`id`)
) ENGINE=InnoDB AUTO_INCREMENT=3 DEFAULT CHARSET=utf8;

-- ----------------------------
-- Records of user
-- ----------------------------
INSERT INTO `user` VALUES ('1', 'admin', 'admin', '2018-03-31', '1', '贵州贵阳');
INSERT INTO `user` VALUES ('2', 'qxb', '123456', '2018-04-01', '1', '美国纽约市');
2.新建javaweb项目:Commodity_system
然后添加包名如下所示:

eclipse创建的是webContent文件夹》》可以改为webroot,也可以不改,效果一样。
3.整合SSM框架:
3.1.导入需要的jar包。
留言邮箱我发给你。
3.2.写配置文件
在项目下新建一个config文件夹,
旗下在建两个包名,一个叫mybatis,一个叫spring。
3.2.1.在spring包下新建一个applicationContext.xml
这是spring的配置文件。
代码如下:
<beans xmlns="http://www.springframework.org/schema/beans"
    xmlns:xsi="http://www.w3.org/2001/XMLSchema-instance" xmlns:p="http://www.springframework.org/schema/p"
    xmlns:context="http://www.springframework.org/schema/context" xmlns:tx="http://www.springframework.org/schema/tx"
    xmlns:aop="http://www.springframework.org/schema/aop"

    xsi:schemaLocation="http://www.springframework.org/schema/beans
     http://www.springframework.org/schema/beans/spring-beans-3.2.xsd
     http://www.springframework.org/schema/tx
     http://www.springframework.org/schema/tx/spring-tx.xsd
     http://www.springframework.org/schema/context
     http://www.springframework.org/schema/context/spring-context-3.2.xsd
     http://www.springframework.org/schema/aop
     http://www.springframework.org/schema/aop/spring-aop-3.2.xsd
     ">

    <context:component-scan base-package="com.aaa">context:component-scan>

    <context:property-placeholder location="classpath:db.properties" />

    <bean id="dataSource" class="org.apache.commons.dbcp.BasicDataSource">
        <property name="url"
            value="${jdbc.url}?useUnicode=true&characterEncoding=utf8">
        property>
        <property name="driverClassName" value="${jdbc.driver}">property>
        <property name="username" value="${jdbc.username}">property>
        <property name="password" value="${jdbc.password}">property>
    bean>

    <bean id="sqlSessionFactory" class="org.mybatis.spring.SqlSessionFactoryBean">
        <property name="dataSource">
            <ref bean="dataSource" />
        property>
        <property name="configLocation" value="classpath:mybatis/mybatis-config.xml">property>
    bean>

    <bean class="org.mybatis.spring.mapper.MapperScannerConfigurer">
        <property name="basePackage" value="com.aaa.mapper">property>
        <property name="sqlSessionFactoryBeanName" value="sqlSessionFactory">property>
    bean>


    <bean id="transactionManager"
        class="org.springframework.jdbc.datasource.DataSourceTransactionManager">
        <property name="dataSource" ref="dataSource" />
    bean>

    <tx:annotation-driven transaction-manager="transactionManager" />

    <tx:advice id="txadvice" transaction-manager="transactionManager">
        <tx:attributes>

            <tx:method name="*" propagation="REQUIRED" />
        tx:attributes>
    tx:advice>
    <aop:config>

        <aop:pointcut expression="execution(* com.aaa.biz..*.*(..))"
            id="points" />

        <aop:advisor advice-ref="txadvice" pointcut-ref="points" />
    aop:config>

beans>
3.2.2.在spring包下新建一个springmvc.xml
这是springmvc的配置文件。
代码如下:
<beans xmlns="http://www.springframework.org/schema/beans"
    xmlns:xsi="http://www.w3.org/2001/XMLSchema-instance" xmlns:mvc="http://www.springframework.org/schema/mvc"
    xmlns:context="http://www.springframework.org/schema/context"
    xmlns:aop="http://www.springframework.org/schema/aop" xmlns:tx="http://www.springframework.org/schema/tx"
    xsi:schemaLocation="http://www.springframework.org/schema/beans
        http://www.springframework.org/schema/beans/spring-beans-3.2.xsd
        http://www.springframework.org/schema/mvc
        http://www.springframework.org/schema/mvc/spring-mvc-3.2.xsd
        http://www.springframework.org/schema/context
        http://www.springframework.org/schema/context/spring-context-3.2.xsd
        http://www.springframework.org/schema/aop
        http://www.springframework.org/schema/aop/spring-aop-3.2.xsd
        http://www.springframework.org/schema/tx
        http://www.springframework.org/schema/tx/spring-tx-3.2.xsd ">


    <mvc:annotation-driven conversion-service="conversionServer">mvc:annotation-driven>
    <context:component-scan base-package="com.aaa.controller">context:component-scan>

    <bean
        class="org.springframework.web.servlet.view.InternalResourceViewResolver">
        <property name="prefix" value="/WEB-INF/jsp/" />
        <property name="suffix" value=".jsp" />
    bean>

    <bean id="conversionServer"
        class="org.springframework.format.support.FormattingConversionServiceFactoryBean">

        <property name="converters">
            <list>
                <bean class="com.aaa.converter.DateConverter" />
            list>
        property>
    bean>

    <bean id="multipartResolver"
        class="org.springframework.web.multipart.commons.CommonsMultipartResolver">
    bean>


    <bean
        class="org.springframework.web.servlet.mvc.method.annotation.RequestMappingHandlerAdapter">
        <property name="messageConverters">
            <list>
                <bean
                    class="org.springframework.http.converter.json.MappingJacksonHttpMessageConverter">bean>
            list>
        property>
    bean>

    <mvc:interceptors>
        <mvc:interceptor>
            <mvc:mapping path="/**" />
            <bean class="com.aaa.inteceptor.LoginIncetepor">bean>
        mvc:interceptor>
    mvc:interceptors>
beans>
3.2.3.在mybatis包下新建一个mybatis-config.xml
这是mybatis的配置文件。
代码如下:
<configuration>

    <settings>

        <setting name="logImpl" value="LOG4J" />
    settings>

    <typeAliases>


        <package name="com.aaa.entity" />
    typeAliases>


    <plugins>
        <plugin interceptor="com.github.pagehelper.PageInterceptor">
        plugin>
    plugins>
configuration>
3.2.4.在config文件夹下新建一个db.properties
这是数据库的配置文件。
代码如下:
jdbc.driver=com.mysql.jdbc.Driver
jdbc.url=jdbc:mysql://127.0.0.1:3306/Commodity_sys?useUnicode=true&;characterEncoding=utf8
jdbc.username=root
jdbc.password=root
在config文件夹下再建一个log4j.properties
这是日志文件
代码如下:
# Global logging configuration
#\u5728\u5f00\u53d1\u73af\u5883\u4e0b\u65e5\u5fd7\u7ea7\u522b\u8981\u8bbe\u7f6e\u6210DEBUG\uff0c\u751f\u4ea7\u73af\u5883\u8bbe\u7f6e\u6210info\u6216error
log4j.rootLogger=DEBUG, stdout
# Console output...
log4j.appender.stdout=org.apache.log4j.ConsoleAppender
log4j.appender.stdout.layout=org.apache.log4j.PatternLayout
log4j.appender.stdout.layout.ConversionPattern=%5p [%t] - %m%n

#4 mybatis \u663E\u793ASQL\u8BED\u53E5\u90E8\u5206
log4j.logger.org.mybatis=DEBUG
#log4j.logger.cn.tibet.cas.dao=DEBUG
#log4j.logger.org.mybatis.common.jdbc.SimpleDataSource=DEBUG#
#log4j.logger.org.mybatis.common.jdbc.ScriptRunner=DEBUG#
#log4j.logger.org.mybatis.sqlmap.engine.impl.SqlMapClientDelegate=DEBUG#
#log4j.logger.java.sql.Connection=DEBUG
log4j.logger.java.sql=DEBUG
log4j.logger.java.sql.Statement=DEBUG
log4j.logger.java.sql.ResultSet=DEBUG
log4j.logger.java.sql.PreparedStatement=DEBUG
3.2.5.最后配置web.xml文件
代码如下:
<web-app xmlns:xsi="http://www.w3.org/2001/XMLSchema-instance" xmlns="http://java.sun.com/xml/ns/javaee" xsi:schemaLocation="http://java.sun.com/xml/ns/javaee http://java.sun.com/xml/ns/javaee/web-app_3_0.xsd" id="WebApp_ID" version="3.0">
  <display-name>Commodity_systemdisplay-name>
  <welcome-file-list>
    <welcome-file>Login.jspwelcome-file>
  welcome-file-list>
  <listener>
    <listener-class>org.springframework.web.context.ContextLoaderListenerlistener-class>
  listener>
  <context-param>
    <param-name>contextConfigLocationparam-name>
    <param-value>classpath*:spring/applicationContext.xmlparam-value>
  context-param>
  <servlet>
    <servlet-name>springmvcservlet-name>
    <servlet-class>org.springframework.web.servlet.DispatcherServletservlet-class>
    <init-param>
      <param-name>contextConfigLocationparam-name>
      <param-value>classpath:spring/springmvc.xmlparam-value>
    init-param>
  servlet>
  <servlet-mapping>
    <servlet-name>springmvcservlet-name>
    <url-pattern>*.actionurl-pattern>
  servlet-mapping>
  <filter>
    <filter-name>CharacterEncodingFilterfilter-name>
    <filter-class>org.springframework.web.filter.CharacterEncodingFilterfilter-class>
    <init-param>
      <param-name>encodingparam-name>
      <param-value>utf-8param-value>
    init-param>
  filter>
  <filter-mapping>
    <filter-name>CharacterEncodingFilterfilter-name>
    <url-pattern>/*url-pattern>
  filter-mapping>
web-app>
新建一个Login.jsp来测试是否可运行?
代码如下:
<%@ page language="java" import="java.util.*" pageEncoding="UTF-8"%>
<%
    String path = request.getContextPath();
    String basePath = request.getScheme() + "://" + request.getServerName() + ":" + request.getServerPort()
            + path + "/";
%>


<html>
<head>
<base href="<%=basePath%>">

<title>登录页-qxbtitle>

<meta http-equiv="pragma" content="no-cache">
<meta http-equiv="cache-control" content="no-cache">
<meta http-equiv="expires" content="0">
<meta http-equiv="keywords" content="登录,ssm练习,web项目">
<meta http-equiv="description" content="This is login page">

<style>
#login {
    width: 450px;
    height: 100px;
    margin: 50px auto;
}
style>

<body>
    <div class="container">
        <div id="login">

            <form class="form-horizontal" role="form">
                <div class="form-group">
                    <label for="inputEmail3" class="col-sm-2 control-label">用户名:label>
                    <div class="col-sm-10">
                        <input type="text" class="form-control" id="loginusername"
                            name="username" placeholder="请输入用户名" required autofocus>
                    div>
                div>
                <div class="form-group">
                    <label for="inputPassword3" class="col-sm-2 control-label">密   码:label>
                    <div class="col-sm-10">
                        <input type="password" class="form-control" id="loginpassword"
                            name="password" placeholder="请输入密码" required> <label
                            class="control-label" for="inputSuccess1" style="color: red;"
                            id="message">label>
                    div>
                div>

                <div class="form-group">
                    <div class="col-sm-offset-2 col-sm-10">
                        <button type="button" class="btn btn-info" id="lo">登录button>
                        <button type="button" class="btn btn-danger" data-toggle="modal"
                            data-target="#myModal">注册button>
                    div>
                div>
            form>
        div>
    div>
body>
html>
运行效果:
哇这么丑,于是引入bootstrap和jquery来美化和实现动态变化,我们并没有写具体的js;
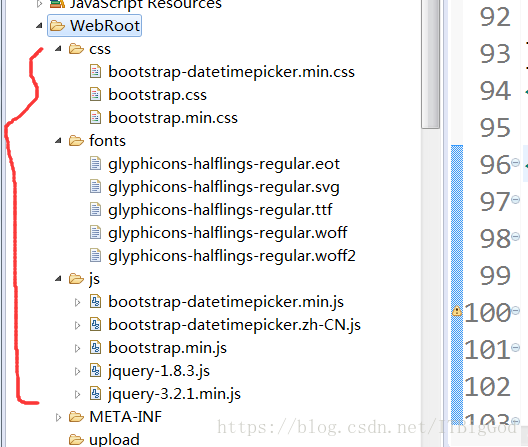
在webroot下新建三个文件夹:css js 和fonts

顺便把WebContext改为了webroot;改了就不用管。个人习惯问题。
引入后在运行界面如图:

运行没有报错也就表示SSM整合成功。
下一篇将完善登录模块的具体功能。
You got a dream, you gotta protect it.
如果你有梦想的话,就要去捍卫它 。 ——《当幸福来敲门》
