Django
Django概述
Django简介
- Django是一个开放源代码的Web应用框架,由Python写成
- 最初是被开发来用于管理劳伦斯出版集团旗下的一些以新闻内容为主的网站
- 2005年7月在BSD许可证下发布
框架介绍
Django 框架的核心组件有:
- 用于创建模型的对象关系映射
- 为最终用户设计的完美管理界面
- 一流的 URL 设计
- 设计者友好的模板语言
- 缓存系统
MTV模式
- Django的MTV模式本质上和MVC是一样的,也是为了各组件间保持松耦合关系,只是定义上有些许不同
-
- M 代表模型(Model):负责业务对象和数据库的关系映射(ORM)
-
- T 代表模板 (Template):负责如何把页面展示给用户(html)
-
- V 代表视图(View):负责业务逻辑,并在适当时候调用Model和Template
- 除了以上三层之外,还需要一个URL分发器,它的作用是将一个个URL的页面请求分发给不同的View处理,View再调用相应的Model和Template
MTV响应模式
- Web服务器(中间件)收到一个http请求
- Django在URLconf里查找对应的视图(View)函数来处理http请求
- 视图函数调用相应的数据模型来存取数据、调用相应的模板向用户展示页面
- 视图函数处理结束后返回一个http的响应给Web服务器
- Web服务器将响应发送给客户端
安装django
python虚拟环境
• 每个项目都需要安装很多库,当项目结束后这些库不需要了,该如何清理?
• 在同一个主系统内,需要同时安装django1.11.6和django2.0.5如何实现
• 有了python虚拟环境,这些问题将迎刃而解
使用虚拟环境
- Python3中已经自带虚拟环境,只要创建并激活即可
[root@localhost ~]#	mkdir pyproject
[root@localhost ~]#	cd	pyproject/
[root@localhost pyproject]#	python3	-m	venv django_env
[root@localhost pyproject]#	source	django_env/bin/activate
(django_env)[root@localhost pyproject]#
安装django
- Django不同版本有微小不同,本次使用1.11.6版本
(django_env)[root@localhost pyproject]# pip install django==1.11.6
- 如果安装过于缓慢,可以使用国内镜像站点
(django_env)[root@localhost pyproject]#	cat ~/.pip/pip.conf
[global]
index-url=http://pypi.douban.com/simple/
[install]
trusted-host=pypi.douban.com
验证django
- Django安装完毕后,就可以导入相关模块了
(django_env)[root@localhost pyproject]#	python
Python	3.6.4	(default,	Apr 27	2018,	08:26:23)
[GCC	4.8.5	20150623	(Red Hat 4.8.5-16)]	on	linux
Type	"help",	"copyright",	"credits"	or "license"	for more	information.
>>>	import	django
>>>	django.__version__
'1.11.6'
一般为了方便,可以直接使用pycharm安装,具体安装步骤,自行搜索
管理项目
创建项目
- Djanog可以自动生成一些代码,这些代码创建一个Django项目:一个Django实例的设置集合,包括数据库的配置、Django有关的选项和应用有关的选项
(django_env)[root@localhost pyproject]#	django-admin startproject mysite
(django_env)[root@localhost pyproject]#	tree mysite
mysite/                   # 项目的根目录
├── manage.py             # 项目的管理文件
├── mysite                # 项目的配置目录
│   ├── __init__.py       # 初始化文件
│   ├── settings.py       # 配置文件
│   ├── urls.py           # URLConf路由映射文件
│   └── wsgi.py           # 部署服务器时使用
└── templates             # 模板网页的目录

2 directories, 5 files
项目文件说明
- 外层的mysite/根目录仅仅是项目的一个容器。 它的名字与Django无关;可以将其重命名为你喜欢的任何内容
- manage.py:一个命令行工具,可以使用多种方式对Django项目进行交互。 可以在django-admin和manage.py中读到关于manage.py的所有细节
- 内层的mysite/目录是项目的真正的Python包。 它是导入任何东西时将需要使用的Python包的名字
(例如 mysite.urls) - mysite/init.py:一个空文件,它告诉Python这个目录应该被看做一个Python包
- mysite/settings.py:该Django 项目的设置/配置。Django settings 将告诉你这些设置如何工作。
- mysite/urls.py:此Django项目的URL声明;Django驱动的网站的“目录”
- mysite/wsgi.py:用于项目的与WSGI兼容的Web服务器入口
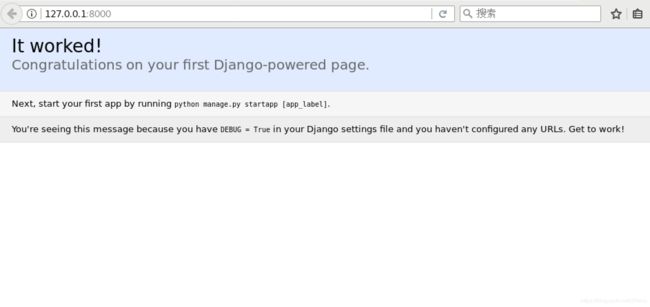
开发服务器
- Django自带一个开发服务器,默认运行于8000端口
- 该开发服务器不要应用在生产环境下
(django_env)[root@localhost mysite]# python	manage.py runserver
Performing	system	checks...
System	check	identified	no	issues	(0	silenced).
You	have	13	unapplied	migration(s).	Your	project	may	not	work	properly
until	you	apply	the	migrations	for	app(s):	admin,	auth,	contenttypes,
sessions.
Run	'python	manage.py migrate'	to	apply	them.
May	09,	2018	- 23:13:04
Django version	1.11.6,	using	settings	'mysite.settings'
Starting	development	server	at	http://127.0.0.1:8000/
Quit	the	server	with	CONTROL-C.
访问django
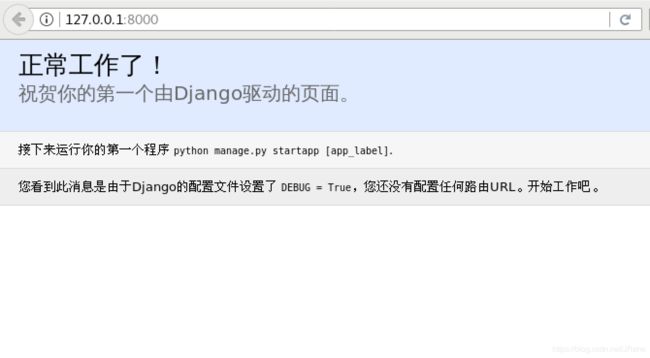
修改设置
- Django默认只允许本机访问、英文环境,这些均可在settings.py中进行修改
# mysite/settings.py
DEBUG = True   # 生产环境应该改为False
ALLOWED_HOSTS = '*'    # 允许所有的客户端访问
LANGUAGE_CODE = 'zh-hans'
TIME_ZONE = 'Asia/Shanghai'
修改访问的端口为80端口,标识所有的主机都可以访问
(django_env) [root@localhost mysite]# python manage.py runserver 0:80
# 0:80   -> 0.0.0.0:80
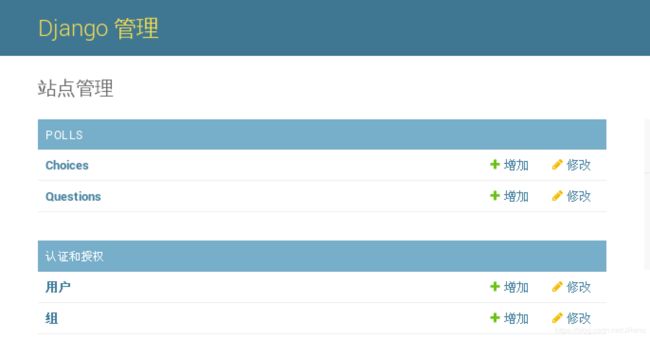
访问后台
- 一旦创建了项目,django自动生成了后台管理页面
http://127.0.0.1/admin
管理数据库
django后台可以使用各种类型的数据库,默认用的是sqlite数据库,不做任何修改,这个数据库直接可以用。
配置django使用mysql数据库:
[root@localhost mysite]# mysql -uroot -p'123456'
mysql> CREATE DATABASE djtest DEFAULT CHARSET utf8;

# 修改配置文件连接数据库的声明
# mysite/settings.py
DATABASES = {
    'default': {
        'ENGINE': 'django.db.backends.mysql',
        'NAME': 'djtest',
        'USER': 'root',
        'PASSWORD': '123456',
        'HOST': '127.0.0.1',
        'PORT': '3306',
    }
}

# 初始化pymysql
# mysite/__init__.py
import pymysql
pymysql.install_as_MySQLdb()

# 生成数据库的表。jdango默认已经集成了很多应用,如用户管理的应用,这些内建的应用也需要把数据保存到数据库。
(django_env) [root@localhost mysite]# python manage.py makemigrations
(django_env) [root@localhost mysite]# python manage.py migrate
mysql> use djtest;
mysql> show tables;   # 查看生成的表
创建管理员帐户
- 访问后台需要有超级用户身份
- 超级用户需要单独创建
- 用户将写到数据库中
(django_env) [root@localhost mysite]# python manage.py createsuperuser
Username (leave blank to use 'root'): admin
Email address: [email protected]
Password:
Password (again):
Superuser created successfully.
- 创建好管理员用户后即可登陆后台
firefox 127.0.0.1/admin
管理应用
应用简介
- 应用是一个Web应用程序,它完成具体的事项 ——比如一个博客系统、一个存储公共档案的数据库或者一个简单的投票应用
- 项目是特定网站的配置和应用程序的集合
- 一个项目可以包含多个应用
- 一个应用可以运用到多个项目中去
创建应用
- 应用可以放在Python path上的任何位置
- 可以在manage.py文件同级目录创建应用,以便可以将它作为顶层模块导入,而不是mysite的子模块
(django_env)[root@localhost mysite]# python manage.py startapp polls
投票应用的规划
- 投票首页:http://127.0.0.1/polls/ 显示所有的问题
- 4号问题详情页:http://127.0.0.1/polls/4/ 该页面可以实现投票
- 4号问题投票结果页:http://127.0.0.1/polls/4/result/
激活应用
- 创建应用后,需要将其安装到项目中,否则应用不会生效
- 修改mysite/settings.py:
INSTALLED_APPS	=	[
	'django.contrib.admin',
	'django.contrib.auth',
	'django.contrib.contenttypes',
	'django.contrib.sessions',
	'django.contrib.messages',
	'django.contrib.staticfiles',
	'polls',
]
配置URLconf
- 为了整洁起见,用户与polls相关的url都交给polls应用进行路由
- 修改mysite/urls.py如下:
from django.conf.urls import url,include
from django.contrib import admin

urlpatterns = [
	url(r'^admin/',	admin.site.urls),
	#导入polls目录(术语称作为包)中的urls模块
	url(r'^polls/',	include('polls.urls'))
]
应用路由
- 创建polls应用的URLconf,配置访问polls应用首页的视图
- 创建polls/urls.py,内容如下:
vim polls/urls.py
from django.conf.urls import url
from . import views
urlpatterns =	[
	url(r'^$', views.index, name='index'),
]
- URL正则采用的是match操作
r'^hello':匹配以hello开头的任意URL,如:/helloabcr'^hello/$':匹配hello且后面无信息的URL,如:/hello,/hello/r'^$':匹配 / 即空URL,通常用来设定应用的根,即默认入口。如:http://IP:port或者http://IP:port/
创建视图
- 视图是URLconf路由到某一URL时执行的函数
- 为上一步polls主页编写简单视图,编辑
polls/views.py如下:
from django.http import	HttpResponse
#用户发给django的请求,函数必须提供一个参数进行接收
def index(request):
	return	HttpResponse(“Hi! 这是polls应用的首页。")
验证应用
- 至此,用户已经可以访问polls应用的主页
(django_env) [root@localhost mysite]# python manage.py runseer 0:80
(django_env) [root@localhost mysite]# firefox 127.0.0.1/polls
修改函数,返回模板文件
# 修改函数的返回值,使用render函数返回模板文件
# polls/views.py
def index(request):
    return render(request, 'index.html')

# 创建模板文件
  # 模板文件的位置:
    # 项目目录下的templates目录
    # 应用目录下的templates目录
# templates/index.html
<!DOCTYPE html>
<html lang="en">
<head>
    <meta charset="UTF-8">
    <title>投票首页</title>
</head>
<body>
<h1>投票首页</h1>
</body>
</html>
刷新页面查看内容
编写问题详情页
- URL
# polls/urls.py
	... ...
    url(r'^\d+/$', views.detail, name='detail'),
    ... ...
- 视图函数
# polls/views.py   # 追加
def detail(request):
    return render(request, 'detail.html')
- 模板文件
# templates/detail.html

<html lang="en">
<head>
    <meta charset="UTF-8">
    <title>投票详情页title>
head>
<body>
<h1>投票详情页h1>
body>
html>
传递参数
- 在urls.py中,只要把url中要作为参数传递的部分用()分组即可。括号中的数据将会传递给函数,函数可以通过参数进行接收。
#polls/urls.py
    url(r'^(\d+)/$', views.detail, name='detail'),
- 函数通过字典的形式,将变量传递给模板
#polls/views.py
def detail(request, question_id):
    return render(request, 'detail.html', {'question_id': question_id})
- 模板文件收到字典时,字典的key是变量名,val是变量值
#templates/detail.html
<body>
<h1>{{ question_id }}号问题投票详情页h1>
body>
django模型
一、ORM映射
模型理念
- 模型指出了数据的唯一、明确的真实来源
- 它包含了正在存储的数据的基本字段和行为
- Django遵循DRY(Do not Repeat Yourself) 原则
- 这个原则的目标是在一个地方定义你的数据模型,并自动从它获得需要的信息
模型说明
- 每个模型都用一个类表示,该类继承自django.db.models.Model
- 每个模型都有一些类变量,在模型中每个类变量都代表了数据库中的一个字段
- 每个字段通过Field类的一个实例表示 —— 例如字符字段CharField和日期字段DateTimeField。 这种方法告诉Django,每个字段中保存着什么类型的数据
- 每个Field 实例的名字就是字段的名字,并且是机器可读的格式
- 在Python代码中将使用到它的值,并且数据库将把它用作表的列名
polls应用模型
- 在这个简单的投票应用中,我们将创建两个模型:Question和Choice
- Question对象具有一个question_text(问题)属性和一个publish_date(发布时间)属性
- Choice有两个字段:选择的内容和选择的得票统计
- 每个Choice与一个Question关联
编写模型
- 编辑polls/models.py文件,输入以下内容:
from django.db import models
class Question(models.Model):
	question_text =	models.CharField(max_length=200)
	pub_date = models.DateTimeField('date published')
class Choice(models.Model):
	question = models.ForeignKey(Question,on_delete = models.CASCADE)
	choice_text = models.CharField(max_length = 200)
	votes =	models.IntegerField(default = 0)
二、数据库管理
迁移Django储存模型
- polls应用建立了新的模型,该模型需要反馈到数据库中
- 通过运行makemigrations告诉Django,已经对模型做了一些更改,并且会将这些更改记录为迁移文件
- 迁移文件位于polls/migrations/目录下
(django_env)[root@localhost mysite]# python manage.py makemigrations
Migrations for 'polls':
polls/migrations/0001_initial.py
- Create model Choice
- Create model Question
- Add field question to choice
生成数据库
- makemigrations只是生成了迁移文件,并未真正的反馈到数据中
- migrate才是真正生成数据库
(django_env) [root@localhost mysite]# python manage.py migrate
Operations to perform:
Apply all migrations: admin, auth, contenttypes, polls, sessions
Running migrations:
Applying polls.0001_initial...	OK
登录数据库,查看创建的表
注册管理后台
- 投票的问题和选项,可以通过后台进行录入、编辑
- 只要把模型注册到后台管理界面即可
- 编辑polls/admin.py,修改如下:
from django.contrib import admin
from .models import Question,Choice

admin.site.register(Question)
admin.site.register(Choice)
Django API
使用python shell
加载python shell
- 使用如下命令来调用Python shell:
(django_env) [root@localhost mysite]# python manage.py shell
- 使用上述命令而不是简单地键入“python”进入python环境
- 因为manage.py 设置了DJANGO_SETTINGS_MODULE 环境变量,该环境变量告诉Django导入mysite/settings.py文件的路径
导入模型
- 导入前面编写的模型
>>> from polls.models import Question,Choice
- 查看所有的问题
>>>	Question.objects.all()
<QuerySet []>
- 因为还没有创建任何问题,所以返回的是一个空查询集
创建Question
- Question模型中需要时间,可以使用django工具
>>> from django.utils import timezone
- 创建问题
>>>	q =	Question(question_text="你希望进入哪个公司工作?",pub_date=timezone.now())
>>>	q.save()
- 保存这个对象到数据库中。 必须显示地调用save()
访问Question模型
- 一旦创建好了对象,就可以对其进行访问了
>>>	q.id
1
>>>	q.question_text
'你希望进入哪个公司工作?'
>>>	q.pub_date
datetime.datetime(2018,	5,	18,	14,	50,	11,	282269,	tzinfo=<UTC>)
修改Question对象
- 通过改变属性来改变字段的值,然后调用save()
>>>	q.question_text =	"你期待哪个公司给你发offer?"
>>>	q.save()
- 查询结果
>>>	Question.objects.all()
<QuerySet [<Question:Question object>]>
查询数据
提供友好实例名称
• 完全是这个对象无意义的表示。
接下来修复这个问题:
class Question(models.Model):
	question_text =	models.CharField(max_length=200)
	pub_date =	models.DateTimeField('date	published')
	def __str__(self):
		return	self.question_text
class Choice(models.Model):
	question = models.ForeignKey(Question,	on_delete=models.CASCADE)
	choice_text = models.CharField(max_length=200)
	votes =	models.IntegerField(default=0)
	def __str__(self):
		return	self.choice_text
- 修改完毕,重新加载
(django_env) [root@localhost mysite]# python	manage.py shell
>>>	from	polls.models import	Question,Choice
>>>	Question.objects.all()
<QuerySet [<Question:你期待哪个公司给你发offer?>]>
自定义方法
- 模型虽然与数据库具有映射关系,但是它也可以像普通的类一样进行方法的创建
import	datetime
from django.db import models
from django.utils import timezone
class Question(models.Model):
	question_text =	models.CharField(max_length=200)
	pub_date =	models.DateTimeField('date	published')
	def __str__(self):
		return	self.question_text
	def was_published_recently(self):
		return	self.pub_date >= timezone.now()	- datetime.timedelta(days=1)
数据库查询
- Django 提供了丰富的数据库查询 API
- 通过关键字查询
>>>	from polls.models import Question, Choice
>>>	Question.objects.get(id=1)
<Question:	你期待哪个公司给你发offer?>
- 如果ID不存在,将引发一个异常
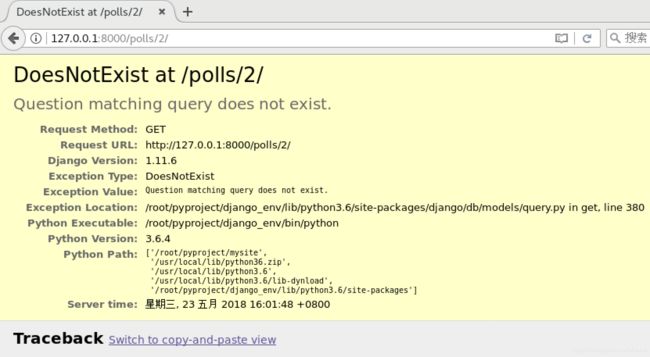
>>>	Question.objects.get(id=2)
......
polls.models.DoesNotExist: Question	matching query does	not	exist.
- 通过主键查询数据是常见的情况,因此 Django 提供了精确查找主键的快捷方式
>>>	Question.objects.get(pk=1)
<Question:	你期待哪个公司给你发offer?>
- 使用自定义方法
>>>	q =	Question.objects.get(pk=1)
>>>	q.was_published_recently()
True
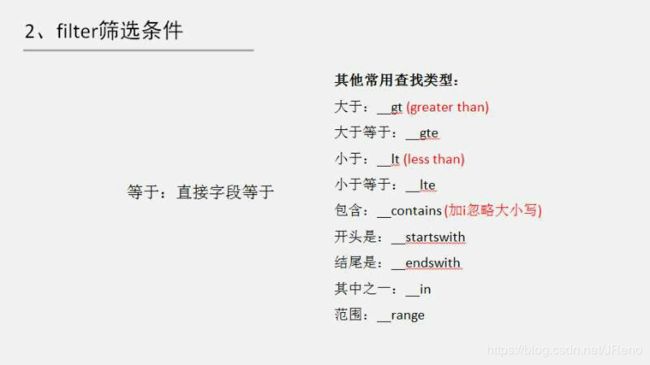
查询的方法:
- get:要求必须返回一个实例,否则报错
- filter:返回0到多个实例的查询集
>>> Question.objects.get(id=1)
<Question: 你期待的工资是多少?>
>>> Question.objects.filter(id=1)
<QuerySet [<Question: 你期待的工资是多少?>]>

>>> q1 = Question.objects.get(id=1)
>>> q1.question_text
'你期待的工资是多少?'
>>> q1.pub_date
datetime.datetime(2019, 7, 23, 9, 32)

>>> qset1 = Question.objects.filter(id=1)
>>> len(qset1)
1
>>> q2 = qset1[0]   # 取出下标为0的实例
>>> q2.question_text
'你期待的工资是多少?'
- Django通过灵活的双下划线实现属性查找
>>>	Question.objects.filter(id=1)
<QuerySet [<Question:	你期待哪个公司给你发offer?>]>
>>>	Question.objects.filter(question_text__startswith='你')
<QuerySet [<Question:	你期待哪个公司给你发offer?>]>
>>> Question.objects.filter(id__exact=1)
<QuerySet [<Question: 你期待的薪资是多少?>]>
>>>	from django.utils import	timezone
>>>	current_year =	timezone.now().year
>>>	Question.objects.get(pub_date__year=current_year)
<Question:	你期待哪个公司给你发offer?>
取出数据
# 取出全部数据
>>> Question.objects.all()   # 返回查询集
>>> Question.objects.order_by('pub_date')  # 按pub_date升序排列
>>> Question.objects.order_by('-pub_date') # 按pub_date降序排列
# 先过滤,再排序
>>> Question.objects.filter(id__gt=2).order_by('-pub_date')
# 在过滤的结果集上继续进行过滤
>>> Question.objects.filter(id__gt=2).filter(id__lt=4)
修改和删除
# 修改前先获取到实例
>>> q1 = Question.objects.get(id=3)
>>> q1
<Question: 住址在哪?>
# 修改就是属性重新赋值
>>> q1.question_text = ' 住址在哪?'
>>> q1.save()

# 删除
>>> q2 = Question.objects.get(question_text__contains='哪个城市找工作')
>>> print(q2)
你打算到哪个城市找工作?
>>> q2.delete()   # delete后,数据库中已经删除对应的记录
>>> print(q2)   # 仍然存在q2实例,只不过数据库中没有记录与之对应
>>> q2.save()   # 再次保存,在表中创建新的记录
创建Choice对象
- 由于存在外键关系,django通过Question对象可以反向得到Choice对象集
- 实例化
- 通过objects管理器
- 通过问题的choice_set创建选项
>>> from polls.models import Question,Choice
>>> q3 = Question.objects.create(question_text='你打算去哪个城
# 实例化
>>> c1 = Choice(choice_text='北京', question=q3)
>>> c1.save()

# 通过objects管理器
>>> c2 = Choice.objects.create(choice_text='上海', question=q3)

# 因为问题和选项存在着一对多的关系,也就是一个问题可以对应多个选项。因为选项类名字是Choice,所以问题实例都有一个choice_set。如果选项类名字是XuanXiang,那么问题实例就有一个xuanxiang_set。choice_set也是一个管理器,它也有和objects一样的方法。
>>> c3 = q3.choice_set.create(choice_text='广州')
视图
视图基础
- 在Django中,网页的页面和其他内容都是由视图来传递的(视图对WEB请求进行回应)
- 每个视图都是由一个简单的Python函数(或者是基于类的视图的方法)表示的
- Django通过检查请求的URL(准确地说,是URL里域名之后的那部分)来选择使用哪个视图
Question详情视图
- 编写一个视图,显示单个Question的具体内容,不显示该议题的当前投票结果,而是提供一个投票的表单
def detail(request,	question_id):
	return	HttpResponse("你正在查看的问题是:%s。"	%	question_id)
Question结果视图
- 编写视图,显示特定的Question的投票结果
def result(request,	question_id):
	response = "你正在查看问题[%s]的结果。"
	return HttpResponse(response % question_id)
投票功能视图
- 编写视图,处理对Question中Choice的投票
def vote(request,	question_id):
	return	HttpResponse("您正在为[%s]投票。")
编写URLCONF
- 将视图和polls.urls模块关联
- 当客户端向你的网站请求一个页面 ( 例如“/polls/34/”)时,Django将加载mysite.urls Python模块
- 因为它被指向ROOT_URLCONF设置, 它寻找名为urlpatterns 的变量并按顺序匹配其中的正则表达式
- 在‘^polls/’找到匹配后,它将取消匹配的文本(“polls/”),并发送剩余的文本 ( “34/” )
到’polls.urls’URLconf进行进一步处理 - 编辑polls/urls.py
from django.conf.urls import url
from . import views
urlpatterns = [
url(r'^$', views.index, name='index'),
url(r'^(?P[0-9]+)/$' , views.detail, name='detail'),
url(r'^(?P[0-9]+)/results/$' , views.result, name='result'),
url(r'^(?P[0-9]+)/vote/$' , views.vote, name='vote'),
]
模板
模板概述
- 前面的例子,HTML是硬编码在python代码中的。这会带来不少问题:
- 任何页面的改动会牵扯到Python代码的改动
- 写后台Python代码与设计HTML是不同的工作,更专业的Web开发应该将两者分开
- 程序员写Python代码同时页面设计者写HTML模板会更高效,而不是一个人等待另一个人编辑同样的文件
为了解决硬码的这些问题,可以模板:
- 网站的设计改动会比Python代码改动更频繁,所以如果我们将两者分离开会更方便
- 页面设计者和HTML/CSS程序员不应该编辑Python代码,他们应该与HTML打交道
- 使用Django的模板系统分离设计和Python代码会更干净更易维护
创建模板工作目录
- 默认的设置文件settings.py配置了一个DjangoTemplates后端,其中将APP_DIRS选项设置为True
- DjangoTemplates在 INSTALLED_APPS所包含的每个应用的目录下查找名为"templates"子目录
- 模板应该位于polls/templates/polls/目录下
[root@localhost mysite]# mkdir -p polls/templates/polls
更新index视图
- 修改polls/views.py的index函数
from django.shortcuts import render
from .models import Question
def index(request):
	latest_question_list =	Question.objects.order_by('-pub_date')[:5]
	context	= {'latest_question_list': latest_question_list}
	return	render(request,	'polls/index.html',	context)
编写模板
- 创建模板文件polls/templates/polls/index.html,模板语言后续有详细介绍
{%	if latest_question_list %}
	<ul>
		{%	for	question in	latest_question_list %}
			<li><a href="/polls/{{	question.id }}/">{{	question.question_text }}a>
			li>
		{%	endfor %}
	ul>
{%	else %}
	<p>No	polls are available.p>
{%	endif %}
-
当模板系统遇到变量名里有小数点时会按以下顺序查找:
-
- 字典查找,如foo[“bar”]
-
- 属性查找,如foo.bar
-
- 方法调用,如foo.bar()
-
- 列表的索引查找,如foo[bar]
-
模板中可以使用的元素有:
-
- 变量,使用 {{ variable }} 的格式
-
- 标签/指令,使用 {% … %}的格式
-
- 字符串:{ } 之外的任何东西,都当做字符串处理
错误处理
- 当请求一个不存在的对象时,django将会抛出异常
- 一种常见的习惯是使用get()并在对象不存在时引发Http404。 Django为此提供一个快捷方式
from django.shortcuts import render,get_object_or_404
def detail(request,	question_id):
	question = get_object_or_404(Question,	pk=question_id)
	return render(request, 'polls/detail.html',	{'question': question})
编写投票详情模板
- 创建polls/templates/polls/detail.html
<h1>{{	question.question_text }}h1>
<ul>
	{%	for	choice in question.choice_set.all %}
	<li>{{ choice.choice_text }}li>
	{%	endfor %}
ul>
detail表单
表单说明
- 在detail网页模板中,我们为Question对应的每个Choice都添加了一个单选按钮用于选择。 每个单选按钮的value属性是对应的各个Choice的ID。
- 每个单选按钮的name是“choice”。 这意味着,当选择一个单选按钮并提交表单提交时,它将发送一个POST数据choice=#,其中#为选择的Choice的ID
编写表单
- 更新投票详细页面的模板detail.html
<h1>{{	question.question_text }}h1>
{%	if	error_message %}
	<p><strong>{{ error_message }}strong>p>
{% endif %}
<form	action="/polls/{{ question.id }}/vote/"	method="post">
	{%	csrf_token %}
	{%	for	choice	in	question.choice_set.all %}
		<input	type="radio" name="choice" id="choice{{	forloop.counter }}"
		value="{{ choice.id }}"	/>
		<label for="choice{{ forloop.counter }}">{{	choice.choice_text }}
		label><br />
	{%	endfor %}
	<input	type="submit" value="投票"	/>
form>
- forloop.counter指示for标签已经循环多少次
- 由于我们创建一个POST表单(它具有修改数据的作用),所以我们需要小心跨站点请求伪造
- Django已经拥有一个用来防御它的非常容易使用的系统
- 简而言之,所有针对内部URL的POST表单都应该使用{% csrf_token %}模板标签
vote视图
- 修改vote函数,使之可以真正投票
def vote(request,	question_id):
	question = get_object_or_404(Question, pk=question_id)
	try:
		choices	=	question.choice_set.get(pk=request.POST['choice'])
	except(KeyError, Choice.DoesNotExist):
		return	render(request,	'polls/detail.html', {
									'qustion':	question,
									'error_message': '您没有做出任何选择',
									})
	else:
		choices.votes += 1
		choices.save()
		return	redirect('result', question_id=question_id)
- request.POST 是一个类似字典的对象,可以通过关键字的名字获取提交的数据
- request.POST[‘choice’] 以字符串形式返回选择的Choice的ID。request.POST 的值永远是字符串
- 如果在POST数据中没有提供request.POST[‘choice’],choice将引发一个KeyError
修改result视图函数
- 修改vote函数,使之可以真正投票
def result(request,	question_id):
	question = get_object_or_404(Question,	pk=question_id)
	return render(request,'polls/results.html', {'question':question})
创建results模板文件
- 创建polls/templates/polls/results.html模板文件
<h1>{{	question.question_text }}h1>
<ul>
	{%	for	choice	in	question.choice_set.all %}
		<li>{{	choice.choice_text }} :	{{ choice.votes }}li>
	{%	endfor %}
ul>
<a	href="/polls/">投票首页a>
======================内容补充
模板语言
https://docs.djangoproject.com/en/1.11/ref/templates/language/
# 变量通过{{var}}来表示

# for 循环,变量在标签中不需要使用{{}}
<ul>
{% for athlete in athlete_list %}
    <li>{{ athlete.name }}li>
{% endfor %}
ul>

# 判断
{% if athlete_list %}
    Number of athletes: {{ athlete_list|length }}
{% elif athlete_in_locker_room_list %}
    Athletes should be out of the locker room soon!
{% else %}
    No athletes.
{% endif %}
- 引入bootstrap
# 把day02的static目录拷贝到应用目录下
(django_env) [root@room8pc16 mysite]# ls -d polls/static/
polls/static

# 静态文件目录,通过settings.py的STATICFILES_DIRS设置
  # 项目目录的static目录
  # 应用目录的static目录

# 修改index.html,第一行加入以下内容:
{% load static %}
# 在index.html的head标签中,加入以下内容:
    <meta name="viewport" content="width=device-width, initial-scale=1">
    <link rel="stylesheet" href="{% static 'css/bootstrap.min.css' %}">
- 配置index.html的页面
{% load static %}

<html lang="en">
<head>
    <meta charset="UTF-8">
    <title>投票首页title>
    <meta name="viewport" content="width=device-width, initial-scale=1">
    <link rel="stylesheet" href="{% static 'css/bootstrap.min.css' %}">
head>
<body>
<div class="container">
    <div id="linux-carousel" class="carousel slide">
        <ol class="carousel-indicators">
            <li class="active" data-target="#linux-carousel" data-slide-to="0">li>
            <li data-target="#linux-carousel" data-slide-to="1">li>
            <li data-target="#linux-carousel" data-slide-to="2">li>
        ol>
        <div class="carousel-inner">
            <div class="item active">
                <a href="http://www.sogou.com" target="_blank">
                    <img src="{% static 'imgs/first.jpg' %}">
                a>
            div>
            <div class="item">
                <img src="{% static 'imgs/second.jpg' %}">
            div>
            <div class="item">
                <img src="{% static 'imgs/third.jpg' %}">
            div>
        div>
        <a href="#linux-carousel" data-slide="prev" class="carousel-control left">
            <span class="glyphicon glyphicon-chevron-left">span>
        a>
        <a href="#linux-carousel" data-slide="next" class="carousel-control right">
            <span class="glyphicon glyphicon-chevron-right">span>
        a>
    div>
    <div class="row h4">
        <div class="col-sm-12">
            <h1 class="text-center text-warning">投票首页h1>
            {#<div>{{ questions }}div>#}
            <ol>
                {% for question in questions %}
                    <li>
            {#        detail是urls.py中为详情页起的名字,它接受一个参数#}
                        <a href="{% url 'detail' question.id %}" target="_blank">
                            {{ question.question_text }}
                        a>
                        {{ question.pub_date }}
                    li>
                {% endfor %}
            ol>
        div>
    div>
    <div class="row text-center h4">
        <div class="col-sm-12">
            <a href="#">TESTa>
        div>
    div>
div>

<script src="{% static 'js/jquery.min.js' %}">script>
<script src="{% static 'js/bootstrap.min.js' %}">script>
<script type="text/javascript">
    $('#linux-carousel').carousel({
        interval : 3000
    });
script>
body>
html>
- 使用模板继承
制作网页时,多个页面呈现的形式是一样的,可以先创建一个基础模板,把共性内容写到基础模板中。具体的模板文件都继承于基础模板,把个性化内容写到模板文件。
# templates/base.html   保留各个页面的共性部分,个性部分用block标签代替
{% load static %}

<html lang="en">
<head>
    <meta charset="UTF-8">
    <title>{% block title %}{% endblock %}title>
    <meta name="viewport" content="width=device-width, initial-scale=1">
    <link rel="stylesheet" href="{% static 'css/bootstrap.min.css' %}">
head>
<body>
<div class="container">
    <div id="linux-carousel" class="carousel slide">
        <ol class="carousel-indicators">
            <li class="active" data-target="#linux-carousel" data-slide-to="0">li>
            <li data-target="#linux-carousel" data-slide-to="1">li>
            <li data-target="#linux-carousel" data-slide-to="2">li>
        ol>
        <div class="carousel-inner">
            <div class="item active">
                <a href="http://www.sogou.com" target="_blank">
                    <img src="{% static 'imgs/first.jpg' %}">
                a>
            div>
            <div class="item">
                <img src="{% static 'imgs/second.jpg' %}">
            div>
            <div class="item">
                <img src="{% static 'imgs/third.jpg' %}">
            div>
        div>
        <a href="#linux-carousel" data-slide="prev" class="carousel-control left">
            <span class="glyphicon glyphicon-chevron-left">span>
        a>
        <a href="#linux-carousel" data-slide="next" class="carousel-control right">
            <span class="glyphicon glyphicon-chevron-right">span>
        a>
    div>
    <div class="row h4">
        <div class="col-sm-12">
            {% block content %}{% endblock %}
        div>
    div>
    <div class="row text-center h4">
        <div class="col-sm-12">
            <a href="#">TEST02a>
        div>
    div>
div>

<script src="{% static 'js/jquery.min.js' %}">script>
<script src="{% static 'js/bootstrap.min.js' %}">script>
<script type="text/javascript">
    $('#linux-carousel').carousel({
        interval : 3000
    });
script>
body>
html>


# 将index.html中共性部分删除,个性部分写到对应的block中
# index.html
{% extends 'base.html' %}
{% load static %}
{% block title %}投票首页{% endblock %}
{% block content %}
    <h1 class="text-center text-warning">投票首页h1>
    <ol>
        {% for question in questions %}
            <li>
                <a href="{% url 'detail' question.id %}" target="_blank">
                    {{ question.question_text }}
                a>
                {{ question.pub_date }}
            li>
        {% endfor %}
    ol>
{% endblock %}
制作详情页
- 先把模板页继承base.html
# detail.html
{% extends 'base.html' %}
{% load static %}
{% block title %}投票详情页{% endblock %}
{% block content %}
    <h1>{{ question_id }}号问题投票详情页h1>
{% endblock %}
- 修改视图函数
详情视图,只要把对应ID的问题取出即可
# polls/views.py
def detail(request, question_id):
    question = Question.objects.get(id=question_id)
    return render(request, 'detail.html', {'question': question})
- 修改视图函数
# templates/detail.html
{% extends 'base.html' %}
{% load static %}
{% block title %}投票详情页{% endblock %}
{% block content %}
    <h1 class="text-center text-warning">{{ question.id }}号问题投票详情页h1>
    <h2>{{ question.question_text }}h2>
    <form action="" method="post">
        {% csrf_token %}
        {% for choice in question.choice_set.all %}
            <div class="radio">
                <label>
                    <input type="radio" name="choice_id" value="{{ choice.id }}">
                    {{ choice.choice_text }}
                label>
            div>
        {% endfor %}
        <div class="form-group">
            <input class="btn btn-primary" type="submit" value="提 交">
        div>
    form>
{% endblock %}
实现投票功能
在投票详情页,当用户提交表单时,将会把数据post给action对应的URL。
为选项投票就是把选项的票数votes加1,通过函数实现投票功能。在django里,访问一个url就会执行函数。
- url
# polls/urls.py
    url(r'^(\d+)/vote/$', views.vote, name='vote'),
- 视图函数
def vote(request, question_id):
    question = Question.objects.get(id=question_id)
    choice_id = request.POST.get('choice_id')  # 从用户post的表单中取出choice_id
    choice = question.choice_set.get(id=choice_id)  # 获取选项实例
    choice.votes += 1
    choice.save()

    return redirect('result', question_id)  # 重定向到result页面
- 修改表单的action值
<form action="{% url 'vote' question.id %}" method="post">
完成投票结果页
- 视图函数
# polls/views.py
def result(request, question_id):
    question = Question.objects.get(id=question_id)
    return render(request, 'result.html', {'question': question})
- 修改模板
{% extends 'base.html' %}
{% load static %}
{% block title %}投票结果页{% endblock %}danei
{% block content %}
    <h1 class="text-center text-warning">{{ question.id }}号问题投票结果页h1>
    <h2>{{ question.question_text }}h2>
    <table class="table table-bordered table-hover table-striped">
        <thead class="bg-primary text-center">
            <tr>
                <td>选项td>
                <td>票数td>
            tr>
        thead>
        <tbody>
            {% for choice in question.choice_set.all %}
                <tr>
                    <td>{{ choice.choice_text }}td>
                    <td>{{ choice.votes }}td>
                tr>
            {% endfor %}
        tbody>
    table>
{% endblock %}
附:
前台页面模板:https://coreui.io/
django2 by example: http://www.conyli.cc/django-2-by-example