理论分析+Python&Tensorflow&Opencv实现深度学习MTCNN人脸检测
理论分析+Python&Tensorflow&Opencv实现深度学习MTCNN人脸检测
MTCNN理论
论文地址:https://arxiv.org/ftp/arxiv/papers/1604/1604.02878.pdf (此论文有部分勘误,后期有修改,具体以代码为准)
具体实现代码地址将在文末放出链接
MTCNN和多数卷积神经网络一样具体分为两个部分即预测部分和训练部分。
1.训练-反向传播
通过论文的思路,MTCNN是一个级联的CNN神经网络结构,分别是:PNet、RNet、ONet;
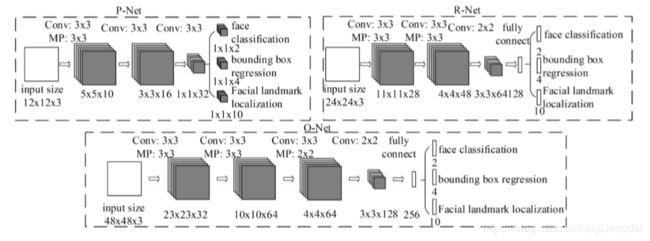
如图可以看出,MTCNN三层网络的输入图像、层中卷积核、输出图像等信息。细分一下,输出也分为三部分,即人脸预测分数、边框回归、人脸的五点定位。所以在训练时候也是分开的,三个部分通过前向传播,预测出相应的三个信息,再通过与标签上的三个信息的误差,做反向传播,从而更新全面卷积核的参数,达到迭代预测,使得整个网络与正确的标签逐渐接近。
三个属性的损失函数也是不一样的,人脸的预测分数使用的是cross-entropy loss(交叉熵损失函数):

边框回归使用的损失函数是Euclidean loss(范数),即偏移量的面积ROI:

人脸的五点定位损失也是类似的Euclidean loss(范数),只不过做了某种减小操作(具体的不多做展开):

由于本篇文章重点着眼于预测,所以就不在训练上继续了。
2.网络结构介绍
注:本文的尺寸表达格式为(矩阵长,矩阵宽,矩阵通道)
2.1 PNet(Proposal Net)
PNet原理描述
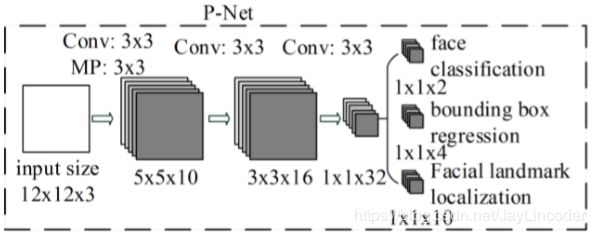
PNet是将样本图像resize成(12,12,3)的尺寸作为输入,先通过三层卷积核(第一层卷积后接一个最大池化层)尺寸分别为Conv(3,3,10)+MP(2,2,10)、(3,3,16)、(3,3,32)进行矩阵的互相关操作,使得输出图像的尺寸按层顺序依次是(5,5,10)、(3,3,16)、(1,1,32)。最后再通过三层卷积核分别为(1,1,2)和(1,1,4)和(1,1,10)的尺寸输出相同尺寸的信息,如图信息内容分别包括为特征矩阵预测出是否是人脸的概率(此处激活函数是"SoftMax")以及预测出的特征在图像中的位置信息,即BoundingBox(左上的X坐标,左上的Y坐标,长,宽)和人脸的五点定位;
网络结构伪代码:
# 读取
img = imread("图像在磁盘中的的位置")
# 获取图像信息(长、宽、通道)
height, width, channel = img.shape
# 将图像resize到(12,12,3)
resized_im = resize(img , (12, 12), interpolation=cv2.INTER_LINEAR)
# 第一个卷积层,用于提取特征图
conv2d(input_shape=(12,12,3),kernel_shape(3,3,10),strides=1,name="conv1")
# 第一个池化层,用于简化特征图
max_pooling(kernel_size=(2,2,10),strides=1,name="MP1")
# 第二个卷积层,用于提取特征图
conv2d(input_shape=(5,5,10),kernel_shape(3,3,16),strides=1,name="conv2")
# 第三个卷积层,用于提取特征图
conv2d(input_shape=(3,3,16),kernel_shape(3,3,32),strides=1,name="conv3")
# 第四个卷积层,用于人脸预测分数,使用“softmax激活函数”
conv2d(input_shape=(1,1,32),kernel_shape(1,1,2),strides=1,name="conv4")
# 第五个卷积层,用于边框回归
conv2d(input_shape=(1,1,32),kernel_shape(1,1,4),name="conv5")
# 第六个卷积层,用于人脸的五点定位
conv2d(input_shape=(1,1,32),kernel_shape(1,1,10),name="conv6")
值得一提的是,PNet属于一个全卷积网络,所以它并没有像别的卷积层一样最后连接一个Dense(全连接),这么做的原因是因为之后预测的时候,每张图像的尺寸不一样,为了能适应尺寸的多样性,通过1X1卷积核保存特征矩阵的信息而非向量信息(如果使用特征向量信息会使得不同的输入尺寸得到不同的特征向量维度不同)。此处关键点在后面的预测环节详细展开。
2.2 RNet(Refinement Net)
RNet原理描述
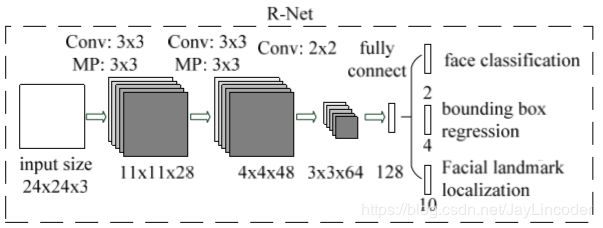
RNet是将图像resize成(24,24,3)尺寸作为输入,先通过三层卷积核(第一、二层卷积后接一个最大池化层)尺寸分别为Conv(3,3,28)+MP(3,3,28)、Conv(3,3,48)+MP(3,3,48)、(2,2,64)进行矩阵的互相关操作,使得输出图像的尺寸按层顺序依次是(11,11,28)、(4,4,48)、(3,3,64)。最后再通过全连接层输出一个128维度的向量,如图信息内容分别包括为特征矩阵预测出是否是人脸的概率(此处激活函数是"SoftMax")以及预测出的特征在图像中的位置信息,即BoundingBox(左上的X坐标,左上的Y坐标,长,宽)和人脸的五点定位;
网络结构伪代码:
# 读取
img = imread("PNet保存的候选图")
# 获取图像信息(长、宽、通道)
height, width, channel = img.shape
# 将图像resize到(24,24,3)
resized_im = resize(img , (24, 24), interpolation=cv2.INTER_LINEAR)
# 第一个卷积层,用于提取特征图
conv2d(input_shape=(24,24,3),kernel_shape(3,3,28),strides=1,name="conv1")
# 第一个池化层,用于简化特征图
max_pooling(kernel_size=(3,3,28),strides=2,activation=“relu”,name="MP1")
# 第二个卷积层,用于提取特征图
conv2d(input_shape=(11,11,28),kernel_shape(3,3,48),strides=2,name="conv2")
# 第二个池化层,用于简化特征图
max_pooling(kernel_size=(3,3,48),strides=2,activation=“relu”,name="MP2")
# 第三个卷积层,用于提取特征图
conv2d(input_shape=(4,4,48),kernel_shape(2,2,64),strides=1,name="conv3")
# 第四层,全连接用于连接特征图
dense(input_shape=(3,3,64),output_shape=128,activation=“relu”,name="fully connect1")
# 第五层,全连接用于人脸预测分数,使用“softmax激活函数”
dense(output_shape=2,activation=“softmax”,name="fully connect2")
# 第六层,全连接用于边框回归
dense(output_shape=4,name="fully connect3")
# 第七层,全连接用于人脸的五点定位
dense(output_shape=10,name="fully connect4")
2.3 ONet(Output Net)
ONet原理描述
ONet是将图像resize成(48,48,3)尺寸作为输入,先通过四层卷积核(第一、二、三层卷积后接一个最大池化层)尺寸分别为Conv(3,3,32)+MP(3,3,32)、Conv(3,3,64)+MP(3,3,64)、(3,3,64)+MP(2,2,64)、(2,2,128)进行矩阵的互相关操作,使得输出图像的尺寸按层顺序依次是(23,23,32)、(10,10,64)、(4,4,64)、(3,3,128)。最后再通过全连接层输出一个256维度的向量,如图信息内容分别包括为特征矩阵预测出是否是人脸的概率(此处激活函数是"SoftMax")以及预测出的特征在图像中的位置信息,即BoundingBox(左上的X坐标,左上的Y坐标,长,宽)和人脸的五点定位;

# 读取
img = imread("RNet保存的候选图")
# 获取图像信息(长、宽、通道)
height, width, channel = img.shape
# 将图像resize到(48,48,3)
resized_im = resize(img , (48, 48), interpolation=cv2.INTER_LINEAR)
# 第一个卷积层,用于提取特征图
conv2d(input_shape=(48,48,3),kernel_shape(3,3,32),strides=1,name="conv1")
# 第一个池化层,用于简化特征图
max_pooling(kernel_size=(3,3,32),strides=2,activation=“relu”,name="MP1")
# 第二个卷积层,用于提取特征图
conv2d(input_shape=(23,23,32),kernel_shape(3,3,64),strides=2,activation=“relu”,name="conv2")
# 第二个池化层,用于简化特征图
max_pooling(kernel_size=(3,3,64),strides=2,name="MP2")
# 第三个卷积层,用于提取特征图
conv2d(input_shape=(10,10,64),kernel_shape(3,3,64),strides=1,name="conv3")
# 第三个池化层,用于简化特征图
max_pooling(kernel_size=(2,2,64),strides=2,name="MP3")
# 第四个卷积层,用于提取特征图
conv2d(input_shape=(4,4,64),kernel_shape(2,2,128),strides=1,name="conv4")
# 第五层,全连接用于连接特征图
dense(input_shape=(3,3,128),output_shape=256,activation=“relu”,name="fully connect1")
# 第六层,全连接用于人脸预测分数,使用“softmax激活函数”
dense(output_shape=2,activation=“softmax”,name="fully connect2")
# 第七层,全连接用于边框回归
dense(output_shape=4,name="fully connect3")
# 第八层,全连接用于人脸的五点定位
dense(output_shape=10,name="fully connect4")
3.预测-前向传播
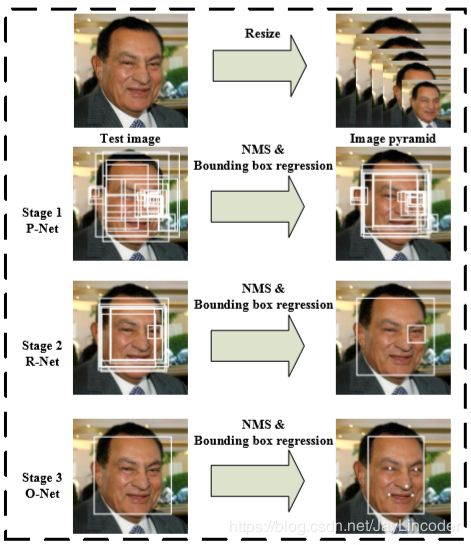
MTCNN前传的主要步骤:
第一步:对于一个图像,首先将其调整到不同的比例,以构建一个图像金字塔,其中设置了一个最小图像尺寸(12,12,3),降采样的的迭代到最小尺度为止。这是以下三级级联网络的输入。
第二步:我们利用PNet,来获得候选人脸窗口及其边界框回归向量。然后根据估计的边框回归向量对候选对象进行校正。在此之后,我们使用非最大抑制(NMS)合并高度重叠的候选。
第三步:PNet保留下的所有候选图resize到(24,24,3)被送入RNet,它进一步通过阈值比较各个边框的得分删除大量的得分很低候选框,用边界框回归进行校准,并进行NMS。
第四步:将RNet保留下的所有候选图resize到(48,48,3),这一阶段与第二阶段相似,但在这一阶段,通过更多的监督来识别面部区域。特别是,网络将输出五个面部标志物的位置。
值得一提的是,从PNet、RNet、ONet,每层都会采用NMS来删除得分较低的候选框。
接下来通过关键代码讲解来完成我们的任务。
我们创建一个nn脚本,首先导入必要的库:
from six import string_types, iteritems
import numpy as np
import tensorflow as tf
这里six库是用于兼容Python2和Python3的一些函数而用的。
接下来建立我们的神经网络类,先定义个层类
def layer(op):
    """Decorator for composable network layers."""

    def layer_decorated(self, *args, **kwargs):
        # Automatically set a name if not provided.
        name = kwargs.setdefault('name', self.get_unique_name(op.__name__))
        # Figure out the layer inputs.
        if len(self.terminals) == 0:
            raise RuntimeError('No input variables found for layer %s.' % name)
        elif len(self.terminals) == 1:
            layer_input = self.terminals[0]
        else:
            layer_input = list(self.terminals)
        # Perform the operation and get the output.
        layer_output = op(self, layer_input, *args, **kwargs)
        # Add to layer LUT.
        self.layers[name] = layer_output
        # This output is now the input for the next layer.
        self.feed(layer_output)
        # Return self for chained calls.
        return self

    return layer_decorated
这样我们就可以开始构建我们的神经网络类了
class Network(object):

    def __init__(self, inputs, trainable=True):
        # The input nodes for this network
        self.inputs = inputs
        # The current list of terminal nodes
        self.terminals = []
        # Mapping from layer names to layers
        self.layers = dict(inputs)
        # If true, the resulting variables are set as trainable
        self.trainable = trainable

        self.setup()

    def setup(self):
        """Construct the network. """
        raise NotImplementedError('Must be implemented by the subclass.')

    def load(self, data_path, session, ignore_missing=False):
        """Load network weights.
        data_path: The path to the numpy-serialized network weights
        session: The current TensorFlow session
        ignore_missing: If true, serialized weights for missing layers are ignored.
        """
        data_dict = np.load(data_path, encoding='latin1').item()  # pylint: disable=no-member

        for op_name in data_dict:
            with tf.variable_scope(op_name, reuse=True):
                for param_name, data in iteritems(data_dict[op_name]):
                    try:
                        var = tf.get_variable(param_name)
                        session.run(var.assign(data))
                    except ValueError:
                        if not ignore_missing:
                            raise

    def feed(self, *args):
        """Set the input(s) for the next operation by replacing the terminal nodes.
        The arguments can be either layer names or the actual layers.
        """
        assert len(args) != 0
        self.terminals = []
        for fed_layer in args:
            if isinstance(fed_layer, string_types):
                try:
                    fed_layer = self.layers[fed_layer]
                except KeyError:
                    raise KeyError('Unknown layer name fed: %s' % fed_layer)
            self.terminals.append(fed_layer)
        return self

    def get_output(self):
        """Returns the current network output."""
        return self.terminals[-1]

    def get_unique_name(self, prefix):
        """Returns an index-suffixed unique name for the given prefix.
        This is used for auto-generating layer names based on the type-prefix.
        """
        ident = sum(t.startswith(prefix) for t, _ in self.layers.items()) + 1
        return '%s_%d' % (prefix, ident)

    def make_var(self, name, shape):
        """Creates a new TensorFlow variable."""
        return tf.get_variable(name, shape, trainable=self.trainable)

    def validate_padding(self, padding):
        """Verifies that the padding is one of the supported ones."""
        assert padding in ('SAME', 'VALID')

    @layer
    def conv(self,
             inp,
             k_h,
             k_w,
             c_o,
             s_h,
             s_w,
             name,
             relu=True,
             padding='SAME',
             group=1,
             biased=True):
        # Verify that the padding is acceptable
        self.validate_padding(padding)
        # Get the number of channels in the input
        c_i = int(inp.get_shape()[-1])
        # Verify that the grouping parameter is valid
        assert c_i % group == 0
        assert c_o % group == 0
        # Convolution for a given input and kernel
        convolve = lambda i, k: tf.nn.conv2d(i, k, [1, s_h, s_w, 1], padding=padding)
        with tf.variable_scope(name) as scope:
            kernel = self.make_var('weights', shape=[k_h, k_w, c_i // group, c_o])
            # This is the common-case. Convolve the input without any further complications.
            output = convolve(inp, kernel)
            # Add the biases
            if biased:
                biases = self.make_var('biases', [c_o])
                output = tf.nn.bias_add(output, biases)
            if relu:
                # ReLU non-linearity
                output = tf.nn.relu(output, name=scope.name)
            return output

    @layer
    def prelu(self, inp, name):
        with tf.variable_scope(name):
            i = int(inp.get_shape()[-1])
            alpha = self.make_var('alpha', shape=(i,))
            output = tf.nn.relu(inp) + tf.multiply(alpha, -tf.nn.relu(-inp))
        return output

    @layer
    def max_pool(self, inp, k_h, k_w, s_h, s_w, name, padding='SAME'):
        self.validate_padding(padding)
        return tf.nn.max_pool(inp,
                              ksize=[1, k_h, k_w, 1],
                              strides=[1, s_h, s_w, 1],
                              padding=padding,
                              name=name)

    @layer
    def fc(self, inp, num_out, name, relu=True):
        with tf.variable_scope(name):
            input_shape = inp.get_shape()
            if input_shape.ndims == 4:
                # The input is spatial. Vectorize it first.
                dim = 1
                for d in input_shape[1:].as_list():
                    dim *= int(d)
                feed_in = tf.reshape(inp, [-1, dim])
            else:
                feed_in, dim = (inp, input_shape[-1].value)
            weights = self.make_var('weights', shape=[dim, num_out])
            biases = self.make_var('biases', [num_out])
            op = tf.nn.relu_layer if relu else tf.nn.xw_plus_b
            fc = op(feed_in, weights, biases, name=name)
            return fc

    @layer
    def softmax(self, target, axis, name=None):
        max_axis = tf.reduce_max(target, axis, keepdims=True)
        target_exp = tf.exp(target - max_axis)
        normalize = tf.reduce_sum(target_exp, axis, keepdims=True)
        softmax = tf.div(target_exp, normalize, name)
        return softmax
接下来构建P、R、ONet
class PNet(Network):
    def setup(self):
        (self.feed('data')  # pylint: disable=no-value-for-parameter, no-member
         .conv(3, 3, 10, 1, 1, padding='VALID', relu=False, name='conv1')
         .prelu(name='PReLU1')
         .max_pool(2, 2, 2, 2, name='pool1')
         .conv(3, 3, 16, 1, 1, padding='VALID', relu=False, name='conv2')
         .prelu(name='PReLU2')
         .conv(3, 3, 32, 1, 1, padding='VALID', relu=False, name='conv3')
         .prelu(name='PReLU3')

         .conv(1, 1, 2, 1, 1, relu=False, name='conv4-1')# face classification
         .softmax(3, name='prob1'))

        (self.feed('PReLU3')  # pylint: disable=no-value-for-parameter
         .conv(1, 1, 4, 1, 1, relu=False, name='conv4-2'))# bounding box regression


class RNet(Network):
    def setup(self):
        (self.feed('data')  # pylint: disable=no-value-for-parameter, no-member
         .conv(3, 3, 28, 1, 1, padding='VALID', relu=False, name='conv1')
         .prelu(name='prelu1')
         .max_pool(3, 3, 2, 2, name='pool1')
         .conv(3, 3, 48, 1, 1, padding='VALID', relu=False, name='conv2')
         .prelu(name='prelu2')
         .max_pool(3, 3, 2, 2, padding='VALID', name='pool2')
         .conv(2, 2, 64, 1, 1, padding='VALID', relu=False, name='conv3')
         .prelu(name='prelu3')
         .fc(128, relu=False, name='conv4')
         .prelu(name='prelu4')
         .fc(2, relu=False, name='conv5-1')
         .softmax(1, name='prob1'))

        (self.feed('prelu4')  # pylint: disable=no-value-for-parameter
         .fc(4, relu=False, name='conv5-2'))


class ONet(Network):
    def setup(self):
        (self.feed('data')  # pylint: disable=no-value-for-parameter, no-member
         .conv(3, 3, 32, 1, 1, padding='VALID', relu=False, name='conv1')
         .prelu(name='prelu1')
         .max_pool(3, 3, 2, 2, name='pool1')
         .conv(3, 3, 64, 1, 1, padding='VALID', relu=False, name='conv2')
         .prelu(name='prelu2')
         .max_pool(3, 3, 2, 2, padding='VALID', name='pool2')
         .conv(3, 3, 64, 1, 1, padding='VALID', relu=False, name='conv3')
         .prelu(name='prelu3')
         .max_pool(2, 2, 2, 2, name='pool3')
         .conv(2, 2, 128, 1, 1, padding='VALID', relu=False, name='conv4')
         .prelu(name='prelu4')
         .fc(256, relu=False, name='conv5')
         .prelu(name='prelu5')
         .fc(2, relu=False, name='conv6-1')
         .softmax(1, name='prob1'))

        (self.feed('prelu5')  # pylint: disable=no-value-for-parameter
         .fc(4, relu=False, name='conv6-2'))

        (self.feed('prelu5')  # pylint: disable=no-value-for-parameter
         .fc(10, relu=False, name='conv6-3'))
至此,我们的nn脚本就完成了,接下来新建一个预测(前传)脚本。
首先,我们还是导入我们刚刚建立的nn脚本,并且导入必要的第三方库函数:
import numpy as np
import tensorflow as tf
import cv2
import os
import nn
import time
然后define一些前面理论上讲的必要操作
# function [boundingbox] = bbreg(boundingbox,reg)
def bbreg(boundingbox, reg):
    """Calibrate bounding boxes"""
    if reg.shape[1] == 1:
        reg = np.reshape(reg, (reg.shape[2], reg.shape[3]))

    w = boundingbox[:, 2] - boundingbox[:, 0] + 1
    h = boundingbox[:, 3] - boundingbox[:, 1] + 1
    b1 = boundingbox[:, 0] + reg[:, 0] * w
    b2 = boundingbox[:, 1] + reg[:, 1] * h
    b3 = boundingbox[:, 2] + reg[:, 2] * w
    b4 = boundingbox[:, 3] + reg[:, 3] * h
    boundingbox[:, 0:4] = np.transpose(np.vstack([b1, b2, b3, b4]))
    return boundingbox


def generateBoundingBox(imap, reg, scale, t):
    """Use heatmap to generate bounding boxes"""
    stride = 2
    cellsize = 12

    imap = np.transpose(imap)
    dx1 = np.transpose(reg[:, :, 0])
    dy1 = np.transpose(reg[:, :, 1])
    dx2 = np.transpose(reg[:, :, 2])
    dy2 = np.transpose(reg[:, :, 3])
    y, x = np.where(imap >= t)
    if y.shape[0] == 1:
        dx1 = np.flipud(dx1)
        dy1 = np.flipud(dy1)
        dx2 = np.flipud(dx2)
        dy2 = np.flipud(dy2)
    score = imap[(y, x)]
    reg = np.transpose(np.vstack([dx1[(y, x)], dy1[(y, x)], dx2[(y, x)], dy2[(y, x)]]))
    if reg.size == 0:
        reg = np.empty((0, 3))
    bb = np.transpose(np.vstack([y, x]))
    q1 = np.fix((stride * bb + 1) / scale)
    q2 = np.fix((stride * bb + cellsize - 1 + 1) / scale)
    boundingbox = np.hstack([q1, q2, np.expand_dims(score, 1), reg])
    return boundingbox, reg


# function pick = nms(boxes,threshold,type)
def nms(boxes, threshold, method):
    if boxes.size == 0:
        return np.empty((0, 3))
    x1 = boxes[:, 0]
    y1 = boxes[:, 1]
    x2 = boxes[:, 2]
    y2 = boxes[:, 3]
    s = boxes[:, 4]
    area = (x2 - x1 + 1) * (y2 - y1 + 1)
    I = np.argsort(s)
    pick = np.zeros_like(s, dtype=np.int16)
    counter = 0
    while I.size > 0:
        i = I[-1]
        pick[counter] = i
        counter += 1
        idx = I[0:-1]
        xx1 = np.maximum(x1[i], x1[idx])
        yy1 = np.maximum(y1[i], y1[idx])
        xx2 = np.minimum(x2[i], x2[idx])
        yy2 = np.minimum(y2[i], y2[idx])
        w = np.maximum(0.0, xx2 - xx1 + 1)
        h = np.maximum(0.0, yy2 - yy1 + 1)
        inter = w * h
        if method is 'Min':
            o = inter / np.minimum(area[i], area[idx])
        else:
            o = inter / (area[i] + area[idx] - inter)
        I = I[np.where(o <= threshold)]
    pick = pick[0:counter]
    return pick


# function [dy edy dx edx y ey x ex tmpw tmph] = pad(total_boxes,w,h)
def pad(total_boxes, w, h):
    """Compute the padding coordinates (pad the bounding boxes to square)"""
    tmpw = (total_boxes[:, 2] - total_boxes[:, 0] + 1).astype(np.int32)
    tmph = (total_boxes[:, 3] - total_boxes[:, 1] + 1).astype(np.int32)
    numbox = total_boxes.shape[0]

    dx = np.ones((numbox), dtype=np.int32)
    dy = np.ones((numbox), dtype=np.int32)
    edx = tmpw.copy().astype(np.int32)
    edy = tmph.copy().astype(np.int32)

    x = total_boxes[:, 0].copy().astype(np.int32)
    y = total_boxes[:, 1].copy().astype(np.int32)
    ex = total_boxes[:, 2].copy().astype(np.int32)
    ey = total_boxes[:, 3].copy().astype(np.int32)

    tmp = np.where(ex > w)
    edx.flat[tmp] = np.expand_dims(-ex[tmp] + w + tmpw[tmp], 1)
    ex[tmp] = w

    tmp = np.where(ey > h)
    edy.flat[tmp] = np.expand_dims(-ey[tmp] + h + tmph[tmp], 1)
    ey[tmp] = h

    tmp = np.where(x < 1)
    dx.flat[tmp] = np.expand_dims(2 - x[tmp], 1)
    x[tmp] = 1

    tmp = np.where(y < 1)
    dy.flat[tmp] = np.expand_dims(2 - y[tmp], 1)
    y[tmp] = 1

    return dy, edy, dx, edx, y, ey, x, ex, tmpw, tmph


# function [bboxA] = rerec(bboxA)
def rerec(bboxA):
    """Convert bboxA to square."""
    h = bboxA[:, 3] - bboxA[:, 1]
    w = bboxA[:, 2] - bboxA[:, 0]
    l = np.maximum(w, h)
    bboxA[:, 0] = bboxA[:, 0] + w * 0.5 - l * 0.5
    bboxA[:, 1] = bboxA[:, 1] + h * 0.5 - l * 0.5
    bboxA[:, 2:4] = bboxA[:, 0:2] + np.transpose(np.tile(l, (2, 1)))
    return bboxA
接下来创建我们的MTCNN:
def create_mtcnn(sess, model_path):

    with tf.variable_scope('pnet'):
        data = tf.placeholder(tf.float32, (None,None,None,3), 'input')
        pnet = nn.PNet({'data':data})
        pnet.load(os.path.join(model_path, 'det1.npy'), sess)
    with tf.variable_scope('rnet'):
        data = tf.placeholder(tf.float32, (None,24,24,3), 'input')
        rnet = nn.RNet({'data':data})
        rnet.load(os.path.join(model_path, 'det2.npy'), sess)
    with tf.variable_scope('onet'):
        data = tf.placeholder(tf.float32, (None,48,48,3), 'input')
        onet = nn.ONet({'data':data})
        onet.load(os.path.join(model_path, 'det3.npy'), sess)

    pnet_fun = lambda img : sess.run(('pnet/conv4-2/BiasAdd:0', 'pnet/prob1:0'),
    								feed_dict={'pnet/input:0':img})
    rnet_fun = lambda img : sess.run(('rnet/conv5-2/conv5-2:0', 'rnet/prob1:0'),
    								feed_dict={'rnet/input:0':img})
    onet_fun = lambda img : sess.run(('onet/conv6-2/conv6-2:0', 'onet/conv6-3/conv6-3:0', 'onet/prob1:0'),
    								 feed_dict={'onet/input:0':img})

    return pnet_fun, rnet_fun, onet_fun
这里强调一点,在前面讲到多尺度输入问题提及的全卷积网络PNet,就是要保存尺度的多样性,构建金字塔,这样才能识别不同尺度的图像,可以看见data = tf.placeholder(tf.float32, (None,None,None,3), ‘input’),三个None分别就是图像的尺寸和通道。
那么,接下来就可以开始define我们的人脸识别函数了。
注意!!!因为人脸的五点定位在我们这个Demo中没什么用,所以我将它的处理移除,节省运行时间。
def detect_face(img, minsize, pnet, rnet, onet, threshold, factor):

    factor_count=0
    total_boxes=np.empty((0,9))
    h=img.shape[0]
    w=img.shape[1]
    minl=np.amin([h, w])
    m=12.0/minsize
    minl=minl*m
    # create scale pyramid
    scales=[]
    while minl>=12:
        scales += [m*np.power(factor, factor_count)]
        minl = minl*factor
        factor_count += 1

    # first stage
    for scale in scales:
        hs=int(np.ceil(h*scale))
        ws=int(np.ceil(w*scale))
        im_data = cv2.resize(img, (hs, ws), interpolation=cv2.INTER_AREA)
        im_data = (im_data-127.5)*0.0078125
        img_x = np.expand_dims(im_data, 0)
        img_y = np.transpose(img_x, (0,2,1,3))
        out = pnet(img_y)
        out0 = np.transpose(out[0], (0,2,1,3))
        out1 = np.transpose(out[1], (0,2,1,3))

        boxes, _ = generateBoundingBox(out1[0,:,:,1].copy(), out0[0,:,:,:].copy(), scale, threshold[0])

        # inter-scale nms
        pick = nms(boxes.copy(), 0.5, 'Union')
        if boxes.size>0 and pick.size>0:
            boxes = boxes[pick,:]
            total_boxes = np.append(total_boxes, boxes, axis=0)

    numbox = total_boxes.shape[0]
    if numbox>0:
        pick = nms(total_boxes.copy(), 0.7, 'Union')
        total_boxes = total_boxes[pick,:]
        regw = total_boxes[:,2]-total_boxes[:,0]
        regh = total_boxes[:,3]-total_boxes[:,1]
        qq1 = total_boxes[:,0]+total_boxes[:,5]*regw
        qq2 = total_boxes[:,1]+total_boxes[:,6]*regh
        qq3 = total_boxes[:,2]+total_boxes[:,7]*regw
        qq4 = total_boxes[:,3]+total_boxes[:,8]*regh
        total_boxes = np.transpose(np.vstack([qq1, qq2, qq3, qq4, total_boxes[:,4]]))
        total_boxes = rerec(total_boxes.copy())
        total_boxes[:,0:4] = np.fix(total_boxes[:,0:4]).astype(np.int32)
        dy, edy, dx, edx, y, ey, x, ex, tmpw, tmph = pad(total_boxes.copy(), w, h)

    numbox = total_boxes.shape[0]
    if numbox>0:
        # second stage
        tempimg = np.zeros((24,24,3,numbox))
        for k in range(0,numbox):
            tmp = np.zeros((int(tmph[k]),int(tmpw[k]),3))
            tmp[dy[k]-1:edy[k],dx[k]-1:edx[k],:] = img[y[k]-1:ey[k],x[k]-1:ex[k],:]
            if tmp.shape[0]>0 and tmp.shape[1]>0 or tmp.shape[0]==0 and tmp.shape[1]==0:
                tempimg[:,:,:,k] = cv2.resize(tmp, (24, 24), interpolation=cv2.INTER_AREA)
            else:
                return np.empty()
        tempimg = (tempimg-127.5)*0.0078125
        tempimg1 = np.transpose(tempimg, (3,1,0,2))
        out = rnet(tempimg1)
        out0 = np.transpose(out[0])
        out1 = np.transpose(out[1])
        score = out1[1,:]
        ipass = np.where(score>threshold[1])
        total_boxes = np.hstack([total_boxes[ipass[0],0:4].copy(), np.expand_dims(score[ipass].copy(),1)])
        mv = out0[:,ipass[0]]
        if total_boxes.shape[0]>0:
            pick = nms(total_boxes, 0.7, 'Union')
            total_boxes = total_boxes[pick,:]
            total_boxes = bbreg(total_boxes.copy(), np.transpose(mv[:,pick]))
            total_boxes = rerec(total_boxes.copy())

    numbox = total_boxes.shape[0]
    if numbox>0:
        # third stage
        total_boxes = np.fix(total_boxes).astype(np.int32)
        dy, edy, dx, edx, y, ey, x, ex, tmpw, tmph = pad(total_boxes.copy(), w, h)
        tempimg = np.zeros((48,48,3,numbox))
        for k in range(0,numbox):
            tmp = np.zeros((int(tmph[k]),int(tmpw[k]),3))
            tmp[dy[k]-1:edy[k],dx[k]-1:edx[k],:] = img[y[k]-1:ey[k],x[k]-1:ex[k],:]
            if tmp.shape[0]>0 and tmp.shape[1]>0 or tmp.shape[0]==0 and tmp.shape[1]==0:
                tempimg[:,:,:,k] = cv2.resize(tmp, (48, 48), interpolation=cv2.INTER_AREA)
            else:
                return np.empty()
        tempimg = (tempimg-127.5)*0.0078125
        tempimg1 = np.transpose(tempimg, (3,1,0,2))
        out = onet(tempimg1)
        out0 = np.transpose(out[0])
        out2 = np.transpose(out[2])
        score = out2[1,:]
        ipass = np.where(score>threshold[2])
        total_boxes = np.hstack([total_boxes[ipass[0],0:4].copy(), np.expand_dims(score[ipass].copy(),1)])
        mv = out0[:,ipass[0]]

        if total_boxes.shape[0]>0:
            total_boxes = bbreg(total_boxes.copy(), np.transpose(mv))
            pick = nms(total_boxes.copy(), threshold[2], 'Min')
            total_boxes = total_boxes[pick,:]

    return total_boxes
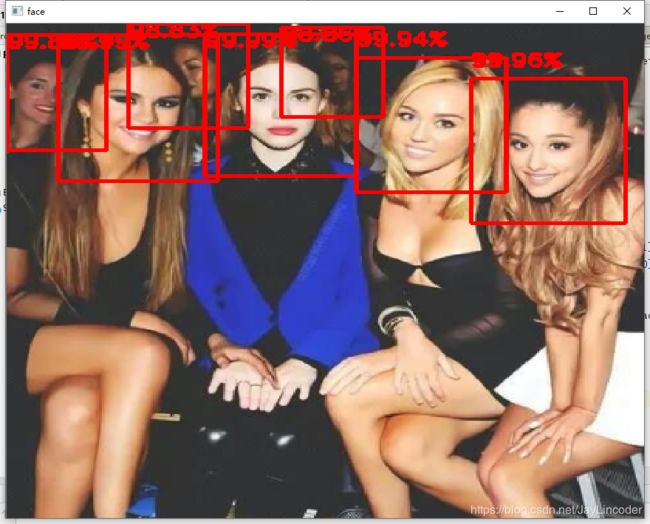
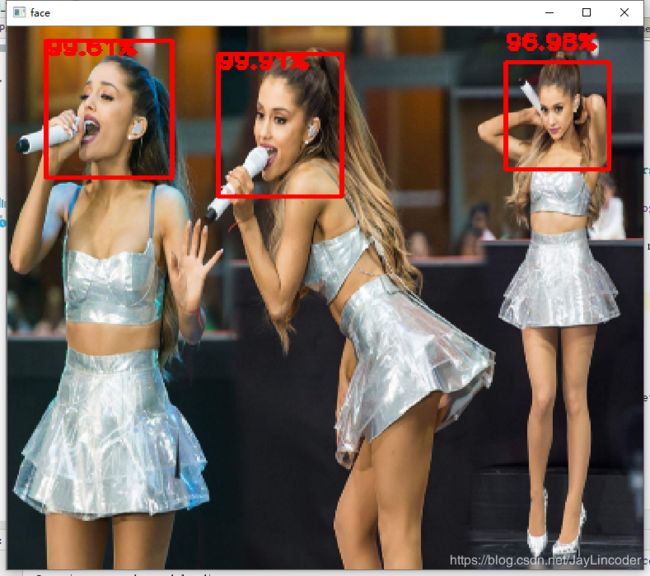
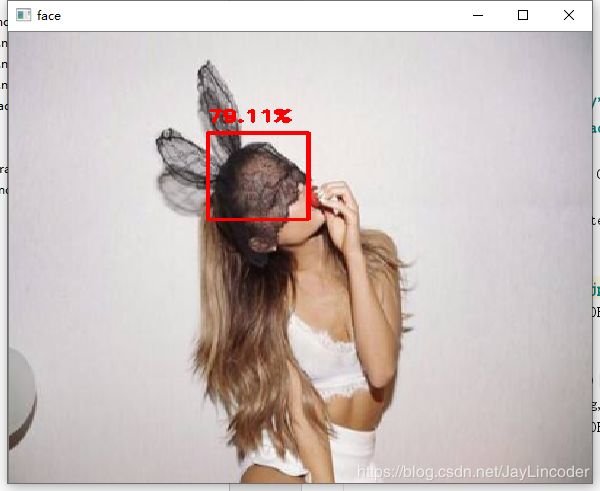
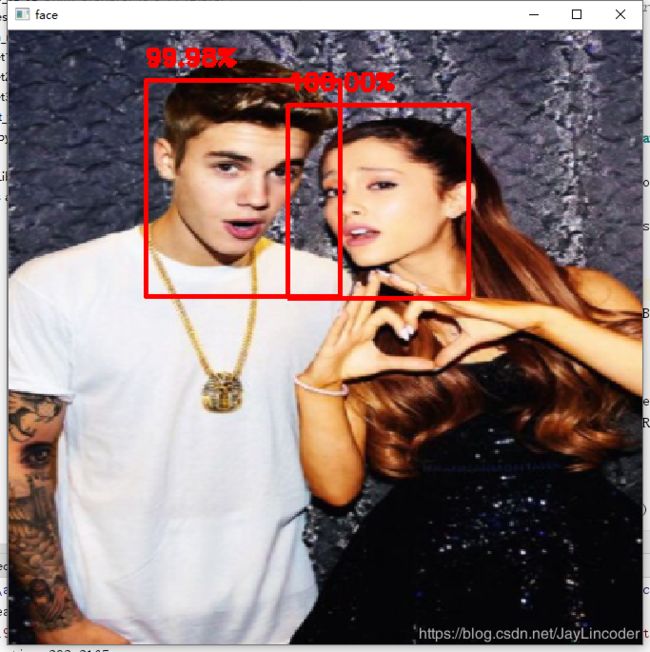
一切都定义好了,接下来我们可以运行我们的主函数试试了。
minsize = 20  # minimum size of face
thresh = [0.6, 0.7, 0.7]  # three steps's threshold
factor = 0.709  # scale factor face image pyramid 图像缩小尺度
margin = 44

if __name__ == '__main__':

    mtcnn_model_path = 'mtcnn_model/'
    print('Creating networks and loading parameters')
    with tf.Graph().as_default():
        sess = tf.Session(config=tf.ConfigProto(log_device_placement=False))
        with sess.as_default():
            pnet, rnet, onet = create_mtcnn(sess, mtcnn_model_path)

    t_start = time.time()
    img = cv2.imread('images/test3.jpg')
    img = cv2.cvtColor(img, cv2.COLOR_BGR2RGB)
    img = cv2.resize(img,(400,400))

    img_size = np.asarray(img.shape)[0:2]
    bounding_boxes = detect_face(img, minsize, pnet, rnet, onet, thresh, factor)
    img = cv2.cvtColor(img, cv2.COLOR_RGB2BGR)

    if len(bounding_boxes) > 0:

        for face in range(len(bounding_boxes)):

            det = np.squeeze(bounding_boxes[face, 0:4])
            bb = np.zeros(4, dtype=np.int32)
            bb[0] = np.maximum(det[0] - margin / 2, 0)
            bb[1] = np.maximum(det[1] - margin / 2, 0)
            bb[2] = np.minimum(det[2] + margin / 2, img_size[1])
            bb[3] = np.minimum(det[3] + margin / 2, img_size[0])
            cv2.rectangle(img, (bb[0], bb[1]), (bb[2], bb[3]), (0, 0, 255), 2)  # 用矩形标记人脸所在区域
            y = bb[1] - 10 if bb[1] - 10 > 10 else bb[1] + 10
            cv2.putText(img,"{:.2f}%".format(bounding_boxes[face,4] * 100) , (bb[0], y),
            cv2.FONT_HERSHEY_SIMPLEX, 0.5, (0, 0, 255), 2)
    cv2.namedWindow('face', 0)
    cv2.imshow('face', img)

    t_end = time.time()
    print("run time",round((t_end-t_start)*1000,4),"ms")
    cv2.waitKey()
将它运行进Tensorflow,使用seesion方法和张量引擎进行会话
这里强调几点,因为我用的是opencv读取图像,所以读入通道顺序是BGR,但是MTCNN训练的时候是用RGB训练的,所以,我用CVTCOLOR函数将通道顺序转变。这点很重要,直接影响了预测结果!没有模型的友友们可参见文末的代码链接。
工程链接:https://github.com/JayLin1996/MyStudy
至此,Mtcnn的讲解已经结束。感谢观看!祝生活愉快
