【多媒体编解码】Openmax IL (二)Android多媒体编解码Component架构
带着三个问题学习这个部分:
问题1:Android中间各种编解码库的加载与管理?
问题1:Android如何确定使用那个编解码器并且初始化?
问题2:Android如何集成一个新的编解码器,硬件平台相关/非硬件平台相关两种情况?
按照OpenMax IL的简述,编解码架构中间至关重要的是如下两点:
1,各个不同功能的conponent
2,平台商实现的“media.resouce_manager”,用来管理conponent需要的资源。从而控制component状态的变化。
PS:
本文是基于Android7.0+QCOM8909高通平台,播放本地视频的情况分析代码,先对架构有一个整体的认识,后面再开始对流媒体以及协议的学习与分析。
1,编解码加载与管理流程
1.1,系统相关的uml类图—看编解码相关成员模块
分析类图:
其中主要包括个模块
1,nuplay
2,MediaCodec
3,OMXConponent
4,FileSouce
1.2编解码库的加载和初始化管理
二,加载初始化时序图,以及流程分析
一,系统包含的编解码库文件的描述文件
“/etc/media_codecs.xml”
“/etc/media_codecs_performance.xml”
这两个文件列举了这个系统支持的所有音视频编解码对应的支持格式,仅仅在开机初始化的时候加载一次
project 编译文件:
# media_profiles and media_codecs xmls for msm8909
ifeq ($(TARGET_ENABLE_QC_AV_ENHANCEMENTS), true)
PRODUCT_COPY_FILES += device/Project/media/media_profiles_8909.xml:system/etc/media_profiles.xml \
                      device/Project/media/media_codecs_8909.xml:system/etc/media_codecs.xml \                   device/Project/media/media_codecs_performance_8909.xml:system/etc/media_codecs_performance.xml
endif
qcom/base.mk编译文件
PRODUCT_COPY_FILES += \    frameworks/av/media/libstagefright/data/media_codecs_google_audio.xml:system/etc/media_codecs_google_audio.xml \    frameworks/av/media/libstagefright/data/media_codecs_google_telephony.xml:system/etc/media_codecs_google_telephony.xml \  frameworks/av/media/libstagefright/data/media_codecs_google_video.xml:system/etc/media_codecs_google_video.xml \
    device/qcom/common/media/media_profiles.xml:system/etc/media_profiles.xml \ #覆盖
    device/qcom/common/media/media_codecs.xml:system/etc/media_codecs.xml  #覆盖
相关文件描述
//media_codecs.xml(media_codecs_8909.xml)
<CodecList>
    <Include href="media_codecs_google_audio.xml" />
    <Include href="media_codecs_google_telephony.xml" />
    <Settings>
        <Setting name="max-video-encoder-input-buffers" value="9" />
    Settings>
    <Encoders>

        <MediaCodec name="OMX.qcom.video.encoder.avc" type="video/avc" >
            <Quirk name="requires-allocate-on-input-ports" />
            <Quirk name="requires-allocate-on-output-ports" />
            <Quirk name="requires-loaded-to-idle-after-allocation" />
            <Limit name="size" min="96x64" max="1280x720" />
            <Limit name="alignment" value="2x2" />
            <Limit name="block-size" value="16x16" />
            <Limit name="blocks-per-second" min="1" max="108000" />
            <Limit name="bitrate" range="1-14000000" />
            <Limit name="concurrent-instances" max="8" />
            <Feature name="intra-refresh" />
        MediaCodec>
    Encoders>
    <Decoders>

        <MediaCodec name="OMX.qti.audio.decoder.flac" type="audio/flac" >
            <Limit name="concurrent-instances" max="10" />
        MediaCodec>

        <MediaCodec name="OMX.qcom.video.decoder.avc" type="video/avc" >
            <Quirk name="requires-allocate-on-input-ports" />
            <Quirk name="requires-allocate-on-output-ports" />
            <Quirk name="defers-output-buffer-allocation" />
            <Limit name="size" min="64x64" max="1920x1088" />
            <Limit name="alignment" value="2x2" />
            <Limit name="block-size" value="16x16" />
            <Limit name="blocks-per-second" min="1" max="244800" />
            <Limit name="bitrate" range="1-20000000" />
            <Feature name="adaptive-playback" />
            <Limit name="concurrent-instances" max="8" />
        MediaCodec>
    Decoders>
    <Include href="media_codecs_google_video.xml" />
CodecList>

// media_codecs_performance.xml  (media_codecs_performance_8909.xml)
<MediaCodecs>
    <Encoders>
        <MediaCodec name="OMX.qcom.video.encoder.avc" type="video/avc" update="true">
            <Limit name="measured-frame-rate-320x240" range="183-183" />
            <Limit name="measured-frame-rate-720x480" range="56-56" />
            <Limit name="measured-frame-rate-1280x720" range="25-25" />
MediaCodec>

    Encoders>
    <Decoders>
       <MediaCodec name="OMX.qcom.video.decoder.avc" type="video/avc" update="true">
            <Limit name="measured-frame-rate-320x240" range="457-457" />
            <Limit name="measured-frame-rate-720x480" range="274-274" />
            <Limit name="measured-frame-rate-1280x720" range="168-168" />
            <Limit name="measured-frame-rate-1920x1088" range="54-54" />
        MediaCodec>
    Decoders>


// media_codecs_google_audio.xml
 //media_codecs_google_telephony.xml
 //media_codecs_google_video.xml
 //media_codecs_performance.xml
 //media_profiles.xml
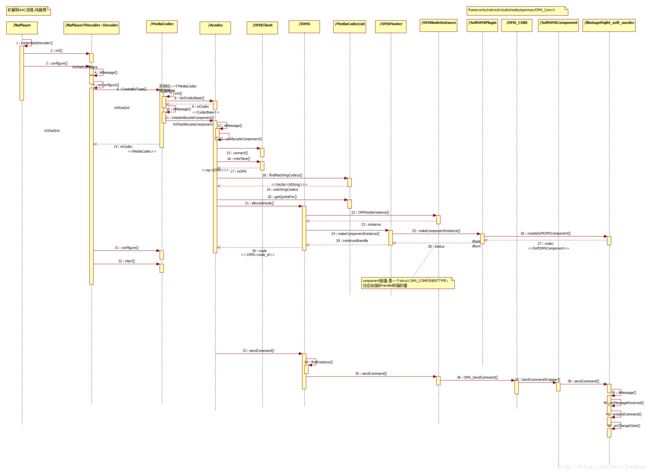
二,初始化加载流程如分析
上图:

从上面的交互可以看出,MediaCodecList初始化的时候:
1,实质就是通过MediaPlayerService,MediaCodecService去支配依次创建OMX实例(交互10),OMXMaster实例(交互11),从而初始化MediaCodecList::mOMX成员。而OMXMaster构造的时候,实质是去加载,遍历vendor和google的OMXPlugin,加载各个component。
这部分重点函数在交互12:addPlugin()
//OMXMaster.c
OMXMaster::OMXMaster()
    : mVendorLibHandle(NULL) {
    //省略不重要代码
    addVendorPlugin();
    addPlugin(new SoftOMXPlugin);//Soft就是google支持的软解
}
//看看加载厂商支持的,就一句话
void OMXMaster::addVendorPlugin() {
    addPlugin("libstagefrighthw.so");
}
//
void OMXMaster::addPlugin(const char *libname) {
    mVendorLibHandle = dlopen(libname, RTLD_NOW);
    typedef OMXPluginBase *(*CreateOMXPluginFunc)();
  //这里映射hardware/qcom/media/libstagefrighthw/QComOMXPlugin.cpp
  //实质是创建一个厂商实现的OMXPluginBase子类,厂商硬解,实例化
    CreateOMXPluginFunc createOMXPlugin =
        (CreateOMXPluginFunc)dlsym(
                mVendorLibHandle, "createOMXPlugin");
    if (!createOMXPlugin)
        createOMXPlugin = (CreateOMXPluginFunc)dlsym(
                mVendorLibHandle, "_ZN7android15createOMXPluginEv");

    if (createOMXPlugin) {
        addPlugin((*createOMXPlugin)());//通过vendor库文件函数映射,创建OMXPluginBase,还是调到这个接口
    }
}
看了上面的代码,我们再来分析addPlugin
void OMXMaster::addPlugin(OMXPluginBase *plugin) {
    Mutex::Autolock autoLock(mLock);
    mPlugins.push_back(plugin);//将所有的plugin保存
    OMX_U32 index = 0;
    char name[128];
    OMX_ERRORTYPE err;
    //调用plugin接口,实质是枚举出plugin支持的所有的component,稍后在具体分析
    while ((err = plugin->enumerateComponents(
                    name, sizeof(name), index++)) == OMX_ErrorNone) {
        String8 name8(name);
        //...
        // KeyedVector mPluginByComponentName;
        mPluginByComponentName.add(name8, plugin);
    }
    // ...
}
mPluginByComponentName,这个数组包含系统所有的编解码库的信息。关于plugin->enumerateComponents,我们具体情况具体分析,加入是google软解,SoftOMXPlugin,查阅代码SoftOMXPlugin.cpp,发现就是根据index返回compont:
OMX_ERRORTYPE SoftOMXPlugin::enumerateComponents(
        OMX_STRING name,
        size_t /* size */,
        OMX_U32 index) {
    //...
    strcpy(name, kComponents[index].mName);
    return OMX_ErrorNone;
}
那看Component是啥?就是一个数组!列举了所有的软解component信息,类似于这样的:
static const struct {
    const char *mName;//名字,要和xml文件中间一致的!
    const char *mLibNameSuffix;//软解库文件后缀
    const char *mRole; //角色,编解码?音视频?

} kComponents[] = {
    { "OMX.google.aac.decoder", "aacdec", "audio_decoder.aac" },
    { "OMX.google.aac.encoder", "aacenc", "audio_encoder.aac" },
    //所有软解支持的都在这里
    }
那如果是平台商的硬解码呢?以MSM8909为例:
在平台实现的OMXPluginBase子类,枚举component函数实际是映射到libOmxCore.so中间的方法:
        mComponentNameEnum =
            (ComponentNameEnumFunc)dlsym(mLibHandle, "OMX_ComponentNameEnum");
查阅hardware/qcom/media/mm-core/src/common/qc_omx_core.c这只文件发现:
typedef struct _omx_core_cb_type
{
  char*                         name;// Component name ,对应在xml文件中间有值
  create_qc_omx_component     fn_ptr;// create instance fn ptr
  void*                         inst[OMX_COMP_MAX_INST];// Instance handle
  void*                so_lib_handle;// So Library handle
  char*                  so_lib_name;// so directory
  char* roles[OMX_CORE_MAX_CMP_ROLES];// roles played
}omx_core_cb_type;
//对应初始化
omx_core_cb_type core[] =
{
  {
    "OMX.qcom.video.decoder.avc",
    NULL,   // Create instance function
    // Unique instance handle
    {
      NULL
    },
    NULL,   // Shared object library handle
    "libOmxVdec.so",
    {
      "video_decoder.avc"
    }
  },
  //...
}
2,加载完component,然后加载解析各个xml文件,根据xml文件描述,主要是初始化MediaCodecList:: mCodecInfos (MediaCodecInfo类型的Vector)。
注意:通过研究所有的xml文件结构以及解析流程,一个Audio Encoder/Decoder只会有一个”type“标签,而video可以有多个,这个就是支持的mineType。
总结一下:
1,初始化工作的大致流程,可以理解为OMXClient和OMXMaster的交互,OMXMaster管理所有的conponent信息,提供接口给client,用来对component的操作:

2,至于IOMX这个角色是干嘛的,具体我们在后面分析,剧透,这个就是控制编解码流程,通过ACodec->MuxOMX->OMX->ComponentInstance ->OMX Core ->Concrate component 这条控制线,进行编解码流程控制。
3,这个流程分析,如果我们要集成一个软/硬 编解码库,我们的工作有如下,当然这三点还不够,还需要做什么还要往下看:
- 添加信息到xml文件
- 根据软硬解码类型,添加到数组core/kComponent
- 同时集成相关的编解码库文件到系统
1.3,如何匹配并且初始化一个编解码库
初始化一个编解码库文件,在之前的文章中间已经有分析到,如果是一个视频文件,先通过MediaExtractor解封装,获得到一个MineType,这个就是我们决定要用何种编解码的重要依据,也是唯一依据。下面开始分析。
首先,上初始化时序图:
在nuplayer::instantiateDecoder调用的时候,mineType是已知的,这个是查找解码componnent的唯一依据。
按照nuplayer::decoder->MediaCodec->ACodec的调用封装顺序分析
交互5:nuplayer::decoder::onConfig中间做的主要工作如下:
1,初始化一个MediaCodec,实质是实例化一个ACodec并且至于ACodec::UninitializedState状态。
2 ,MediaCodec 通过交互11(initiateAllocateComponent)触发ACodec的系列操作,去根据mineType,最终是构建一个OMXNodeInstance,这是控制OMX core的接口。那这部分的重点,就是看OMXNodeInstance到底是封装了什么东西,以及后面的交互33-42的控制component流程可以体现其作用。下面重点分析这个实例化流程,学习OMXNodeInstance在Android Openmax中间的关键作用。
相关调用参数说明:
交互18: 主要是传入mineTpe,返回一组满足的matchingCodecs,随后在其中遍历,根据遍历成功的第一个,allocatenode。
        MediaCodecList::findMatchingCodecs(
                mime.c_str(),
                encoder, // createEncoder
                0,       // flags
                &matchingCodecs);
交互21:OMX::allocateNode传入参数主要是为CodecName,返回一个node_id
status_t OMX::allocateNode(
        const char *name, const sp &observer,
        sp *nodeBinder, node_id *node)
        {
    Mutex::Autolock autoLock(mLock);

    *node = 0;
    if (nodeBinder != NULL) {
        *nodeBinder = NULL;
    }

    if (mNodeIDToInstance.size() == kMaxNodeInstances) {
        // all possible node IDs are in use
        return NO_MEMORY;
    }//系统支持的node instance是有上限的

    OMXNodeInstance *instance = new OMXNodeInstance(this, observer, name); //创建一个实例,第三个参数是codec name

    OMX_COMPONENTTYPE *handle;
    //获得一个handle,这个继续跟代码
    OMX_ERRORTYPE err = mMaster->makeComponentInstance(
            name, &OMXNodeInstance::kCallbacks,
            instance, &handle);
//...
    *node = makeNodeID_l(instance);//获得node_id
    mDispatchers.add(*node, new CallbackDispatcher(instance));

    instance->setHandle(*node, handle);//设置操作句柄

    mLiveNodes.add(IInterface::asBinder(observer), instance);
    IInterface::asBinder(observer)->linkToDeath(this);

    return OK;
}

//下面看OMXMaster::makeComponentInstance,实质是根据名字找到对应的OMXPluginBase,然后调用OMXPluginBase::makeComponentInstance,以AAC软件为例。则是调用如下:
 /*  @name:"OMX.google.mp3.decoder"
 */
OMX_ERRORTYPE SoftOMXPlugin::makeComponentInstance(
        const char *name,
        const OMX_CALLBACKTYPE *callbacks,
        OMX_PTR appData,
        OMX_COMPONENTTYPE **component)
        {

    for (size_t i = 0; i < kNumComponents; ++i) {
        if (strcmp(name, kComponents[i].mName)) {
            continue;
        }
//1,遍历kComponent,找到这个解码库名字对应信息,找到继续下走,否则查找下一个。
        AString libName = "libstagefright_soft_";
        libName.append(kComponents[i].mLibNameSuffix);
        libName.append(".so");
//2,解码库名字对应信息,合成一个解码库的名字,这里解码库后缀"aacdec",那么编解码库就是libstagefright_soft_aacdec
        void *libHandle = dlopen(libName.c_str(), RTLD_NOW);

        if (libHandle == NULL) {
            ALOGE("unable to dlopen %s: %s", libName.c_str(), dlerror());

            return OMX_ErrorComponentNotFound;
        }
//3,读解码库,libstagefright_soft_aacdec,映射出其中名字为“createSoftOMXComponent”的创建方法
        typedef SoftOMXComponent *(*CreateSoftOMXComponentFunc)(
                const char *, const OMX_CALLBACKTYPE *,
                OMX_PTR, OMX_COMPONENTTYPE **);

        CreateSoftOMXComponentFunc createSoftOMXComponent =
            (CreateSoftOMXComponentFunc)dlsym(
                    libHandle,
                    "_Z22createSoftOMXComponentPKcPK16OMX_CALLBACKTYPE"
                    "PvPP17OMX_COMPONENTTYPE");

        if (createSoftOMXComponent == NULL) {
            dlclose(libHandle);
            libHandle = NULL;

            return OMX_ErrorComponentNotFound;
        }
//4,执行“createSoftOMXComponent”的创建方法,创建一个SoftOMXComponent,关注下component赋值
        sp codec =
            (*createSoftOMXComponent)(name, callbacks, appData, component);

        if (codec == NULL) {
            dlclose(libHandle);
            libHandle = NULL;

            return OMX_ErrorInsufficientResources;
        }

        OMX_ERRORTYPE err = codec->initCheck();
        if (err != OMX_ErrorNone) {
            dlclose(libHandle);
            libHandle = NULL;

            return err;
        }

        codec->incStrong(this);
        codec->setLibHandle(libHandle);

        return OMX_ErrorNone;
    }

    return OMX_ErrorInvalidComponentName;
}

//5,查阅这个AAC解码库,找到创建codec对应的方法,其实就是实例化一个SoftAAC2,关注component赋值
android::SoftOMXComponent *createSoftOMXComponent(
        const char *name, const OMX_CALLBACKTYPE *callbacks,
        OMX_PTR appData, OMX_COMPONENTTYPE **component) {
    return new android::SoftAAC2(name, callbacks, appData, component);
}

//6,追查component赋值,发现其赋值是调用的基类的赋值方法继承关系为:SoftAAC2 : public SimpleSoftOMXComponent:SoftOMXComponent,那么其赋值为:

SoftOMXComponent::SoftOMXComponent(
        const char *name,
        const OMX_CALLBACKTYPE *callbacks,
        OMX_PTR appData,
        OMX_COMPONENTTYPE **component)
    : mName(name),
      mCallbacks(callbacks),
      mComponent(new OMX_COMPONENTTYPE),
      mLibHandle(NULL) {
    //可见,就是创建一个OMX_COMPONENTTYPE,赋值后,传给component
    mComponent->nSize = sizeof(*mComponent);
    mComponent->nVersion.s.nVersionMajor = 1;
    mComponent->nVersion.s.nVersionMinor = 0;
    mComponent->nVersion.s.nRevision = 0;
    mComponent->nVersion.s.nStep = 0;
    mComponent->pComponentPrivate = this;//重点
    mComponent->pApplicationPrivate = appData;
    mComponent->GetComponentVersion = NULL;
    mComponent->SendCommand = SendCommandWrapper;
    mComponent->GetParameter = GetParameterWrapper;
    mComponent->SetParameter = SetParameterWrapper;
    mComponent->GetConfig = GetConfigWrapper;
    mComponent->SetConfig = SetConfigWrapper;
    mComponent->GetExtensionIndex = GetExtensionIndexWrapper;
    mComponent->GetState = GetStateWrapper;
    mComponent->ComponentTunnelRequest = NULL;
    mComponent->UseBuffer = UseBufferWrapper;
    mComponent->AllocateBuffer = AllocateBufferWrapper;
    mComponent->FreeBuffer = FreeBufferWrapper;
       //以此为例,查看这里封装的什么
    mComponent->EmptyThisBuffer = EmptyThisBufferWrapper;
    mComponent->FillThisBuffer = FillThisBufferWrapper;
    mComponent->SetCallbacks = NULL;
    mComponent->ComponentDeInit = NULL;
    mComponent->UseEGLImage = NULL;
    mComponent->ComponentRoleEnum = NULL;

    *component = mComponent;
}

// static
OMX_ERRORTYPE SoftOMXComponent::EmptyThisBufferWrapper(
        OMX_HANDLETYPE component,
        OMX_BUFFERHEADERTYPE *buffer) {
    SoftOMXComponent *me =
        (SoftOMXComponent *)
            ((OMX_COMPONENTTYPE *)component)->pComponentPrivate;
//基类无此方法实现,查看子类,看下面
    return me->emptyThisBuffer(buffer);
}

OMX_ERRORTYPE SimpleSoftOMXComponent::emptyThisBuffer(
        OMX_BUFFERHEADERTYPE *buffer) {
    sp msg = new AMessage(kWhatEmptyThisBuffer, mHandler);
    msg->setPointer("header", buffer);
    msg->post();

    return OMX_ErrorNone;
}
//根据这个kWhatEmptyThisBuffer消息查看,其中会发现很多SimpleSoftOMXComponent也没有实现的方法,这个时候,就需要查看SoftAAC2中间的具体实现了。
从上面的代码分析来看从makeComponentInstance初始化一个component,实质是将SoftOMXComponent与具体的解码库结合。每个解码库,都必须实现一个SimpleSoftOMXComponent接口,如SoftAAC2,这个类是和具体的解码库关联的接口文件,那么集成一个解码库,还需要实现一个SimpleSoftOMXComponent子类,创建要点:
- 实现一个createSoftOMXComponent,用于初始化
- 实现一个SimpleSoftOMXComponent子类,调用libstagefright_soft_xxx 中间的编解码方法,实现编解码流程,具体接口参考SimpleSoftOMXComponent
当然如果是视频的解码库,那么就需要去查阅SoftVideoDecoderOMXComponent的封装与实现
可以看下OMX_CALLBACKTYPE和OMX_COMPONENTTYPE在OMX中间的声明与定义。
1.4 从控制Conponent分析OMXNodeInstance到底封装了什么?
在ACodec通过OMX创建 OMXNodeInstance实例的时候,关注这个成员:
// static
OMX_CALLBACKTYPE OMXNodeInstance::kCallbacks = {
    &OnEvent, &OnEmptyBufferDone, &OnFillBufferDone
};
这个OMX_CALLBACKTYPE最终是赋值给哪里查看SoftOMXComponent的三个相关方法。如下:
void SoftOMXComponent::notify(
        OMX_EVENTTYPE event,
        OMX_U32 data1, OMX_U32 data2, OMX_PTR data) {
    (*mCallbacks->EventHandler)(
            mComponent,
            mComponent->pApplicationPrivate,
            event,
            data1,
            data2,
            data);
}

void SoftOMXComponent::notifyEmptyBufferDone(OMX_BUFFERHEADERTYPE *header) {
    (*mCallbacks->EmptyBufferDone)(
            mComponent, mComponent->pApplicationPrivate, header);
}

void SoftOMXComponent::notifyFillBufferDone(OMX_BUFFERHEADERTYPE *header) {
    (*mCallbacks->FillBufferDone)(
            mComponent, mComponent->pApplicationPrivate, header);
}