使用Kalman滤波器做目标跟踪
https://www.mathworks.com/help/vision/examples/using-kalman-filter-for-object-tracking.html:由该例整理而来。
-
- 1、前言
- 2、介绍
- 3、目标跟踪的挑战
- 4、使用卡尔曼滤波器跟踪单个目标
- 5、探索卡尔曼滤波器参数配置选项
- 6、使用卡尔曼滤波器跟踪多目标
- 7、本例中使用的函数
1、前言
本文所举例子说明了如何使用vision.KalmanFilter 对象和configureKalmanFilter函数来跟踪目标。示例以函数名形式显示,其函数内容在最后。
function kalmanFilterForTracking2、介绍
卡尔曼滤波器有很多用处,包括控制,导航,计算机视觉和时间序列计量经济学。这个例子解释了怎样使用卡尔曼滤波器用于目标跟踪,并致力于三个重要的特征:
- 目标未来位置的预测;
- 减少不准确检测引入的噪声;
- 促进多个对象与其轨迹相关联的过程。
3、目标跟踪的挑战
在显示卡尔曼滤波器的使用之前,让我们先看看视频中的跟踪对象。 以下视频显示了一个绿球在地板上从左向右移动。
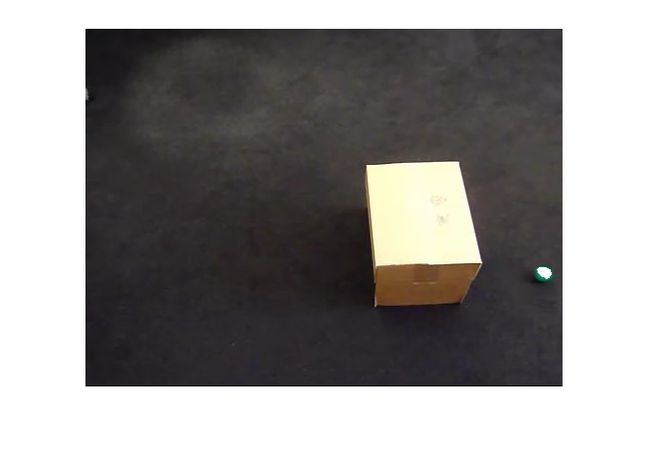
showDetections();球上高亮的白色像素是由 vision.ForegroundDetector检测得到的,这个函数可以从背景中分离移动的目标,背景减法因为球和地板的低对比度使得只能检测到球的一部分,不理想并且引入噪声。
把所有帧叠加到单幅图片上,可视化检测到的轨迹如下。
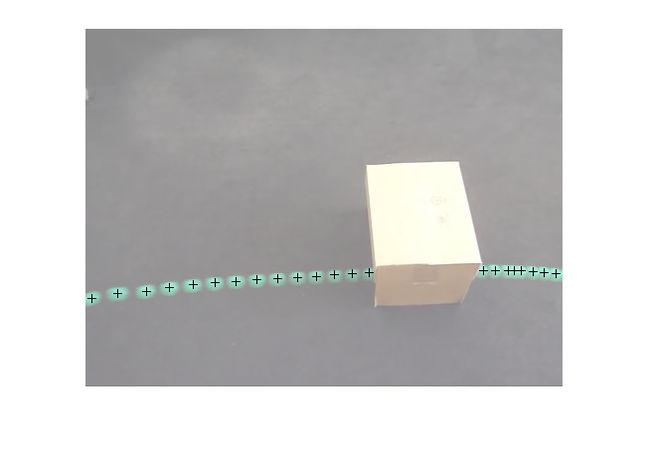
这样的检测结果可以看出两个问题:
- 区域中心不同于球的中心,说明检测有误差。
- 球被方框遮挡时,检测不到了。
但是,这两个挑战都可以被卡尔曼滤波器解决。
4、使用卡尔曼滤波器跟踪单个目标
使用之前展示的视频,trackSingleObject如下做法:
1. 通过使用configureKalmanFilter创建vision.KalmanFilter。
2. 使用序列中的predict和correct方法消除跟踪系统中存在的噪声。
3. 当球被遮挡时,使用预测方法估计球的位置。
参数选择可以调整,configureKalmanFilter函数可以简化问题,细节性的问题可以看最后的函数内容。
trackSingleObject函数包含了嵌套的辅助函数,下面的全局变量用于在子函数之间传输数据。
frame            = [];  % 视频帧
detectedLocation = [];  % 检测到的位置
trackedLocation  = [];  % 跟踪到的位置
label            = '';  % 球的标签
utilities        = [];  % 处理视频的实例
跟踪单个目标的步骤如下:
function trackSingleObject(param)
  % 创建用于读取视频,检测移动对象和显示结果的实用程序。  utilities = createUtilities(param);

  isTrackInitialized = false;
  while ~isDone(utilities.videoReader)
    frame = readFrame();

    % 检测球
    [detectedLocation, isObjectDetected] = detectObject(frame);

    if ~isTrackInitialized
      if isObjectDetected
        % 当球第一次被检测到时,通过创建一个卡尔曼滤波器初始化一个跟踪器。
        initialLocation = computeInitialLocation(param, detectedLocation);
        kalmanFilter = configureKalmanFilter(param.motionModel, ...
          initialLocation, param.initialEstimateError, ...
          param.motionNoise, param.measurementNoise);

        isTrackInitialized = true;
        trackedLocation = correct(kalmanFilter, detectedLocation);
        label = 'Initial';
     else
        trackedLocation = [];
        label = '';
      end

    else
      % 使用卡尔曼滤波器来跟踪球
      if isObjectDetected % 球被检测到
        % 减少测量噪声通过调用卡尔曼预测和更新
        predict(kalmanFilter);
        trackedLocation = correct(kalmanFilter, detectedLocation);
        label = 'Corrected';
      else % 球丢失了
        % 预测球的位置
        trackedLocation = predict(kalmanFilter);
        label = 'Predicted';
      end
    end

    annotateTrackedObject();
  end % while结束

  showTrajectory();
end
卡尔曼滤波器在解决过程中,分为两种场景:
- 当球被检测到时,卡尔曼滤波器首先预测它在当前帧的状态,然后使用最新检测到的目标位置来更新状态。这会产生一个过滤的位置。
- 当球看不见时,卡尔曼完全依赖先前的状态预测当前位置。
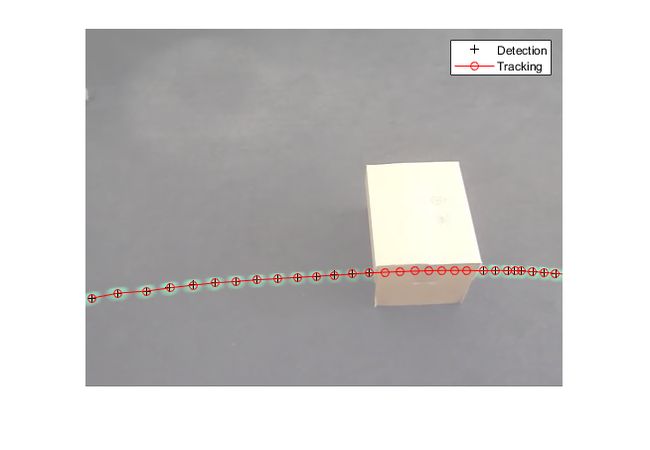
你可以通过覆盖所有帧来得到球的轨迹。
param = getDefaultParameters();  % 得到卡尔曼参数的配置。

trackSingleObject(param);  % 可视化结果
5、探索卡尔曼滤波器参数配置选项
卡尔曼滤波器的参数配置可谓是颇具挑战性,除了对卡尔曼滤波器的基本理解,更需要的是调参经验。上面定义的 trackSingleObject函数可以帮助你探索不同参数带来的影响。
configureKalmanFilter 返回一个卡尔曼滤波器对象,可以提供5个参数。
kalmanFilter = configureKalmanFilter(MotionModel, InitialLocation,
InitialEstimateError, MotionNoise, MeasurementNoise)- MotionModel设置必须与对象运动的物理特征相对应。 您可以将其设置为恒定速度或恒定加速度模型。 以下示例说明了进行次优选择的后果。
param = getDefaultParameters();         % get parameters that work well
param.motionModel = 'ConstantVelocity'; % switch from ConstantAcceleration
                                        % to ConstantVelocity
% After switching motion models, drop noise specification entries
% corresponding to acceleration.
param.initialEstimateError = param.initialEstimateError(1:2);
param.motionNoise          = param.motionNoise(1:2);

trackSingleObject(param); % visualize the results
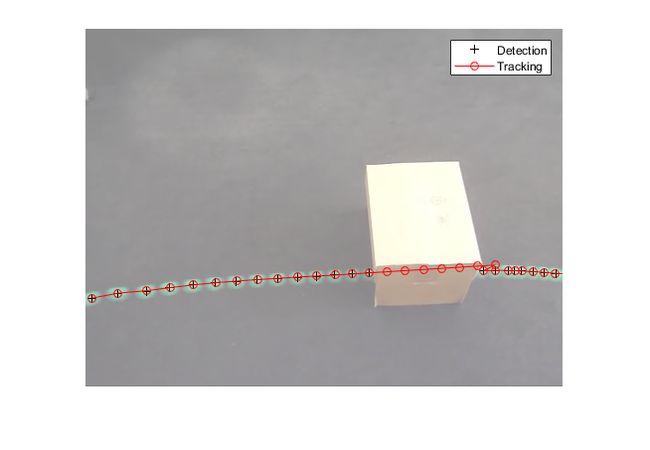
请注意,球出现在与预测位置完全不同的位置。 从球被释放的时间起,由于来自地毯的阻力,它经受恒定的减速。 因此,恒定加速模型是更好的选择。 如果保持恒定速度模型,无论您为其他值选择什么,跟踪结果都将是次优的。
- 通常,您可以将InitialLocation输入设置为首次检测到对象的位置。 您还可以将InitialEstimateError向量设置为较大的值,因为初始状态可能非常嘈杂,因为它是从单个检测派生的。 下图演示了错误配置这些参数的影响。
param = getDefaultParameters();  % get parameters that work well
param.initialLocation = [0, 0];  % location that's not based on an actual detection
param.initialEstimateError = 100*ones(1,3); % use relatively small values

trackSingleObject(param); % visualize the results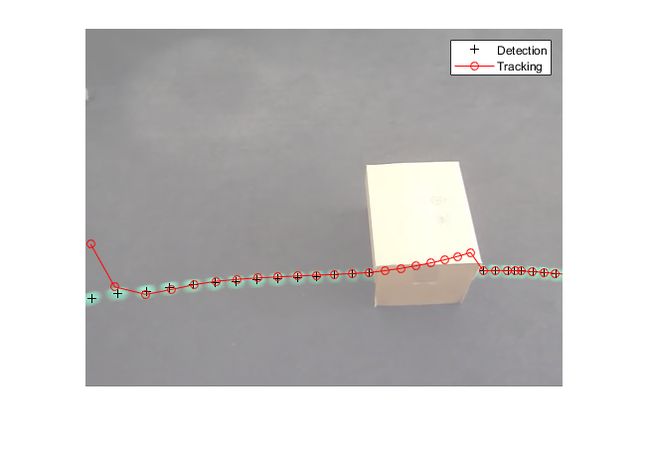
使用错误配置的参数,在卡尔曼滤波器返回的位置与对象的实际轨迹对齐之前需要几个步骤。
- 应根据探测器的精度选择MeasurementNoise的值。 测量噪声设置为较大的值会获得不太精确的检测器。 以下示例说明了错误配置的分段阈值的噪声检测。 增加测量噪声会导致卡尔曼滤波器更多地依赖于其内部状态而不是输入的测量值,从而补偿检测噪声。
param = getDefaultParameters();
param.segmentationThreshold = 0.0005; % smaller value resulting in noisy detections
param.measurementNoise      = 12500;  % increase the value to compensate
                                      % for the increase in measurement noise

trackSingleObject(param); % visualize the results
通常,物体不会以恒定的加速度或恒定的速度移动。 您可以使用MotionNoise指定与理想运动模型的偏差量。 当您增加运动噪声时,卡尔曼滤波器更多地依赖于输入测量而不是内部状态。 尝试使用MotionNoise参数进行试验,以了解有关其效果的更多信息。
现在您已熟悉如何使用卡尔曼滤波器以及如何配置它,下面将帮助您了解如何将其用于多个对象跟踪。
注意:为了简化上述示例中的配置过程,我们使用了configureKalmanFilter函数。 这个函数做了几个假设。 有关详细信息,请参阅功能文档。 如果您需要对配置过程进行更高级别的控制,则可以直接使用vision.KalmanFilter对象。
6、使用卡尔曼滤波器跟踪多目标
多目标跟踪面临寄个额外的挑战:
- 多个检测器必须联合统一跟踪器
- 必须处理场景中出现的新对象
- 当多个目标进入一个检测器时目标的身份必须保持
vision.KalmanFilter该对象结合assignDetectionsToTracks函数可以帮你解决如下问题:
- 将检测分配给轨道
- 确定检测是否对应于新对象,换句话说,跟踪创建
- 就像被遮挡的单个对象的情况一样,预测可以用于帮助分离彼此接近的对象
了解更多关于多目标跟踪的,可前往https://www.mathworks.com/help/vision/examples/motion-based-multiple-object-tracking.html
7、本例中使用的函数
参数设置。
function param = getDefaultParameters
  param.motionModel           = 'ConstantAcceleration';
  param.initialLocation       = 'Same as first detection';
  param.initialEstimateError  = 1E5 * ones(1, 3);
  param.motionNoise           = [25, 10, 1];
  param.measurementNoise      = 25;
  param.segmentationThreshold = 0.05;
end
读视频文件下一帧。
function frame = readFrame()
  frame = step(utilities.videoReader);
end
在视频中检测球并标注。
function showDetections()
  param = getDefaultParameters();
  utilities = createUtilities(param);
  trackedLocation = [];

  idx = 0;
  while ~isDone(utilities.videoReader)
    frame = readFrame();
    detectedLocation = detectObject(frame);
    % Show the detection result for the current video frame.
    annotateTrackedObject();

    % To highlight the effects of the measurement noise, show the detection
    % results for the 40th frame in a separate figure.
    idx = idx + 1;
    if idx == 40
      combinedImage = max(repmat(utilities.foregroundMask, [1,1,3]), frame);
      figure, imshow(combinedImage);
    end
  end % while

  % Close the window which was used to show individual video frame.
  uiscopes.close('All');
end
检测当前帧的球。
function [detection, isObjectDetected] = detectObject(frame)
  grayImage = rgb2gray(frame);
  utilities.foregroundMask = step(utilities.foregroundDetector, grayImage);
  detection = step(utilities.blobAnalyzer, utilities.foregroundMask);
  if isempty(detection)
    isObjectDetected = false;
  else
    % To simplify the tracking process, only use the first detected object.
    detection = detection(1, :);
    isObjectDetected = true;
  end
end
显示当前检测与跟踪结果。
function annotateTrackedObject()
  accumulateResults();
  % Combine the foreground mask with the current video frame in order to
  % show the detection result.
  combinedImage = max(repmat(utilities.foregroundMask, [1,1,3]), frame);

  if ~isempty(trackedLocation)
    shape = 'circle';
    region = trackedLocation;
    region(:, 3) = 5;
    combinedImage = insertObjectAnnotation(combinedImage, shape, ...
      region, {label}, 'Color', 'red');
  end
  step(utilities.videoPlayer, combinedImage);
end


function accumulateResults()
  utilities.accumulatedImage      = max(utilities.accumulatedImage, frame);
  utilities.accumulatedDetections ...
    = [utilities.accumulatedDetections; detectedLocation];
  utilities.accumulatedTrackings  ...
    = [utilities.accumulatedTrackings; trackedLocation];
end
显示轨迹。
function showTrajectory
  % Close the window which was used to show individual video frame.
  uiscopes.close('All');

  % Create a figure to show the processing results for all video frames.
  figure; imshow(utilities.accumulatedImage/2+0.5); hold on;
  plot(utilities.accumulatedDetections(:,1), ...
    utilities.accumulatedDetections(:,2), 'k+');

  if ~isempty(utilities.accumulatedTrackings)
    plot(utilities.accumulatedTrackings(:,1), ...
      utilities.accumulatedTrackings(:,2), 'r-o');
    legend('Detection', 'Tracking');
  end
end
选初始位置用在卡尔曼滤波器上。
function loc = computeInitialLocation(param, detectedLocation)
  if strcmp(param.initialLocation, 'Same as first detection')
    loc = detectedLocation;
  else
    loc = param.initialLocation;
  end
end
创建读取视频的实例,检测移动目标,并显示结果。
function utilities = createUtilities(param)
  % Create System objects for reading video, displaying video, extracting
  % foreground, and analyzing connected components.
  utilities.videoReader = vision.VideoFileReader('singleball.mp4');
  utilities.videoPlayer = vision.VideoPlayer('Position', [100,100,500,400]);
  utilities.foregroundDetector = vision.ForegroundDetector(...
    'NumTrainingFrames', 10, 'InitialVariance', param.segmentationThreshold);
  utilities.blobAnalyzer = vision.BlobAnalysis('AreaOutputPort', false, ...
    'MinimumBlobArea', 70, 'CentroidOutputPort', true);

  utilities.accumulatedImage      = 0;
  utilities.accumulatedDetections = zeros(0, 2);
  utilities.accumulatedTrackings  = zeros(0, 2);
end
end