RPC入门总结(四)RPC IO基础:Netty原理和使用
转载:Java 编程思想(七) BIO/NIO/AIO的区别(Reactor和Proactor的区别)
转载:Java 编程思想(八)BIO/NIO/AIO的具体实现
转载:源码之下无秘密 ── 做最好的 Netty 源码分析教程
转载:架构设计:系统间通信(6)——IO通信模型和Netty 上篇
转载:架构设计:系统间通信(7)——IO通信模型和Netty 下篇
转载:Netty——基本使用介绍
转载:Netty系列之Netty线程模型
转载:Netty实现原理浅析
转载:Netty 之 Netty生产级的心跳和重连机制
一、Netty
Netty是由JBOSS提供的一个java开源框架。Netty提供异步的、事件驱动的网络应用程序框架和工具,用以快速开发高性能、高可靠性的网络服务器和客户端程序。
二、Netty架构
Netty中包含的内容繁多,支持NIO和BIO模式,支持多种传输协议(HTTP/ProtoBuf/文本&二进制传输协议等),除此之外也支持安全特性,其特点如下:
1. 丰富的缓冲实现:
Netty使用自建的buffer API,而不是使用 NIO的 ByteBuffer来代表一个连续的字节序列。与 ByteBuffer相比这种方式拥有明显的优势。Netty使用新的 buffer 类型ChannelBuffer,ChannelBuffer被设计为一个可从底层解决 ByteBuffer 问题,并可满足日常网络应用开发需要的缓冲类型。这些很酷的特性包括:1. 如果需要,允许使用自定义的缓冲类型。
2. 复合缓冲类型中内置的透明的零拷贝实现。
3. 开箱即用的动态缓冲类型,具有像 StringBuffer 一样的动态缓冲能力。
4. 不再需要调用的 flip()方法。
5. 正常情况下具有比 ByteBuffer更快的响应速度。
2.统一的异步I/O API
Netty有一个叫做 Channel 的统一的异步 I/O编程接口,这个编程接口抽象了所有点对点的通信操作。也就是说,如果你的应用是基于 Netty的某一种传输实现,那么同样的,你的应用也可以运行在 Netty 的另一种传输实现上。Netty提供了几种拥有相同编程接口的基本传输实现: NIO-based TCP/IP transport (See org.jboss.netty.channel.socket.nio),
OIO-based TCP/IP transport (See org.jboss.netty.channel.socket.oio),
OIO-based UDP/IP transport, and
Local transport (See org.jboss.netty.channel.local).
切换不同的传输实现通常只需对代码进行几行的修改调整,例如选择一个不同的 ChannelFactory实现。
此外,你甚至可以利用新的传输实现没有写入的优势,只需替换一些构造器的调用方法即可,例如串口通信。而且由于核心 API 具有高度的可扩展性,你还可以完成自己的传输实现。
3.基于拦截链模式的事件触发模型
一个定义良好并具有扩展能力的事件模型是事件驱动开发的必要条件。 Netty具有定义良好的I/O事件模型。由于严格的层次结构区分了不同的事件类型,因此 Netty也允许你在不破坏现有代码的情况下实现自己的事件类型。这是与其他框架相比另一个不同的地方。
很多 NIO 框架没有或者仅有有限的事件模型概念;在你试图添加一个新的事件类型的时候常常需要修改已有的代码,或者根本就不允许你进行这种扩展。 在一个ChannelPipeline内部一个ChannelEvent被一组ChannelHandler处理。这个管道是拦截过滤器 模式的一种高级形式的实现,因此对于一个事件如何被处理以及管道内部处理器间的交互过程,你都将拥有绝对的控制力。
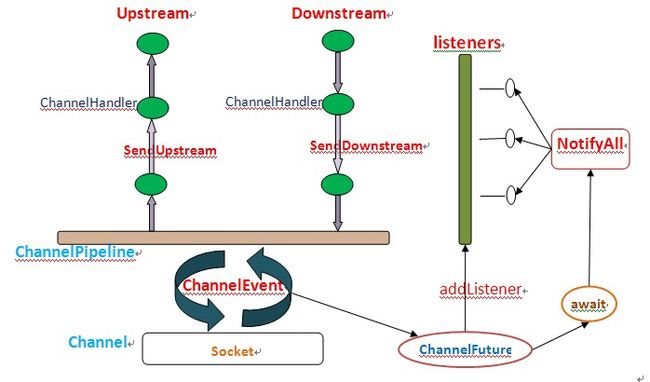
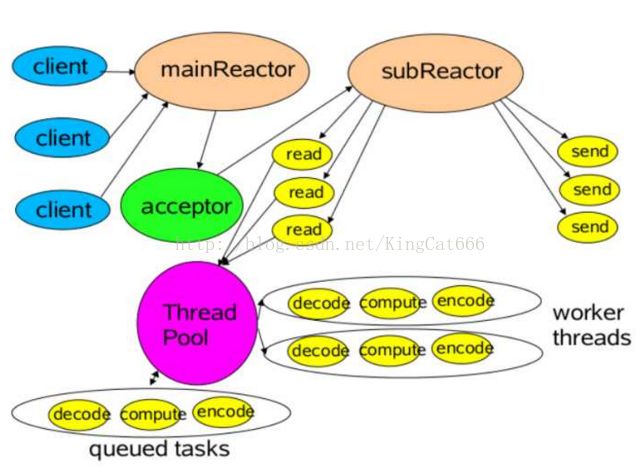
Netty使用主从Reactor模式,在实现上,Netty中的Boss类充当mainReactor,NioWorker类充当subReactor(默认 NioWorker的个数是Runtime.getRuntime().availableProcessors())。在处理新来的请求 时,NioWorker读完已收到的数据到ChannelBuffer中,之后触发ChannelPipeline中的ChannelHandler流。
4.适用快速开发的高级组件:
4.1.Codec框架:
从业务逻辑代码中分离协议处理部分总是一个很不错的想法。然而如果一切从零开始便会遭遇到实现上的复杂性。你不得不处理分段的消息。一些协议是多层的(例如构建在其他低层协议之上的协议)。一些协议过于复杂以致难以在一台主机(single state machine)上实现。 因此,一个好的网络应用框架应该提供一种可扩展,可重用,可单元测试并且是多层的 codec 框架,为用户提供易维护的 codec 代码。
Netty提供了一组构建在其核心模块之上的 codec 实现,这些简单的或者高级的 codec 实现帮你解决了大部分在你进行协议处理开发过程会遇到的问题,无论这些协议是简单的还是复杂的,二进制的或是简单文本的。
4.2.SSL/TSL支持:
不同于传统阻塞式的 I/O实现,在 NIO模式下支持 SSL 功能是一个艰难的工作。你不能只是简单的包装一下流数据并进行加密或解密工作,你不得不借助于javax.net.ssl.SSLEngine,SSLEngine是一个有状态的实现,其复杂性不亚于 SSL 自身。你必须管理所有可能的状态,例如密码套件,密钥协商(或重新协商),证书交换以及认证等。此外,与通常期望情况相反的是 SSLEngine 甚至不是一个绝对的线程安全实现。在 Netty内部,SslHandler 封装了所有艰难的细节以及使用 SSLEngine 可能带来的陷阱。你所做的仅是配置并将该 SslHandler 插入到你的ChannelPipeline中。同样 Netty 也允许你实现像 StartTlS 那样所拥有的高级特性,这很容易。
4.3.HTTP实现:
HTTP 无疑是互联网上最受欢迎的协议,并且已经有了一些例如 Servlet 容器这样的 HTTP 实现。因此,为什么 Netty还要在其核心模块之上构建一套 HTTP 实现?与现有的 HTTP 实现相比 Netty 的 HTTP 实现是相当与众不同的。在 HTTP 消息的低层交互过程中你将拥有绝对的控制力。这是因为 Netty的 HTTP 实现只是一些HTTP codec 和 HTTP 消息类的简单组合,这里不存在任何限制——例如那种被迫选择的线程模型。你可以随心所欲的编写那种可以完全按照你期望的工作方式工作的客户端或服务器端代码。这包括线程模型,连接生命期,快编码,以及所有 HTTP 协议允许你做的,所有的一切,你都将拥有绝对的控制力。
由于这种高度可定制化的特性,你可以开发一个非常高效的 HTTP 服务器,例如:
要求持久化链接以及服务器端推送技术的聊天服务(e.g. Comet )
需要保持链接直至整个文件下载完成的媒体流服务(e.g. 2小时长的电影)
需要上传大文件并且没有内存压力的文件服务(e.g. 上传1GB 文件的请求)
支持大规模 mash-up 应用以及数以万计连接的第三方 web services 异步处理平台
4.4.Google Protocol Buffer整合:
Google Protocol Buffers 是快速实现一个高效的二进制协议的理想方案。通过使用 ProtobufEncoder 和ProtobufDecoder,你可以把 Google Protocol Buffers 编译器 (protoc)生成的消息类放入到Netty 的 codec实现中。三、Netty的线程模型
1. 服务端线程模型
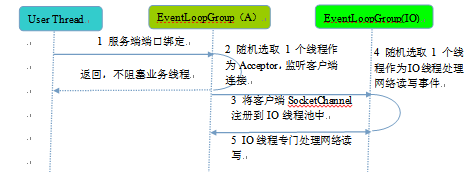
Netty的做法是服务端监听线程和IO线程分离,即主从Reactor的模型:
Netty的主从Reactor线程模型创建过程分为如下几步:
1. 从用户线程发起创建服务端操作
public class TestTCPNetty {
    static {
        BasicConfigurator.configure();
    }

    public static void main(String[] args) throws Exception {
        ServerBootstrap serverBootstrap = new ServerBootstrap(); //这就是主要的服务启动器
        EventLoopGroup bossLoopGroup = new NioEventLoopGroup(1); //BOSS线程池
        ThreadFactory threadFactory = new DefaultThreadFactory("work thread pool"); //WORK线程池
        int processorsNumber = Runtime.getRuntime().availableProcessors();  //CPU个数
        EventLoopGroup workLoogGroup = new NioEventLoopGroup(processorsNumber * 2, threadFactory, SelectorProvider.provider());
        serverBootstrap.group(bossLoopGroup , workLoogGroup);
        //如果是以下的申明方式,说明BOSS线程和WORK线程共享一个线程池
        //serverBootstrap.group(workLoogGroup);

        serverBootstrap.channel(NioServerSocketChannel.class);
        //当然也可以这样创建(那个SelectorProvider是不是感觉很熟悉?)
        //serverBootstrap.channelFactory(new ChannelFactory() {
        //  @Override
        //  public NioServerSocketChannel newChannel() {
        //      return new NioServerSocketChannel(SelectorProvider.provider());
        //  }
        //});

        //为了演示,这里我们设置了一组简单的ByteArrayDecoder和ByteArrayEncoder
        //Netty的特色就在这一连串“通道水管”中的“处理器”
        serverBootstrap.childHandler(new ChannelInitializer() {
            @Override
            protected void initChannel(NioSocketChannel ch) throws Exception {
                ch.pipeline().addLast(new ByteArrayEncoder());
                ch.pipeline().addLast(new TCPServerHandler());
                ch.pipeline().addLast(new ByteArrayDecoder());
            }
        });

        //========================设置netty服务器绑定的ip和端口
        serverBootstrap.option(ChannelOption.SO_BACKLOG, 128);
        serverBootstrap.childOption(ChannelOption.SO_KEEPALIVE, true);
        serverBootstrap.bind(new InetSocketAddress("0.0.0.0", 83));
        //还可以监控多个端口
        //serverBootstrap.bind(new InetSocketAddress("0.0.0.0", 84));
    }
}
通常情况下,服务端的创建是在用户进程启动的时候进行,因此一般由Main函数或者启动类负责创建,服务端的创建由业务线程负责完成。在创建服务端的时候实例化了2个EventLoopGroup,1个EventLoopGroup实际就是一个EventLoop线程组,负责管理EventLoop的申请和释放。
EventLoopGroup管理的线程数可以通过构造函数设置,如果没有设置,默认取-Dio.netty.eventLoopThreads,如果该系统参数也没有指定,则为可用的CPU内核数 × 2。
bossGroup线程组实际就是Acceptor线程池,负责处理客户端的TCP连接请求,如果系统只有一个服务端端口需要监听,则建议bossGroup线程组线程数设置为1。
workerGroup是真正负责I/O读写操作的线程组,通过ServerBootstrap的group方法进行设置,用于后续的Channel绑定。当WORK线程发现操作系统有一个它感兴趣的IO事件时(例如SocketChannel的READ事件)则调用相应的ChannelHandler事件。当某个channel失效后(例如显示调用ctx.close())这个channel将从绑定的EventLoop中被剔除。
EventLoopGroup 的初始化过程:
1. EventLoopGroup(其实是MultithreadEventExecutorGroup) 内部维护一个类型为EventExecutorchildren 数组, 其大小是 nThreads, 这样就构成了一个线程池。
2. 如果我们在实例化NioEventLoopGroup时, 如果指定线程池大小, 则 nThreads 就是指定的值, 反之是处理器核心数 * 2
3.MultithreadEventExecutorGroup中会调用 newChild 抽象方法来初始化 children 数组
4. 抽象方法 newChild 是在 NioEventLoopGroup 中实现的, 它返回一个NioEventLoop实例.
NioEventLoop 属性:
SelectorProvider provider 属性: NioEventLoopGroup 构造器中通过 SelectorProvider.provider() 获取一个 SelectorProvider
Selector selector 属性: NioEventLoop 构造器中通过调用通过 selector = provider.openSelector() 获取一个selector对象.
2. Acceptor线程绑定监听端口,启动NIO服务端
Channel createChannel() {
    EventLoop eventLoop = group().next();
    return channelFactory().newChannel(eventLoop, childGroup);
}
@Override
public EventExecutor next() {
    return children[Math.abs(childIndex.getAndIncrement() % children.length)];
}
public NioServerSocketChannel(EventLoop eventLoop, EventLoopGroup childGroup) {
    super(null, eventLoop, childGroup, newSocket(), SelectionKey.OP_ACCEPT);
    config = new DefaultServerSocketChannelConfig(this, javaChannel.socket());
}
一个 NioSocketChannel 所需要做的工作:
-
调用 NioSocketChannel.newSocket(DEFAULT_SELECTOR_PROVIDER) 打开一个新的 Java NIO SocketChannel
-
AbstractChannel(Channel parent) 中初始化AbstractChannel的属性:
-
parent 属性置为 null
-
unsafe 通过newUnsafe() 实例化一个 unsafe 对象, 它的类型是 AbstractNioByteChannel.NioByteUnsafe内部类
-
pipeline 是 new DefaultChannelPipeline(this) 新创建的实例.
Each channel has its own pipeline and it is created automatically when a new channel is created.
-
-
AbstractNioChannel 中的属性:
-
SelectableChannel ch 被设置为 Java SocketChannel, 即 NioSocketChannel#newSocket 返回的 Java NIO SocketChannel.
-
readInterestOp 被设置为 SelectionKey.OP_READ
-
SelectableChannel ch 被配置为非阻塞的 ch.configureBlocking(false)
-
-
NioSocketChannel 中的属性:
-
SocketChannelConfig config = new NioSocketChannelConfig(this, socket.socket())
-
首先看Acceptor如何处理客户端的接入:
try{
    int readyOps = k.readyOps();
    if ((readyOps & (SelectionKey.OP_READ | SelectionKey.OP_ACCEPT)) != 0 || readyOps == 0) {
        unsafe.read();
        if (!ch.isOpen()) {
            return;
        }
    }
}
Throwable exception = null;
try{
    for (; ; ) {
        int localRead = doReadMessages(readBuf);
        if (localRead == 0) {
            break;
        }
        if (localRead < 0) {
            closed = true;
            break;
        }
    }
}
protected int doReadMessages(List4. 选择IO线程之后,将SocketChannel注册到多路复用器上,监听READ操作。
protected AbstractNioByteChannel(Channel parent, EventLoop eventLoop, SelectableChannel ch) {
    super(parent, eventLoop, ch, SelectionKey.OP_READ);
}
int readyOps = k.readyOps();
if ((readyOps & (SelectionKey.OP_READ | SelectionKey.OP_ACCEPT)) != 0 || readyOps == 0) {
    unsafe.read();
    if (!ch.isOpen()) {
        return;
    }
}
if ((readyOps & SelectionKey.OP_WRITE) != 0) {
    ch.unsafe().forceFlush();
}
2. 客户端线程模型
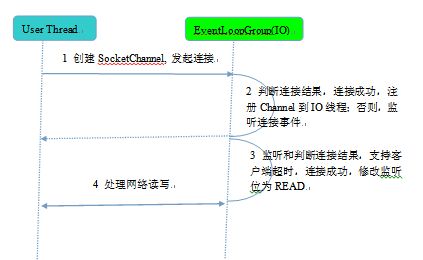
相比于服务端,客户端的线程模型简单一些,它的工作原理如下:
1. 由用户线程发起客户端连接
EventLoopGroup group = new NioEventLoopGroup();
try{
    Bootstrap b = new Bootstrap();
    b.group(group)
     .channel(NioSocketChannel.class)
     .option(ChannelOption.TCP_NODELAY, true)
     .handler(new ChanneInitialize(){
        @Override
        public void initChannel(SockectChannel ch) throws Exception {
            ch.pipeline().addLast(new EchoClientHandler(firstMessageSize));
        }
     });
     ChannelFuture f = b.connect(host, port).sync();
} @Override
Channel createChannel(){
EventLoop eventLoop = group().next();
return channelFactory().newChannel(eventLoop);
}2. 发起连接操作,判断连接结果
@Override
protected boolean doConnect(SocketAddress remoteAddress, SockectAddress localAddress) {
    if (localAddress != null) {
        javaChannel().socket().bind(localAddress);
    }
    boolean success = false;
    try{
        boolean connected = javaChannel().connect(remoteAddress);
        if (!connected) {
            SelectionKey().interestOps(SelectionKey.OP_CONNECT);
        }
        success = true;
        return connected;
    } finally {
        if (!success) {
            doClose();
        }
    }
}3. 由NioEventLoop的多路复用器轮询连接操作结果
if ((readyOps & SelectionKey.OP_CONNECT) != 0) {
    int ops = k.interestOps();
    ops &= ~SelectionKey.OP_CONNECT;
    k.interestOps(ops);

    unsafe.finishConnect();
}
@Override
protected void doBeginRead() throws Exception{
    if (inputShutdown) {
        return;
    }
    final SelectionKey selectionKey = this.selectionKey;
    if (!selectionKey.isValid) {
        return;
    }
    final int interestOps = selectionKey.interestOps();
    if ((interestOps & readInterestOp) == 0) {
        selectionKey.interestOps(interestOps | readInterestOp);
    }
}总结:客户端创建,线程模型如下:
1. 由用户线程负责初始化客户端资源,发起连接操作;
2. 如果连接成功,将SocketChannel注册到IO线程组的NioEventLoop线程中,监听读操作位;
3. 如果没有立即连接成功,将SocketChannel注册到IO线程组的NioEventLoop线程中,监听连接操作位;
4. 连接成功之后,修改监听位为READ,但是不需要切换线程。
四、Netty的通信过程
NIO的通信步骤:
①创建ServerSocketChannel,为其配置非阻塞模式。
②绑定监听,配置TCP参数,录入backlog大小等。
③创建一个独立的IO线程,用于轮询多路复用器Selector。
④创建Selector,将之前创建的ServerSocketChannel注册到Selector上,并设置监听标识位SelectionKey.OP_ACCEPT。
⑤启动IO线程,在循环体中执行Selector.select()方法,轮询就绪的通道。
⑥当轮询到处于就绪状态的通道时,需要进行操作位判断,如果是ACCEPT状态,说明是新的客户端接入,则调用accept方法接收新的客户端。
⑦设置新接入客户端的一些参数,如非阻塞,并将其继续注册到Selector上,设置监听标识位等。
⑧如果轮询的通道标识位是READ,则进行读取,构造Buffer对象等。
⑨更细节的问题还有数据没发送完成继续发送的问题......
Netty通信的步骤:
①创建两个NIO线程组,一个专门用于网络事件处理(接受客户端的连接),另一个则进行网络通信的读写。
②创建一个ServerBootstrap对象,配置Netty的一系列参数,例如接受传出数据的缓存大小等。
③创建一个用于实际处理数据的类ChannelInitializer,进行初始化的准备工作,比如设置接受传出数据的字符集、格式以及实际处理数据的接口。
④绑定端口,执行同步阻塞方法等待服务器端启动即可。
五、Netty的责任链ChannelPipeline/ChannelHandler
Channel通道。
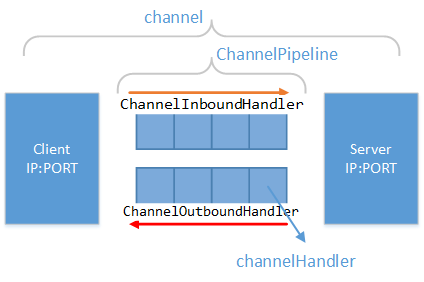
可以使用JAVA NIO中的Channel去初次理解,但实际上它的意义和JAVA NIO中的通道意义还不一样。我们可以理解成:“更抽象、更丰富”。如下如所示:
Netty中的Channel专门代表网络通信,这个和JAVA NIO框架中的Channel不一样,后者中还有类似FileChannel本地文件IO通道。由于前者专门代表网络通信,所以它是由客户端地址 + 服务器地址 + 网络操作状态构成的,请参见io.netty.channel.Channel接口的定义。
每一个Netty中的Channel,比JAVA NIO中的Channel更抽象。这是为什么呢?在Netty中,不止封装了JAVA NIO的IO模型,还封装了JAVA BIO的阻塞同步IO通信模型。将他们在表现上都抽象成Channel了。这就是为什么Netty中有io.netty.channel.oio.AbstractOioChannel这样的抽象类。
从上图我们也可以看出,每一个Channel都与一个ChannelPipeline对应。 而且在ChannelPipeline 中又维护了一个由ChannelHandlerContext 组成的双向链表。这个链表的头是HeadContext, 链表的尾是 TailContext, 并且每个 ChannelHandlerContext又与一个 ChannelHandler一一对应。
ChannelPipeline和ChannelHandler
Netty中的每一个Channel,都有一个独立的ChannelPipeline,中文称为“通道水管”。只不过这个水管是双向的里面流淌着数据,数据可以通过这个“水管”流入到服务器,也可以通过这个“水管”从服务器流出。
在ChannelPipeline中,有若干的过滤器。我们称之为“ChannelHandler”(处理器或者过滤器)。同“流入”和“流出”的概念向对应:用于处理/过滤 流入数据的ChannelHandler,称之为“ChannelInboundHandler”;用于处理/过滤 流出数据的ChannelHandler,称之为“ChannelOutboundHandler”。
inbound 事件和 outbound 事件的流向是不一样的, inbound 事件的流行是从下至上, 而 outbound 刚好相反, 是从上到下. 并且 inbound 的传递方式是通过调用相应的ChannelHandlerContext.fireIN_EVT() 方法, 而 outbound 方法的的传递方式是通过调用ChannelHandlerContext.OUT_EVT() 方法. 例如 ChannelHandlerContext.fireChannelRegistered() 调用会发送一个 ChannelRegistered 的 inbound 给下一个ChannelHandlerContext, 而 ChannelHandlerContext.bind 调用会发送一个 bind 的 outbound 事件给 下一个 ChannelHandlerContext。
Inbound 事件传播方法有:
ChannelHandlerContext.fireChannelRegistered()
ChannelHandlerContext.fireChannelActive()
ChannelHandlerContext.fireChannelRead(Object)
ChannelHandlerContext.fireChannelReadComplete()
ChannelHandlerContext.fireExceptionCaught(Throwable)
ChannelHandlerContext.fireUserEventTriggered(Object)
ChannelHandlerContext.fireChannelWritabilityChanged()
ChannelHandlerContext.fireChannelInactive()
ChannelHandlerContext.fireChannelUnregistered()ChannelHandlerContext.bind(SocketAddress, ChannelPromise)
ChannelHandlerContext.connect(SocketAddress, SocketAddress, ChannelPromise)
ChannelHandlerContext.write(Object, ChannelPromise)
ChannelHandlerContext.flush()
ChannelHandlerContext.read()
ChannelHandlerContext.disconnect(ChannelPromise)
ChannelHandlerContext.close(ChannelPromise)对于 Outbound事件:
1. Outbound 事件是请求事件(由 Connect 发起一个请求, 并最终由 unsafe 处理这个请求)
2. Outbound 事件的发起者是 Channel
3. Outbound 事件的处理者是 unsafe
4. Outbound 事件在 Pipeline 中的传输方向是 tail -> head.
5. 在 ChannelHandler 中处理事件时, 如果这个 Handler 不是最后一个 Hander, 则需要调用 ctx.xxx(例如 ctx.connect) 将此事件继续传播下去. 如果不这样做, 那么此事件的传播会提前终止.
6. Outbound 事件流: Context.OUT_EVT -> Connect.findContextOutbound -> nextContext.invokeOUT_EVT -> nextHandler.OUT_EVT -> nextContext.OUT_EVT
对于 Inbound 事件:
1. Inbound 事件是通知事件, 当某件事情已经就绪后, 通知上层.
2. Inbound 事件发起者是 unsafe
3. Inbound 事件的处理者是 Channel, 如果用户没有实现自定义的处理方法, 那么Inbound 事件默认的处理者是 TailContext, 并且其处理方法是空实现.
4. Inbound 事件在 Pipeline 中传输方向是 head -> tail
5. 在 ChannelHandler 中处理事件时, 如果这个 Handler 不是最后一个 Hnalder, 则需要调用 ctx.fireIN_EVT (例如 ctx.fireChannelActive) 将此事件继续传播下去. 如果不这样做, 那么此事件的传播会提前终止.
6. Outbound 事件流: Context.fireIN_EVT -> Connect.findContextInbound -> nextContext.invokeIN_EVT -> nextHandler.IN_EVT -> nextContext.fireIN_EVT
责任链和适配器的应用
数据在ChannelPipeline中有一个一个的Handler进行处理,并形成一个新的数据状态。这是典型的“责任链”模式。需要注意,虽然数据管道中的Handler是按照顺序执行的,但不代表某一个Handler会处理任何一种由“上一个handler”发送过来的数据。某些Handler会检查传来的数据是否符合要求,如果不符合自己的处理要求,则不进行处理。
I/O Request
                                              via Channel or
                                          ChannelHandlerContext
                                                    |
+---------------------------------------------------+---------------+
|                           ChannelPipeline         |               |
|                                                  \|/              |
|    +---------------------+            +-----------+----------+    |
|    | Inbound Handler  N  |            | Outbound Handler  1  |    |
|    +----------+----------+            +-----------+----------+    |
|              /|\                                  |               |
|               |                                  \|/              |
|    +----------+----------+            +-----------+----------+    |
|    | Inbound Handler N-1 |            | Outbound Handler  2  |    |
|    +----------+----------+            +-----------+----------+    |
|              /|\                                  .               |
|               .                                   .               |
| ChannelHandlerContext.fireIN_EVT() ChannelHandlerContext.OUT_EVT()|
|        [ method call]                       [method call]         |
|               .                                   .               |
|               .                                  \|/              |
|    +----------+----------+            +-----------+----------+    |
|    | Inbound Handler  2  |            | Outbound Handler M-1 |    |
|    +----------+----------+            +-----------+----------+    |
|              /|\                                  |               |
|               |                                  \|/              |
|    +----------+----------+            +-----------+----------+    |
|    | Inbound Handler  1  |            | Outbound Handler  M  |    |
|    +----------+----------+            +-----------+----------+    |
|              /|\                                  |               |
+---------------+-----------------------------------+---------------+
                |                                  \|/
+---------------+-----------------------------------+---------------+
|               |                                   |               |
|       [ Socket.read() ]                    [ Socket.write() ]     |
|                                                                   |
|  Netty Internal I/O Threads (Transport Implementation)            |
+-------------------------------------------------------------------+我们可以实现ChannelInboundHandler接口或者ChannelOutboundHandler接口,来实现我们自己业务的“数据流入处理器”或者“数据流出”处理器。但是这两个接口的事件方法是比较多的,例如ChannelInboundHandler接口一共有11个需要实现的接口方法(包括父级ChannelHandler的,我们在下一节讲解Channel的生命周期时,回专门讲到这些事件的执行顺序和执行状态),一般情况下我们不需要把这些方法全部实现。
所以Netty中增加了两个适配器“ChannelInboundHandlerAdapter”和“ChannelOutboundHandlerAdapter”来帮助我们去实现我们只需要实现的事件方法。其他的事件方法我们就不需要关心了。
ChannelInboundHandler类举例
HttpRequestDecoder:实现了Http协议的数据输入格式的解析。这个类将数据编码为HttpMessage对象,并交由下一个ChannelHandler进行处理。
ByteArrayDecoder:最基础的数据流输入处理器,将所有的byte转换为ByteBuf对象(一般的实现类是:io.netty.buffer.UnpooledUnsafeDirectByteBuf)。我们进行一般的文本格式信息传输到服务器时,最好使用这个Handler将byte数组转换为ByteBuf对象。
DelimiterBasedFrameDecoder:这个数据流输入处理器,会按照外部传入的数据中给定的某个关键字符/关键字符串,重新将数据组装为新的段落并发送给下一个Handler处理器。后文中,我们将使用这个处理器进行TCP半包的问题。
ProtobufDecoder:支持Google Protocol Buffers 数据格式解析的处理器。
ChannelOutboundHandler类举例
HttpResponseEncoder:这个类和HttpRequestDecoder相对应,是将服务器端HttpReponse对象的描述转换成ByteBuf对象形式,并向外传播。
ByteArrayEncoder:这个类和ByteArrayDecoder,是将服务器端的ByteBuf对象转换成byte数组的形式,并向外传播。一般也和ByteArrayDecoder对象成对使用。
还有支持标准的编码成Google Protocol Buffers格式、JBoss Marshalling 格式、ZIP压缩格式的ProtobufEncoder、ProtobufVarint32LengthFieldPrepender、MarshallingEncoder、JZlibEncoder等
Channel的生命周期
一个Channel的生命周期如下(这个生命周期的事件方法调用顺序只是针对Netty封装使用JAVA NIO框架时,并且在进行TCP/IP协议监听时的事件方法调用顺序。):
六、Netty的NioEventLoop
1. 责任链的串行设计
Netty采用了串行化设计理念,从消息的读取、编码以及后续Handler的执行,始终都由IO线程NioEventLoop负责,这就意外着整个流程不会进行线程上下文的切换,数据也不会面临被并发修改的风险,对于用户而言,甚至不需要了解Netty的线程细节,这确实是个非常好的设计理念。
NioEventLoop 继承于 SingleThreadEventExecutor, 而 SingleThreadEventExecutor 中有一个 Queue
一个NioEventLoop聚合了一个多路复用器Selector,因此可以处理成百上千的客户端连接,Netty的处理策略是每当有一个新的客户端接入,则从NioEventLoop线程组中顺序获取一个可用的NioEventLoop,当到达数组上限之后,重新返回到0,通过这种方式,可以基本保证各个NioEventLoop的负载均衡。一个客户端连接只注册到一个NioEventLoop上,这样就避免了多个IO线程去并发操作它。
Netty通过串行化设计理念降低了用户的开发难度,提升了处理性能。利用线程组实现了多个串行化线程水平并行执行,线程之间并没有交集,这样既可以充分利用多核提升并行处理能力,同时避免了线程上下文的切换和并发保护带来的额外性能损耗。
2. NioEventLoop的执行过程
在 Java NIO 中所讲述的 Selector 的使用流程:
-
通过 Selector.open() 打开一个 Selector.
-
将 Channel 注册到 Selector 中, 并设置需要监听的事件(interest set)
-
不断重复:
-
调用 select() 方法
-
调用 selector.selectedKeys() 获取 selected keys
-
迭代每个 selected key:
-
1) 从 selected key 中获取 对应的 Channel 和附加信息(如果有的话)
-
2) 判断是哪些 IO 事件已经就绪了, 然后处理它们. 如果是 OP_ACCEPT 事件, 则调用 "SocketChannel clientChannel = ((ServerSocketChannel) key.channel()).accept()" 获取 SocketChannel, 并将它设置为 非阻塞的, 然后将这个 Channel 注册到 Selector 中.
-
3) 根据需要更改 selected key 的监听事件.
-
4) 将已经处理过的 key 从 selected keys 集合中删除.
-
-
Netty对NIO的过程进行了封装:
1. Netty 中是通过调用 SelectorProvider.openSocketChannel() 来打开一个新的 Java NIO SocketChannel:
private static SocketChannel newSocket(SelectorProvider provider) {
    ...
    return provider.openSocketChannel();
}
Bootstrap.initAndRegister ->
    AbstractBootstrap.initAndRegister ->
        MultithreadEventLoopGroup.register ->
            SingleThreadEventLoop.register ->
                AbstractUnsafe.register ->
                    AbstractUnsafe.register0 ->
                        AbstractNioChannel.doRegister
@Override
public final void register(EventLoop eventLoop, final ChannelPromise promise) {
    // 省略条件判断和错误处理
    AbstractChannel.this.eventLoop = eventLoop;
    register0(promise);
}
@Override
protected void doRegister() throws Exception {
    // 省略错误处理
    selectionKey = javaChannel().register(eventLoop().selector, 0, this);
}当 EventLoop.execute 第一次被调用时, 就会触发 startThread() 的调用, 进而导致了 EventLoop 所对应的 Java 线程的启动,
下面是此线程的 run() 方法, 我已经把一些异常处理和收尾工作的代码都去掉了. 这个 run 方法可以说是十分简单, 主要就是调用了 SingleThreadEventExecutor.this.run() 方法. 而 SingleThreadEventExecutor.run() 是一个抽象方法, 它的实现在NioEventLoop 中,继续跟踪到 NioEventLoop.run() 方法,其源码如下:
@Override
protected void run() {
    for (;;) {
        boolean oldWakenUp = wakenUp.getAndSet(false);
        try {
            if (hasTasks()) {
                selectNow();
            } else {
                select(oldWakenUp);
                if (wakenUp.get()) {
                    selector.wakeup();
                }
            }

            cancelledKeys = 0;
            needsToSelectAgain = false;
            final int ioRatio = this.ioRatio;
            if (ioRatio == 100) {
                processSelectedKeys();
                runAllTasks();
            } else {
                final long ioStartTime = System.nanoTime();

                processSelectedKeys();

                final long ioTime = System.nanoTime() - ioStartTime;
                runAllTasks(ioTime * (100 - ioRatio) / ioRatio);
            }

            if (isShuttingDown()) {
                closeAll();
                if (confirmShutdown()) {
                    break;
                }
            }
        } catch (Throwable t) {
            ...
        }
    }
}
对该函数进行分析:
1. IO 事件的轮询
首先, 在 run 方法中, 第一步是调用 hasTasks() 方法来判断当前任务队列中是否有任务,检查了一下 taskQueue 是否为空:
void selectNow() throws IOException {
    try {
        selector.selectNow();
    } finally {
        // restore wakup state if needed
        if (wakenUp.get()) {
            selector.wakeup();
        }
    }
}
当 taskQueue 中没有任务时,那么 Netty 可以 阻塞地等待 IO 就绪事件; 而当 taskQueue 中有任务时, 我们自然地希望所提交的任务可以尽快地执行, 因此 Netty 会调用 非阻塞的 selectNow() 方法, 以保证 taskQueue 中的任务尽快可以执行.
2. IO 事件的处理
IO事件的处理如下所示:
final int ioRatio = this.ioRatio;
if (ioRatio == 100) {
    processSelectedKeys();
    runAllTasks();
} else {
    final long ioStartTime = System.nanoTime();

    processSelectedKeys();

    final long ioTime = System.nanoTime() - ioStartTime;
    runAllTasks(ioTime * (100 - ioRatio) / ioRatio);
}runAllTasks():运行 taskQueue 中的任务。
ioRatio:表示此线程分配给 IO 操作所占的时间比(即运行 processSelectedKeys 耗时在整个循环中所占用的时间)。例如 ioRatio 默认是 50, 则表示 IO 操作和执行 task 的所占用的线程执行时间比是 1 : 1。
private void processSelectedKeys() {
    if (selectedKeys != null) {
        processSelectedKeysOptimized(selectedKeys.flip());
    } else {
        processSelectedKeysPlain(selector.selectedKeys());
    }
}private void processSelectedKeysOptimized(SelectionKey[] selectedKeys) {
for (int i = 0;; i ++) {
final SelectionKey k = selectedKeys[i];
if (k == null) {
break;
}
selectedKeys[i] = null;
final Object a = k.attachment();
if (a instanceof AbstractNioChannel) {
processSelectedKey(k, (AbstractNioChannel) a);
} else {
@SuppressWarnings("unchecked")
NioTask task = (NioTask) a;
processSelectedKey(k, task);
}
...
}
} private static void processSelectedKey(SelectionKey k, AbstractNioChannel ch) {
final NioUnsafe unsafe = ch.unsafe();
...
try {
int readyOps = k.readyOps();
// 可读事件
if ((readyOps & (SelectionKey.OP_READ | SelectionKey.OP_ACCEPT)) != 0 || readyOps == 0) {
unsafe.read();
if (!ch.isOpen()) {
// Connection already closed - no need to handle write.
return;
}
}
// 可写事件
if ((readyOps & SelectionKey.OP_WRITE) != 0) {
// Call forceFlush which will also take care of clear the OP_WRITE once there is nothing left to write
ch.unsafe().forceFlush();
}
// 连接建立事件
if ((readyOps & SelectionKey.OP_CONNECT) != 0) {
// remove OP_CONNECT as otherwise Selector.select(..) will always return without blocking
// See https://github.com/netty/netty/issues/924
int ops = k.interestOps();
ops &= ~SelectionKey.OP_CONNECT;
k.interestOps(ops);
unsafe.finishConnect();
}
} catch (CancelledKeyException ignored) {
unsafe.close(unsafe.voidPromise());
}
}1. OP_READ, 可读事件, 即 Channel 中收到了新数据可供上层读取.
2. OP_WRITE, 可写事件, 即上层可以向 Channel 写入数据.
3. OP_CONNECT, 连接建立事件, 即 TCP 连接已经建立, Channel 处于 active 状态.
当就绪的 IO 事件是 OP_READ, 代码会调用 unsafe.read() 方法,unsafe对象实质上是一个 NioSocketChannelUnsafe实例, 负责的是 Channel 的底层 IO 操作,它的实现源码如下:
@Override
public final void read() {
    ...
    ByteBuf byteBuf = null;
    int messages = 0;
    boolean close = false;
    try {
        int totalReadAmount = 0;
        boolean readPendingReset = false;
        do {
            byteBuf = allocHandle.allocate(allocator);
            int writable = byteBuf.writableBytes();
            int localReadAmount = doReadBytes(byteBuf);

            // 检查读取结果.
            ...

            pipeline.fireChannelRead(byteBuf);
            byteBuf = null;

            ...

            totalReadAmount += localReadAmount;

            // 检查是否是配置了自动读取, 如果不是, 则立即退出循环.
            ...
        } while (++ messages < maxMessagesPerRead);

        pipeline.fireChannelReadComplete();
        allocHandle.record(totalReadAmount);

        if (close) {
            closeOnRead(pipeline);
            close = false;
        }
    } catch (Throwable t) {
        handleReadException(pipeline, byteBuf, t, close);
    } finally {
    }
}1. 分配 ByteBuf
2. 从 SocketChannel 中读取数据
3. 调用 pipeline. fireChannelRead 发送一个 inbound 事件.
当调用了 pipeline.fireIN_EVT() 后, 那么就产生了一个 inbound 事件, 此事件会以 head -> customContext -> tail 的方向依次流经 ChannelPipeline 中的各个 handler。
调用了 pipeline.fireChannelRead 后, 就是 ChannelPipeline 中所需要做的工作了,最终ChannelPipeLine调用Read相关的Handler进行数据处理完成流程。
3. 定时任务与时间轮算法
在Netty中,有很多功能依赖定时任务,比较典型的有两种(这两种也是Netty实现的多于NIO的特性功能):
1. 客户端连接超时控制;
2. 链路空闲检测。
一种比较常用的设计理念是在NioEventLoop中聚合JDK的定时任务线程池ScheduledExecutorService,通过它来执行定时任务。这样做单纯从性能角度看不是最优,原因有如下三点:
1. 在IO线程中聚合了一个独立的定时任务线程池,这样在处理过程中会存在线程上下文切换问题,这就打破了Netty的串行化设计理念;
2. 存在多线程并发操作问题,因为定时任务Task和IO线程NioEventLoop可能同时访问并修改同一份数据;
3. JDK的ScheduledExecutorService从性能角度看,存在性能优化空间。
最早面临上述问题的是操作系统和协议栈,例如TCP协议栈,其可靠传输依赖超时重传机制,因此每个通过TCP传输的 packet 都需要一个 timer来调度 timeout 事件。这类超时可能是海量的,如果为每个超时都创建一个定时器,从性能和资源消耗角度看都是不合理的。
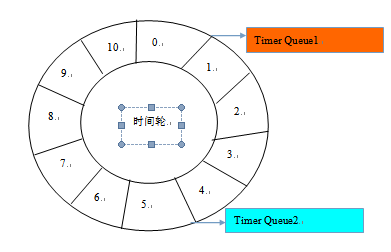
根据George Varghese和Tony Lauck 1996年的论文《Hashed and Hierarchical Timing Wheels: data structures to efficiently implement a timer facility》提出了一种定时轮的方式来管理和维护大量的timer调度。Netty的定时任务调度就是基于时间轮算法调度。定时轮是一种数据结构,其主体是一个循环列表,每个列表中包含一个称之为slot的结构,它的原理图如下:
定时轮的工作原理可以类比于时钟,如上图箭头(指针)按某一个方向按固定频率轮动,每一次跳动称为一个tick。这样可以看出定时轮由个3个重要的属性参数:ticksPerWheel(一轮的tick数),tickDuration(一个tick的持续时间)以及timeUnit(时间单位),例如当ticksPerWheel=60,tickDuration=1,timeUnit=1秒,这就和时钟的秒针走动完全类似了。
时间轮的执行由NioEventLoop来复杂检测,首先看任务队列中是否有超时的定时任务和普通任务,如果有则按照比例循环执行这些任务,代码如下:
protected void run(){
    for (; ;) {
        oldWakenUp = wakenUp.getAndSet(false);
        try{
            if (hasTasks()) {
                selectNow();
            } else {
                ...
            }
        }
    }
}int selectCnt = 0;
long currentTimeNanos = System.nanoTime();
long selectDeadLineNanos = currentTimeNanos + delayNanos(currentTimeNanos);
for (; ; ) {
long timeoutMillis = (selectDeadLineNanos - currentTimeNanos + 500000L);
if (timeoutMillis <= 0) {
if (selectCnt == 0) {
selector.selectNow();
selectCnt = 1;
}
break;
}
int selectedKeys = selector.select(timeoutMillis);
}protected long delayNanos(long currentTimeNanos){
ScheduledFutureTask delayedTask = delayedTaskQueue.peek();
if (delayedTask == null) {
return SCHEDULE_PURGE_INTERVAL;
}
return delayedTask.delayNanos(currentTimeNanos);
}
private void fetchFromDelayedQueue(){
    long nanoTime = 0L;
    for (; ; ) {
        ScheduledFutureTask delayedTask = delayedTaskQueue.peek();
        if (delayedTask == null) {
            break;
        }
        if (nanoTime == 0L) {
            nanoTime = ScheduledFutureTask.nanoTime();
        }
        if (delayedTask.deadlineNanos() <= nanoTime) {
            delayedTaskQueue.remove();
            taskQueue.add(delayedTask);
        } else {
            break;
        }
    }
}
protected boolean runAllTasks(long timeoutNanos) {
    fetchFromDelayedQueue();
    Runnable task = pollTask();
    if (task == null) {
        return false;
    }

    final long deadline = ScheduledFutureTask.nanoTime() + timeoutNanos;
    long runTasks;
    long lastExecutionTime;
    for (; ; ) {
        try{
            task.run();
        } catch (Throwable t) {
            logger.warn("A task raised an execption.", t);
        }

        runTasks++;
    }
}因为获取系统的纳秒时间是件耗时的操作,所以Netty 每执行64个定时任务检测一次是否达到执行的上限时间,达到则退出。如果没有执行完,放到下次Selector轮询时再处理,给IO事件的处理提供机会,代码如下:
if ((runTasks & 0x3F) == 0) {
    lastExecutionTime = ScheduledFutureTask.nanoTime();
    if (lastExecutionTime >= deadline) {
        break;
    }
}

task = pollTask();
if (task == null) {
    lastExecutionTime = ScheduledFutureTask.nanoTime();
    break;
}
六、Netty编解码技术
通常我们也习惯将编码(Encode)成为序列化,它将数据序列化为字节数组,用于网络传输、数据持久化或者其他用途。反之,解码(Decode)/反序列化(deserialization)把从网络、磁盘等读取的字节数组还原成原始对象(通常是原始对象的拷贝),以方便后续的业务逻辑操作。进行远程跨进程服务调用时(例如RPC调用),需要使用特定的编解码技术,对需要进行网络传输的对象做编码或者解码,以便完成远程调用。主流的编解码框架包括:
①JBoss的Marshalling包
②google的Protobuf
③基于Protobuf的Kyro
④MessagePack框架
⑤HTTP Request / HTTP Response 协议。
以下HTTP协议的示例表明了解码器的使用方法:
package testNetty;

import java.net.InetSocketAddress;
import java.nio.channels.spi.SelectorProvider;
import java.util.concurrent.ThreadFactory;

import io.netty.bootstrap.ServerBootstrap;
import io.netty.buffer.ByteBuf;
import io.netty.channel.ChannelHandlerContext;
import io.netty.channel.ChannelInboundHandlerAdapter;
import io.netty.channel.ChannelInitializer;
import io.netty.channel.ChannelOption;
import io.netty.channel.EventLoopGroup;
import io.netty.channel.ChannelHandler.Sharable;
import io.netty.channel.nio.NioEventLoopGroup;
import io.netty.channel.socket.nio.NioServerSocketChannel;
import io.netty.channel.socket.nio.NioSocketChannel;
import io.netty.handler.codec.http.DefaultFullHttpResponse;
import io.netty.handler.codec.http.FullHttpResponse;
import io.netty.handler.codec.http.HttpContent;
import io.netty.handler.codec.http.HttpHeaders;
import io.netty.handler.codec.http.HttpMethod;
import io.netty.handler.codec.http.HttpRequest;
import io.netty.handler.codec.http.HttpRequestDecoder;
import io.netty.handler.codec.http.HttpResponseEncoder;
import io.netty.handler.codec.http.HttpResponseStatus;
import io.netty.handler.codec.http.HttpVersion;
import io.netty.util.AttributeKey;
import io.netty.util.concurrent.DefaultThreadFactory;

import org.apache.commons.logging.Log;
import org.apache.commons.logging.LogFactory;
import org.apache.log4j.BasicConfigurator;

public class TestHTTPNetty {
    static {
        BasicConfigurator.configure();
    }

    public static void main(String[] args) throws Exception {

        ServerBootstrap serverBootstrap = new ServerBootstrap();
        EventLoopGroup bossLoopGroup = new NioEventLoopGroup(1);
        ThreadFactory threadFactory = new DefaultThreadFactory("work thread pool");
        int processorsNumber = Runtime.getRuntime().availableProcessors();
        EventLoopGroup workLoogGroup = new NioEventLoopGroup(processorsNumber * 2, threadFactory, SelectorProvider.provider());
        serverBootstrap.group(bossLoopGroup , workLoogGroup);
        serverBootstrap.channel(NioServerSocketChannel.class);
        serverBootstrap.childHandler(new ChannelInitializer() {
            @Override
            protected void initChannel(NioSocketChannel ch) throws Exception {
                //我们在socket channel pipeline中加入http的编码和解码器
                ch.pipeline().addLast(new HttpResponseEncoder());
                ch.pipeline().addLast(new HttpRequestDecoder());
                ch.pipeline().addLast(new HTTPServerHandler());
            }
        });

        serverBootstrap.option(ChannelOption.SO_BACKLOG, 128);
        serverBootstrap.childOption(ChannelOption.SO_KEEPALIVE, true);
        serverBootstrap.bind(new InetSocketAddress("0.0.0.0", 83));
    }
}

/**
 * @author yinwenjie
 */
@Sharable
class HTTPServerHandler extends ChannelInboundHandlerAdapter {
    private static Log LOGGER = LogFactory.getLog(HTTPServerHandler.class);

    /**
     * 由于一次httpcontent可能没有传输完全部的请求信息。所以这里要做一个连续的记录
     * 然后在channelReadComplete方法中(执行了这个方法说明这次所有的http内容都传输完了)进行处理
     */
    private static AttributeKey CONNTENT = AttributeKey.valueOf("content");

    @Override
    public void channelRead(ChannelHandlerContext ctx, Object msg) throws Exception {
        /*
         * 在测试中,我们首先取出客户端传来的参数、URL信息,并且返回给一个确认信息。
         * 要使用HTTP服务,我们首先要了解Netty中http的格式,如下:
         * ----------------------------------------------
         * | http request | http content | http content |
         * ----------------------------------------------
         *
         * 所以通过HttpRequestDecoder channel handler解码后的msg可能是两种类型:
         * HttpRquest:里面包含了请求head、请求的url等信息
         * HttpContent:请求的主体内容
         * */
        if(msg instanceof HttpRequest) {
            HttpRequest request = (HttpRequest)msg;
            HttpMethod method = request.getMethod();

            String methodName = method.name();
            String url = request.getUri();
            HTTPServerHandler.LOGGER.info("methodName = " + methodName + " && url = " + url);
        }

        //如果条件成立,则在这个代码段实现http请求内容的累加
        if(msg instanceof HttpContent) {
            StringBuffer content = ctx.attr(HTTPServerHandler.CONNTENT).get();
            if(content == null) {
                content = new StringBuffer();
                ctx.attr(HTTPServerHandler.CONNTENT).set(content);
            }

            HttpContent httpContent = (HttpContent)msg;
            ByteBuf contentBuf = httpContent.content();
            String preContent = contentBuf.toString(io.netty.util.CharsetUtil.UTF_8);
            content.append(preContent);
        }
    }

    @Override
    public void channelReadComplete(ChannelHandlerContext ctx) throws Exception {
        HTTPServerHandler.LOGGER.info("super.channelReadComplete(ChannelHandlerContext ctx)");

        /*
         * 一旦本次http请求传输完成,则可以进行业务处理了。
         * 并且返回响应
         * */
        StringBuffer content = ctx.attr(HTTPServerHandler.CONNTENT).get();
        HTTPServerHandler.LOGGER.info("http客户端传来的信息为:" + content);

        //开始返回信息了
        String returnValue = "return response";
        FullHttpResponse response = new DefaultFullHttpResponse(HttpVersion.HTTP_1_1, HttpResponseStatus.OK);
        HttpHeaders httpHeaders = response.headers();
        //这些就是http response 的head信息咯,参见http规范。另外您还可以设置自己的head属性
        httpHeaders.add("param", "value");
        response.headers().set(HttpHeaders.Names.CONTENT_TYPE, "text/plain");
        //一定要设置长度,否则http客户端会一直等待(因为返回的信息长度客户端不知道)
        response.headers().set(HttpHeaders.Names.CONTENT_LENGTH, returnValue.length());

        ByteBuf responseContent = response.content();
        responseContent.writeBytes(returnValue.getBytes("UTF-8"));

        //开始返回
        ctx.writeAndFlush(response);
    }
}
七、Netty半包和粘包问题的解决
无论是服务器端还是客户端,当我们读取或者发送数据的时候,都需要考虑TCP底层的粘包/拆包机制。
TCP是一个“流”协议,所谓流就是没有界限的遗传数据。TCP底层并不了解上层业务数据的具体含义,它会根据TCP缓冲区的具体情况进行包的划分,也就是说,在业务上一个完整的包可能会被TCP分成多个包进行发送,也可能把多个小包封装成一个大的数据包发送出去,这就是所谓的半包/粘包问题。
半包/粘包是一个应用层问题。要解决半包/粘包问题,就是在应用程序层面建立协商一致的信息还原依据。常见的有两种方式:
一是消息定长,即保证每一个完整的信息描述的长度都是一定的,这样无论TCP/IP协议如何进行分片,数据接收方都可以按照固定长度进行消息的还原。
二是在完整的一块数据结束后增加协商一致的分隔符(例如增加一个回车符)。
在JAVA NIO技术框架中,半包和粘包问题我们需要自己解决,如果使用Netty框架,它其中提供了多种解码器的封装帮助我们解决半包和粘包问题。甚至针对不同的数据格式,Netty都提供了半包和粘包问题的现成解决方式。
1、使用FixedLengthFrameDecoder解决问题
FixedLengthFrameDecoder解码处理器将TCP/IP的数据按照指定的长度进行重新拆分,如果接收到的数据不满足设置的固定长度,Netty将等待新的数据到达:
serverBootstrap.childHandler(new ChannelInitializer() {
    @Override
    protected void initChannel(NioSocketChannel ch) throws Exception {
        ch.pipeline().addLast(new ByteArrayEncoder());
        ch.pipeline().addLast(new FixedLengthFrameDecoder(20));
        ch.pipeline().addLast(new TCPServerHandler());
        ch.pipeline().addLast(new ByteArrayDecoder());
    }
}); 2、使用 LineBasedFrameDecoder解决问题
LineBasedFrameDecoder解码器,基于最简单的“ 换行符”进行接收到的信息的再组织。windows和linux两个操作系统中的“换行符”是不一样的,LineBasedFrameDecoder解码器都支持。当然这个解码器没有我们后面介绍的DelimiterBasedFrameDecoder解码器灵活。
serverBootstrap.childHandler(new ChannelInitializer() {
    @Override
    protected void initChannel(NioSocketChannel ch) throws Exception {
        ch.pipeline().addLast(new ByteArrayEncoder());
        ch.pipeline().addLast(new LineBasedFrameDecoder(100));
        ch.pipeline().addLast(new TCPServerHandler());
        ch.pipeline().addLast(new ByteArrayDecoder());
    }
});
this is 0 client \r\n request 1 \r\n”
this is 0 client
request 1DelimiterBasedFrameDecoder是按照“自定义”分隔符(也可以是“回车符”或者“空字符”注意windows系统中和linux系统中“回车符”的表示是不一样的)进行信息的重新拆分。
serverBootstrap.childHandler(new ChannelInitializer() {
    @Override
    protected void initChannel(NioSocketChannel ch) throws Exception {
        ch.pipeline().addLast(new ByteArrayEncoder());
        ch.pipeline().addLast(new DelimiterBasedFrameDecoder(1500, false, Delimiters.lineDelimiter()));
        ch.pipeline().addLast(new TCPServerHandler());
        ch.pipeline().addLast(new ByteArrayDecoder());
    }
});
DelimiterBasedFrameDecoder(int maxFrameLength, boolean stripDelimiter, ByteBuf... delimiters)
/**
*  maxFrameLength:最大分割长度,如果接收方在一段长度 大于maxFrameLength的数据段中,没有找到指定的分隔符,那么这个处理器会抛出TooLongFrameException异常。
*
*  stripDelimiter:这个是一个布尔型参数,指代是否保留指定的分隔符。
*
*  delimiters:设置的分隔符。一般使用Delimiters.lineDelimiter()或者Delimiters.nulDelimiter()。当然您也可以自定义分隔符,定义成bytebuf的类型就行了。
*/
八、Netty的使用经验
1. Netty长连接的处理方式
两台机器(甚至多台)使用Netty的通信方式大体分为三种:
①使用长连接通道不断开的形式进行通信,也就是服务器和客户端的通道一直处于开启状态,如果服务器性能足够好,并且客户端数量也比较上的情况下,推荐这种方式。
②一次性批量提交数据,采用短连接方式。也就是说先把数据保存到本地临时缓存区或者临时表,当达到界值时进行一次性批量提交,又或者根据定时任务轮询提交,这种情况的弊端是做不到实时性传输,对实时性要求不高的应用程序中推荐使用。
③使用一种特殊的长连接,在某一指定时间段内,服务器与某台客户端没有任何通信,则断开连接。下次连接则是客户端向服务器发送请求的时候,再次建立连接。
在这里将介绍使用Netty实现第三种方式的连接,但是我们需要考虑两个因素:
①如何在超时(即服务器和客户端没有任何通信)后关闭通道?关闭通道后又如何再次建立连接?
②客户端宕机时,我们无需考虑,下次重启客户端之后就可以与服务器建立连接,但服务器宕机时,客户端如何与服务器端通信?
Netty为超时控制封装了两个类ReadTimeoutHandler和WriteTimeoutHandler,ReadTimeoutHandler用于控制读取数据的时候的超时,如果在设置时间段内都没有数据读取了,那么就引发超时,然后关闭当前的channel;WriteTimeoutHandler用于控制数据输出的时候的超时,如果在设置时间段内都没有数据写了,那么就超时。它们都是IdleStateHandler的子类。
Netty 的超时类型 IdleState 主要分为:
1. ALL_IDLE : 一段时间内没有数据接收或者发送
2. READER_IDLE : 一段时间内没有数据接收
3. WRITER_IDLE : 一段时间内没有数据发送
在 Netty 的 timeout 包下,主要类有:
1. IdleStateEvent : 超时的事件
2. IdleStateHandler : 超时状态处理
3. ReadTimeoutHandler : 读超时状态处理
4. WriteTimeoutHandler : 写超时状态处理
其使用时只需要在initChannel时添加相应的状态处理Handler即可:
        serverBootstrap.childHandler(new ChannelInitializer() {
            /* (non-Javadoc)
             * @see io.netty.channel.ChannelInitializer#initChannel(io.netty.channel.Channel)
             */
            @Override
            protected void initChannel(NioSocketChannel ch) throws Exception {
                //我们在socket channel pipeline中加入http的编码和解码器
                ch.pipeline().addLast(new HttpResponseEncoder());
                ch.pipeline().addLast(new ReadTimeoutHandler(5));
                ch.pipeline().addLast(new HttpRequestDecoder());
                ch.pipeline().addLast(new HTTPServerHandler());
            }
}); 2. Netty心跳包
Netty应用心跳和重连的整个过程:
1)客户端连接服务端
2)在客户端的的ChannelPipeline中加入一个比较特殊的IdleStateHandler,设置一下客户端的写空闲时间,例如4s
3)当客户端的所有ChannelHandler中4s内没有write事件,则会触发userEventTriggered方法(上文介绍过)
4)我们在客户端的userEventTriggered中对应的触发事件下发送一个心跳包给服务端,检测服务端是否还存活,防止服务端已经宕机,客户端还不知道。
5)同样,服务端要对心跳包做出响应,其实给客户端最好的回复就是“不回复”,这样可以服务端的压力,假如有10w个空闲Idle的连接,那么服务端光发送心跳回复,则也是费事的事情,那么怎么才能告诉客户端它还活着呢,其实很简单,因为5s服务端都会收到来自客户端的心跳信息,那么如果10秒内收不到,服务端可以认为客户端挂了,可以close链路。
6)加入服务端因为什么因素导致宕机的话,就会关闭所有的链路链接,所以作为客户端要做的事情就是短线重连
要写工业级的Netty心跳重连的代码,需要解决一下几个问题:
1)ChannelPipeline中的ChannelHandlers的维护,首次连接和重连都需要对ChannelHandlers进行管理
2)重连对象的管理,也就是bootstrap对象的管理
3)重连机制编写
1. 首先先定义一个接口ChannelHandlerHolder,用来保管ChannelPipeline中的Handlers的
package com.lyncc.netty.idle;

import io.netty.channel.ChannelHandler;

/**
 *
 * 客户端的ChannelHandler集合,由子类实现,这样做的好处:
 * 继承这个接口的所有子类可以很方便地获取ChannelPipeline中的Handlers
 * 获取到handlers之后方便ChannelPipeline中的handler的初始化和在重连的时候也能很方便
 * 地获取所有的handlers
 */
public interface ChannelHandlerHolder {

    ChannelHandler[] handlers();
}
package com.lyncc.netty.idle;

import io.netty.bootstrap.ServerBootstrap;
import io.netty.channel.ChannelFuture;
import io.netty.channel.ChannelInitializer;
import io.netty.channel.ChannelOption;
import io.netty.channel.EventLoopGroup;
import io.netty.channel.nio.NioEventLoopGroup;
import io.netty.channel.socket.SocketChannel;
import io.netty.channel.socket.nio.NioServerSocketChannel;
import io.netty.handler.codec.string.StringDecoder;
import io.netty.handler.codec.string.StringEncoder;
import io.netty.handler.logging.LogLevel;
import io.netty.handler.logging.LoggingHandler;
import io.netty.handler.timeout.IdleStateHandler;

import java.net.InetSocketAddress;
import java.util.concurrent.TimeUnit;

public class HeartBeatServer {

    private final AcceptorIdleStateTrigger idleStateTrigger = new AcceptorIdleStateTrigger();

    private int port;

    public HeartBeatServer(int port) {
        this.port = port;
    }

    public void start() {
        EventLoopGroup bossGroup = new NioEventLoopGroup(1);
        EventLoopGroup workerGroup = new NioEventLoopGroup();
        try {
            ServerBootstrap sbs = new ServerBootstrap().group(bossGroup, workerGroup)
                    .channel(NioServerSocketChannel.class).handler(new LoggingHandler(LogLevel.INFO))
                    .localAddress(new InetSocketAddress(port)).childHandler(new ChannelInitializer() {
                        protected void initChannel(SocketChannel ch) throws Exception {
                            ch.pipeline().addLast(new IdleStateHandler(5, 0, 0, TimeUnit.SECONDS));
                            ch.pipeline().addLast(idleStateTrigger);
                            ch.pipeline().addLast("decoder", new StringDecoder());
                            ch.pipeline().addLast("encoder", new StringEncoder());
                            ch.pipeline().addLast(new HeartBeatServerHandler());
                        };

                    }).option(ChannelOption.SO_BACKLOG, 128).childOption(ChannelOption.SO_KEEPALIVE, true);
            // 绑定端口,开始接收进来的连接
            ChannelFuture future = sbs.bind(port).sync();

            System.out.println("Server start listen at " + port);
            future.channel().closeFuture().sync();
        } catch (Exception e) {
            bossGroup.shutdownGracefully();
            workerGroup.shutdownGracefully();
        }
    }

    public static void main(String[] args) throws Exception {
        int port;
        if (args.length > 0) {
            port = Integer.parseInt(args[0]);
        } else {
            port = 8080;
        }
        new HeartBeatServer(port).start();
    }

}
package com.lyncc.netty.idle;

import io.netty.channel.ChannelHandler;
import io.netty.channel.ChannelHandlerContext;
import io.netty.channel.ChannelInboundHandlerAdapter;
import io.netty.handler.timeout.IdleState;
import io.netty.handler.timeout.IdleStateEvent;


@ChannelHandler.Sharable
public class AcceptorIdleStateTrigger extends ChannelInboundHandlerAdapter {

    @Override
    public void userEventTriggered(ChannelHandlerContext ctx, Object evt) throws Exception {
        if (evt instanceof IdleStateEvent) {
            IdleState state = ((IdleStateEvent) evt).state();
            if (state == IdleState.READER_IDLE) {
                throw new Exception("idle exception");
            }
        } else {
            super.userEventTriggered(ctx, evt);
        }
    }
}
package com.lyncc.netty.idle;

import io.netty.channel.ChannelHandlerContext;
import io.netty.channel.ChannelInboundHandlerAdapter;

public class HeartBeatServerHandler extends ChannelInboundHandlerAdapter {


    @Override
    public void channelRead(ChannelHandlerContext ctx, Object msg) throws Exception {
        System.out.println("server channelRead..");
        System.out.println(ctx.channel().remoteAddress() + "->Server :" + msg.toString());
    }

    @Override
    public void exceptionCaught(ChannelHandlerContext ctx, Throwable cause) throws Exception {
        cause.printStackTrace();
        ctx.close();
    }

}
package netty.test.chapter14;

/**
 * Created by Administrator on 2016/9/22.
 */
/**
 *
 * 重连检测狗,当发现当前的链路不稳定关闭之后,进行12次重连
 */
import io.netty.bootstrap.Bootstrap;
import io.netty.channel.*;
import io.netty.channel.ChannelHandler.Sharable;
import io.netty.util.Timeout;
import io.netty.util.Timer;
import io.netty.util.TimerTask;

import java.util.concurrent.TimeUnit;
@Sharable
public abstract class ConnectionWatchdog extends ChannelInboundHandlerAdapter implements TimerTask ,ChannelHandlerHolder{


    private final Bootstrap bootstrap;
    private final Timer timer;
    private final int port;

    private final String host;

    private volatile boolean reconnect = true;
    private int attempts;


    public ConnectionWatchdog(Bootstrap bootstrap, Timer timer, int port,String host, boolean reconnect) {
        this.bootstrap = bootstrap;
        this.timer = timer;
        this.port = port;
        this.host = host;
        this.reconnect = reconnect;
    }

    /**
     * channel链路每次active的时候,将其连接的次数重新☞ 0
     */
    @Override
    public void channelActive(ChannelHandlerContext ctx) throws Exception {
        System.out.println("当前链路已经激活了,重连尝试次数重新置为0");
        attempts = 0;
        ctx.fireChannelActive();
    }

    @Override
    public void channelInactive(ChannelHandlerContext ctx) throws Exception {
        System.out.println("链接关闭");
        if(reconnect){
            System.out.println("链接关闭,将进行重连");
            if (attempts < 12) {
                attempts++;
            }           //重连的间隔时间会越来越长
            int timeout = 2 << attempts;
            timer.newTimeout(this, timeout, TimeUnit.MILLISECONDS);
        }
        ctx.fireChannelInactive();
    }

    public void run(Timeout timeout) throws Exception {
        ChannelFuture future;
        //bootstrap已经初始化好了,只需要将handler填入就可以了
        synchronized (bootstrap) {
            bootstrap.handler(new ChannelInitializer(){
                @Override
                protected void initChannel(Channel ch) throws Exception {
                    ch.pipeline().addLast(handlers());
                }
            });
            future = bootstrap.connect(host,port);
        }
         //future对象
         future.addListener(new ChannelFutureListener() {
             public void operationComplete(ChannelFuture f) throws Exception {
                 boolean succeed = f.isSuccess();
         //如果重连失败,则调用ChannelInactive方法,再次出发重连事件,一直尝试12次,如果失败则不再重连
                 if (!succeed) {
                     System.out.println("重连失败");
                     f.channel().pipeline().fireChannelInactive();
                 }else{
                     System.out.println("重连成功");
                 }
             }
         });
    }

}
稍微分析一下:
1)继承了 ChannelInboundHandlerAdapter,说明它也是Handler,也对,作为一个检测对象,肯定会放在链路中,否则怎么检测
2)实现了2个接口, TimeTask, ChannelHandlerHolder
①TimeTask,我们就要写 run方法,这应该是一个定时任务,这个定时任务做的事情应该是 重连的工作
②ChannelHandlerHolder的接口,这个接口我们刚才说过是维护的所有的Handlers,因为在重连的时候需要获取Handlers
3)bootstrap对象,重连的时候依旧需要这个对象
4)当链路断开的时候会触发 channelInactive这个方法,也就说触发重连的导火索是从这边开始的
6. HeartBeatsClient
package com.lyncc.netty.idle;

import io.netty.bootstrap.Bootstrap;
import io.netty.channel.Channel;
import io.netty.channel.ChannelFuture;
import io.netty.channel.ChannelHandler;
import io.netty.channel.ChannelInitializer;
import io.netty.channel.EventLoopGroup;
import io.netty.channel.nio.NioEventLoopGroup;
import io.netty.channel.socket.nio.NioSocketChannel;
import io.netty.handler.codec.string.StringDecoder;
import io.netty.handler.codec.string.StringEncoder;
import io.netty.handler.logging.LogLevel;
import io.netty.handler.logging.LoggingHandler;
import io.netty.handler.timeout.IdleStateHandler;
import io.netty.util.HashedWheelTimer;

import java.util.concurrent.TimeUnit;

public class HeartBeatsClient {

    protected final HashedWheelTimer timer = new HashedWheelTimer();

    private Bootstrap boot;

    private final ConnectorIdleStateTrigger idleStateTrigger = new ConnectorIdleStateTrigger();

    public void connect(int port, String host) throws Exception {

        EventLoopGroup group = new NioEventLoopGroup();

        boot = new Bootstrap();
        boot.group(group).channel(NioSocketChannel.class).handler(new LoggingHandler(LogLevel.INFO));

        final ConnectionWatchdog watchdog = new ConnectionWatchdog(boot, timer, port,host, true) {

                public ChannelHandler[] handlers() {
                    return new ChannelHandler[] {
                            this,
                            new IdleStateHandler(0, 4, 0, TimeUnit.SECONDS),
                            idleStateTrigger,
                            new StringDecoder(),
                            new StringEncoder(),
                            new HeartBeatClientHandler()
                    };
                }
            };

            ChannelFuture future;
            //进行连接
            try {
                synchronized (boot) {
                    boot.handler(new ChannelInitializer() {

                        //初始化channel
                        @Override
                        protected void initChannel(Channel ch) throws Exception {
                            ch.pipeline().addLast(watchdog.handlers());
                        }
                    });

                    future = boot.connect(host,port);
                }

                // 以下代码在synchronized同步块外面是安全的
                future.sync();
            } catch (Throwable t) {
                throw new Exception("connects to  fails", t);
            }
    }

    /**
     * @param args
     * @throws Exception
     */
    public static void main(String[] args) throws Exception {
        int port = 8080;
        if (args != null && args.length > 0) {
            try {
                port = Integer.valueOf(args[0]);
            } catch (NumberFormatException e) {
                // 采用默认值
            }
        }
        new HeartBeatsClient().connect(port, "127.0.0.1");
    }

} 1)创建了ConnectionWatchdog对象,自然要实现handlers方法
2)初始化好bootstrap对象
3)4秒内没有写操作,进行心跳触发,也就是 IdleStateHandler这个方法
7. ConnectorIdleStateTrigger
package com.lyncc.netty.idle;

import io.netty.buffer.ByteBuf;
import io.netty.buffer.Unpooled;
import io.netty.channel.ChannelHandler.Sharable;
import io.netty.channel.ChannelHandlerContext;
import io.netty.channel.ChannelInboundHandlerAdapter;
import io.netty.handler.timeout.IdleState;
import io.netty.handler.timeout.IdleStateEvent;
import io.netty.util.CharsetUtil;

@Sharable
public class ConnectorIdleStateTrigger extends ChannelInboundHandlerAdapter {

    private static final ByteBuf HEARTBEAT_SEQUENCE = Unpooled.unreleasableBuffer(Unpooled.copiedBuffer("Heartbeat", CharsetUtil.UTF_8));

    @Override
    public void userEventTriggered(ChannelHandlerContext ctx, Object evt) throws Exception {
        if (evt instanceof IdleStateEvent) {
            IdleState state = ((IdleStateEvent) evt).state();
            if (state == IdleState.WRITER_IDLE) {
                // write heartbeat to server
                ctx.writeAndFlush(HEARTBEAT_SEQUENCE.duplicate());
            }
        } else {
            super.userEventTriggered(ctx, evt);
        }
    }
}
此处由于示例只需要使用一个带信息的包在"WRITER_IDLE"状态下发送心跳而已,对于内容没有要求,因此使用了
private static final ByteBuf HEARTBEAT_SEQUENCE = Unpooled.unreleasableBuffer(Unpooled.copiedBuffer("Heartbeat", CharsetUtil.UTF_8)); +--------+-----+---------------+
| Length |Type | Content |
| 17 | 1 |"HELLO, WORLD" |
+--------+-----+---------------+ if (byteBuf.getByte(4) == PING_MSG) {
// throwHeartbeatMsg(context);
}package com.lyncc.netty.idle;
import io.netty.channel.ChannelHandler.Sharable;
import io.netty.channel.ChannelHandlerContext;
import io.netty.channel.ChannelInboundHandlerAdapter;
import io.netty.util.ReferenceCountUtil;
import java.util.Date;
@Sharable
public class HeartBeatClientHandler extends ChannelInboundHandlerAdapter {
@Override
public void channelActive(ChannelHandlerContext ctx) throws Exception {
System.out.println("激活时间是:"+new Date());
System.out.println("HeartBeatClientHandler channelActive");
ctx.fireChannelActive();
}
@Override
public void channelInactive(ChannelHandlerContext ctx) throws Exception {
System.out.println("停止时间是:"+new Date());
System.out.println("HeartBeatClientHandler channelInactive");
}
@Override
public void channelRead(ChannelHandlerContext ctx, Object msg) throws Exception {
String message = (String) msg;
System.out.println(message);
if (message.equals("Heartbeat")) {
ctx.write("has read message from server");
ctx.flush();
}
ReferenceCountUtil.release(msg);
}
} 
