jersey学习笔记1-简单的例子
环境准备
JDK
JDK需要1.6及1.6以上的版本,作者使用1.7.0_80版本,安装过程不描述。
Maven
安装当前最新的版本:3.3.9,安装过程不描述,参考作者另外的博客《maven学习》系统。
IDE
开发工具选择myeclipse2014版本,安装过程不描述,参考作者的《Myeclipse2014安装及破解》。
创建服务
从maven原型创建项目
mvn archetype:generate -DarchetypeArtifactId=jersey-quickstart-grizzly2 -DarchetypeGroupId=org.glassfish.jersey.archetypes -DinteractiveMode=false -DgroupId=com.example -DartifactId=simple-service -Dpackage=com.example -DarchetypeVersion=2.9
执行上面的mvn语句,从中央仓库取一个已经编译好的jersey项目。
测试项目可用性
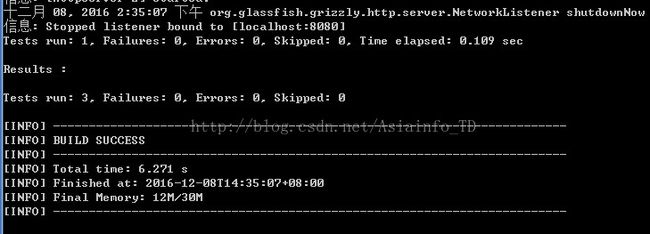
在项目目录下运行mvn clean test,运行不报错。
项目分析
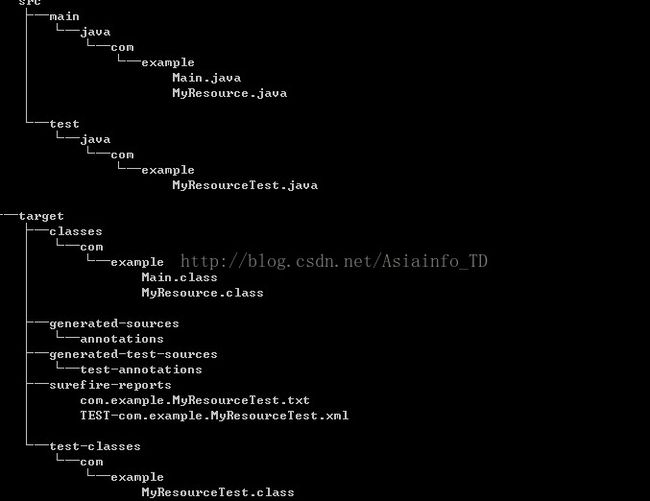
在项目根目录下执行tree /f,可以看到simple-service的目录结构,对开发者有用的代码只有Main.java,MyResource.java的测试代码MyReourceTest.java。
资源类分析
按web开发中典型的三层逻辑,资料类位于逻辑分层的最高层-API层,相当于servlet、action、controller,其下为service层和dao层,API层对外发布接口,对于Rest应用,API层的资料类用于对外公布接口。其下的两层和标准的web区别不大。
例子中的MyResource类代码如下:
@Path("myresource")
public class MyResource {
/**
* Method handling HTTP GET requests. The returned object will be sent
* to the client as "text/plain" media type.
*
* @return String that will be returned as a text/plain response.
*/
@GET
@Produces(MediaType.TEXT_PLAIN)
public String getIt() {
return "Got it!";
}
}
关注点:@Path("myresource"),资料路径。@GET,资源方法。 @Produces(MediaType.TEXT_PLAIN),传输格式。
这个服务对外公布的API就为:http 服务路径/resr服务名称/myresource
入口类分析
public class Main {
public static final String BASE_URI = "http://localhost:8080/myapp/";
public static HttpServer startServer() {
final ResourceConfig rc = new ResourceConfig().packages("com.example");
return GrizzlyHttpServerFactory.createHttpServer(URI.create(BASE_URI), rc);
}
/**
* Main method.
* @param args
* @throws IOException
*/
public static void main(String[] args) throws IOException {
final HttpServer server = startServer();
System.out.println(String.format("Jersey app started with WADL available at "
+ "%sapplication.wadl\nHit enter to stop it...", BASE_URI));
System.in.read();
server.stop();
}
}
解读:public static final String BASE_URI = "http://localhost:8080/myapp/"; 服务路径
final ResourceConfig rc = new ResourceConfig().packages("com.example");加载资源类
return GrizzlyHttpServerFactory.createHttpServer(URI.create(BASE_URI), rc);创建服务器
测试类分析
public class MyResourceTest {private HttpServer server;
private WebTarget target;
@Before
public void setUp() throws Exception {
server = Main.startServer();
Client c = ClientBuilder.newClient();
target = c.target(Main.BASE_URI);
}
@After
public void tearDown() throws Exception {
server.stop();
}
/**
* Test to see that the message "Got it!" is sent in the response.
*/
@Test
public void testGetIt() {
String responseMsg = target.path("myresource").request().get(String.class);
assertEquals("Got it!", responseMsg);
}
}
关注点:
private HttpServer server;
private WebTarget target;全局字段
server = Main.startServer();
Client c = ClientBuilder.newClient();
target = c.target(Main.BASE_URI);准备测试环境
server.stop();释放测试环境
String responseMsg = target.path("myresource").request().get(String.class);
assertEquals("Got it!", responseMsg);测试
扩展服务
将simple-service工程导入到myeclipse中,方便开发。
新建一个实体类:Device
@XmlRootElement(name="device")
public class Device {
private String deviceIp;
private int deviceStatus;
@XmlAttribute
public String getDeviceIp() {
return deviceIp;
}
public void setDeviceIp(String deviceIp) {
this.deviceIp = deviceIp;
}
@XmlAttribute
public int getDeviceStatus() {
return deviceStatus;
}
public void setDeviceStatus(int deviceStatus) {
this.deviceStatus = deviceStatus;
}
@Override
public boolean equals(Object obj) {
if (null == obj)
return false;
if (obj == this)
return true;
if (getClass() != obj.getClass())
return false;
Device device = (Device) obj;
if (device.getDeviceIp() == null)
return false;
if (device.getDeviceIp().equals(this.getDeviceIp()))
return true;
else
return false;
}
}
关注点1:@XmlRootElement(name="device") jaxb根元素
关注点2:@XmlAttribute jaxb属性
jersey内部使用JAXb处理Java类和xml格式的信息、JSON格式的映射关系,JAXB通过POJO中定义的xml注解将其与xml格式的信息对应起来。
新建一个资源类:DeviceResource
@Path("device")
public class DeviceResource {
private final IDeviceDao iDeviceDao;
public DeviceResource() {
iDeviceDao = new DeviceDaoImpl();
}
@GET
@Produces({ MediaType.APPLICATION_JSON, MediaType.APPLICATION_XML })
public Device get(@QueryParam("ip") final String deviceIp) {
Device result = null;
if (deviceIp != null) {
result = iDeviceDao.getDevice(deviceIp);
}
return result;
}
@PUT
@Produces({ MediaType.APPLICATION_JSON, MediaType.APPLICATION_XML })
public Device get(final Device device) {
Device result = null;
if (device != null) {
result = iDeviceDao.updateDevice(device);
}
return result;
}
}
关注点1:@Path("device") 资源路路径
关注点2:@Produces({ MediaType.APPLICATION_JSON, MediaType.APPLICATION_XML }) 格式可以是JSON或者XML
关注点3:public Device get(@QueryParam("ip") final String deviceIp)
跟@pathparam不同,@queryparam中,指定的是URL中的参数是以键值对的形式出现的,如本例子中: /device?ip=1,而@pathparem中,URL中只出现参数的值,不出现 键值对在本例子中 /device/1
关注点4:@GET、@PUT,分别处理get和put请求。
新建一个Dao类:DeviceResource
定义静态map作为内存级别的持久化。public class DeviceDaoImpl implements IDeviceDao {
private static ConcurrentHashMap
static {
fakeDB.put("10.95.236.185", new Device("10.95.236.185", 1));
fakeDB.put("10.95.236.186", new Device("10.95.236.186", 1));
fakeDB.put("10.95.236.187", new Device("10.95.236.187", 1));
}
/*
* (non-Javadoc)
*
* @see com.example.IDeviceDao#getDevice(java.lang.String)
*/
@Override
public Device getDevice(String deviceIp) {
// TODO Auto-generated method stub
return fakeDB.get(deviceIp);
}
/*
* (non-Javadoc)
*
* @see com.example.IDeviceDao#updateDevice(java.lang.String)
*/
@Override
public Device updateDevice(Device device) {
// TODO Auto-generated method stub
String ip = device.getDeviceIp();
fakeDB.put(ip, new Device(ip, 1));
return fakeDB.get(ip);
}
}
新建一个junit框架的测试类:DeviceResourceTest
public class DeviceResourceTest {
private HttpServer server;
private WebTarget target;
/**
* @throws java.lang.Exception
*/
@BeforeClass
public static void setUpBeforeClass() throws Exception {
}
/**
* @throws java.lang.Exception
*/
@Before
public void setUp() throws Exception {
server = Main.startServer();
Client c = ClientBuilder.newClient();
target = c.target(Main.BASE_URI);
}
/**
* @throws java.lang.Exception
*/
@After
public void tearDown() throws Exception {
server.shutdownNow();
}
/**
* Test method for {@link com.example.DeviceResource#get(java.lang.String)}.
*/
@Test
public void testGetString() {
final String testIp = "10.95.236.186";
final Device device = target.path("device").queryParam("ip", testIp).request().get(Device.class);
assertEquals(testIp, device.getDeviceIp());
}
/**
* Test method for
* {@link com.example.DeviceResource#get(com.example.Device)}.
*/
@Test
public void testGetDevice() {
final Device device = new Device("10.95.236.189", 1);
Entity
final Device result = target.path("device").request().put(entity, Device.class);
assertEquals(1, result.getDeviceStatus());
}
}
关注点1:target.path("device").queryParam("ip", testIp).request().get(Device.class); targer传递了一个字符串参数ip。
关注点2:target.path("device").request().put(entity, Device.class);targer传递一个device对象。
在控制台输入"mvn clean test ",断言成功,则表示本次demo开发成功。
启动服务
1、运行main.java
2、在浏览器中输入:http://localhost:8080/myapp/application.wadl,能正常访问则表示服务启动成功
3、在浏览器中输入:http://localhost:8080/myapp/device?ip=10.95.236.186,返回


