- Vue3+Echarts 绘制省会地图
OPQ迷路的羔羊
echarts前端javascriptvue.js
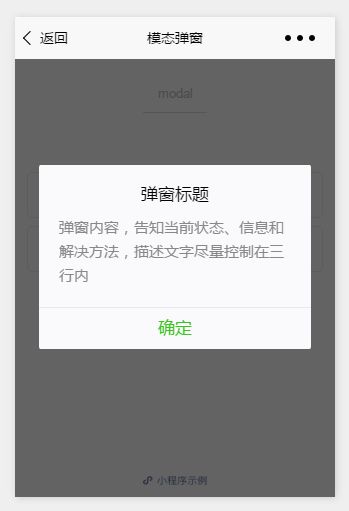
Vue3+Echarts绘制省会地图需求:绘制XX省会地图(背景颜色,边框颜色都可自定义,有相应代码注释)鼠标点击XX市区,区域变红色,再次点击,恢复默认蓝色鼠标移入XX市区,区域变橘色,鼠标移开,恢复默认蓝色效果图如下:在这里插入图片描述实现:1.前往https://datav.aliyun.com/portal/school/atlas/area_selector2.输入具体省份,然后复制JS
- YOLOv8重磅升级:引入DenseOne密集网络革新主干设计,重塑YOLO目标检测性能新高度
程序员杨弋
YOLO目标检测人工智能
随着深度学习技术的不断进步,目标检测作为计算机视觉领域的重要任务之一,其性能和应用范围也在不断扩大。作为目标检测领域的佼佼者,YOLO(YouOnlyLookOnce)系列算法以其出色的性能和实时性受到了广泛关注。而最近提出的YOLOv8更是在前代版本的基础上进行了多项优化,进一步提升了检测精度和速度。然而,尽管YOLOv8已经取得了显著的进步,但在处理复杂场景和遮挡问题时,仍然存在一定的挑战。为
- 0458-基于单片机的输液监测系统设计
电子开发圈
MCU51系统设计单片机嵌入式硬件
功能描述1、采用51/52单片机作为主控芯片;2、采用红外槽式传感器检测液滴速度;3、采用LCD1602显示:液滴速度(p/min)、液滴计数值;4、可通过按键设置液滴异常报警阈值(即连续无液滴时长);5、当输液出现异常时进行声光报警。电路设计采用AltiumDesigner作为电路设计工具。AltiumDesigner通过把原理图设计、PCB绘制编辑、拓扑逻辑自动布线、信号完整性分析和设计输出等
- python爬虫scrapy爬取新闻标题及链接_18Python爬虫---CrawlSpider自动爬取新浪新闻网页标题和链接...
珍妮赵
一、爬取新浪新闻思路1、创建scrapy项目2、分析新浪新闻网站静态页面代码3、编写对应的xpath公式4、写代码二、项目代码步骤1、创建scrapy项目scrapystartprojectmycwpjt步骤2、分析新浪网站静态代码随便打开一个新浪新闻网,新闻可以看到地址为http://news.sina.com.cn/gov/xlxw/2018-03-21/doc-ifyskeue0491622
- python图片分析中央气象台降水量预报_全国天气降水量预报图数据接口
周美灵是我大姐头
全国天气降水量预报图接口免费在线测试此接口(需要登录)接口每两小时更新一次,一天调取1-2次即可,返回3张图:24、48、72小时,请勿频繁调用!。请求方式及url:请求方式:GET接口地址:https://tianqiapi.com/api请求示例https://tianqiapi.com/api?version=v8&appid=&appsecret=请求参数说明:参数名必选类型说明备注(示例
- 通过付款码来区分是属于支付宝、微信
笑醉踏歌行
微信
微信支付码规则:18位纯数字,以10、11、12、13、14、15开头支付宝支付码规则:25-30开头的长度为16~24位的数字,实际字符串长度以开发者获取的付款码长度为准
- NAT类型的判断(RFC3489)
tzhlovesakura
网络协议网络
一、NAT网络分为4大类型:1、FullConeNAT(完全锥形):所有内网的IP和端口的请求,都会被映射成同一个外网IP和端口,并且任何一个外网主机都可以通过这个映射的外网IP和端口号向这台内网主机发送包。2、RestrictedConeNAT(限制锥形):所有内网的IP和端口的请求,都会被映射成同一个外网IP和端口,但是只有内网主动通讯过的外网主机可访问内网主机。3、PortRestricte
- linux 安装jupyter教程 自定义配置 jupyter忘记密码重置密码
0x8g1T9E
dockerpythonDMMLDL
第一步检查Python环境python-V第二步通过pip安装jupyterpipinstalljupyter 第三步生成jupyter配置文件#root客户:jupyternotebook--generate-config--allow-root#非root客户jupyternotebook--generate-config值得一提的是:windows环境下,并没有jupyter_noteboo
- 【YOLOv8改进- Backbone主干】YOLOv8更换主干网络之ConvNexts,纯卷积神经网络,更快更准,,降低参数量!
YOLO大师
YOLO网络cnn目标检测论文阅读yolov8
YOLOv8目标检测创新改进与实战案例专栏专栏目录:YOLOv8有效改进系列及项目实战目录包含卷积,主干注意力,检测头等创新机制以及各种目标检测分割项目实战案例专栏链接:YOLOv8基础解析+创新改进+实战案例介绍摘要视觉识别的“咆哮20年代”开始于视觉Transformer(ViTs)的引入,ViTs迅速取代了卷积神经网络(ConvNets)成为最先进的图像分类模型。然而,普通的ViT在应用于诸
- matlab代码实现了一个关节型六轴机械臂的仿真
max500600
MATLAB算法开发语言matlab算法人工智能
%%基于MATLAB的关节型六轴机械臂仿真%%参数定义clear;closeall;clc;%角度转换angle=pi/180;%转化为角度制%D-H参数表theta1=0;D1=0.4;A1=0.025;alpha1=pi/2;offset1=0;theta2=pi/2;D2=0;A2=0.56;alpha2=0;offset2=0;theta3=0;D3=0;A3=0.035;alpha3=p
- C语言进阶——通讯录模拟实现
_麦麦_
C语言进阶c语言算法开发语言
个人主页:_麦麦_今日名言:只有走在路上,才能摆脱局限,摆脱执着,让所有的选择,探寻,猜测,想象都生机勃勃。——余秋雨《文化苦旅》目录一、前言二、正文1.大体框架2.界面显示3.创建通讯录4.初始化通讯录5.增加联系人6.显示联系人7.删除联系人8.查找联系人9.修改联系人10.排序联系人三、结语一、前言在上一章的结构体的学习中,相信小伙伴们或多或少都有所收获,但是有的小伙伴可能会问,结构体到底能
- 拿下美赛M奖之必备软件和网站!
东方建模.
数学建模
目录前言:一.题目翻译与理解:DeepL+知云文献翻译二.查找文献:国内外平台结合使用三.论文撰写:Word或LaTeX+Overleaf四.公式输入与思维导图:MathType+XMind五.阅读文献与文献管理:AdobeReader+Zotero六.模型求解与编程:MATLAB+Python+Lingo七.图形绘制与结果可视化:MATLAB+Python+Origin八.流程图与示意图:亿图图
- 单片机实物成品-010 智能宠物喂食系统(代码+硬件+论文)
学个单片机
单片机实物成品单片机宠物嵌入式硬件
项目介绍版本1:oled显示+定时投喂(舵机模拟)+声光报警+显示实时时间---演示视频:智能宠物喂食001_哔哩哔哩_bilibili1.STM32F103C8T6单片机进行数据处理2.OLED液晶显示3,按键1在数据显示界面时按下按键1切换下一个界面,在校准时间界面时按下按键1退出校准时间界面,在设置定时时间界面中如果是处于设置某个时间的状态按下按键1退出否则切换下一个页面。4.按键2数据显示
- 基于深度学习的人脸表情识别系统:YOLOv5 + YOLOv8 + YOLOv10 + UI界面 + 数据集
2025年数学建模美赛
深度学习YOLOui分类人工智能
引言随着人工智能的飞速发展,深度学习技术已广泛应用于各个领域,尤其是在计算机视觉领域。人脸识别和表情识别是其中的一个重要应用,能够在多种场景下提供重要的信息,例如安全监控、情感分析、智能客服、健康监测等。在人脸表情识别任务中,准确识别人脸的情感状态(如高兴、愤怒、悲伤等)是一个极具挑战性的任务。随着YOLO系列算法的不断进步,YOLOv5、YOLOv8和YOLOv10的推出大大提高了目标检测的精度
- 基于YOLOv8深度学习的人脸年龄检测识别系统
2025年数学建模美赛
YOLO深度学习人工智能ui数据挖掘分类
引言随着人工智能和计算机视觉的飞速发展,人脸分析技术在年龄检测领域取得了显著进展。人脸年龄检测系统在安全监控、广告推荐、健康监测等领域有广泛应用。本文将基于YOLOv8目标检测模型和UI界面,开发一个完整的人脸年龄检测识别系统。我们将详细介绍项目的技术实现、数据集构建、模型训练以及UI设计,并附上完整代码。目录引言系统架构设计数据准备公开人脸年龄数据集数据标注格式数据目录结构模型训练YOLOv8环
- 基于深度学习的人脸表情识别系统:YOLOv8 + UI界面 + 数据集完整实现
2025年数学建模美赛
深度学习YOLOui人工智能代码
1.引言近年来,人脸表情识别在情感计算、智能人机交互、心理学研究等领域有着广泛的应用。深度学习的快速发展,使得高效、准确的人脸表情识别成为可能。通过利用卷积神经网络(CNN)和目标检测技术,可以实现实时、精准的人脸表情识别。本文将基于YOLOv8构建一个完整的人脸表情识别系统。系统集成了数据集准备、YOLOv8模型训练、实时推理以及基于PyQt5的图形用户界面(UI)。通过本文,你将学习如何实现一
- VSLAM技术实现机器人在不同场景下的精准导航、避障
向阳而生|X
自主导航python计算机视觉
链接:https://developer.orbbec.com.cn/forum_plate_module_details.html?id=998
- 我的秋招总结
今天不coding
秋招秋招总结大厂秋招建议秋招准备
我的秋招总结个人背景双非本,985硕,科班准备情况以求职为目的学习Java的时间大概一年。八股,一开始主要是看B站黑马的八股文课程,背JavaGuide和小林coding还有面试鸭。算法,250+,刷了3遍左右项目,API开放平台+OJ在线判题系统+实习项目(检索+大模型)实习,华为线上算法实习4个月,小厂Java实习5个月,滴滴后端实习9个月offer京东零售-供应链sp美团到家-履约sp快手-
- PostgreSQL 语法
lly202406
开发语言
PostgreSQL是一个功能强大的开源关系型数据库管理系统,它具有高度的可扩展性、稳定性和安全性,适用于各种规模的应用场景。以下是关于PostgreSQL语法的一些重要信息:数据库连接:使用psql命令可以连接到PostgreSQL数据库。连接时需要指定服务器地址、端口、用户名和数据库名称。例如:psql-h127.0.0.1-Udbuser-p5832-ddatabase【1†source】。
- ubuntu 22.04(arm64)环境安装zabbix6.4.4
gaodi2002
ubuntulinux运维服务器
参考https://www.zabbix.com/download?zabbix=6.0&os_distribution=ubuntu_arm64&os_version=22.04&components=server_frontend_agent&db=mysql&ws=apache在arm环境需要部署zabbix6,尝试过centos7编译、centos8编译、docker部署,都不是想要的结果
- python+playwright自动化测试(三):事件等待机制
觅远
自动化测试pythonpython开发语言自动化
目录goto设置等待强制等待wait_for_timeoutwait_forwait_for_selectorwait_for_load_statewait_for_urlwait_for_eventwait_for_functionplaywright中的timeout默认为30s,timeout=30000,有时需要根据具体情况进行自定义调整。goto设置等待page.goto('https:
- 【YashanDB知识库】YashanDB获取统计信息
数据库
本文内容来自YashanDB官网,原文内容请见https://www.yashandb.com/newsinfo/7106885.html?templateId=171...在测试环境重现生产环境SQL语句执行计划问题时,需要使用生产环境相关表的统计信息模拟。“变更产生风险”,更新统计信息之后,有些SQL语句的执行计划可能改变,可能变好,也可能变差,纠正SQL语句执行计划比较有效的手段之一是回退统
- 一篇文章让你学会Java之数组的定义和初始化
凭君语未可
Javajava开发语言
数组的定义和初始化一、数组的定义方式一:数组类型+方括号+数组变量名方式二:数组类型+数组变量名+方括号方式三:定义数组并初始化大小二、数组的初始化1.静态初始化1.1无需指定数组大小1.2指定数组大小但初始化元素2.动态初始化2.1定义数组并初始化大小2.2数组大小和元素值的关系三、二维数组的定义和初始化1.定义二维数组2.动态初始化二维数组3.静态初始化二维数组总结一、数组的定义在Java中,
- Linux中yum问题
xin-zfyyz
linux运维服务器
出现错误Loadedplugins:fastestmirrorLoadingmirrorspeedsfromcachedhostfileCouldnotretrievemirrorlisthttp://mirrorlist.centos.org/?release=7&arch=x86_64&repo=os&infra=stockerrorwas14:curl#6-"Couldnotresolveh
- springMVC---resultful风格
sin2201
springMVCmvc
目录一、创建项目pom.xml二、配置文件1.web.xml2.spring-mvc.xml三、图解四、controller一、创建项目pom.xml4.0.0com.qcbyspringMVC141.0-SNAPSHOTwar88UTF-85.0.2.RELEASEorg.springframeworkspring-context${spring.version}org.springframew
- 第81期 | GPTSecurity周报
aigc网络安全
GPTSecurity是一个涵盖了前沿学术研究和实践经验分享的社区,集成了生成预训练Transformer(GPT)、人工智能生成内容(AIGC)以及大语言模型(LLM)等安全领域应用的知识。在这里,您可以找到关于GPT/AIGC/LLM最新的研究论文、博客文章、实用的工具和预设指令(Prompts)。现为了更好地知悉近一周的贡献内容,现总结如下。SecurityPapers1.大语言模型与代码安
- 云原生周刊:Docker 的替代方案
云计算
开源项目推荐DitoDito是一个用Go语言编写的高级Layer7反向代理服务器,提供灵活的中间件支持、后端连接的自定义证书处理、动态配置重载,以及与Redis的分布式缓存和速率限制功能。其主要特性包括高效处理HTTP和HTTPS请求、支持WebSocket代理、动态配置热重载、分布式速率限制和缓存、以及自定义TLS证书管理等。Dito的设计注重灵活性和可扩展性,允许用户根据自身需求进行定制,满足
- 踏上 C++ 编程之旅:开篇之作
珹洺
#C++C++分栏c++开发语言
踏上C++编程之旅:开篇之作在计算机编程的广袤天地中,C++宛如一座巍峨的高峰,吸引着无数开发者攀登探索。今天,就让我们一同开启这段充满挑战与惊喜的C++编程之旅,在代码的世界里开辟属于自己的道路。一、为什么选择C++C++作为一门强大的编程语言,有着深厚的历史底蕴和广泛的应用场景。它诞生于上世纪80年代,由BjarneStroustrup博士开发,最初是为了给C语言添加面向对象的特性,后来逐渐发
- P1824 进击的奶牛
zty郑桐羽呀
洛谷算法开发语言数据结构zty二分查找c++
前言今天zty带来的是P1824进击的奶牛,大家给个赞呗,zty还要上学,发作品会少一点先赞后看养成习惯先赞后看养成习惯演示用编译器及其标准DevC++6.7.5RedpandaC++14正文进击的奶牛题目描述FarmerJohn建造了一个有NNN(2≤N≤1052\leqN\leq10^52≤N≤105)个隔间的牛棚,这些隔间分布在一条直线上,坐标是x1,x2,⋯ ,xNx_1,x_2,\cdo
- 议题征集 | 2024 广州站 Meetup 即将开启!
云计算
2024年,KubeSphere社区已陆续在北京、上海、深圳、杭州、成都等五座城市成功举办线下Meetup。今年的收官之站,我们将相约广州!广州的小伙伴们,KubeSphere社区盛会即将到来,千万别错过!目前活动议题征集通道已经开启,欢迎各位技术大咖及云原生爱好者踊跃投稿,共同分享技术洞见和实践经验!活动信息时间:2024年12月28日(周六)地点:广东省广州市海珠区鼎新路88号广州阿里中心(风
- Spring中@Value注解,需要注意的地方
无量
springbean@Valuexml
Spring 3以后,支持@Value注解的方式获取properties文件中的配置值,简化了读取配置文件的复杂操作
1、在applicationContext.xml文件(或引用文件中)中配置properties文件
<bean id="appProperty"
class="org.springframework.beans.fac
- mongoDB 分片
开窍的石头
mongodb
mongoDB的分片。要mongos查询数据时候 先查询configsvr看数据在那台shard上,configsvr上边放的是metar信息,指的是那条数据在那个片上。由此可以看出mongo在做分片的时候咱们至少要有一个configsvr,和两个以上的shard(片)信息。
第一步启动两台以上的mongo服务
&nb
- OVER(PARTITION BY)函数用法
0624chenhong
oracle
这篇写得很好,引自
http://www.cnblogs.com/lanzi/archive/2010/10/26/1861338.html
OVER(PARTITION BY)函数用法
2010年10月26日
OVER(PARTITION BY)函数介绍
开窗函数 &nb
- Android开发中,ADB server didn't ACK 解决方法
一炮送你回车库
Android开发
首先通知:凡是安装360、豌豆荚、腾讯管家的全部卸载,然后再尝试。
一直没搞明白这个问题咋出现的,但今天看到一个方法,搞定了!原来是豌豆荚占用了 5037 端口导致。
参见原文章:一个豌豆荚引发的血案——关于ADB server didn't ACK的问题
简单来讲,首先将Windows任务进程中的豌豆荚干掉,如果还是不行,再继续按下列步骤排查。
&nb
- canvas中的像素绘制问题
换个号韩国红果果
JavaScriptcanvas
pixl的绘制,1.如果绘制点正处于相邻像素交叉线,绘制x像素的线宽,则从交叉线分别向前向后绘制x/2个像素,如果x/2是整数,则刚好填满x个像素,如果是小数,则先把整数格填满,再去绘制剩下的小数部分,绘制时,是将小数部分的颜色用来除以一个像素的宽度,颜色会变淡。所以要用整数坐标来画的话(即绘制点正处于相邻像素交叉线时),线宽必须是2的整数倍。否则会出现不饱满的像素。
2.如果绘制点为一个像素的
- 编码乱码问题
灵静志远
javajvmjsp编码
1、JVM中单个字符占用的字节长度跟编码方式有关,而默认编码方式又跟平台是一一对应的或说平台决定了默认字符编码方式;2、对于单个字符:ISO-8859-1单字节编码,GBK双字节编码,UTF-8三字节编码;因此中文平台(中文平台默认字符集编码GBK)下一个中文字符占2个字节,而英文平台(英文平台默认字符集编码Cp1252(类似于ISO-8859-1))。
3、getBytes()、getByte
- java 求几个月后的日期
darkranger
calendargetinstance
Date plandate = planDate.toDate();
SimpleDateFormat df = new SimpleDateFormat("yyyy-MM-dd");
Calendar cal = Calendar.getInstance();
cal.setTime(plandate);
// 取得三个月后时间
cal.add(Calendar.M
- 数据库设计的三大范式(通俗易懂)
aijuans
数据库复习
关系数据库中的关系必须满足一定的要求。满足不同程度要求的为不同范式。数据库的设计范式是数据库设计所需要满足的规范。只有理解数据库的设计范式,才能设计出高效率、优雅的数据库,否则可能会设计出错误的数据库.
目前,主要有六种范式:第一范式、第二范式、第三范式、BC范式、第四范式和第五范式。满足最低要求的叫第一范式,简称1NF。在第一范式基础上进一步满足一些要求的为第二范式,简称2NF。其余依此类推。
- 想学工作流怎么入手
atongyeye
jbpm
工作流在工作中变得越来越重要,很多朋友想学工作流却不知如何入手。 很多朋友习惯性的这看一点,那了解一点,既不系统,也容易半途而废。好比学武功,最好的办法是有一本武功秘籍。研究明白,则犹如打通任督二脉。
系统学习工作流,很重要的一本书《JBPM工作流开发指南》。
本人苦苦学习两个月,基本上可以解决大部分流程问题。整理一下学习思路,有兴趣的朋友可以参考下。
1 首先要
- Context和SQLiteOpenHelper创建数据库
百合不是茶
androidContext创建数据库
一直以为安卓数据库的创建就是使用SQLiteOpenHelper创建,但是最近在android的一本书上看到了Context也可以创建数据库,下面我们一起分析这两种方式创建数据库的方式和区别,重点在SQLiteOpenHelper
一:SQLiteOpenHelper创建数据库:
1,SQLi
- 浅谈group by和distinct
bijian1013
oracle数据库group bydistinct
group by和distinct只了去重意义一样,但是group by应用范围更广泛些,如分组汇总或者从聚合函数里筛选数据等。
譬如:统计每id数并且只显示数大于3
select id ,count(id) from ta
- vi opertion
征客丶
macoprationvi
进入 command mode (命令行模式)
按 esc 键
再按 shift + 冒号
注:以下命令中 带 $ 【在命令行模式下进行】,不带 $ 【在非命令行模式下进行】
一、文件操作
1.1、强制退出不保存
$ q!
1.2、保存
$ w
1.3、保存并退出
$ wq
1.4、刷新或重新加载已打开的文件
$ e
二、光标移动
2.1、跳到指定行
数字
- 【Spark十四】深入Spark RDD第三部分RDD基本API
bit1129
spark
对于K/V类型的RDD,如下操作是什么含义?
val rdd = sc.parallelize(List(("A",3),("C",6),("A",1),("B",5))
rdd.reduceByKey(_+_).collect
reduceByKey在这里的操作,是把
- java类加载机制
BlueSkator
java虚拟机
java类加载机制
1.java类加载器的树状结构
引导类加载器
^
|
扩展类加载器
^
|
系统类加载器
java使用代理模式来完成类加载,java的类加载器也有类似于继承的关系,引导类是最顶层的加载器,它是所有类的根加载器,它负责加载java核心库。当一个类加载器接到装载类到虚拟机的请求时,通常会代理给父类加载器,若已经是根加载器了,就自己完成加载。
虚拟机区分一个Cla
- 动态添加文本框
BreakingBad
文本框
<script> var num=1; function AddInput() { var str=""; str+="<input
- 读《研磨设计模式》-代码笔记-单例模式
bylijinnan
java设计模式
声明: 本文只为方便我个人查阅和理解,详细的分析以及源代码请移步 原作者的博客http://chjavach.iteye.com/
public class Singleton {
}
/*
* 懒汉模式。注意,getInstance如果在多线程环境中调用,需要加上synchronized,否则存在线程不安全问题
*/
class LazySingleton
- iOS应用打包发布常见问题
chenhbc
iosiOS发布iOS上传iOS打包
这个月公司安排我一个人做iOS客户端开发,由于急着用,我先发布一个版本,由于第一次发布iOS应用,期间出了不少问题,记录于此。
1、使用Application Loader 发布时报错:Communication error.please use diagnostic mode to check connectivity.you need to have outbound acc
- 工作流复杂拓扑结构处理新思路
comsci
设计模式工作算法企业应用OO
我们走的设计路线和国外的产品不太一样,不一样在哪里呢? 国外的流程的设计思路是通过事先定义一整套规则(类似XPDL)来约束和控制流程图的复杂度(我对国外的产品了解不够多,仅仅是在有限的了解程度上面提出这样的看法),从而避免在流程引擎中处理这些复杂的图的问题,而我们却没有通过事先定义这样的复杂的规则来约束和降低用户自定义流程图的灵活性,这样一来,在引擎和流程流转控制这一个层面就会遇到很
- oracle 11g新特性Flashback data archive
daizj
oracle
1. 什么是flashback data archive
Flashback data archive是oracle 11g中引入的一个新特性。Flashback archive是一个新的数据库对象,用于存储一个或多表的历史数据。Flashback archive是一个逻辑对象,概念上类似于表空间。实际上flashback archive可以看作是存储一个或多个表的所有事务变化的逻辑空间。
- 多叉树:2-3-4树
dieslrae
树
平衡树多叉树,每个节点最多有4个子节点和3个数据项,2,3,4的含义是指一个节点可能含有的子节点的个数,效率比红黑树稍差.一般不允许出现重复关键字值.2-3-4树有以下特征:
1、有一个数据项的节点总是有2个子节点(称为2-节点)
2、有两个数据项的节点总是有3个子节点(称为3-节
- C语言学习七动态分配 malloc的使用
dcj3sjt126com
clanguagemalloc
/*
2013年3月15日15:16:24
malloc 就memory(内存) allocate(分配)的缩写
本程序没有实际含义,只是理解使用
*/
# include <stdio.h>
# include <malloc.h>
int main(void)
{
int i = 5; //分配了4个字节 静态分配
int * p
- Objective-C编码规范[译]
dcj3sjt126com
代码规范
原文链接 : The official raywenderlich.com Objective-C style guide
原文作者 : raywenderlich.com Team
译文出自 : raywenderlich.com Objective-C编码规范
译者 : Sam Lau
- 0.性能优化-目录
frank1234
性能优化
从今天开始笔者陆续发表一些性能测试相关的文章,主要是对自己前段时间学习的总结,由于水平有限,性能测试领域很深,本人理解的也比较浅,欢迎各位大咖批评指正。
主要内容包括:
一、性能测试指标
吞吐量、TPS、响应时间、负载、可扩展性、PV、思考时间
http://frank1234.iteye.com/blog/2180305
二、性能测试策略
生产环境相同 基准测试 预热等
htt
- Java父类取得子类传递的泛型参数Class类型
happyqing
java泛型父类子类Class
import java.lang.reflect.ParameterizedType;
import java.lang.reflect.Type;
import org.junit.Test;
abstract class BaseDao<T> {
public void getType() {
//Class<E> clazz =
- 跟我学SpringMVC目录汇总贴、PDF下载、源码下载
jinnianshilongnian
springMVC
----广告--------------------------------------------------------------
网站核心商详页开发
掌握Java技术,掌握并发/异步工具使用,熟悉spring、ibatis框架;
掌握数据库技术,表设计和索引优化,分库分表/读写分离;
了解缓存技术,熟练使用如Redis/Memcached等主流技术;
了解Ngin
- the HTTP rewrite module requires the PCRE library
流浪鱼
rewrite
./configure: error: the HTTP rewrite module requires the PCRE library.
模块依赖性Nginx需要依赖下面3个包
1. gzip 模块需要 zlib 库 ( 下载: http://www.zlib.net/ )
2. rewrite 模块需要 pcre 库 ( 下载: http://www.pcre.org/ )
3. s
- 第12章 Ajax(中)
onestopweb
Ajax
index.html
<!DOCTYPE html PUBLIC "-//W3C//DTD XHTML 1.0 Transitional//EN" "http://www.w3.org/TR/xhtml1/DTD/xhtml1-transitional.dtd">
<html xmlns="http://www.w3.org/
- Optimize query with Query Stripping in Web Intelligence
blueoxygen
BO
http://wiki.sdn.sap.com/wiki/display/BOBJ/Optimize+query+with+Query+Stripping+in+Web+Intelligence
and a very straightfoward video
http://www.sdn.sap.com/irj/scn/events?rid=/library/uuid/40ec3a0c-936
- Java开发者写SQL时常犯的10个错误
tomcat_oracle
javasql
1、不用PreparedStatements 有意思的是,在JDBC出现了许多年后的今天,这个错误依然出现在博客、论坛和邮件列表中,即便要记住和理解它是一件很简单的事。开发者不使用PreparedStatements的原因可能有如下几个: 他们对PreparedStatements不了解 他们认为使用PreparedStatements太慢了 他们认为写Prepar
- 世纪互联与结盟有感
阿尔萨斯
10月10日,世纪互联与(Foxcon)签约成立合资公司,有感。
全球电子制造业巨头(全球500强企业)与世纪互联共同看好IDC、云计算等业务在中国的增长空间,双方迅速果断出手,在资本层面上达成合作,此举体现了全球电子制造业巨头对世纪互联IDC业务的欣赏与信任,另一方面反映出世纪互联目前良好的运营状况与广阔的发展前景。
众所周知,精于电子产品制造(世界第一),对于世纪互联而言,能够与结盟