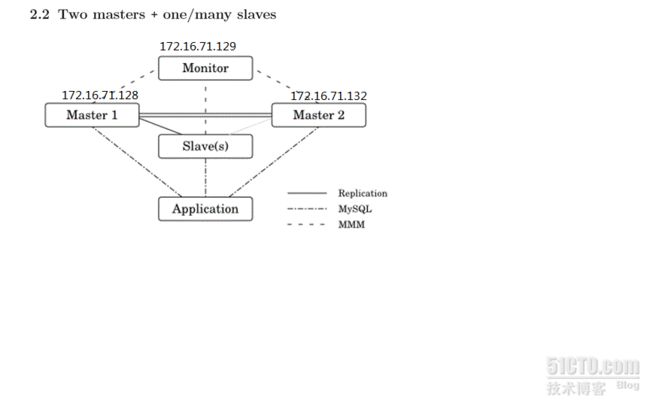
一、关系图
二、安装mysql-mmm
1)安装epel
相关文档参见:http://fedoraproject.org/wiki/EPEL
rpm -Uvh http://download.fedora.redhat.com/pub/epel/5/i386/epel-release-5-4.noarch.rpm
2) monitor软件安装
[root@localhost ~]# yum install –y mysql-mmm-monitor-*
包如下:
[root@localhost ~]# rpm -qa|grep mysql
mysql-mmm-monitor-2.2.1-1.el5
mysql-mmm-2.2.1-1.el5
mysql-5.0.77-4.el5_5.4
3)数据库所在机器安装(包括master,slave)
[root@localhost ~]# yum install –y mysql-mmm-agent*
包如下:
[root@localhost ~]# rpm -qa|grep mysql
mysql-test-5.0.77-4.el5_5.4
mysql-mmm-agent-2.2.1-1.el5
mysql-5.0.77-4.el5_5.4
mysql-server-5.0.77-4.el5_5.4
mysql-devel-5.0.77-4.el5_5.4
mysql-bench-5.0.77-4.el5_5.4
mysql-mmm-2.2.1-1.el5
mysql-connector-odbc-3.51.26r1127-1.el5
三、配置文件
1)monitor配置文件
[root@localhost ~]# vi /etc/mysql-mmm/mmm_mon.conf
include mmm_common.conf
ip 127.0.0.1
pid_path /var/run/mysql-mmm/mmm_mond.pid
bin_path /usr/libexec/mysql-mmm
status_path /var/lib/mysql-mmm/mmm_mond.status
ping_ips 172.16.71.128,172.16.71.130 #master,slave实际数据库ip
auto_set_online 60
monitor_user mmm_monitor
monitor_password ths
Debug
2)通用的配置文件,在monitor及master,slave上放置的这个文件都一致
[root@localhost ~]# vi /etc/mysql-mmm/mmm_common.conf
active_master_role writer
cluster_interface eth0
pid_path /var/run/mysql-mmm/mmm_agentd.pid
bin_path /usr/libexec/mysql-mmm/
replication_user replicant
replication_password ths
agent_user mmm_agent
agent_password ths
ip 172.16.71.128 #真实master数据库ip
mode master
peer db2
ip 172.16.71.130 #真实master数据库ip
mode master
peer db1
#
# ip 192.168.100.51 #真实slave数据库ip
# mode slave
#
hosts db1, db2
ips 172.16.71.253 #虚拟写数据库ip
mode exclusive
hosts db1, db2
ips 172.16.71.251,172.16.71.252 #虚拟读数据库ip
mode balanced
3)master,slave配置文件
[root@localhost ~]# vi /etc/mysql-mmm/mmm_agent.conf
include mmm_common.conf
# The 'this' variable refers to this server. Proper operation requires
# that 'this' server (db1 by default), as well as all other servers, have the
# proper IP addresses set in mmm_common.conf.
this db1#如为第一台master db则为db1如为第二台则为db2与mmm_common.conf里的机器对应
三、查看效果
1)启动db1的相关服务
service mysqld start
service mysql-mmm-agent start
数据库授权:所有数据库的授权一致
GRANT REPLICATION CLIENT ON *.* TO 'mmm_monitor'@'172.16.71.%' IDENTIFIED BY 'ths';
GRANT SUPER, REPLICATION CLIENT, PROCESS ON *.* TO 'mmm_agent'@'172.16.71.%' IDENTIFIED BY 'ths';
grant all on *.* to replicant@'172.16.71.%' identified by 'ths';
flush privileges;
2)启动monitor相关服务
service mysql-mmm-monitor start
查看状态:
mmm_control show
把db1设置为online状态:
mmm_control set_online db1
开放mmm_agentd端口9989
真实机器查看分配的vip地址
[root@localhost ~]# ip a
1: lo:
link/loopback 00:00:00:00:00:00 brd 00:00:00:00:00:00
inet 127.0.0.1/8 scope host lo
inet6 ::1/128 scope host
valid_lft forever preferred_lft forever
2: eth0:
link/ether 00:0c:29:ef:79:70 brd ff:ff:ff:ff:ff:ff
inet 172.16.71.132/24 brd 172.16.71.255 scope global eth0
inet 172.16.71.251/32 scope global eth0
inet 172.16.71.253/32 scope global eth0
inet6 fe80::20c:29ff:feef:7970/64 scope link
valid_lft forever preferred_lft forever
