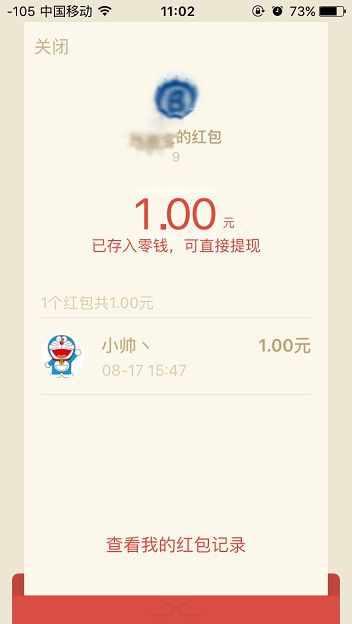
微信红包的使用已经很广泛,本篇文章介绍了微信发红包的实例,需要有认证的公众号,且开通了微信支付,商户平台且开通了现金红包的权限即可。
https://pay.weixin.qq.com商户登陆地址。选择查看营销中心的现金红包
https://pay.weixin.qq.com/wiki/doc/api/tools/cash_coupon.php?chapter=13_1 现金红包的官网文档说明
先看几个图 简单的测试。前提需要你去商户平台先充值。不支持预支付。本文只是总结微信现金红包接口的调用与实现。具体要根据自己的业务去实现如何调用该接口。
https://pay.weixin.qq.com/wiki/doc/api/tools/cash_coupon.php?chapter=13_4&index=3 文档中普通红包有关于所有的讲解。 调用必须有商户平台的证书。
需要的参数也都有列出。根据自己需求来决定。
1.java封装一个红包对象
 /**

* 红包对象
 * @author 小帅帅丶
 * @date 2016-8-17上午11:12:19
 * @开源中国 http://my.oschina.net/xshuai
 */
public class RedPack implements Serializable{
 private String sign; //根据属性生成的验证
 private String mch_billno; //订单号
 private String mch_id; //商户号
 private String wxappid; // 微信appid
 private String send_name;// 商户名称
 private String re_openid;// 用户openid
 private String total_amount;// 付款金额
 private String total_num;//红包接收人数 现金红包只能是 1
 private String wishing;// 红包祝福语
 private String client_ip;// 调用接口机器的IP
 private String act_name;// 活动名称
 private String remark;// 备注
 private String nonce_str;// 随机字符串
    //set get省略
}
2.需要用的工具类 createBillNo是生成商户订单号 官网文档要求如下:
/**
 * 红包工具类
 * @author 小帅帅丶
 * @date 2016-8-17上午11:12:19
 * @开源中国 http://my.oschina.net/xshuai
 */
public class RedPackUtil {
 /**
 * 生成商户订单号
 * @param mch_id 商户号
 * @param userId 该用户的userID
 * @return
 */
 public static String createBillNo(){
 //组成: mch_id+yyyymmdd+10位一天内不能重复的数字
 //10位一天内不能重复的数字实现方法如下:
 //因为每个用户绑定了userId,他们的userId不同,加上随机生成的(10-length(userId))可保证这10位数字不一样
 Date dt=new Date();
 SimpleDateFormat df = new SimpleDateFormat("yyyymmdd");
 String nowTime= df.format(dt);
 int length = 10 ;
 return WXConstants.MCH_ID + nowTime + getRandomNum(length);
 }
 /**
 * 生成特定位数的随机数字
 * @param length
 * @return
 */
 public static String getRandomNum(int length) {
 String val = "";
 Random random = new Random();
 for (int i = 0; i < length; i++) {
  val += String.valueOf(random.nextInt(10));
 }
 return val;
 }
}
3.前面工作很简单需要的证书和商户号有。且商户平台有金额即可测试现金红包接口
RedPack pack = new RedPack(null//第一次为空, RedPackUtil.createBillNo()//商户订单号,
  "你自己的商户号", "公众号的appid", "名称",
  "要发送用户的openid", "发送金额 单位是分 例如100 则是1元RMB", "只能是1", "9", "127.0.0.1",
  "活动名称", "备注", "随机字符串");
测试中除了sign为空。其他都可以填充。现在我们生成sign签名;根据pack对象中的参数去生成sign;
具体签名算法https://pay.weixin.qq.com/wiki/doc/api/tools/cash_coupon.php?chapter=4_3 官网给出的地址
https://pay.weixin.qq.com/wiki/tools/signverify/可以在这个测试页面进行对比看加密后是否一致。
String signs = Signature.getSign(pack);
//生成的signset到pack对象中
pack.setSign(signs);
//将对象转为xml格式 微信要求xml格式
String xml = XmlUtil.objToXml(pack,RedPack.class,"xml");
4.发送红包
RedPackService service = new RedPacService();
    String result = service.redpackOrder(xml);//请求返回的数据是否成功
public class RedPackService{
 /**
 * 红包接口地址
 */
 private final static String REDP_ORDER_PATH="https://api.mch.weixin.qq.com/mmpaymkttransfers/sendredpack";
 /**
 * 红包
 * 需要证书
 * @param paramXml
 * @return
 */
 public static String redpackOrder(String paramXml){
 try {

  WXBaseService service=new WXBaseService(REDP_ORDER_PATH);

  return service.sendPost(paramXml);

 } catch (Exception e) {

  log.error(e.toString());
 }
 return null;
 }
}
 /**
   * 通过Https往API post xml数据
   *
   * @param url  API地址
   * @param xmlObj 要提交的XML数据对象
   * @return API回包的实际数据
   * @throws IOException
   * @throws KeyStoreException
   * @throws UnrecoverableKeyException
   * @throws NoSuchAlgorithmException
   * @throws KeyManagementException
   */

  public String sendPost(String url, String postDataXML) throws IOException, KeyStoreException, UnrecoverableKeyException, NoSuchAlgorithmException, KeyManagementException {

    if (!hasInit) {
      init();
    }

    String result = null;

    HttpPost httpPost = new HttpPost(url);

    //解决XStream对出现双下划线的bug
//    XStream xStreamForRequestPostData = new XStream(new DomDriver("UTF-8", new XmlFriendlyNameCoder("-_", "_")));

    //将要提交给API的数据对象转换成XML格式数据Post给API
//    String postDataXML = xStreamForRequestPostData.toXML(xmlObj);

    Util.log("API,POST过去的数据是:");
    Util.log(postDataXML);

    //得指明使用UTF-8编码,否则到API服务器XML的中文不能被成功识别
    StringEntity postEntity = new StringEntity(postDataXML, "UTF-8");
    httpPost.addHeader("Content-Type", "text/xml");
    httpPost.setEntity(postEntity);

    //设置请求器的配置
    httpPost.setConfig(requestConfig);

    Util.log("executing request" + httpPost.getRequestLine());

    try {
      HttpResponse response = httpClient.execute(httpPost);

      HttpEntity entity = response.getEntity();

      result = EntityUtils.toString(entity, "UTF-8");

    } catch (ConnectionPoolTimeoutException e) {
      log.e("http get throw ConnectionPoolTimeoutException(wait time out)");

    } catch (ConnectTimeoutException e) {
      log.e("http get throw ConnectTimeoutException");

    } catch (SocketTimeoutException e) {
      log.e("http get throw SocketTimeoutException");

    } catch (Exception e) {
      log.e("http get throw Exception");

    } finally {
      httpPost.abort();
    }

    return result;
  }
5.返回的xml看是否成功 由于只充值了1元 前几天已经测试发送 所以返回如下信息
100
以上就是本文的全部内容,希望对大家的学习有所帮助,也希望大家多多支持脚本之家。


