开启三台虚拟机
192.168.80.100         Nginx
192.168.80.101         web1
192.168.80.102         web2
提供与Squid类似的缓存,把URL以及相关信息当成key,用MD5编码哈希后,把数据文件保存在硬盘上,并且只能为指定的URL或者状态码设置过期时间,并不支持类似 squid的purge命令来手动清除指定缓存页面,但是可以通过第三方的ngx_cache_purge来清除指定的URL缓存
Nginx的缓存加速功能是由proxy_cache(用于反向代理和静态缓存)和fastcgi_cache(PHP动态缓存)两个功能模块完成
反向代理:proxy_pass 转发Nginx缓存特点:
缓存稳定,运行速度与Squid相差无几(因为都使用硬盘缓存)
对多核CPU的利用率比其他的开源软件好
支持高并发请求数,能同时承受更多的访问请求nginx有两段缓存:
共享内存(存储键和缓存对象元数据)
磁盘空间:存储数据Nginx缓存、Varnish、Squid对比Squid:应用较早,支持传统、透明、反向等功能的一款应用软件,设置较复杂,一般配合CDN
Varnish:新兴软件,设计简单,使用内存缓存数据(快)
Nginx缓存:需通过调用模块实现缓存功能,基于硬盘缓存数据
nginx要定义缓存,需要以下配置:
proxy_cache_path:不能定义在server{}上下文中
官方帮助手册:https://docs.nginx.com/nginx/admin-guide/实战:nginx缓存三台虚拟机都要启动:
systemctl stop firewalld //关闭防火墙
setenforce 0 //关闭监控yum install lrz* -y //安装上传软件
再把nginx-1.13.5.tar
ngx_cache_purge-2.3.tar
pcre-8.41.tar拉入解压软件包:
tar xf ngx_cache_purge-2.3.tar.gz -C /opt/
tar xf pcre-8.41.tar.gz -C /opt/
tar xf nginx-1.13.5.tar.gz -C /opt/
cd /opt/nginx-1.13.5/yum install -y zlib-devel //安装插件
yum install -y gcc gcc-c++ make./configure \
--prefix=/usr/local/nginx \
--user=nginx \
--group=nginx \
--with-http_stub_status_module \
--with-pcre=/opt/pcre-8.41 \
--add-module=/opt/ngx_cache_purge-2.3make && make installuseradd -M -s /sbin/nologin nginx //创建一个程序用户
cdln -s /usr/local/nginx/conf/nginx.conf /etc/ //软链接vi /etc/nginx.conf
修改新增以下内容:
user nginx nginx;
……
error_log logs/error.log info;前面的#去掉
pid的#去掉
use epoll; //新增 ,事件驱动模型
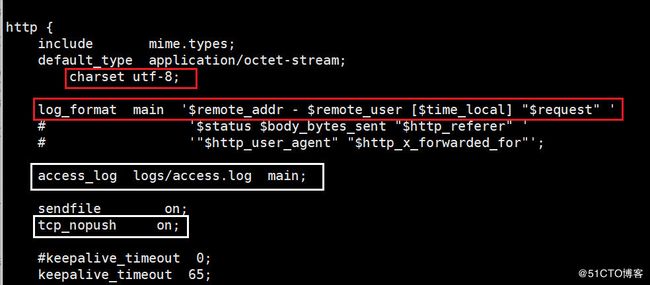
default_type application/octet-stream; #默认文件类型
charset utf-8; //新增
tcp_nopush on; //去掉#号
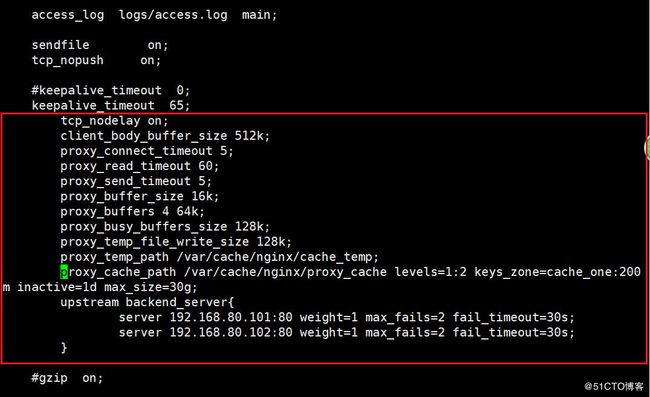
keepalive_timeout 65; //在当前行下面新增,连接超时时间
tcp_nodelay on;
client_body_buffer_size 512k;
proxy_connect_timeout 5; #跟后端服务器连接超时时间,发起握手等候响应时间
proxy_read_timeout 60; #连接成功后等待后端服务器的响应时间,已经进入后端的排队之中等候处理
proxy_send_timeout 5; #后端服务器回传时间,就是在规定时间内后端服务器必须传完所有数据
proxy_buffer_size 16k; #代理请求缓冲区,会保存用户的头信息以供nginx进行处理
proxy_buffers 4 64k; #nginx保存单个用几个buffer最大用多少空间
proxy_busy_buffers_size 128k; #系统很忙时候可以申请最大的proxy_buffers
proxy_temp_file_write_size 128k; #proxy缓存临时文件的大小
#以下两行是开启nginx缓存功能的配置:
proxy_temp_path /var/cache/nginx/cache_temp;
#创建缓存的时候可能生成一些临时文件存放的位置,自动创建
proxy_cache_path /var/cache/nginx/proxy_cache levels=1:2 keys_zone=cache_one:200m inactive=1d max_size=30g;
#定义缓存存储目录;缓存级别,子目录级别,表示缓存目录的一级子目录是1个字符,二级子目录是2个字符;建立共享缓存,缓存数据元数据的空间,查缓存时,先从此空间查找,然后到相应目录中查找;缓存的时间;缓存空间大小
upstream backend_server{
server 192.168.80.101:80 weight=1 max_fails=2 fail_timeout=30s;
server 192.168.80.102:80 weight=1 max_fails=2 fail_timeout=30s;
} 加权轮询
location / {
proxy_next_upstream http_502 http_504 error timeout invalid_header; #出现502-504或错误,会跳过此台服务器访问下一台服务器
proxy_cache cache_one; #启用名为cache_one缓存
proxy_cache_valid 200 304 12h; #状态码,有效时间12小时,其余状态码10分钟过期
proxy_cache_key $host$uri$is_args$args; #缓存key,通过唯一key来进行hash存取
proxy_set_header Host $host; #增加头部信息,方便观察客户端respoce是否命中
proxy_set_header X-Forwarded-For $remote_addr; #后端节点机器获取客户端真实ip,$remote_addr代表客户端的ip地址,
proxy_pass http://backend_server; 请求转向
}ln -s /usr/local/nginx/sbin/nginx /usr/local/sbin/ //软连接到$PATH环境变量中,方便系统识别
nginx -t //检查nginx语法错误mkdir -p /var/cache/nginx/cache_temp //创建缓存目录
mkdir /var/cache/nginx/proxy_cache //创建代理目录
nginx -t //检查nginx语法错误nginx //启动nginx服务
netstat -anpt | grep nginx在另一台虚拟机搭建一个web服务器:web1(80.101)
yum install -y httpd //安装httpvi /etc/httpd/conf/httpd.conf
把ServerName www.example.com:80 前面#删除echo "192.168.80.101
" > /var/www/html/index.htmlsystemctl start httpd在另一台虚拟机搭建一个web服务器:web2(80.102)
yum install -y httpd //安装httpvi /etc/httpd/conf/httpd.conf
把ServerName www.example.com:80 前面#删除echo "192.168.80.102
" > /var/www/html/index.htmlsystemctl start httpd在浏览器上输入:
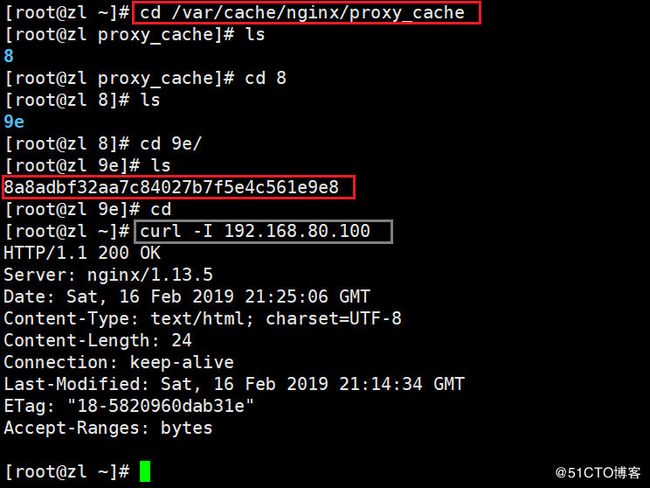
http://192.168.80.101/http://192.168.80.102/http://192.168.80.100/cd /var/cache/nginx/proxy_cache
cd 8
cd 9e/
cd
curl -I 192.168.80.100vi /etc/nginx.conf
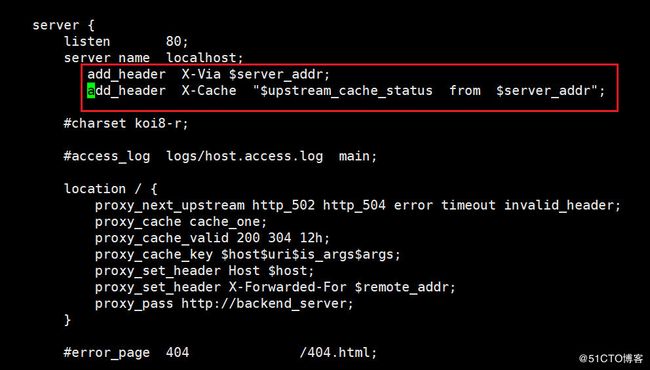
在server_name localhost;下添加
add_header X-Via $server_addr;
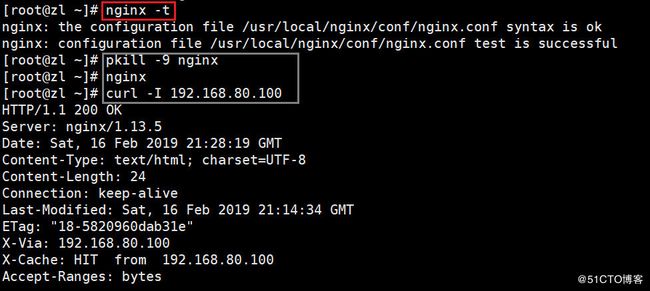
add_header X-Cache "$upstream_cache_status from $server_addr";nginx -t
pkill -9 nginx
nginx
curl -I 192.168.80.100vi /etc/nginx.conf
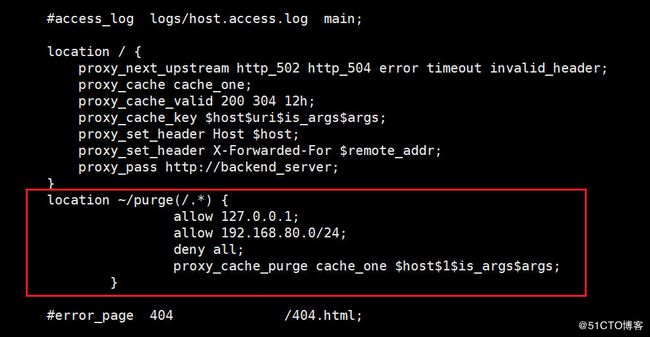
把以下内容添加在/404.html上面:
location ~/purge(/.*) {
allow 127.0.0.1;
allow 192.168.80.0/24;
deny all;
proxy_cache_purge cache_one $host$1$is_args$args;
}nginx -t
pkill -9 nginx
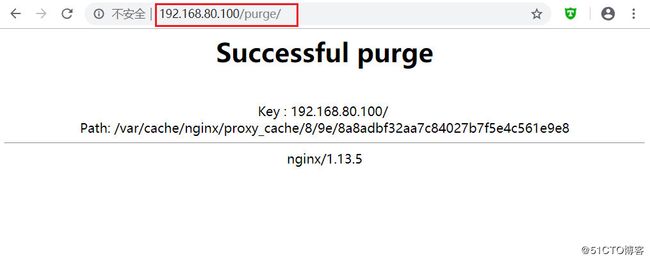
nginxhttp://192.168.80.100/purge/ //用来清除缓存


