varnish 使用进阶
================================================================================
概述:
================================================================================
VCL配置用法详解
1.state engine:状态引擎切换机制(varnish4.0 )
★request:
vcl_recv 接受请求报文
★response:
vcl_deliver 发送请求报文
★处理流程:
①缓存命中
vcl_hash -(hit)-> vcl_hit --> vcl_deliver
②缓存未命中
vcl_hash -(miss)-> vcl_miss --> vcl_backend_fetch --> vcl_backend_response --> vcl_deliver
③缓存修减(处理,清理)
vcl_hash -(purge)-> vcl_purge --> vcl_synth
④请求不能识别,直接响应到后端,建立一个管道
vcl_hash -(pipe)-> vcl_pipe
★两个特殊的引擎:
vcl_init:在处理任何请求之前要执行的vcl代码:主要用于初始化VMODs;
vcl_fini:所有的请求都已经结束,在vcl配置被丢弃时调用;主要用于清理VMODs;
2.vcl的语法格式:
★语法格式
VCL files start with vcl 4.0; 指明版本
//, # and /* foo */ for comments; 单行和多行注释
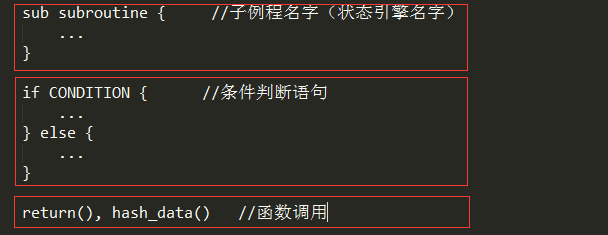
Subroutines are declared with the sub keyword; 子例程要用sub关键字声明 例如:sub vcl_recv { ...};
No loops, state-limited variables 不支持循环,受限于引擎的内建变量;
Terminating statements with a keyword for next action as argument of the return() function, i.e.: return(action);
Domain-specific:域专用的配置
★The VCL Finite State Machine vcl 有限状态机
Each request is processed separately;
Each request is independent from others at any given time;
States are related, but isolated;
return(action); exits one state and instructs Varnish to proceed to the next state;
Built-in VCL code is always present and appended below your own VCL;
★三类主要语法:
示例:
[root@centos7 ~]# varnishadm -S /etc/varnish/secret -T :6082
200
-----------------------------
Varnish Cache CLI 1.0
-----------------------------
Linux,3.10.0-327.el7.x86_64,x86_64,-smalloc,-smalloc,-hcritbit
varnish-4.0.3 revision b8c4a34

Type 'help' for command list.
Type 'quit' to close CLI session.

vcl.show -v boot  # 查看boot配置文件详细信息
vcl 4.0;

#######################################################################
# Client side
sub vcl_recv {
    if (req.method == "PRI") {
	/* We do not support SPDY or HTTP/2.0 */
	return (synth(405));
    }
    if (req.method != "GET" &&
      req.method != "HEAD" &&
      req.method != "PUT" &&
      req.method != "POST" &&
      req.method != "TRACE" &&
      req.method != "OPTIONS" &&
      req.method != "DELETE") {
        /* Non-RFC2616 or CONNECT which is weird. */
        return (pipe);
    }

    if (req.method != "GET" && req.method != "HEAD") {
        /* We only deal with GET and HEAD by default */
        return (pass);
    }
    if (req.http.Authorization || req.http.Cookie) {
        /* Not cacheable by default */
        return (pass);
    }
    return (hash);
}

sub vcl_pipe {
    # By default Connection: close is set on all piped requests, to stop
    # connection reuse from sending future requests directly to the
    # (potentially) wrong backend. If you do want this to happen, you can undo
    # it here.
    # unset bereq.http.connection;
    return (pipe);
}

sub vcl_pass {
    return (fetch);
}

sub vcl_hash {
    hash_data(req.url);
    if (req.http.host) {
        hash_data(req.http.host);
    } else {
        hash_data(server.ip);
    }
    return (lookup);
}

sub vcl_purge {
    return (synth(200, "Purged"));
}

sub vcl_hit {
    if (obj.ttl >= 0s) {
        // A pure unadultered hit, deliver it
        return (deliver);
    }
    if (obj.ttl + obj.grace > 0s) {
        // Object is in grace, deliver it
        // Automatically triggers a background fetch
        return (deliver);
    }
    // fetch & deliver once we get the result
    return (fetch);
}

sub vcl_miss {
    return (fetch);
}

sub vcl_deliver {
    return (deliver);
}
-------------------------------------------------------------------------------
3.VCL Built-in Functions and Keywords 內建函数和关键字
★函数:
regsub(str, regex, sub) 正则表达式替换
regsuball(str, regex, sub) 替换所有
ban(boolean expression) 清理缓存项
hash_data(input) 对指定的数据做哈希计算
synthetic(str)
★Keywords:
call subroutine 调用子例程关键字
return(action) return关键字,指明下一次的action
new
set 设定一个变量值
unset 撤销一个变量值
★操作符:
==, !=, ~, >, >=, <, <=
逻辑操作符:&&, ||, !
变量赋值:=
演示:
通过判断响应报文缓存命中的次数来判断是否命中缓存
1)因为是响应报文,所以在val_deliver中定义,所以编辑/etc/varnish/default.vcl如下:
2)让配置生效需要执行varnish_reload_vcl也可手动执行,如下:
[root@centos7 ~]# varnishadm -S /etc/varnish/secret -T :6082
200
-----------------------------
Varnish Cache CLI 1.0
-----------------------------
Linux,3.10.0-327.el7.x86_64,x86_64,-smalloc,-smalloc,-hcritbit
varnish-4.0.3 revision b8c4a34

Type 'help' for command list.
Type 'quit' to close CLI session.

vcl.load testconf1 default.vcl    # 给重载的配置起个名字
200
VCL compiled.
vcl.list
200
active          0 boot
available       0 testconf1       # 这时为available

vcl.use testconf1                 # 使用此配置
200
VCL 'testconf1' now active
vcl.list
200
available       0 boot
active          0 testconf1       # 变为active
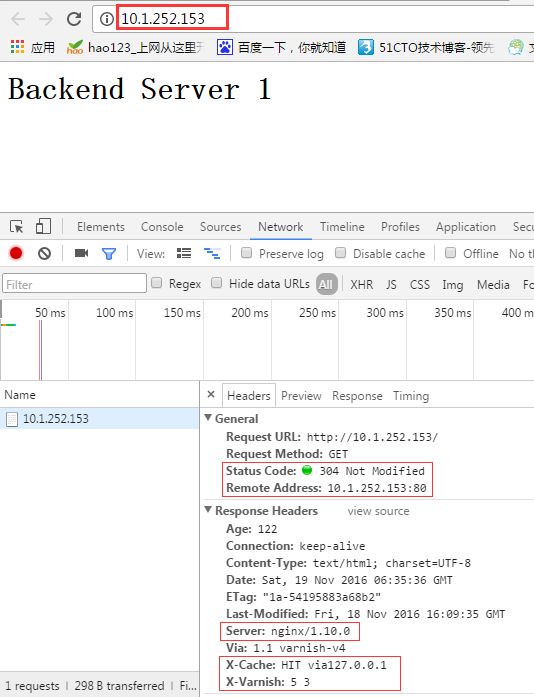
3)在浏览器中查看,可以发现在http首部添加的首部X-Cache 为HIT,说明为缓存命中的,如下:
-------------------------------------------------------------------------------
VCL变量详解
1.内建变量和用户自定义变量:
★內建变量
☉req.*:request,表示由客户端发来的请求报文相关;
req.http.*
req.http.User-Agent, req.http.Referer, ...
☉bereq.*:由varnish发往BE主机的httpd请求相关;
bereq.http.*
☉beresp.*:由BE主机响应给varnish的响应报文相关;
beresp.http.*
☉resp.*:由varnish响应给client相关;
☉obj.*:存储在缓存空间中的缓存对象的属性;只读;
★用户自定义变量
set
unset
2.常用内建变量:
☉bereq.*, req.*:
bereq.http.HEADERS
bereq.request: 请求方法;
bereq.url: 请求的url;
bereq.proto: 请求的协议版本;
bereq.backend: 指明要调用的后端主机;
req.http.Cookie: 客户端的请求报文中Cookie首部的值;
req.http.User-Agent ~ "chrome" 浏览器的类型被chrome匹配
☉beresp.*, resp.*:
beresp.http.HEADERS
beresp.status: 响应的状态码;
reresp.proto: 协议版本;
beresp.backend.name: BE主机的主机名;
beresp.ttl: BE主机响应的内容的余下的可缓存时长;
☉obj.*
obj.hits: 此对象从缓存中命中的次数;
obj.ttl: 对象的ttl值
☉server.*
server.ip
server.hostname
☉client.*
client.ip
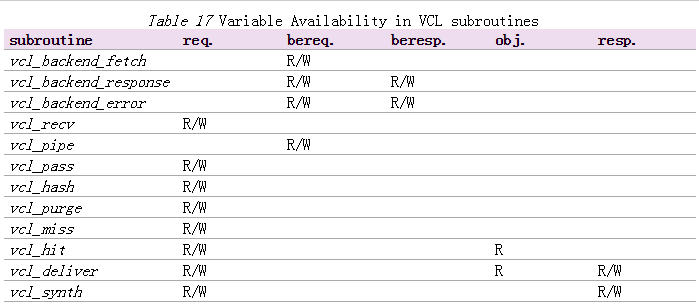
附图:
变量的使用范围:
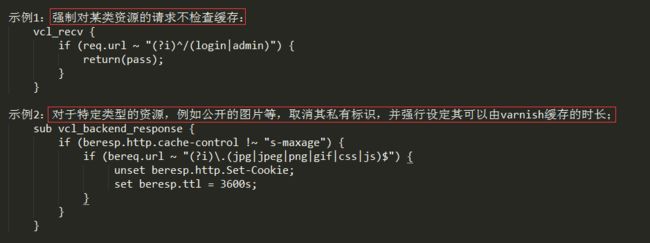
演示1:
强制对某类资源的请求不检查缓存,这里以login和admin类为例
-------------------------------------------------------------------------------
1)首先在后端主机创建一个login的目录并提供测试页面,如下:
[root@RS1 ~]# mkdir /var/www/html/login [root@RS1 ~]# echo "Login Page
" > /var/www/html/login/index.html [root@RS1 ~]# cat /var/www/html/login/index.htmlLogin Page
2)此时请求login中的资源,可以看到第一次是后端主机直接响应的,之后都是命中缓存,由varnish直接响应,如下:
[root@CentOS6 ~]# curl -I http://10.1.252.153/login/index.html
HTTP/1.1 200 OK
Server: nginx/1.10.0
Date: Sat, 19 Nov 2016 07:55:21 GMT
Content-Type: text/html; charset=UTF-8
Content-Length: 20
Connection: keep-alive
Last-Modified: Sat, 19 Nov 2016 07:47:02 GMT
ETag: "14-541a2a0d1380d"
X-Varnish: 65538
Age: 0
Via: 1.1 varnish-v4
X-Cache: MISS via127.0.0.1

[root@CentOS6 ~]# curl -I http://10.1.252.153/login/index.html
HTTP/1.1 200 OK
Server: nginx/1.10.0
Date: Sat, 19 Nov 2016 07:55:28 GMT
Content-Type: text/html; charset=UTF-8
Content-Length: 20
Connection: keep-alive
Last-Modified: Sat, 19 Nov 2016 07:47:02 GMT
ETag: "14-541a2a0d1380d"
X-Varnish: 32772 65539
Age: 7
Via: 1.1 varnish-v4
X-Cache: HIT via127.0.0.1
3)现在,我们定义其请求报文,如果含有login和admin的就不从缓存中响应,编辑/etc/varnish/default.vcl,在vcl_recv定义如下:
4)配置生效,执行varnish_reload_vcl或者手动执行,如下:
[root@centos7 ~]# varnishadm -S /etc/varnish/secret -T :6082
200
-----------------------------
Varnish Cache CLI 1.0
-----------------------------
Linux,3.10.0-327.el7.x86_64,x86_64,-smalloc,-smalloc,-hcritbit
varnish-4.0.3 revision b8c4a34

Type 'help' for command list.
Type 'quit' to close CLI session.

vcl.list
200
available       0 boot
active          0 testconf1

vcl.load testconf2 default.vcl
200
VCL compiled.
vcl.load

vcl.list
200
available       0 boot
active          0 testconf1
available       0 testconf2

vcl.use testconf2
200
VCL 'testconf2' now active
vcl.list
200
available       0 boot
available       0 testconf1
active          0 testconf2
5)再次请求发现现在都是从后端主机直接响应的,不在命中缓存,如下:
[root@CentOS6 ~]# curl -I http://10.1.252.153/login/index.html
HTTP/1.1 200 OK
Server: nginx/1.10.0
Date: Sat, 19 Nov 2016 07:58:11 GMT
Content-Type: text/html; charset=UTF-8
Content-Length: 20
Connection: keep-alive
Last-Modified: Sat, 19 Nov 2016 07:47:02 GMT
ETag: "14-541a2a0d1380d"
Accept-Ranges: bytes
X-Varnish: 32774
Age: 0
Via: 1.1 varnish-v4
X-Cache: MISS via 127.0.0.1

[root@CentOS6 ~]# curl -I http://10.1.252.153/login/index.html
HTTP/1.1 200 OK
Server: nginx/1.10.0
Date: Sat, 19 Nov 2016 07:58:12 GMT
Content-Type: text/html; charset=UTF-8
Content-Length: 20
Connection: keep-alive
Last-Modified: Sat, 19 Nov 2016 07:47:02 GMT
ETag: "14-541a2a0d1380d"
Accept-Ranges: bytes
X-Varnish: 65546
Age: 0
Via: 1.1 varnish-v4
X-Cache: MISS via 127.0.0.1
示例总结:
--------------------------------------------------------------------------------
缓存对象的修剪
---purge,ban
★purge:
清理单个url所对应的资源;
★ban:
清理表达式模式匹配到的所有url缓存所对应的资源;
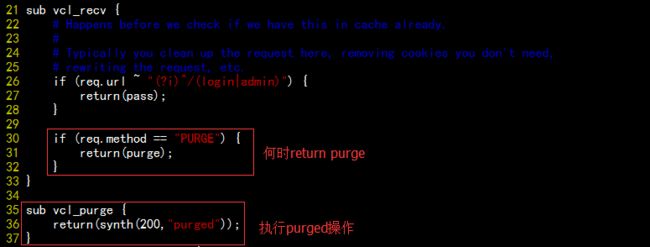
★能执行purge操作
★何时执行purge操作
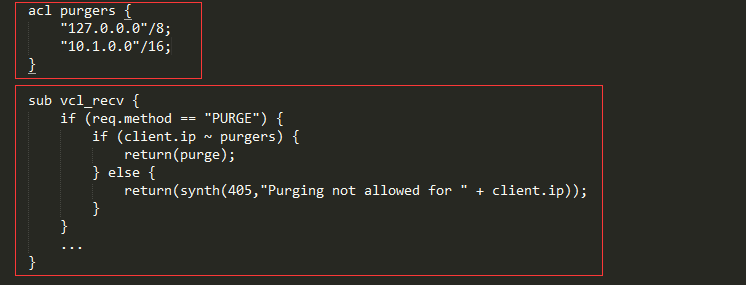
★添加此类请求的访问控制法则:
收到用户的请求方法为“purge”然后就执行return purage
------------------------------------------------------------------------------
1)编辑/etc/varnish/default.vcl,在vcl_recv定义如下:
2)配置生效,执行varnish_reload_vcl或者手动执行,如下:
[root@centos7 ~]# varnish_reload_vcl
Loading vcl from /etc/varnish/default.vcl
Current running config name is boot
Using new config name reload_2016-11-19T18:06:32
VCL compiled.
VCL 'reload_2016-11-19T18:06:32' now active
available       0 boot
active          0 reload_2016-11-19T18:06:32

Done
3)使用curl命令请求,如下:
# 第一次请求因为没有缓存所以由后端服务器直接响应,之后在过期时间内一直是缓存响应
[root@CentOS6 ~]# curl -I http://10.1.252.153/index.html
HTTP/1.1 200 OK
Server: nginx/1.10.0
Date: Sat, 19 Nov 2016 10:12:57 GMT
Content-Type: text/html; charset=UTF-8
Content-Length: 26
Connection: keep-alive
Last-Modified: Fri, 18 Nov 2016 16:09:35 GMT
ETag: "1a-54195883a68b2"
X-Varnish: 32790
Age: 0
Via: 1.1 varnish-v4
X-Cache: MISS via 127.0.0.1    # 后端服务器响应

[root@CentOS6 ~]# curl -I http://10.1.252.153/index.html
HTTP/1.1 200 OK
Server: nginx/1.10.0
Date: Sat, 19 Nov 2016 10:13:00 GMT
Content-Type: text/html; charset=UTF-8
Content-Length: 26
Connection: keep-alive
Last-Modified: Fri, 18 Nov 2016 16:09:35 GMT
ETag: "1a-54195883a68b2"
X-Varnish: 32793 32791
Age: 4
Via: 1.1 varnish-v4
X-Cache: HIT via 127.0.0.1     # 之后一直是缓存响应
# 使用自定义PURGE请求 ,会送往return purge,清理指定url缓存。 [root@CentOS6 ~]# curl -X PURGE http://10.1.252.153/index.html200 purged Error 200 purged
purged
Guru Meditation:
XID: 20
Varnish cache server
[root@CentOS6 ~]# curl -I http://10.1.252.153/index.html HTTP/1.1 200 OK Server: nginx/1.10.0 Date: Sat, 19 Nov 2016 10:13:58 GMT Content-Type: text/html; charset=UTF-8 Content-Length: 26 Connection: keep-alive Last-Modified: Fri, 18 Nov 2016 16:09:35 GMT ETag: "1a-54195883a68b2" X-Varnish: 22 Age: 0 Via: 1.1 varnish-v4 X-Cache: MISS via 127.0.0.1 # 再次请求,发现来自后端服务器响应 [root@CentOS6 ~]# curl -I 10.1.252.153/index.html HTTP/1.1 200 OK Server: nginx/1.10.0 Date: Sat, 19 Nov 2016 10:13:59 GMT Content-Type: text/html; charset=UTF-8 Content-Length: 26 Connection: keep-alive Last-Modified: Fri, 18 Nov 2016 16:09:35 GMT ETag: "1a-54195883a68b2" X-Varnish: 32795 23 Age: 1 Via: 1.1 varnish-v4 X-Cache: HIT via 127.0.0.1 # 之后都是缓存响应
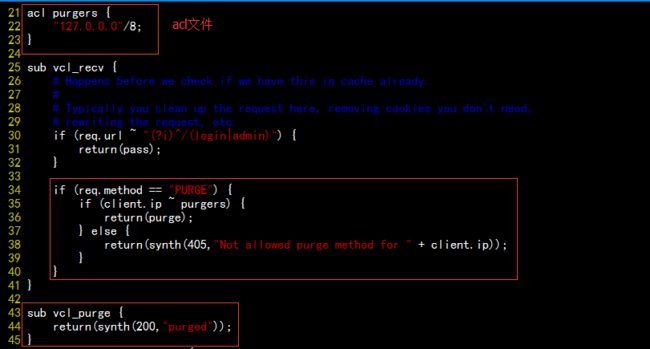
4)现在,对能够执行return purge 做acl访问控制,只允许来自本机的网络执行,编辑配置文件如下:
配置生效,执行varnish_reload_vcl或者手动执行,如下:
[root@centos7 ~]# varnish_reload_vcl
Loading vcl from /etc/varnish/default.vcl
Current running config name is reload_2016-11-19T18:06:32
Using new config name reload_2016-11-19T18:33:15
VCL compiled.
VCL 'reload_2016-11-19T18:33:15' now active
available       0 boot
available       0 reload_2016-11-19T18:06:32
active          0 reload_2016-11-19T18:33:15

Done
测试,我这里不使用nginx反代,因为nginx和varnish在同一台主机,所以,用户请求nginx的80服务,是由nignx反代至varnish,而varnish识别的是nginx反代的地址,不是用户的地址,所以这里为了演示效果,不使用nginx反代。然后在远程主机请求,如下:
[root@CentOS6 ~]# curl -X PURGE http://10.1.252.153:6081/index.html405 Not allowed purge method for 10.1.252.205 # 不允许请求Error 405 Not allowed purge method for 10.1.252.205
Not allowed purge method for 10.1.252.205
Guru Meditation:
XID: 32806
Varnish cache server
# 在本地请求可以正常响应,如下: [root@centos7 ~]# curl -X PURGE http://127.0.0.1:6081/index.html200 purged Error 200 purged
purged
Guru Meditation:
XID: 33
Varnish cache server
