Opencv与dlib联合进行人脸关键点检测与识别【转】

来自:http://blog.csdn.net/mr_curry/article/details/51994497

前言

依赖库:OpenCV 2.4.9 /dlib 19.0/libfacedetection 
本篇不记录如何配置,重点在算法实现上。使用libfacedetection实现人脸区域检测,联合dlib标记人脸特征点,最后使用opencv的FaceRecognizer实现人脸识别。

准备工作

1、配置好Opencv2.4.9。(Opencv3.1需要另外下载一个包才有FaceRecognizer) 
2、配置好dlib 19.0(版本其实没有多大关系) 
3、配置好ShiQi.Yu的人脸检测库

思想

训练模块:人脸检测——>获取人脸区域的点坐标——>人脸关键点标记——>人脸对正——>归一化处理——>保存图片——>手动筛选图片——>训练样本——>得到train.xml 
识别模块:读取train.xml——>循环(人脸检测——>获取人脸区域的点坐标——>人脸关键点标记——>人脸对正——>归一化处理——>送入model->predict——>预测出结果——>putText在方框上写出名字)

结果

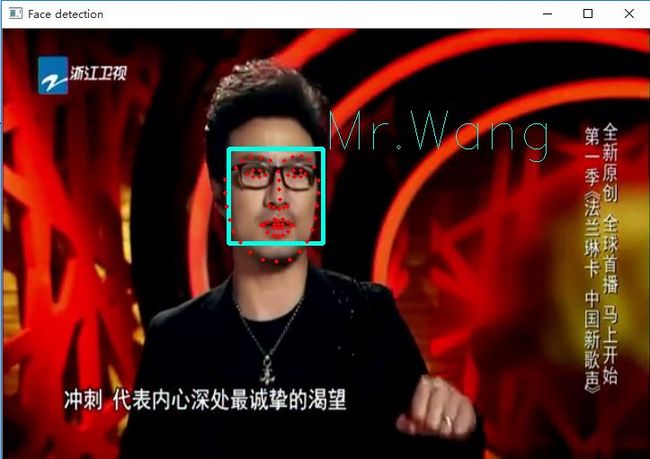
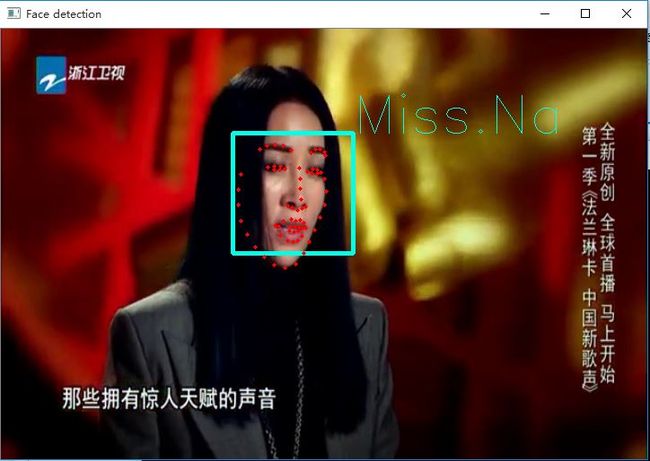
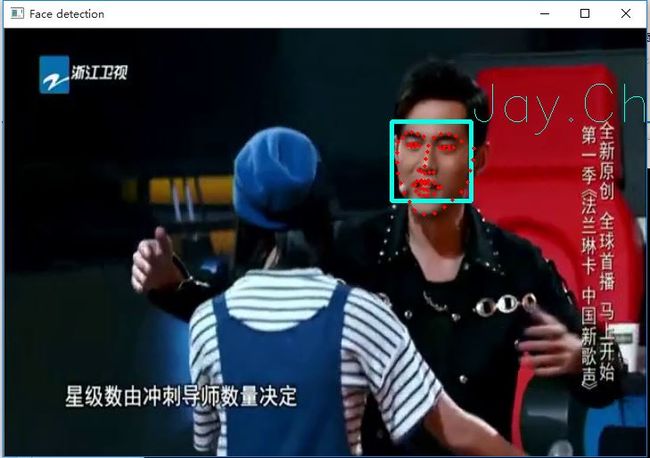
识别速度:0.15~0.25秒,Release平台。 
识别精度:还可以,基本不会识别错,样本没有选择需要识别的东西哦。 
使用了一段中国好声音的视频做识别。 
Opencv与dlib联合进行人脸关键点检测与识别【转】_第1张图片 
Opencv与dlib联合进行人脸关键点检测与识别【转】_第2张图片 
Opencv与dlib联合进行人脸关键点检测与识别【转】_第3张图片 
当然,这里用的是Fisherface算法,主要还是样本不多,已经可以搞定了。

代码

ReadCSV.h

#include 
#include 
#include 
using namespace cv;
using namespace std;
static void read_csv(const string& filename, cv::vector& images, cv::vector<int>& labels, char separator = ';') {
    std::ifstream file(filename.c_str(), ifstream::in);
    if (!file) {
        string error_message = "No valid input file was given, please check the given filename.";
        CV_Error(CV_StsBadArg, error_message);
    }
    string line, path, classlabel;
    while (getline(file, line)) {
        stringstream liness(line);
        getline(liness, path, separator);
        getline(liness, classlabel);
        if (!path.empty() && !classlabel.empty()) {
            images.push_back(imread(path, 0));
            labels.push_back(atoi(classlabel.c_str()));
        }
    }
}
  • 1
  • 2
  • 3
  • 4
  • 5
  • 6
  • 7
  • 8
  • 9
  • 10
  • 11
  • 12
  • 13
  • 14
  • 15
  • 16
  • 17
  • 18
  • 19
  • 20
  • 21
  • 22
  • 1
  • 2
  • 3
  • 4
  • 5
  • 6
  • 7
  • 8
  • 9
  • 10
  • 11
  • 12
  • 13
  • 14
  • 15
  • 16
  • 17
  • 18
  • 19
  • 20
  • 21
  • 22

FaceRotate.h

#include 
#include 
#include 
#include 
#include 
#include
#include 

using namespace dlib;

frontal_face_detector detector = get_frontal_face_detector();
shape_predictor sp;//Already get
  • 1
  • 2
  • 3
  • 4
  • 5
  • 6
  • 7
  • 8
  • 9
  • 10
  • 11
  • 12
  • 1
  • 2
  • 3
  • 4
  • 5
  • 6
  • 7
  • 8
  • 9
  • 10
  • 11
  • 12

FaceRecognition.cpp

#include 
#include 
const int namenumber = 4;//测试的人脸数量
const string textname[namenumber] = { "Hariem", "Miss.Na", "Mr.Wang", "Jay.Chou" };//做一个储存人脸名字的数组


Ptr  GetTrainModel(string fn_csv)//输入CSV文件的路径名
{
    vector images; 
    vector<int> labels;
    try {
        read_csv(fn_csv, images, labels);
    }
    catch (cv::Exception& e) {
        cerr << "Error opening file \"" << fn_csv << "\". Reason: " << e.msg << endl;
        // 文件有问题,我们啥也做不了了,退出了
        exit(1);
    }
    // 如果没有读取到足够图片,我们也得退出.
    if (images.size() <= 1) {
        string error_message = "This demo needs at least 2 images to work. Please add more images to your data set!";
        CV_Error(CV_StsError, error_message);
    }
    Ptr model = createEigenFaceRecognizer(80);//创建人脸识别类 可修改 LBPHFace、EigenFace、FisherFace
    model->train(images, labels);
    return model;
}

int main()
{
    Dlib_Predefine();//加载dlib的文件
    Ptr model = GetTrainModel("face.csv");//获得模型
    VideoCapture cap("好声音.mp4");
    Mat frame,gray;
    while (true)
    {
        cap >> frame;
        if (!frame.empty())
        {
            gray = FaceDetect(frame);
            if (!gray.empty())
            putText(frame, textname[model->predict(gray)], Point(50, 50), FONT_HERSHEY_DUPLEX, 3, Scalar(230, 255, 0), 2);//model->predict(frame) = predictLabel 名字写在 1 1
            imshow("Face Recogniton", frame);
            waitKey(1);
        }
        else{ cout << "The Video's end." <break; }
    }

}
  • 1
  • 2
  • 3
  • 4
  • 5
  • 6
  • 7
  • 8
  • 9
  • 10
  • 11
  • 12
  • 13
  • 14
  • 15
  • 16
  • 17
  • 18
  • 19
  • 20
  • 21
  • 22
  • 23
  • 24
  • 25
  • 26
  • 27
  • 28
  • 29
  • 30
  • 31
  • 32
  • 33
  • 34
  • 35
  • 36
  • 37
  • 38
  • 39
  • 40
  • 41
  • 42
  • 43
  • 44
  • 45
  • 46
  • 47
  • 48
  • 49

FaceDetect.cpp

用了掩码。

#include 
#include 
void Dlib_Predefine()
{
    deserialize("shape_predictor_68_face_landmarks.dat") >> sp;//读入标记点文件
}

cv::Mat FaceToOne(cv::Mat source)//归一化处理函数
{

    cv::equalizeHist(source, source);//直方图均衡
    cv::resize(source, source, cv::Size(92, 112));//裁剪
    cv::Mat Mask = cv::imread("mask.jpg", 0);
    cv::Mat changedMask;
    source.copyTo(changedMask, Mask);
    return changedMask;
}

Mat FaceDetect(Mat frame)//脸是否存在
{
    Mat gray, error;
    cvtColor(frame, gray, CV_BGR2GRAY);
    int * pResults = NULL;
    pResults = facedetect_frontal_tmp((unsigned char*)(gray.ptr(0)), gray.cols, gray.rows, gray.step, 1.2f, 5, 24);
    int peopleNUM = (pResults ? *pResults : 0);

    for (int i = 0; i < peopleNUM; i++)//代表有几张人脸(pResults ? *pResults : 0)
    {
        short * p = ((short*)(pResults + 1)) + 6 * i;
        Rect opencvRect(p[0], p[1], p[2], p[3]);
        //gray = gray(opencvRect);
        cv::rectangle(frame, opencvRect, Scalar(230, 255, 0));
        dlib::rectangle dlibRect((long)opencvRect.tl().x, (long)opencvRect.tl().y, (long)opencvRect.br().x - 1, (long)opencvRect.br().y - 1);
        //人脸对齐技术提高了准确率
        dlib::full_object_detection shape = sp(dlib::cv_image(gray), dlibRect);//标记点
        std::vector shapes;
        shapes.push_back(shape);//把点保存在了shape中
        dlib::array>  face_chips;
        extract_image_chips(dlib::cv_image(gray), get_face_chip_details(shapes), face_chips);
        Mat pic = toMat(face_chips[0]);
        cvtColor(pic, pic, CV_BGR2GRAY);
        return FaceToOne(pic);
    }
    return error;
}


  • 1
  • 2
  • 3
  • 4
  • 5
  • 6
  • 7
  • 8
  • 9
  • 10
  • 11
  • 12
  • 13
  • 14
  • 15
  • 16
  • 17
  • 18
  • 19
  • 20
  • 21
  • 22
  • 23
  • 24
  • 25
  • 26
  • 27
  • 28
  • 29
  • 30
  • 31
  • 32
  • 33
  • 34
  • 35
  • 36
  • 37
  • 38
  • 39
  • 40
  • 41
  • 42
  • 43
  • 44
  • 45
  • 46
  • 47
  • 48

FaceDetect.h

#include 
#include "facedetect-dll.h"

using namespace cv;
using namespace std;

Mat FaceDetect(Mat frame);
void Dlib_Predefine();//dlib 预定义的函数
  • 1
  • 2
  • 3
  • 4
  • 5
  • 6
  • 7
  • 8
  • 9
  • 1
  • 2
  • 3
  • 4
  • 5
  • 6
  • 7
  • 8
  • 9

FaceRotate.h

#include 
#include 
#include 
#include 
#include 
#include
#include 

using namespace dlib;

frontal_face_detector detector = get_frontal_face_detector();
shape_predictor sp;//Already get
  • 1
  • 2
  • 3
  • 4
  • 5
  • 6
  • 7
  • 8
  • 9
  • 10
  • 11
  • 12
  • 1
  • 2
  • 3
  • 4
  • 5
  • 6
  • 7
  • 8
  • 9
  • 10
  • 11
  • 12

Mask图片: 
这里写图片描述

有几个说明

已经全部更正。


你可能感兴趣的:(opencv)