ZYNQ7000_linux开发环境搭建
ZYNQ7020_linux开发环境搭建
- 一、软件和设置
- 1、开发工具版本
- 2、交叉编译环境
- 3、安装/更新32位库文件
- 二、获取Xilinx源文件
- 三、uboot修改和编译
- 1、修改zynq-common.h
- 2、修改zynq_zybo.h
- 3、修改uboot中的dts
- 4、修改Makefile
- 5、uboot配置、编译
- 四、内核编译
- 五、修改设备树
- 1、修改设备树中关于QSPI的选项。
- 2、编译
- 六、ramdisk文件
- 七、.bit,fsbl
- 八、采用SDK生产bin,并下载
- 九、启动结果
一、软件和设置
1、开发工具版本
- 虚拟机: VMware® Workstation 14 Pro
- Ubuntu :ubuntu16.04 LTS 64bit
- Vivado+SDK:2017.4
- 平台:zynq7020(clg400)
2、交叉编译环境
使用xilinx集成开发环境SDK中自带的工具。
export ARCH=arm
export CROSS_COMPILE=arm-linux-gnueabihf-
export PATH=/opt/Xilinx/SDK/2017.4/gnu/aarch32/lin/gcc-arm-linux-gnueabi/bin/:$PATH
3、安装/更新32位库文件
一共三条,第一:系统更新(个人随意);第二:安装库文件(注意安装提示),第三:为make menuconfig准备(scripts/kconfig/lxdialog/dialog.h:38:20: fatal error: curses.h: No such file or directory)
sudo apt-get update
sudo apt-get install lib32z1 lib32ncurses5 lib32stdc++6 libbz2-1.0:i386
sudo apt-get install libncurses5-dev
二、获取Xilinx源文件
这里直接使用git从xilinx github中获取uboot和kernel源文件。
git clone https://github.com/Xilinx/linux-xlnx.git
git clone https://github.com/Xilinx/u-boot-xlnx.git
三、uboot修改和编译
1、修改zynq-common.h
我打算用QSPI启动,所以修改的是/your_dir/u-boot-xlnx/include/zynq-common.h中的qspiboot的配置。为FSBL和.bit文件和uboot预留5M;内核占5M,没用使用ramdisk的情况下在bootm中加一个横。
"qspiboot=echo Copying Linux from QSPI flash to RAM... && " \
		"sf probe 0 0 0 && " \
		"sf read ${kernel_load_address} 0x500000 ${kernel_size} && " \
		"sf read ${devicetree_load_address} 0xA00000 ${devicetree_size} && " \
		"echo Copying ramdisk... && " \
		"sf read ${ramdisk_load_address} 0xB00000 ${ramdisk_size} && " \
		"bootm ${kernel_load_address} ${ramdisk_load_address} ${devicetree_load_address}\0" \
/* 不使用ramdisk的版本*/
"qspiboot=echo Copying Linux from QSPI flash to RAM... && " \
		"sf probe 0 0 0 && " \
		"echo Copying kernel... && " \
		"sf read ${kernel_load_address} 0x500000 ${kernel_size} && " \
		"echo Copying devicetree... && " \
		"sf read ${devicetree_load_address} 0xA00000 ${devicetree_size} && " \
		"bootm ${kernel_load_address} - ${devicetree_load_address}\0" \
2、修改zynq_zybo.h
这里选择在zybo的基础上修改配置,它和zynq-common.h在同一目录.在其中添加一条.
#define CONFIG_OF_EMBED
3、修改uboot中的dts
把/your_dir/u-boot-xlnx/arch/arm/dts目录中zynq-zybo.dts的部分设备注释掉.
&clkc {
	ps-clk-frequency = <50000000>;
};
/*
&gem0 {
	status = "okay";
	phy-mode = "rgmii-id";
	phy-handle = <ðernet_phy>;

	ethernet_phy: ethernet-phy@0 {
		reg = <0>;
		device_type = "ethernet-phy";
	};
};
*/
&qspi {
	u-boot,dm-pre-reloc;
	status = "okay";
};
/*
&sdhci0 {
	u-boot,dm-pre-reloc;
	status = "okay";
};
*/
&uart1 {
	u-boot,dm-pre-reloc;
	status = "okay";
};
/*
&usb0 {
	status = "okay";
	dr_mode = "host";
	usb-phy = <&usb_phy0>;
};
*/
4、修改Makefile
打开在uboot目录中Makefile,注释掉一下代码(这一步可以省略)。
#quiet_cmd_cfgcheck = CFGCHK  $2
#cmd_cfgcheck = $(srctree)/scripts/check-config.sh $2 \
#		$(srctree)/scripts/config_whitelist.txt $(srctree)
5、uboot配置、编译
make distclean
make zynq_zybo_defconfig
make
将生成的uboot 复制位uboot.elf。备用
四、内核编译
make distclean
make xilinx_zynq_defconfig
make -j4 UIMAGE_LOADADDR=0x8000 uImage
在./arch/arm/boot/下的uimage复制备用。
五、修改设备树
1、修改设备树中关于QSPI的选项。
/*这个bootargs是为从emmc启动文件系统而准备的,刚开始时emmc中并没有文件系统也没关系,在uboot中我们配置为带ramdisk的QSPI选项就可以*/
bootargs = "console=ttyPS0,115200 root=/dev/mmcblk0p1 rw rootfstype=ext4 rootwait";
		stdout-path = "serial0:115200n8";
//
*****
/////
&qspi {
	status = "okay";
	is-dual = <0>;
	num-cs = <1>;
	flash@0 {
		compatible = "n25q128a11";
		reg = <0x0>;
		spi-tx-bus-width = <1>;
		spi-rx-bus-width = <4>;
		spi-max-frequency = <50000000>;
		#address-cells = <1>;
		#size-cells = <1>;
		partition@qspi-fsbl-uboot {
			label = "qspi-fsbl-uboot";
			reg = <0x0 0x500000>;
		};
		partition@qspi-linux {
			label = "qspi-linux";
			reg = <0x500000 0x500000>;
		};
		partition@qspi-device-tree {
			label = "qspi-device-tree";
			reg = <0xA00000 0x100000>;
		};
		partition@qspi-rootfs {
			label = "qspi-rootfs";
			reg = <0xB00000 0x700000>;
		};
	};
};
2、编译
这里利用内核的dtc,在内核目录下执行一下代码。
./scripts/dtc/dtc -I dts -O dtb -o ./arch/arm/boot/devicetree.dtb ./arch/arm/boot/dts/zynq-zybo.dts
将devicetree.dtb复制备用。
六、ramdisk文件
从xilinx wiki页面中下载我们想要的ramdisk。当然,你也可以自己做。
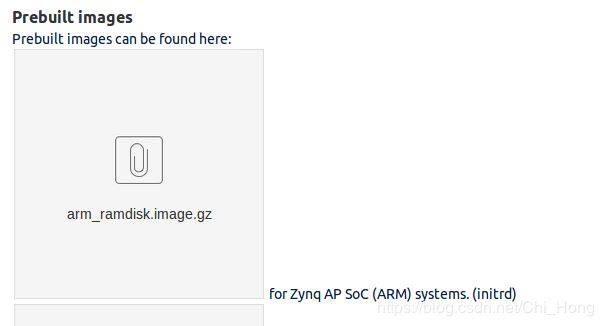 这个是xilinx 提供的生成好的文件系统,将它更名为ramdisk.image.gz。我们需要的是uramdisk,还需要设置:
mkimage -A arm -T ramdisk -C gzip -d ramdisk.image.gz uramdisk.image.gz
生成的uramdisk.image.gz备用。
七、.bit,fsbl
打开一个在裸机状态下验证可用的vivado 工程(可以用sdk下的helloworld工程)。导入到SDK,新建FSBL。复制system_wrapper.bit 和fsbl.elf备用。
八、采用SDK生产bin,并下载
注意这里的uImage、devicetree、uramdisk偏移地址。之后点击生成BOOT.bin文件,接着采用SDK把程序烧写到FLASH中,sdk2017.4烧写flash需要调整时钟,具体看这里。

九、启动结果
将开发板的启动方式设置为QSPI启动,之后上电,在SecureCRT中的结果:
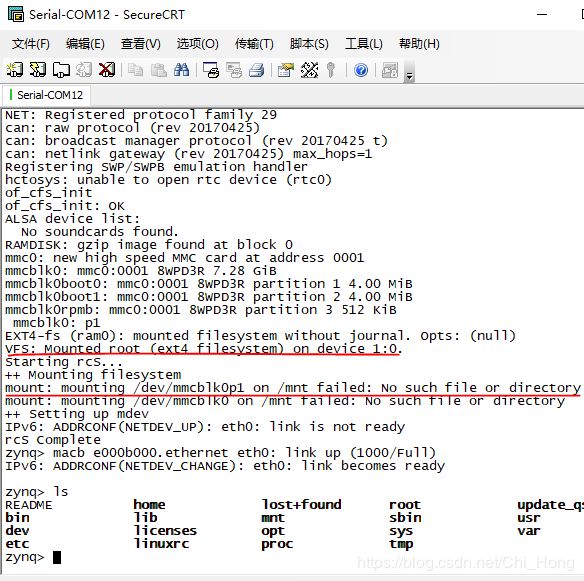
由于采用的是带有uramdisk的启动方式,所以提示了从device 1:0挂载了根文件系统,但是设备树中也设置了bootargs从emmc中启动所以有了第二行的failed。关于ramdisk的内容以后在分析,首先看下文件系统中的设备1:0是谁:
