设置phpMyAdmin可管理多个数据库服务器、自动登录等操作
一、如何设置phpMyAdmin自动登录?
首先在根目录找到config.sample.inc.php复制一份文件名改为config.inc.php(如果已经存在 config.inc.php 文件,则直接修改该文件即可)。
打开config.inc.php 找到 $cfg['Servers'][$i]['auth_type'],将
然后在下面追加如下代码:
二、如何取消phpMyAdmin自动登录?
只需把
温馨提示:
$cfg['Servers'][$i]['auth_type'] 有三个待选项值,即 cookie、http、config。用的比较多的是 cookie与config。当在正式环境时,用 cookie,要求用户必须输入正确的用户名与密码,而在本地测试服务器时,一般用 config,省得session失效后又得输入用户名与密码,以节省开发时间
#####################################
默认安装phpMyAdmin,通常只能连一台MySql服务器,其配置信息是保存在phpMyAdmin的配置文件里的,当我们需要在多台服务器之间进行切换登陆的时候,修改起来非常麻烦。遵照下面的配置方法,我们可以方便的使用phpMyAdmin连接多台MySql
方法一:登陆phpMyAdmin时输入服务器ip地址、用户名、密码
缺点:登陆操作比较繁琐,而且切换服务器时须首先退出当前所登陆的服务器
操作步骤:修改phpMyAdmin目录下的 /libraries/config.default.php
将默认值false修改为true;
为避免修改失误所造成的损失,强烈建议先备份 config.default.php 文件为 config.default.php.bak

方法二:登陆phpMyAdmin时只需输入用户名、密码,服务器地址为下拉列表可选,登陆后也可选择其他服务器快速切换。 (推荐)
优点:登陆操作简便,登陆后切换服务器无须退出当前连接。
操作步骤:
1. 备份phpMyAdmin根目录下的config.sample.inc.php 文件为 config.sample.inc.php.bak (此操作避免修改失误所造成的损失)
2. 备份phpMyAdmin根目录下的config.inc.php 文件为 config.inc.php.bak (此操作避免修改失误所造成的损失)
3. 将phpMyAdmin根目录下的config.sample.inc.php 文件重命名为config.inc.php
4. 修改config.inc.php文件,找到 First server 注释部分,将其修改为以下内容
请注意我们使用一个for循环来配置所有服务器的信息,循环变量$i的初始值为1,遍历$hosts数组中的配置信息,循环体中的内容无须更改。
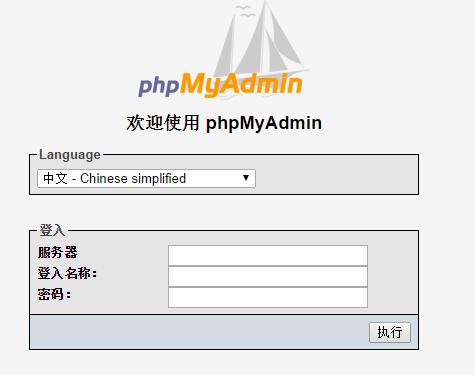
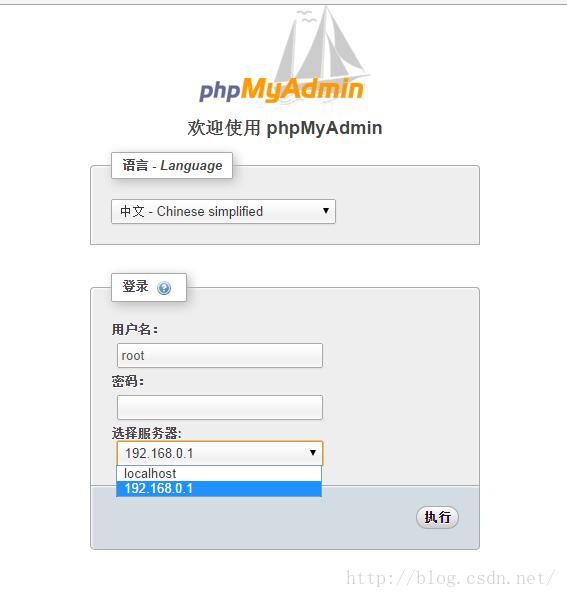
修改完成后保存文件,重新登陆,如果可以看到phpMyAdmin登陆界面中出现服务器候选列表,说明修改正确.
注意一点, 数组下标不要从0开始,不然会提示错误的,无效的服务器索引:“0”
登录前,

登录后,

首先在根目录找到config.sample.inc.php复制一份文件名改为config.inc.php(如果已经存在 config.inc.php 文件,则直接修改该文件即可)。
打开config.inc.php 找到 $cfg['Servers'][$i]['auth_type'],将
$cfg['Servers'][$i]['auth_type'] = 'cookie';$cfg['Servers'][$i]['auth_type'] = 'config';然后在下面追加如下代码:
$cfg['Servers'][$i]['user']          = 'root';      // 设置的mysql用户名
$cfg['Servers'][$i]['password']      = '123456';    // 设置的mysql密码
二、如何取消phpMyAdmin自动登录?
只需把
$cfg['Servers'][$i]['auth_type'] = 'config';$cfg['Servers'][$i]['auth_type'] = 'cookie';温馨提示:
$cfg['Servers'][$i]['auth_type'] 有三个待选项值,即 cookie、http、config。用的比较多的是 cookie与config。当在正式环境时,用 cookie,要求用户必须输入正确的用户名与密码,而在本地测试服务器时,一般用 config,省得session失效后又得输入用户名与密码,以节省开发时间
#####################################
默认安装phpMyAdmin,通常只能连一台MySql服务器,其配置信息是保存在phpMyAdmin的配置文件里的,当我们需要在多台服务器之间进行切换登陆的时候,修改起来非常麻烦。遵照下面的配置方法,我们可以方便的使用phpMyAdmin连接多台MySql
方法一:登陆phpMyAdmin时输入服务器ip地址、用户名、密码
缺点:登陆操作比较繁琐,而且切换服务器时须首先退出当前所登陆的服务器
操作步骤:修改phpMyAdmin目录下的 /libraries/config.default.php
/**
 * allow login to any user entered server in cookie based authentication
 *
 * @global boolean $cfg[‘AllowArbitraryServer’]
 */
$cfg['AllowArbitraryServer'] = true;
将默认值false修改为true;
为避免修改失误所造成的损失,强烈建议先备份 config.default.php 文件为 config.default.php.bak

方法二:登陆phpMyAdmin时只需输入用户名、密码,服务器地址为下拉列表可选,登陆后也可选择其他服务器快速切换。 (推荐)
优点:登陆操作简便,登陆后切换服务器无须退出当前连接。
操作步骤:
1. 备份phpMyAdmin根目录下的config.sample.inc.php 文件为 config.sample.inc.php.bak (此操作避免修改失误所造成的损失)
2. 备份phpMyAdmin根目录下的config.inc.php 文件为 config.inc.php.bak (此操作避免修改失误所造成的损失)
3. 将phpMyAdmin根目录下的config.sample.inc.php 文件重命名为config.inc.php
4. 修改config.inc.php文件,找到 First server 注释部分,将其修改为以下内容
$hosts = array(
'1'=>array('host'=>'localhost','user'=>'root','password'=>'123456'),
'2'=>array('host'=>'192.168.0.1','user'=>'ciray','password'=>'123456')
);
//$hosts数组下标从1开始,host的值为服务器ip地址,user是对应的MySql登陆用户名,password的值为MySql的登陆密码,请修改成你自己的
//$hosts数组配置了两台服务器,如果你有多台服务器,请按数组下标递增的顺序添加配置信息
/*
 * First server
 */
for($i=1;$i<=count($hosts);$i++){
	/* Authentication type */
	$cfg['Servers'][$i]['auth_type'] = 'cookie';
	/* Server parameters */
	$cfg['Servers'][$i]['host'] = $hosts[$i]['host'];   //修改host
	$cfg['Servers'][$i]['connect_type'] = 'tcp';
	$cfg['Servers'][$i]['compress'] = false;
	/* Select mysqli if your server has it */
	$cfg['Servers'][$i]['extension'] = 'mysql';
	$cfg['Servers'][$i]['AllowNoPassword'] = true;
	$cfg['Servers'][$i]['user'] = $hosts[$i]['user'];  //修改用户名
	$cfg['Servers'][$i]['password'] = $hosts[$i]['password']; //密码
	/* rajk – for blobstreaming */
	$cfg['Servers'][$i]['bs_garbage_threshold'] = 50;
	$cfg['Servers'][$i]['bs_repository_threshold'] = '32M';
	$cfg['Servers'][$i]['bs_temp_blob_timeout'] = 600;
	$cfg['Servers'][$i]['bs_temp_log_threshold'] = '32M';
}
请注意我们使用一个for循环来配置所有服务器的信息,循环变量$i的初始值为1,遍历$hosts数组中的配置信息,循环体中的内容无须更改。
修改完成后保存文件,重新登陆,如果可以看到phpMyAdmin登陆界面中出现服务器候选列表,说明修改正确.
注意一点, 数组下标不要从0开始,不然会提示错误的,无效的服务器索引:“0”
登录前,

登录后,

有一点要注意,用localhost登录后,选择上图下拉中的192.168.0.1后,还会让你登录,都登录后,在多个服务器这间切换就不要在登录了。