【Flume】【源码分析】flume中http监控类型的源码分析,度量信息分析,以及flume的事件总线
在flume1.5.2中,如果想要通过http方式的监控来获取flume相关度量值,通过在启动脚本后添加如下内容即可:
-Dflume.monitoring.type=http -Dflume.monitoring.port=34545
监控
-D的属性可以通过System.getProerties()直接获取得到,那么以上两个属性是通过方法loadMonitoring()来读取,该方法在flume入口中Application
 private void loadMonitoring() {
    Properties systemProps = System.getProperties();
    Set keys = systemProps.stringPropertyNames();
    try {
      if (keys.contains(CONF_MONITOR_CLASS)) {
        String monitorType = systemProps.getProperty(CONF_MONITOR_CLASS);
        Class klass;
        try {
          //Is it a known type?
          klass = MonitoringType.valueOf(
                  monitorType.toUpperCase()).getMonitorClass();
        } catch (Exception e) {
          //Not a known type, use FQCN
          klass = (Class) Class.forName(monitorType);
        }
        this.monitorServer = klass.newInstance();
        Context context = new Context();
        for (String key : keys) {
          if (key.startsWith(CONF_MONITOR_PREFIX)) {
            context.put(key.substring(CONF_MONITOR_PREFIX.length()),
                    systemProps.getProperty(key));
          }
        }
        monitorServer.configure(context);
        monitorServer.start();
      }
    } catch (Exception e) {
      logger.warn("Error starting monitoring. "
              + "Monitoring might not be available.", e);
    }

} public void start() {
jettyServer = new Server();
//We can use Contexts etc if we have many urls to handle. For one url,
//specifying a handler directly is the most efficient.
SelectChannelConnector connector = new SelectChannelConnector();
connector.setReuseAddress(true);
connector.setPort(port);
jettyServer.setConnectors(new Connector[] {connector});
jettyServer.setHandler(new HTTPMetricsHandler());
try {
jettyServer.start();
while (!jettyServer.isStarted()) {
Thread.sleep(500);
}
} catch (Exception ex) {
LOG.error("Error starting Jetty. JSON Metrics may not be available.", ex);
}注意看上面有一个处理器HttpMetricsHandler
看它的handle()方法
public void handle(String target,
            HttpServletRequest request,
            HttpServletResponse response,
            int dispatch) throws IOException, ServletException {
      // /metrics is the only place to pull metrics.
      //If we want to use any other url for something else, we should make sure
      //that for metrics only /metrics is used to prevent backward
      //compatibility issues.
      if(request.getMethod().equalsIgnoreCase("TRACE") || request.getMethod()
        .equalsIgnoreCase("OPTIONS")) {
        response.sendError(HttpServletResponse.SC_FORBIDDEN);
        response.flushBuffer();
        ((Request) request).setHandled(true);
        return;
      }
      if (target.equals("/")) {
        response.setContentType("text/html;charset=utf-8");
        response.setStatus(HttpServletResponse.SC_OK);
        response.getWriter().write("For Flume metrics please click"
                + "  here.");
        response.flushBuffer();
        ((Request) request).setHandled(true);
        return;
      } else if (target.equalsIgnoreCase("/metrics")) {
        response.setContentType("application/json;charset=utf-8");
        response.setStatus(HttpServletResponse.SC_OK);
        Map> metricsMap = JMXPollUtil.getAllMBeans();
        String json = gson.toJson(metricsMap, mapType);
        response.getWriter().write(json);
        response.flushBuffer();
        ((Request) request).setHandled(true);
        return;
      }
      response.sendError(HttpServletResponse.SC_NOT_FOUND);
      response.flushBuffer();
      //Not handling the request returns a Not found error page.
} 1、首先是禁止了TRACE和OPTIONS两种请求
TRACE- 回显服务器收到的请求,主要用于测试或诊断。
OPTIONS - 返回服务器针对特定资源所支持的HTTP请求方法。也可以利用向Web服务器发送'*'的请求来测试服务器的功能性。
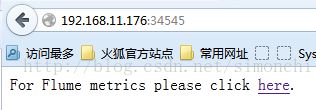
2、如果你输入的地址是ip:port,没有输入后面的metrics,效果如下:
3、如果你输入了metrics请求,后面就是具体的处理逻辑了
Map> metricsMap = JMXPollUtil.getAllMBeans(); 这后面的内容就是JMX相关的了,与本文没太大关系,具体请见: http://baike.baidu.com/link?url=k1fgRfj4e720XBCEKIZT1eV1Zfct5LCkufbwKYj1s5MFvaK7kS0Vlb-lfdmkXOWFjJB9vYA1PWgYPYupkIRzJ_
度量
现在来看看某一个度量信息是如何一步步被获取到的,以
OpenConnectionCount
为例
在类SourceCounter中
构造方法
public SourceCounter(String name) {
    super(MonitoredCounterGroup.Type.SOURCE, name, ATTRIBUTES);
}而该方法又被BasicSourceSemantics类的configure调用
在会上就回到了入口Application的loadMonitoring方法了,这一条链就通了
上面构造方法调用了父类构造方法
protected MonitoredCounterGroup(Type type, String name, String... attrs) {
    this.type = type;
    this.name = name;

    Map counterInitMap = new HashMap();

    // Initialize the counters
    for (String attribute : attrs) {
      counterInitMap.put(attribute, new AtomicLong(0L));
    }

    counterMap = Collections.unmodifiableMap(counterInitMap);

    startTime = new AtomicLong(0L);
    stopTime = new AtomicLong(0L);

} 在整个SourceCounter类中,我们看到有很多increment,add,get的方法,那么这些方法什么时候被调用呢?
我们看一个具体的AvroSource类
public Status append(AvroFlumeEvent avroEvent) {
    logger.debug("Avro source {}: Received avro event: {}", getName(),
        avroEvent);
    sourceCounter.incrementAppendReceivedCount();
    sourceCounter.incrementEventReceivedCount();

    Event event = EventBuilder.withBody(avroEvent.getBody().array(),
        toStringMap(avroEvent.getHeaders()));

    try {
      getChannelProcessor().processEvent(event);
    } catch (ChannelException ex) {
      logger.warn("Avro source " + getName() + ": Unable to process event. " +
          "Exception follows.", ex);
      return Status.FAILED;
    }

    sourceCounter.incrementAppendAcceptedCount();
    sourceCounter.incrementEventAcceptedCount();

    return Status.OK;
}各个属性都是在组件运行过程,实时的去赋值的。
{
"SOURCE.r1": {
"OpenConnectionCount": "0", 当前有效的连接数
"Type": "SOURCE", 组件类型
"AppendBatchAcceptedCount": "0", source端刚刚追加放入channel的批量数
"AppendBatchReceivedCount": "0", source端刚刚追加的批量的数量,比如一批100,该度量为2,就是source端收到了200个events
"EventAcceptedCount": "10", source端目前成功放入channel的event数量
"StopTime": "0",
"AppendReceivedCount": "0", source端刚刚追加的目前收到的event数量
"StartTime": "1422502242340", source组件启动的时间
"EventReceivedCount": "10", source端已经收到的event数量
"AppendAcceptedCount": "0" source端刚刚追加放入channel的event数量
},
"SOURCE.r2": {
"OpenConnectionCount": "0",
"Type": "SOURCE",
"AppendBatchAcceptedCount": "0",
"AppendBatchReceivedCount": "0",
"EventAcceptedCount": "10",
"StopTime": "0",
"AppendReceivedCount": "0",
"StartTime": "1422502242341",
"EventReceivedCount": "10",
"AppendAcceptedCount": "0"
},
"CHANNEL.c1": {
"EventPutSuccessCount": "20", 成功放入通道的event数量
"ChannelFillPercentage": "0.0", 通道使用比例
"Type": "CHANNEL",
"StopTime": "0",
"EventPutAttemptCount": "20", 正在放进通道的event数量
"ChannelSize": "0",
"StartTime": "1422502242328",
"EventTakeSuccessCount": "20", 从通道中成功取出event的数量
"ChannelCapacity": "10000000",
"EventTakeAttemptCount": "2105" 正在从通道中取event的数量
},
"SINK.k1": {
"BatchCompleteCount": "0", 成功完成输出的批量事件个数
"ConnectionFailedCount": "0", sink端连接失败的次数
"EventDrainAttemptCount": "20", 试图消耗的事件数量,从通道中拿来消耗
"ConnectionCreatedCount": "1", sink端连接数
"Type": "SINK",
"BatchEmptyCount": "1042", 批量取空的次数
"ConnectionClosedCount": "0", 连接关闭的次数
"EventDrainSuccessCount": "20", 成功处理的event数量
"StopTime": "0",
"StartTime": "1422502242340",
"BatchUnderflowCount": "1" 没有达到batchsize的批量event数目,也就是这一批没有达到batchsize就处理了,根据这个值可调整batchsize
},
"SINK.k2": {
"BatchCompleteCount": "0",
"ConnectionFailedCount": "0",
"EventDrainAttemptCount": "0",
"ConnectionCreatedCount": "1",
"Type": "SINK",
"BatchEmptyCount": "1042",
"ConnectionClosedCount": "0",
"EventDrainSuccessCount": "0",
"StopTime": "0",
"StartTime": "1422502243048",
"BatchUnderflowCount": "0"
}
}
事件总线
以上是监控相关的度量信息,那么回到本文的一开始,loadMonitoring方法,我们来看看它的调用过程,分析下eventBus相关内容
if(reload) {
        EventBus eventBus = new EventBus(agentName + "-event-bus");
        PollingPropertiesFileConfigurationProvider configurationProvider =
            new PollingPropertiesFileConfigurationProvider(agentName,
                configurationFile, eventBus, 30);
        components.add(configurationProvider);
        application = new Application(components);
        eventBus.register(application);
      } else {
        PropertiesFileConfigurationProvider configurationProvider =
            new PropertiesFileConfigurationProvider(agentName,
                configurationFile);
        application = new Application();
        application.handleConfigurationEvent(configurationProvider.getConfiguration());
}eventBus是一个事件总线
EventBus的代码:
public void register(Object object) {
Multimap
finder.findAllHandlers(object);
handlersByType.putAll(methodsInListener);
}
在EventBus进行register时,会通过一个finder找到register的object中被标注了@Subscribe的方法。并且按照EventType进行分类,放在handlersByType里。这样当EventBus的post新的Event时,就可以根据EventType调用相应的EventHandler。
该事件总线注册了application,按照上面的解释,会寻找Application类中注解了@Subscribe的方法@Subscribe
public synchronized void handleConfigurationEvent(MaterializedConfiguration conf) {
stopAllComponents();
startAllComponents(conf);
}关于事件总线的详细介绍,请参考: http://blog.csdn.net/kiwi_coder/article/details/9338721
