Android自定义通知栏Notification字体适配问题
Android自定义通知栏Notification字体适配问题
- 前言
- 方案
- 通过设置style的方式
- 通过设置的contentTitle和contentText的文字来获取
- 通过contentTitle/contentText(反射获取)的id来取得TextView
- 按照安卓版本猜测
- github
- 感谢
前言
项目之前自定义的通知栏是一直有一个问题,就是不同的手机厂商生产的手机状态栏的背景颜色是不同的,所以自定义布局的字体颜色就会出现冲突,看了几种适配方案都不是特别完美,把官方文档看了个遍,最后在前辈的总结下添加自己的方案终于得到了一个比较完美的解决方案。文章底部附送github链接。
方案
通过设置style的方式
通过设置style的方式来设置字体颜色可以达到字体颜色随着下拉菜单的背景色变化而变化,字体的颜色会跟随系统的字体颜色。
这个方案给出了低于5.0的Android版本和高于5.0的Android版本的不同的方案,在低于5.0版本的添加一行代码 android:textAppearance="@style/TextAppearance.StatusBar.EventContent" 如下:
<TextView
    android:id="@+id/notification_content_title"
    android:textAppearance="@style/TextAppearance.StatusBar.EventContent"
    android:layout_width="wrap_content"
    android:layout_height="wrap_content"
    android:text="Custom_content_title" />
在高于5.0的版本中,在res的values-v21目录下定义styles.xml文件如下:
<?xml version="1.0" encoding="utf-8"?>
<resources>
    <style
        name="NotificationContentTitle"
        parent="@android:style/TextAppearance.Material.Notification.Title" />
    <style
        name="NotificationContentText"
        parent="@android:style/TextAppearance.Material.Notification.Line2" />
</resources>
自定义通知布局文件调用:
 <LinearLayout
            android:layout_width="0dp"
            android:layout_height="wrap_content"
            android:layout_weight="1"
            android:orientation="vertical" >

            <TextView
                android:id="@+id/notification_content_title"
                style="@style/NotificationContentTitle"
                android:layout_width="wrap_content"
                android:layout_height="wrap_content"
                android:text="Custom_content_title" />

            <TextView
                android:id="@+id/notification_content_text"
                style="@style/NotificationContentText"
                android:layout_width="wrap_content"
                android:layout_height="wrap_content"
                android:text="Custom_content_text" />
        </LinearLayout>
缺点:要适配5.0以上和5.0以下版本,在测试过程中在部分机型改变手机主题后字体颜色并没有跟随系统的字体颜色。
通过设置的contentTitle和contentText的文字来获取
这种方法通过我们创建默认的Notification设置我们指定的文字后通过遍历拿到子Tview,在通过
getText()判断是不是我们设定的文字,如果是就通过.getTextColors().getDefaultColor()拿到系统默认的字体颜色。
首先我们需要创建一个默认的系统通知并且设置我们指定的ContentTitle和ContentText
/**
     * 创建默认的Notification获取默认通知内RemoteViews
     *
     * @param context
     * @return
     */
    @SuppressWarnings("deprecation")
    private RemoteViews buildFakeRemoteViews(Context context) {
        Notification.Builder builder;
                builder = new Notification.Builder(context);
                builder.setContentTitle(fakeContentTitle)
                       .setContentText(fakeContentText)
                       .setTicker("fackTicker");
                Notification notification = builder.getNotification();
                RemoteViews remoteViews = notification.contentView;
                    return remoteViews;
    }
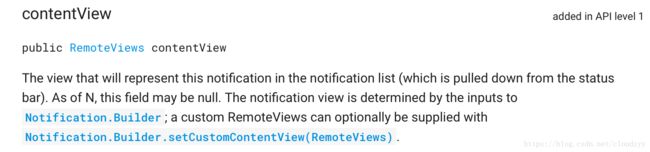
我们可以看到返回的是一个RemoteView,这个RemoteViews给我们提供了一种可以在其他进程中生成View并进行更新的机制,这里就不介绍RemoteViews了,这里我们主要是通过RemoteViews在自定义的通知布局中设置了TextView并在代码中动态地更新了其显示的内容。少年你以为这样就行了么,哼 你还是太年轻了。在android N之后的版本经测试notification.contentView会返回null,如果返回null那么我们根本拿不到里面的布局。这时候怎么办,少年你别慌,这时候基础我们的法宝 百度 谷歌 。但是我硬是没搜到解决方案,这条路走不通可怎么办。我尼玛,不解决我下面怎么吹NB啊,我默默的打开的我的宝典Android Documentation ,这里我们可看到文档告诉我们为什么返回null。
最后在我翻遍了所有关于Notification的文档后找到了这个方法:
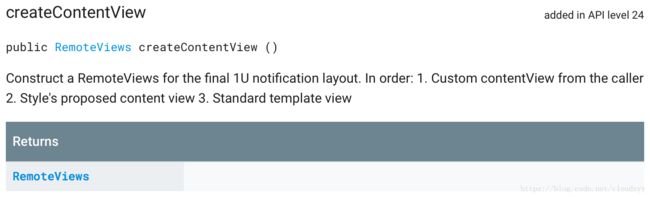
可以看到文档说返回的是一个最终的RemoteViews的内容视图,这样我们的问题就解决了这个问题,我们修改下上面的方法:
/**
     * 创建默认的Notification获取默认通知内RemoteViews
     *
     * @param context
     * @return
     */
    @SuppressWarnings("deprecation")
    private RemoteViews buildFakeRemoteViews(Context context) {

        Notification.Builder builder;
        builder = new Notification.Builder(context);
        builder.setContentTitle(fakeContentTitle)
                .setContentText(fakeContentText)
                .setTicker("fackTicker");

        RemoteViews remoteViews = null;

        if (builder != null) {

            //notification.contentView 在android N 被弃用 返回的remoteViews有可能是空的
            //翻遍官方文档找到builder.createContentView() 来获取remoteViews
            // 官方文档原话:Construct a RemoteViews for the final 1U notification layout.
            //理论上返回为默认RemoteViews 经测试 有效

            if (Build.VERSION.SDK_INT >= Build.VERSION_CODES.N) {

                remoteViews = builder.createContentView();

            } else {

                Notification notification = builder.getNotification();
                remoteViews = notification.contentView;
            }

        }
        return remoteViews;
    }
通过我们设置的contentTitle和contentText的文字来获取对应的textView
 /**
     * 通过我们设置的contentTitle和contentText的文字来获取对应的textView
     * @param remoteViews
     * @return
     */
    private boolean NotificationTextColorByText(final RemoteViews remoteViews) {
        if (DEBUG) {
            log("fetchNotificationTextColorByText");
        }
        fetchMode = "ByText";
        try {
            if (remoteViews != null) {
                TextView contentTitleTextView = null, contentTextTextView = null;
                View notificationRootView = remoteViews.apply(context, new FrameLayout(context));

                Stack<View> stack = new Stack<View>();
                stack.push(notificationRootView);
                while (!stack.isEmpty()) {
                    View v = stack.pop();
                    if (v instanceof TextView) {
                        final TextView childTextView = ((TextView) v);
                        final CharSequence charSequence = childTextView.getText();
                        if (TextUtils.equals(fakeContentTitle, charSequence)) {
                            contentTitleTextView = childTextView;

                        } else if (TextUtils.equals(fakeContentText, charSequence)) {
                            contentTextTextView = childTextView;

                        }
                if ((contentTitleTextView != null) && (contentTextTextView != null)) {
                            break;
                        }
                    }
                    if (v instanceof ViewGroup) {
                        ViewGroup vg = (ViewGroup) v;
                        final int count = vg.getChildCount();
                        for (int i = 0; i < count; i++) {
                            stack.push(vg.getChildAt(i));
                        }
                    }
                }
                stack.clear();
                return checkAndGuessColor(contentTitleTextView, contentTextTextView);
            }
        } catch (Throwable e) {
            e.printStackTrace();
        }
        return false;
    }
获取文字默认颜色:
private boolean checkAndGuessColor(TextView contentTitleTextView, TextView contentTextTextView) {

        if (contentTitleTextView != null) {
            contentTitleColor = contentTitleTextView.getTextColors().getDefaultColor();
        }
        if (contentTextTextView != null) {
            contentTextColor = contentTextTextView.getTextColors().getDefaultColor();
        }
       f (contentTitleColor != INVALID_COLOR && contentTextColor != INVALID_COLOR) {
            return true;
        }

        if (contentTitleColor != INVALID_COLOR) {
            if (isLightColor(contentTitleColor)) {
                contentTextColor = DEFAULT_LIGHT_CONTENT_TEXT_COLOR;
            } else {
                contentTextColor = DEFAULT_DARK_CONTENT_TEXT_COLOR;
            }
            return true;
        }
        if (contentTextColor != INVALID_COLOR) {
            if (isLightColor(contentTextColor)) {
                contentTitleColor = DEFAULT_LIGHT_CONTENT_TITLE_COLOR;
            } else {
                contentTitleColor = DEFAULT_DARK_CONTENT_TITLE_COLOR;
            }
            return true;
        }
        return false;
    }
这样就解决了我们的需求,不过这个方法有可能不兼容AppCompatActivity,但是我测试了暂时没有出现问题。
通过contentTitle/contentText(反射获取)的id来取得TextView
为了解决上个方法出现的问题我们在上述的基础上在通过反射获取的方法获取TextView,代码比较好理解所以不做过多解释。
核心代码:
/**
     * 通过contentTitle/contentText(反射获取)的id来取得TextView
     *
     * @param remoteViews
     * @return
     */
    private boolean fetchNotificationTextColorById(final RemoteViews remoteViews) {
        if (DEBUG) {
            log("fetchNotificationTextColorById");
        }
        fetchMode = "ById";
        try {
            final int systemNotificationContentTitleId = getAndroidInternalResourceId("title");//android.R.id.title;
            final int systemNotificationContentTextId = getAndroidInternalResourceId("text");//获取android.R.id.text
            if (DEBUG) {
                log("systemNotificationContentId -> #" + Integer.toHexString(systemNotificationContentTextId));
            }
            if (remoteViews != null && remoteViews.getLayoutId() > 0) {
                TextView contentTitleTextView = null, contentTextTextView = null;
                View notificationRootView = LayoutInflater.from(context).inflate(remoteViews.getLayoutId(), null);
                View titleView = notificationRootView.findViewById(systemNotificationContentTitleId);
                if (titleView instanceof TextView) {
                    contentTitleTextView = (TextView) titleView;
                }
                if (systemNotificationContentTextId > 0) {
                    View contentView = notificationRootView.findViewById(systemNotificationContentTextId);
                    contentTextTextView = (TextView) contentView;
                }
                return checkAndGuessColor(contentTitleTextView, contentTextTextView);
            }
        } catch (Throwable e) {
            e.printStackTrace();
        }
        return false;
    }
获取id:
public static int getAndroidInternalResourceId(String resourceName) {
        //获取"android"包名里的id
        //即com.android.internal.R.id.resourceName
        //实际上如果getIdentifier没有的话,下面反射的方式也应该是没有的
        //defType = "id",还可以有"layout","drawable"之类的
        final int id = Resources.getSystem().getIdentifier(resourceName, "id", "android");//defType和defPackage必须指定
        if (id > 0) {
            return id;
        }

        try {
            // 如果上面的方法没有返回id 通过反射获取
            // 反射的方法取com.android.internal.R.id.resourceName
            // 通知栏的大图标imageView的id="icon"
            // 标题是"title" 内容是"text"
            Class<?> clazz = Class.forName("com.android.internal.R$id");
            Field field = clazz.getField(resourceName);
            field.setAccessible(true);
            return field.getInt(null);
        } catch (Exception e) {
        }
        return 0;
    }
这样通过这几个方法我们就能获取手机的背景色进行设置字体颜色。
按照安卓版本猜测
这种方法只是通过原生的版本进行设置,但是国内厂商都对android进行的订制所以这种方法不是很有效果,但是若果是原生系统返回为准确的颜色。
代码:
    /**
     * 按照安卓版本纯猜测
     * 我们要知道每个版本颜色进行设置
     * 这是只是举个例子
     */
    private void fetchNotificationTextColorBySdkVersion() {
        fetchMode = "BySdkVersion";
        final int SDK_INT = Build.VERSION.SDK_INT;
        final boolean isLightColor = (SDK_INT >= Build.VERSION_CODES.HONEYCOMB)
                && (SDK_INT < Build.VERSION_CODES.LOLLIPOP);// 安卓3.0到4.4之间是黑色通知栏
        if (isLightColor) {
            contentTitleColor = DEFAULT_LIGHT_CONTENT_TITLE_COLOR;
            contentTextColor = DEFAULT_LIGHT_CONTENT_TEXT_COLOR;
        } else {// DRAK
            if (SDK_INT >= Build.VERSION_CODES.LOLLIPOP) {
                contentTitleColor = ANDROID_5_CONTENT_TITLE_COLOR;
                contentTextColor = ANDROID_5_CONTENT_TEXT_COLOR;
            } else {
                contentTitleColor = DEFAULT_DARK_CONTENT_TITLE_COLOR;
                contentTextColor = DEFAULT_DARK_CONTENT_TEXT_COLOR;
            }
        }
    }
github
地址: 点这
感谢
- 感谢 Android自定义通知样式适配 文章,参考 点这.
- 感谢 设置Android通知栏Notification的字体/图标颜色随背景色变化而变化 文章,参考 点这.
- 感谢 Mixiaoxiao 作者,参考 点这.
- 感谢 Notification显示过程详解 作者,参考 点这.