Spring MVC+hibernate 项目的总结(对初学者)
这个是自己第一个用spring mvc 架构编写的web应用。遇到了不少的知识点, 在项目过程中,随着问题的一个一个解决,也收获了不少。 在此总结一下,希望能对大家有个帮助。
初期软件安装需求
安装eclipse 最好直接安装jee版本, 如果安装se版本要下载web插件。google一下插件的名字。
安装Tomcat文件,解压缩,然后在eclipse中的windows-》perfermance中找到server,设置Tomcat 文件夹的路径。
安装Mysql,解压或者安装之后,将mysql-connector-java-5.1.38-bin.jar 文件放到Tomcat-》lib文件夹下面, 将tomcat与mysql进行关联。
Spring配置: 下载springsource-tool-suite-3.7.3.RELEASE-e4.5.2-updatesite, 里面的lib文件夹中的jar文件是每次用到spring时进行关联的文件。 注意,所有spring的jar版本要一样。还要引用commons-logging-1.2.jar
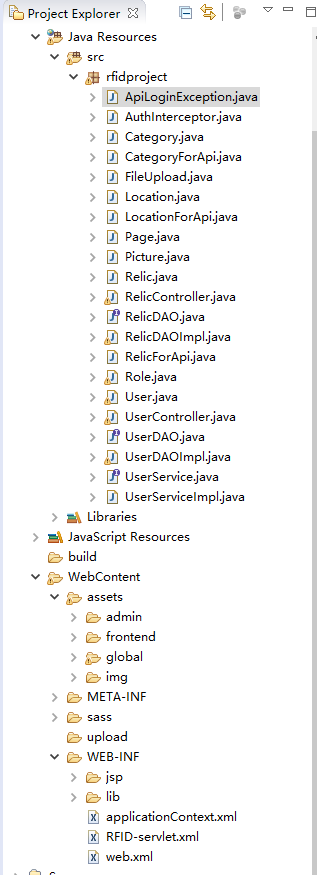
文件结构
下图中比较重要的是这个三个.xml的配置文件 上面那两个是针对spring mvc 的, 下面的web.xml 是针对java web的,具体的配置代码就不放了,网上查查很多的。而且如果不想用这个.xml配置文件的 也可以用@configuration这个。需要注意的是这个配置文件一定要配置好,不然会非常麻烦。

我在这个项目中用到的.jar包

项目中的注意事项
项目的架构
- 前端-主要是jsp编写的 里面用到了一个购买的模板,其他的技术要点就是jquery、bootstrap和jstl
- 服务器端- 主要就是通过各种@controller中的方法来实现具体功能。需要注意的是路径和对get 和 post 的支持, 如果不在方法的括号中添加RequestMethod, 则两种都支持。

- 关于 DAO层,service层, controller层, view层下面这篇文章写的很清楚了
(http://blog.csdn.net/zdwzzu2006/article/details/6053006) - Javabean
Spring MVC和hibernate这种架构是将要存到数据库中的数据以javabean的形式通过hibernate实现数据的存储和读取的。
基本的Javabean格式是private的属性, 相关的setter和getter,没有constructor, 类必须声明为public(外部可以访问到)。
还有一点要提到的是@autowired 注释, 这个spring提供的注释是省去了每次生成一个object需要new 这个过程。还有就是不用在.xml文件中配置DAO(Data Access Object)层的bean,具体的原理大家可以谷歌下。
翻页功能
我是在网上找了一个Page的class,这一个class就够了,它主要记录每页的大小(也就是每页最多显示的记录条数),页数,总记录条数,当前页,第一页,下一页,最后一页。
那么如何使用这个class实现翻页效果呢?这里我就说一下大概的流程。
在前端需要有一个hidden的input来记录当前页
<input name="page.curPage" id="curpage" value="1" type="hidden">input>然后前端的分页我用的是bootstrap, 大家可以去bootstrap查一下pagination。
这个代码比较多,就放一小段比较关键的在这里
<c:forEach var="i" begin="1" end="${page.pageCount}">
<c:if test="${i==page.curPage}">
    <c:choose>
    <c:when test="${page.curPage==1}">
      <li class="active" ><a href="#">${i} <span class="sr-only">(current)span>a>li>
      <script>
           document.getElementById('previous').className = "disabled";
      script>
    c:when>
    <c:otherwise>
      <c:choose>
      <c:when test="${page.curPage==page.pageCount}">
          <li class="active" ><a href="#">${i} <span class="sr-only">(current)span>a>li>
          <script>
                $(document).ready(function(){
                    document.getElementById('next').className = "disabled";
                });
          script>
      c:when>
      <c:otherwise>
          <li class="active" ><a href="#">${i} <span class="sr-only">(current)span>a>li>
      c:otherwise>
      c:choose>
    c:otherwise>
    c:choose>
c:if>
function forward(curpage){
document.getElementById("curpage").value=curpage;
document.formUser.submit();
}后台controller的作用主要是new一个page的Object 然后在dao层和view层来回传递。
@RequestMapping(value = "/userControl.do", method = RequestMethod.GET)
public String userControl(ModelMap model,HttpServletRequest req) {
      Page page = new Page();
      HttpSession session = req.getSession();
      session.removeAttribute("search");
      List users = userService.listUsers(page);
      model.addAttribute("page",page);
      model.addAttribute("Users", users);
      model.addAttribute("command", new User());
      return "result";
}
在DAO层page的用法
public List checkName(String name, Page page){
  String hql = "FROM User WHERE name like :name";
  Session session = this.sessionFactory.getCurrentSession();
  Query query = session.createQuery(hql);
  query.setParameter("name","%"+name+"%");
  page.setRecordCount(query.list().size());
  page.freshPage();
  query.setFirstResult((page.getCurPage() - 1) * page.getPageSize());
  query.setMaxResults(page.getPageSize());
  List users = query.list();
  return users;
}
上传图片
对于上传文件和图片需要注意的是windows下的路径需要\转义成/
public class FileUpload {

    public static String uploadFile(MultipartFile file, HttpServletRequest request) throws IOException {

        String filePath = "C:\\我的文件夹\\Tomcat\\webapps\\RFID\\upload\\";
        String fileName = file.getOriginalFilename();
        File tempFile = new File(filePath, fileName);
        if (!tempFile.getParentFile().exists()) {
            tempFile.getParentFile().mkdir();
        }
        if (!tempFile.exists()) {
            tempFile.createNewFile();
        }
        file.transferTo(tempFile);
        System.out.println(filePath + tempFile.getName());
        return "/RFID/upload/" + tempFile.getName();
    }

}
多条件搜索
多条件搜索用动态string作为hql的方法实现(建议),或者用criteria的查询方法(不建议)
@Transactional
    public List searchRelicById(String name, String location_id, String category_id, Page page){
        Session session = this.sessionFactory.getCurrentSession();
        String hql = "FROM Relic r WHERE 1=1";
        if(name!=null && name!=""){
            hql=hql+" and r.name like '%"+name+"%'";
        }
        if(location_id!=null && location_id!=""){
            hql=hql+" and r.location.id = "+location_id;
        }
        if(category_id!=null && category_id!=""){
            hql=hql+" and r.category.id = "+category_id;
        }
        Query query = session.createQuery(hql);
        page.setRecordCount(query.list().size());
        page.freshPage();
        query.setFirstResult((page.getCurPage() - 1) * page.getPageSize());
        query.setMaxResults(page.getPageSize());
        List relics = query.list();
        return relics;
    }
以上就是这个项目的总结,代码不方便上传,请见谅。
未经本人同意请勿转载