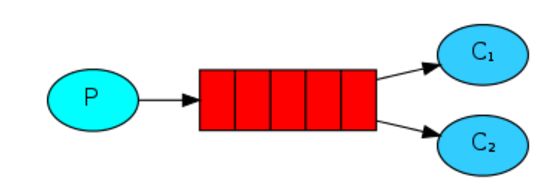
RabbitMQ是实现AMQP(高级消息队列协议)的消息中间件的一种,最初起源于金融系统,用于在分布式系统中存储转发消息,在易用性、扩展性、高可用性等方面表现不俗。和普通的queue比较起来,生产和消费不再针对内存里的一个Queue对象,而是某台服务器上的RabbitMQ Server实现的消息队列。
RabbitMQ主要是为了实现系统之间的双向解耦而实现的。当生产者大量产生数据时,消费者无法快速消费,那么需要一个中间层。保存这个数据。
首先来他需要安装erlang语言包和rabbitmq-server,启动服务,然后打开端口5672
服务器(CentOS7)
yum install erlang
yum install rabbitmq-server
systemctl start rabbitmq-server
systemctl status rabbitmq-server
firewall-cmd --add-port=5672/tcp --permanent
systemctl restart firewalld
Python客户端(windows),安装pika模块
C:\WINDOWS\system32>pip install pika
Collecting pika
  Downloading pika-0.10.0-py2.py3-none-any.whl (92kB)
    100% |################################| 102kB 632kB/s
Installing collected packages: pika
Successfully installed pika-0.10.0
现在看看Python里面如何使用:
例1 Hello World
发送
import pika
# ######################### 生产者 #########################
#绑定到一个broker上面
connection = pika.BlockingConnection(pika.ConnectionParameters(
        host='sydnagios'))
channel = connection.channel()

#创建一个queue用来传输信息
channel.queue_declare(queue='hello1')

#RabbitMQ不可以直接给queue发送信息,必须通过exchange,这里空字符串表示默认的exchange
channel.basic_publish(exchange='',
                      routing_key='hello1',
                      body='Hello World!')
print(" [x] Sent 'Hello World!'")

#清空queue,断开连接
connection.close()
接收
#!/usr/bin/env python
import pika

# ########################## 消费者 ##########################
connection = pika.BlockingConnection(pika.ConnectionParameters(
    host='sydnagios'))
channel = connection.channel()
# 和生产者一样,这里也需要定义一个queue,这是因为我们不知道到底是生产者和消费者谁先执行;这个queue即使多次定义也只会创建一个对象
channel.queue_declare(queue='hello1')


# 每当接收到一个信息,pika库会自动调用callback函数
def callback(ch, method, properties, body):
    print(" [x] Received %r" % body)


# 指定callback从哪个queue获取信息
channel.basic_consume(callback,
                      queue='hello1',
                      no_ack=True)
print(' [*] Waiting for messages. To exit press CTRL+C')

# 死循环,不停阻塞接收信息
channel.start_consuming()
如果在RabbitMQ的服务器上执行以下操作,可以看见queue里面有几个信息
比如发送者发送了2条信息之后,可以看见hello1数目变成2,如果我用客户端去取了2次,那么他又会变成0
[root@sydnagios nagvis]# sudo rabbitmqctl list_queues
Listing queues ...
hello   0
hello1  2
kakaxi1 0
...done.
例2, 工作队列和可靠性
例1里面我们通过一个queue发送和接受了信息;我们也可以创建一个工作队列(Task Queue)来给多个客户端发送信息,这种模型适合于那种特别耗时的任务;感觉这个和之前线程池的方式类似,所有的任务放在queue里面,然后每个线程(客户端)不停地去取任务执行。
在默认情况下,任务的分发是通过round-robin(轮换)的方式实现的,比如C1接受任务1,C2任务2,C1任务3,C2任务4...这样的缺点是如果任务的耗时不同,可能C1一直在执行一堆繁重的任务,而C2分到的都是轻量级的任务,一直很空闲。我们可以通过指定channel.basic_qos(prefetch_count=1)来实现公平分发,换句话说消息只会分发给空闲的客户端。
RabbitMQ里面有3种方式来确保消息的可靠性。
第一个方式是在消费者方面进行ACK的确认,每次成功接收消息之后发送确认信号,如果意外中止了,RabbitMQ会把任务重新放入队列中,然后发给下一个客户端,比如C1如果刚刚收到任务1就挂了,因为C1没有确认,那么RabitMQ会把任务1重新发给C2;确认是通过下面的代码实现的
import pika
# ########################## 消费者 ##########################
connection = pika.BlockingConnection(pika.ConnectionParameters(
        host='sydnagios'))
channel = connection.channel()
channel.queue_declare(queue='hello1')
def callback(ch, method, properties, body):
    print(" [x] Received %r" % body)
    import time
    time.sleep(10)
    print ('ok')
    ch.basic_ack(delivery_tag = method.delivery_tag)
channel.basic_consume(callback,
           queue='hello1',
           no_ack=False)
print(' [*] Waiting for messages. To exit press CTRL+C')
channel.start_consuming()
---------
 [*] Waiting for messages. To exit press CTRL+C
 [x] Received b'Hello World!'
ok
注意no_ack默认是Fasle,因此可以不写
ch.basic_ack如果忘记写了,后果会很严重,客户端掉线的时候,RabbitMQ会转发消息给下一个客户,但是他不会释放掉没有被ACK的消息,这样内存不被不断的吃掉。
可以通过下面命令进行debug
[root@sydnagios nagvis]# rabbitmqctl list_queues name messages_ready messages_unacknowledged
Listing queues ...
hello   0       0
hello1  0       0
kakaxi1 0       0
task_queue      0       0
第二种方式是确保queue不会丢失,注意这种方式对已经创建过的queue无效!
注意客户端和服务器端申明的时候都要指定
channel.queue_declare(queue='hello', durable=True)
第三种可靠性的方法是消息的持久化,针对生产者指定delivery_mode=2,这样即使生产者那边挂了,生产者那边会重新把任务放入队列。
channel.basic_publish(exchange='',
                      routing_key='hello',
                      body='Hello World!',
                      properties=pika.BasicProperties(
                          delivery_mode=2, # make message persistent
                      ))
最后来个完整的例子
生产者
#!/usr/bin/env python
# -*- coding:utf-8 -*-
# Author Yuan Li
#!/usr/bin/env python
import pika
import sys
connection = pika.BlockingConnection(pika.ConnectionParameters(
        host='sydnagios'))
channel = connection.channel()
#queue durable
channel.queue_declare(queue='task_queue', durable=True)
message = ' '.join(sys.argv[1:]) or "Hello World!"
channel.basic_publish(exchange='',
                      routing_key='task_queue',
                      body=message,
                      properties=pika.BasicProperties(
                         delivery_mode = 2, # make message persistent
                      ))
print(" [x] Sent %r" % message)
connection.close()
消费者
#!/usr/bin/env python
# -*- coding:utf-8 -*-
# Author Yuan Li
#!/usr/bin/env python
import pika
import time
connection = pika.BlockingConnection(pika.ConnectionParameters(
        host='sydnagios'))
channel = connection.channel()
channel.queue_declare(queue='task_queue', durable=True)
print(' [*] Waiting for messages. To exit press CTRL+C')
def callback(ch, method, properties, body):
    print(" [x] Received %r" % body)
    time.sleep(body.count(b'.'))
    print(" [x] Done")
    #千万别忘了,不然不会释放内存
    ch.basic_ack(delivery_tag = method.delivery_tag)

#按任务繁忙分配,而不是顺序分配
channel.basic_qos(prefetch_count=1)
channel.basic_consume(callback,
                      queue='task_queue')
channel.start_consuming()
例3 发布订阅
RabbitMQ可以通过一个Exchange来同时给多个Queue发送消息,一般情况下,P(发布者)并不知道信息应该发给哪个queue,这些都是有Exchange的类型决定的。Exchange有3种常用类型
fanout 转发消息到所有的绑定队列
direct 通过一个关键字(routingkey)匹配转发消息到指定的队列
topic 模糊匹配转发消息到指定的队列
header
可以看见exchange的列表
[root@sydnagios nagvis]# rabbitmqctl list_exchanges
Listing exchanges ...
        direct
amq.direct      direct
amq.fanout      fanout
amq.headers     headers
amq.match       headers
amq.rabbitmq.log        topic
amq.rabbitmq.trace      topic
amq.topic       topic
...done.
Fanout类型
消费者
# Author:Alex Li
#!/usr/bin/env python
import pika
connection = pika.BlockingConnection(pika.ConnectionParameters(
        host='sydnagios'))
channel = connection.channel()
channel.exchange_declare(exchange='logs_fanout',
                         type='fanout')
# 随机创建队列,exclusive=True表示当我们断开和消费者的连接,这个queue会自动删除
result = channel.queue_declare(exclusive=True)
queue_name = result.method.queue
# 绑定
channel.queue_bind(exchange='logs_fanout',
                   queue=queue_name)
print(' [*] Waiting for logs. To exit press CTRL+C')
def callback(ch, method, properties, body):
    print(" [x] %r" % body)
channel.basic_consume(callback,
                      queue=queue_name,
                      no_ack=True)
channel.start_consuming()
生产者
# Author:Alex Li
#!/usr/bin/env python
import pika
import sys
connection = pika.BlockingConnection(pika.ConnectionParameters(
        host='sydnagios'))
channel = connection.channel()
channel.exchange_declare(exchange='logs_fanout',
                         type='fanout')
message = '456'

#注意在fanout模式里面,routing_key为空
channel.basic_publish(exchange='logs_fanout',
                      routing_key='',
                      body=message)
print(" [x] Sent %r" % message)
connection.close()
Direct类型,消息发送给和他自己的routing key同名binding key的队列,多个队列可以使用同一个binding key
direct可以指定关键字来绑定queue,比如第一个客户循环地绑定了error,info,warning3个关键字所在的queue
第二个客户只绑定了error
客户1
# Author:Alex Li
import pika
import sys
connection = pika.BlockingConnection(pika.ConnectionParameters(
        host='sydnagios'))
channel = connection.channel()
channel.exchange_declare(exchange='direct_logs_test_1',
                         type='direct')
result = channel.queue_declare(exclusive=True)
queue_name = result.method.queue
severities = ['error', 'info', 'warning']
for severity in severities:
    channel.queue_bind(exchange='direct_logs_test_1',
                       queue=queue_name,
                       routing_key=severity)
print(' [*] Waiting for logs. To exit press CTRL+C')
def callback(ch, method, properties, body):
    print(" [x] %r:%r" % (method.routing_key, body))
channel.basic_consume(callback,
                      queue=queue_name,
                      no_ack=True)
channel.start_consuming()
客户2
# Author:Alex Li
import pika
import sys
connection = pika.BlockingConnection(pika.ConnectionParameters(
        host='sydnagios'))
channel = connection.channel()
channel.exchange_declare(exchange='direct_logs_test_1',
                         type='direct')
result = channel.queue_declare(exclusive=True)
queue_name = result.method.queue
severities = ['error',]
for severity in severities:
    channel.queue_bind(exchange='direct_logs_test_1',
                       queue=queue_name,
                       routing_key=severity)
print(' [*] Waiting for logs. To exit press CTRL+C')
def callback(ch, method, properties, body):
    print(" [x] %r:%r" % (method.routing_key, body))
channel.basic_consume(callback,
                      queue=queue_name,
                      no_ack=True)
channel.start_consuming()
生产者可以指定给哪些routingkey的queue发送信息,比如只发给info,那么只有客户2收到;如果发给error,那么两个客户都能收到
# Author:Alex Li
#!/usr/bin/env python
import pika
connection = pika.BlockingConnection(pika.ConnectionParameters(
        host='sydnagios'))
channel = connection.channel()
channel.exchange_declare(exchange='direct_logs_test_1',
                         type='direct')
severity = 'info'
message = '456'
channel.basic_publish(exchange='direct_logs_test_1',
                      routing_key=severity,
                      body=message)
print(" [x] Sent %r:%r" % (severity, message))
connection.close()
在topic类型下,可以让队列绑定几个模糊的关键字,之后发送者将数据发送到exchange,exchange将传入”路由值“和 ”关键字“进行匹配,匹配成功,则将数据发送到指定队列。
# 表示可以匹配 0 个 或 多个 单词
* 表示只能匹配 一个 单词
|
1
2
3
|
发送者路由值 队列中
old.boy.python old.
*
-
-
不匹配
old.boy.python old.
# -- 匹配
|
最后我们来看看RPC
简单的说就是在远程电脑执行命令然后返回结果
基本思路:
客户端发送请求(包括请求的correlation_id和reply_to队列),服务器端收到之后执行命令,返回结果到reply_to的队列里面,然后客户端从reply_to 队列读取数据
例如
result = channel.queue_declare(exclusive=True)
callback_queue = result.method.queue
channel.basic_publish(exchange='',
                      routing_key='rpc_queue',
                      properties=pika.BasicProperties(
                            reply_to = callback_queue,
                            ),
                      body=request)
注意properties属性里面有14个预定义的值,其中4个最为常见:
delivery_mode: 消息的持久化(2)
content_type:用于mime-type的编码,一般Json使用application/json
reply_to:callback的队列
correlation_id:关联RPC反馈信息和请求命令,每个请求都需要有唯一的值
演示源码
服务器端(需要先接受信息,再发布信息回去)
#!/usr/bin/env python
# -*- coding:utf-8 -*-
# Author Yuan Li
#!/usr/bin/env python
import pika

#绑定broker,创建一个队列
connection = pika.BlockingConnection(pika.ConnectionParameters(
        host='sydnagios'))
channel = connection.channel()
channel.queue_declare(queue='rpc_queue')


#定义一个斐波拉契数列作为测试
def fib(n):
    if n == 0:
        return 0
    elif n == 1:
        return 1
    else:
        return fib(n-1) + fib(n-2)

#定义一个回调函数给basic_consume使用
def on_request(ch, method, props, body):
    n = int(body)
    print(" [.] fib(%s)" % n)
    response = fib(n)

    #把结果发布回去
    ch.basic_publish(exchange='',
                     routing_key=props.reply_to,
                     properties=pika.BasicProperties(correlation_id = \
                                                         props.correlation_id),
                     body=str(response))

    ch.basic_ack(delivery_tag = method.delivery_tag)
#负载平衡
channel.basic_qos(prefetch_count=1)

#接受请求之后,自动调用on_request,内部执行函数,然后发回结果
channel.basic_consume(on_request, queue='rpc_queue')
print(" [x] Awaiting RPC requests")
channel.start_consuming()
发布者
#!/usr/bin/env python
# -*- coding:utf-8 -*-
# Author Yuan Li
#!/usr/bin/env python
import pika
import uuid
class FibonacciRpcClient(object):

    def __init__(self):
            #绑定
        self.connection = pika.BlockingConnection(pika.ConnectionParameters(
                host='sydnagios'))
        self.channel = self.connection.channel()

        #生成随机队列
        result = self.channel.queue_declare(exclusive=True)
        self.callback_queue = result.method.queue

        #指定on_response从callback_queue读取信息,阻塞状态
        self.channel.basic_consume(self.on_response, no_ack=True,
                                   queue=self.callback_queue)

    #接受返回的信息
    def on_response(self, ch, method, props, body):
        if self.corr_id == props.correlation_id:
            self.response = body

    #发送请求
    def call(self, n):
        self.response = None

        #生成一个随机值
        self.corr_id = str(uuid.uuid4())

        #发送两个参数 reply_to和 correlation_id
        self.channel.basic_publish(exchange='',
                                   routing_key='rpc_queue',
                                   properties=pika.BasicProperties(
                                         reply_to = self.callback_queue,
                                         correlation_id = self.corr_id,
                                         ),
                                   body=str(n))

        #等待接受返回结果
        while self.response is None:
            self.connection.process_data_events()
        return int(self.response)

#实例化对象
fibonacci_rpc = FibonacciRpcClient()
print(" [x] Requesting fib(30)")

#调用call,发送数据
response = fibonacci_rpc.call(30)
print(" [.] Got %r" % response)
结果如下:
"C:\Program Files\Python3\python.exe" C:/Users/yli/pycharmprojects/Exercise/Week11/c.py
 [x] Requesting fib(30)
 [.] Got 832040
参考资料:
http://www.cnblogs.com/wupeiqi/articles/5132791.html
https://www.rabbitmq.com/tutorials/tutorial-five-python.html
https://geewu.gitbooks.io/rabbitmq-quick/content/RabbitMQ%E4%BB%8B%E7%BB%8D.html


