一、前言
Glide 是安卓平台上媒体管理和图片加载框架,它内部封装了媒体解码工具、内存和磁盘缓存以及资源池等,并向用户暴露简单易用的接口。我们可以用它来获取、解码、并展示视频、图片和 GIF 动画。如果大家有用过 Picasso 应该知道,Glide 的使用方式和 Picasso 非常相似,甚至很多 API 的名称都一样。Glide是一个优秀的图片加载库,它有如下优点:
Glide可以监听Activity的生命周期管理,更加合理的管理图片的加载和释放。
加载质量,Picasso默认采用的ARGB-8888, Glide默认采用的是RGB-565,内存占用会减小一半。
Glide可以加载Gif图。
缓存策略和加载速度。Picasso缓存的是全尺寸,而Glide的缓存的图片和ImageView的尺寸相同。Glide的这个特点,让加载显得特别的快,而Picasso则因为需要在显示之前重新调整大小而导致一些延迟。
Glide可以通过自定义GlideMoudle来完成特殊的加载需求,例如加载加密的图片等。接下来我们就从源码的角度来探究一下 Glide 的内部原理。
二、分析
(一)Glide.with(……) **
首先我们来看一下Gilde的源码
/
* Begin a load with Glide by passing in a context.
*
*
* Any requests started using a context will only have the application level options applied and will not be
* started or stopped based on lifecycle events. In general, loads should be started at the level the result
* will be used in. If the resource will be used in a view in a child fragment,
* the load should be started with {@link #with(android.app.Fragment)}} using that child fragment. Similarly,
* if the resource will be used in a view in the parent fragment, the load should be started with
* {@link #with(android.app.Fragment)} using the parent fragment. In the same vein, if the resource will be used
* in a view in an activity, the load should be started with {@link #with(android.app.Activity)}}.
*
*
*
* This method is appropriate for resources that will be used outside of the normal fragment or activity
* lifecycle (For example in services, or for notification thumbnails).
*
*
* @see #with(android.app.Activity)
* @see #with(android.app.Fragment)
* @see #with(android.support.v4.app.Fragment)
* @see #with(android.support.v4.app.FragmentActivity)
*
* @param context Any context, will not be retained.
* @return A RequestManager for the top level application that can be used to start a load.
*/
public static RequestManager with(Context context) {
RequestManagerRetriever retriever = RequestManagerRetriever.get(); return retriever.get(context);
}
/**
 * Begin a load with Glide that will be tied to the given {@link android.app.Activity}'s lifecycle and that uses the
 * given {@link Activity}'s default options.
 *
 * @param activity The activity to use.
 * @return A RequestManager for the given activity that can be used to start a load.
 */
public static RequestManager with(Activity activity) {
    RequestManagerRetriever retriever = RequestManagerRetriever.get(); return retriever.get(activity);
}

/**
 * Begin a load with Glide that will tied to the give {@link android.support.v4.app.FragmentActivity}'s lifecycle
 * and that uses the given {@link android.support.v4.app.FragmentActivity}'s default options.
 *
 * @param activity The activity to use.
 * @return A RequestManager for the given FragmentActivity that can be used to start a load.
 */
public static RequestManager with(FragmentActivity activity) {
    RequestManagerRetriever retriever = RequestManagerRetriever.get(); return retriever.get(activity);
}

/**
 * Begin a load with Glide that will be tied to the given {@link android.app.Fragment}'s lifecycle and that uses
 * the given {@link android.app.Fragment}'s default options.
 *
 * @param fragment The fragment to use.
 * @return A RequestManager for the given Fragment that can be used to start a load.
 */
@TargetApi(Build.VERSION_CODES.HONEYCOMB)
public static RequestManager with(android.app.Fragment fragment) {
    RequestManagerRetriever retriever = RequestManagerRetriever.get(); return retriever.get(fragment);
}

/**
 * Begin a load with Glide that will be tied to the given {@link android.support.v4.app.Fragment}'s lifecycle and
 * that uses the given {@link android.support.v4.app.Fragment}'s default options.
 *
 * @param fragment The fragment to use.
 * @return A RequestManager for the given Fragment that can be used to start a load.
 */
public static RequestManager with(Fragment fragment) {
    RequestManagerRetriever retriever = RequestManagerRetriever.get(); return retriever.get(fragment);
}
总结:可以传入的参数有
@see #with(android.app.Activity)
@see #with(android.app.Fragment)
@see #with(android.support.v4.app.Fragment)
@see #with(android.support.v4.app.FragmentActivity)
同时将Activity/Fragment作为with()参数的好处是:图片加载会和Activity/Fragment的生命周期保持一致,比如Paused状态在暂停加载,在Resumed的时候又自动重新加载。所以我建议传参的时候传递Activity 和 Fragment给Glide,而不是Context。
三、原理
接下来介绍Glide的原理。
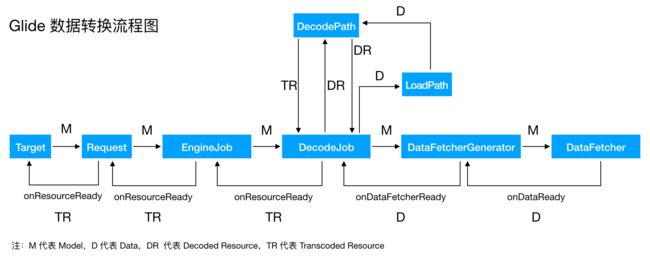
1.Glide的资源获取组件:
· Model: 原始资源,比如Url,AndroidResourceId, File等
· Data: 中间资源,比如Stream,ParcelFileDescriptor(ContentProvider共享文件时比较常用,其实就是操作系统的文件描述符的封装,里面有in out err三个取值。也有人说是链接建立好之后的socket句柄。)等
· Resource:直接使用的资源,包括Bitmap,Drawable等
2.Glide库的资源复用:
· Android的内存申请几乎都在new的时候发生,而new较大对象(比如Bitmap时),更加容易触发GC_FOR_ALLOW。所以Glide尽量的复用资源来防止不必要的GC_FOR_ALLOC引起卡顿。
· 最显著的内存复用就是内存LruResourceCache(第一次从网络或者磁盘上读取到Resource时,并不会保存到LruCache当中,当Resource被release时,也就是View不在需要此Resource时,才会进入LruCache当中)
· 还有BitmapPool(Glide会尽量用图片池来获取到可以复用的图片,获取不到才会new,而当LruCache触发Evicted时会把从LruCache中淘汰下来的Bitmap回收,也会把transform时用到的中间Bitmap加以复用及回收)
3.Glide库图片池:
· 3.1以前是Bitmap复用必须长宽相等才可以复用
· 3.2及以后是Size>=所需就可以复用,只不过需要调用reconfigure来调整尺寸
·3.3 Glide用AttributeStategy和SizeStrategy来实现两种策略
· 3.4图片池在收到传来的Bitmap之后,通过长宽或者Size来从KeyPool中获取Key(对象复用到了极致,连Key都用到了Pool),然后再每个Key对应一个双向链表结构来存储。每个Key下可能有很多个待用Bitmap
· 取出后要减少图片池中记录的当前Size等,并对Bitmap进行eraseColor(Color.TRANSPAENT)操作确保可用
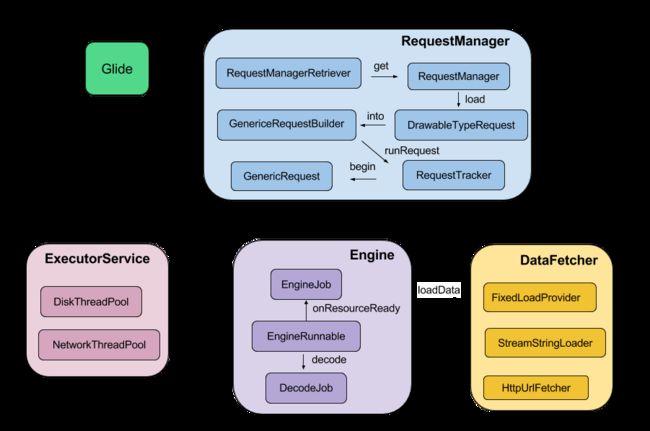
4.Glide加载发起流程:
4.1. Glide.with(context)创建RequestManager
· RequestManager负责管理当前context的所有Request
· Context可以传Fragment、Activity或者其他Context,当传Fragment、Activity时,当前页面对应的Activity的生命周期可以被RequestManager监控到,从而可以控制Request的pause、resume、clear。这其中采用的监控方法就是在当前activity中添加一个没有view的fragment,这样在activity发生onStart onStop onDestroy的时候,会触发此fragment的onStart onStop onDestroy。
· RequestManager用来跟踪众多当前页面的Request的是RequestTracker类,用弱引用来保存运行中的Request,用强引用来保存暂停需要恢复的Request。
4.2. Glide.with(context).load(url)创建需要的Request
· 通常是DrawableTypeRequest,后面可以添加transform、fitCenter、animate、placeholder、error、override、skipMemoryCache、signature等等
· 如果需要进行Resource的转化比如转化为Byte数组等需要,可以加asBitmap来更改为BitmapTypeRequest
· Request是Glide加载图片的执行单位
4.3. Glide.with(context).load(url).into(imageview)
· 在Request的into方法中会调用Request的begin方法开始执行
· 在正式生成EngineJob放入Engine中执行之前,如果并没有事先调用override(width, height)来指定所需要宽高,Glide则会尝试去获取imageview的宽和高,如果当前imageview并没有初始化完毕取不到高宽,Glide会通过view的ViewTreeObserver来等View初始化完毕之后再获取宽高再进行下一步
5.Glide加载资源:
· GlideBuilder在初始化Glide时,会生成一个执行机Engine
· Engine中包含LruCache缓存及一个当前正在使用的active资源Cache(弱引用)
· activeCache辅助LruCache,当Resource从LruCache中取出使用时,会从LruCache中remove并进入acticeCache当中
· Cache优先级LruCache>activeCache
· Engine在初始化时要传入两个ExecutorService,即会有两个线程池,一个用来从DiskCache获取resource,另一个用来从Source中获取(通常是下载)
· 线程的封装单位是EngineJob,有两个顺序状态,先是CacheState,在此状态先进入DiskCacheService中执行获取,如果没找到则进入SourceState,进到SourceService中执行下载
6.Glide的Target:
负责图片加载的回调
四、 总结
以上便是 Glide 的源码和原理,它内部的运作实在是太复杂了,但正是这种复杂的内部实现使得 Glide 的可扩展型得到增强。比如我们可以自定义磁盘缓存策略,自定义 ModelLoader 以实现 Model 到 Data 的转换,也可以自定义 ResourceDecoder 和 ResourceTranscoder 来实现资源的解码和转码。用一张图来总结整个加载过程:
好啦,文章写到这里就结束了,如果你觉得文章写得不错就给个赞呗?如果你觉得那里值得改进的,请给我留言。一定会认真查询,修正不足。谢谢。更多更详细更专业android架构资料。
文档资料整理:
视频资料整理:
资料免费领取方式: 转发+关注+点赞后,加入点击链接加入群聊:Android高级开发交流群(878873098)即可获取免费领取方式!
重要的事说三遍,关注!关注!关注!