树莓派(十四)——为数据和视频显示创建一个Web服务器应用程序
文章目录
- 1、文件结构速览
- 2、创建appcam2.py;
- 3、创建index.html:
- 4、创建camera.html:
- 5、创建style.css:
- 6、启动服务
- 7、验证
上一节我们用flask创建了一个视频流媒体服务器,这一节让我们用Flask创建另一个python 网络服务器,它将处理传感器和视频流捕获的数据。
本节用到的传感器是温湿度传感器,也就是 文档十二 https://blog.csdn.net/damanchen/article/details/85622109 安装的DHT11温湿度传感器,大家可以参考之前的文档。
下面直接进入正题,在上一节的基础上进行更深入的学习。
1、文件结构速览
我们这次创建的应用为camwebserver2,最后的文件结构如下:
pi@raspberrypi:~/flask $ tree camwebserver2/
camwebserver2/
├── appcam2.py
├── camera_pi.py
├── camera_pi.pyc
├── static
│   └── style.css
└── templates
    ├── camera.html
    └── index.html
2、创建appcam2.py;
其中最主要的代码为appcam2.py,代码如下:
#!/usr/bin/env python
# -*- coding: utf-8 -*-
#
#  	appCam.py
#  	based on tutorial ==> https://blog.miguelgrinberg.com/post/video-streaming-with-flask
# 	PiCam Local Web Server with Flask
# MJRoBot.org 19Jan18

from flask import Flask, render_template, Response
app = Flask(__name__)

# Raspberry Pi camera module (requires picamera package)
from camera_pi import Camera

import Adafruit_DHT
import time

# get data from DHT sensor
def getDHTdata():
	DHT22Sensor = Adafruit_DHT.DHT22
	DHTpin = 16
	hum, temp = Adafruit_DHT.read_retry(DHT22Sensor, DHTpin)

	if hum is not None and temp is not None:
		hum = round(hum)
		temp = round(temp, 1)
	return temp, hum


@app.route("/")
def index():
	timeNow = time.asctime( time.localtime(time.time()) )
	temp, hum = getDHTdata()

	templateData = {
      'time': timeNow,
      'temp': temp,
      'hum'	: hum
	}
	return render_template('index.html', **templateData)

@app.route('/camera')
def cam():
	"""Video streaming home page."""
	timeNow = time.asctime( time.localtime(time.time()) )
	templateData = {
      'time': timeNow
	}
	return render_template('camera.html', **templateData)


def gen(camera):
    """Video streaming generator function."""
    while True:
        frame = camera.get_frame()
        yield (b'--frame\r\n'
               b'Content-Type: image/jpeg\r\n\r\n' + frame + b'\r\n')


@app.route('/video_feed')
def video_feed():
    """Video streaming route. Put this in the src attribute of an img tag."""
    return Response(gen(Camera()),
                    mimetype='multipart/x-mixed-replace; boundary=frame')


if __name__ == '__main__':
    app.run(host='0.0.0.0', port =8080, debug=True, threaded=True)
以上代码主要内容:
当有人在浏览器上输入地址,即我们网页的主页面(index.html),就会生成请求;
通过此请求,代码中的第一件事是使用函数从DHT读取传感器数据。
接下来,从系统中检索用的实际时间。
通过手头的数据,我们的脚本返回到网页(index.html):时间,温度和湿度对之前的请求的反馈。
另外,当用户想要看到视频流时,可以调用页面“/相机”。在这种情况下,3个路径都会在最后一步中显示。并渲染camera.html。
因此,我们来看看将用于构建前端的index.html,camera.html和style.css文件:
3、创建index.html:
<html>
<head>
    <title>CFQ's Sensor Datatitle>
    <link rel="stylesheet" href='../static/style.css'/>
head>
<body>
    <h1>CFQ's Sensor Datah1>
    <h3> TEMPERATURE   ==>  {{ temp }} oCh3>
    <h3> HUMIDITY (Rel.) ==>  {{ hum }} %h3>
    <hr>
    <h3> Last Sensors Reading: {{ time }} ==> REFRESHa>h3>
    <hr>
    <h3> CFQ's Live Streaming ==> <a href="/camera" class="button">LIVEa>h3>
    <hr>
    <p> @2019/1/2 Developed by CFQp>
body>
html>
4、创建camera.html:
基本上,这个页面与我们之前创建的页面相同,只是我们添加了一个按钮来返回到主页面。
<html>
  <head>
    <title>CFQ's Live Streamingtitle>
    <link rel="stylesheet" href='../static/style.css'/>
    <style>
    body {
        text-align: center;
    }
    style>
  head>
  <body>
    <h1>CFQ's Live Streamingh1>
    <h3><img src="{{ url_for('video_feed') }}" width="80%">h3>
    <h3>{{ time }}h3>
    <hr>
    <h3> Return to main page ==> RETURNa>h3>
    <hr>
    <p> @2019/1/2 Developed by CFQp>
  body>
html>
5、创建style.css:
body{
    background: blue;
    color: yellow;
    padding:1%
}

.button {
    font: bold 15px Arial;
    text-decoration: none;
    background-color: #EEEEEE;
    color: #333333;
    padding: 2px 6px 2px 6px;
    border-top: 1px solid #CCCCCC;
    border-right: 1px solid #333333;
    border-bottom: 1px solid #333333;
    border-left: 1px solid #CCCCCC;
}
6、启动服务
在正确的位置创建好上面的文件之后,就可以重新运行我们的flask服务了:
pi@raspberrypi:~/flask/camwebserver2 $ ls
appcam2.py  camera_pi.py  camera_pi.pyc  dht_test.py  static  templates
pi@raspberrypi:~/flask/camwebserver2 $ sudo python appcam2.py
 * Running on http://0.0.0.0:8080/ (Press CTRL+C to quit)
 * Restarting with stat
 * Debugger is active!
 * Debugger pin code: 293-786-523
7、验证
在浏览器上输入ip和端口,会在浏览器上看到如下如下界面:(可以看到温湿度的值)

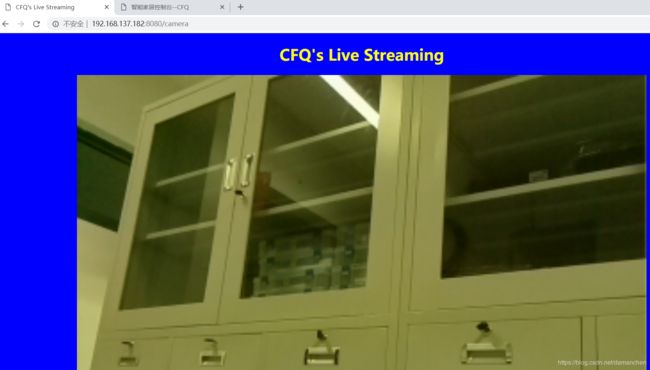
点击“LIVE”后,会跳转到我们的摄像头界面:

再点击“RETURN”按钮之后,又会返回第一个温湿度的界面。
如上操作说明我们的实验成功!
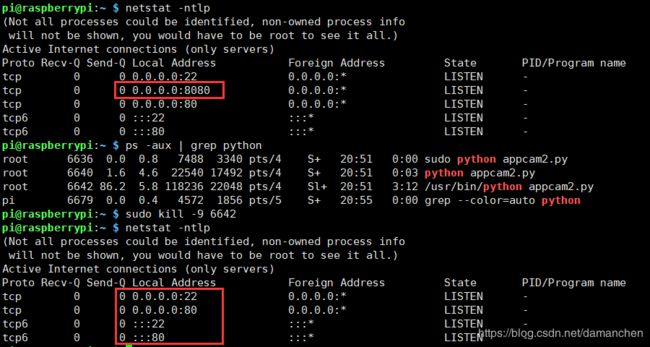
注意:在运行新的服务之前,需要将之前的服务彻底关掉,否则会出现端口被占用的情况
1、查看运行服务的进程PID:

2、将其杀掉:
![]()
下图可以看到再我们没杀死占用8080端口的进程的时候,我们可以看到8080端口还在被使用,再我们将其进程kill掉之后就没有了:

现在我们就可以放心的启动我们的新的服务了。
在这节的实验中,我们学习了为数据和视频显示创建一个Web服务器应用程序,仅提供一个参考。大家可以根据自己的应用场景,改写相应的代码,实现自己的物联网应用
(如果遇到什么问题,请及时联系我~~~)