Android 自定义标题栏
背景
在大多数应用的页面顶部,都会有标题栏,这种业务相关性不大,通用性很强的视图,第一直觉,是要把它抽取,做成通用的。


最先想到的是使用google推荐的ActionBar 和 ToolBar。但要标题文字居中就特别麻烦,ActionBar得使用自定义布局setCustomView(),设置后,它提供的其它api就相当于废弃了,原有的api无法操作自定义的布局,相当于只能用它当作容器,view的操作还得自己写;ToolBar更奇怪,得用TextView覆盖在ToolBar视图之上,再给ToolBar 的标题文字清空,它的setTitle函数这就算是废掉了,,后续都操作自己加入的title TextView。唉,标题居中都这么麻烦,原谅我我不擅长使用这个轮子,… 那就按照项目中的要求自己造一个吧。
方法一 include 通用型布局
这是早期项目中的比较原始的一般做法
实现
- 将标题栏写成通用型的布局文件,在主布局文件中inclide
新建titlebar_view.xml 大致代码如下:
<RelativeLayout xmlns:android="http://schemas.android.com/apk/res/android"
    android:layout_width="match_parent"
    android:layout_height="@dimen/titlebar_height"
    android:background="#CCCCCC"
    android:orientation="vertical">
    <LinearLayout
        android:layout_width="wrap_content"
        android:layout_height="match_parent"
        android:background="#AAAAAA"
        android:gravity="center_vertical"
        android:orientation="horizontal">
        <ImageView
            android:layout_width="36dp"
            android:layout_height="36dp"
            android:src="@android:drawable/ic_menu_compass"/>
        <TextView
            android:layout_width="wrap_content"
            android:layout_height="wrap_content"
            android:text="首页"/>
    LinearLayout>
    <TextView
        android:id="@+id/titlebar_title_tv"
        android:layout_width="wrap_content"
        android:layout_height="wrap_content"
        android:layout_centerInParent="true"
        android:text="title text"/>
    <LinearLayout
        android:layout_width="wrap_content"
        android:layout_height="match_parent"
        android:background="#AAAAAA"
        android:layout_alignParentRight="true"
        android:gravity="center_vertical"
        android:orientation="horizontal">
        <TextView
            android:layout_width="wrap_content"
            android:layout_height="wrap_content"
            android:text="重设"/>
        <ImageView
            android:layout_width="36dp"
            android:layout_height="36dp"
            android:src="@android:drawable/ic_menu_add"/>
    LinearLayout>
RelativeLayout>- 在主布局文件activity_main.xml 中include titlebar_view.xml
<RelativeLayout xmlns:android="http://schemas.android.com/apk/res/android"
    android:layout_width="match_parent"
    android:layout_height="match_parent">
    <include layout="@layout/titlebar_view"/>
    <TextView
        android:layout_width="wrap_content"
        android:layout_height="wrap_content"
        android:text="Hello World!" />
RelativeLayout>
使用
Activity中对view进行操作。设置标题,控制右侧操作图标的展示隐藏等
public void setTitle(CharSequence title) {
        ((TextView)findViewById(R.id.titlebar_title_tv)).setText(title);
    }
缺陷
每个页面的布局得include这个文件,很繁琐,Activity中直接操作titlebar的子视图id,学习成本过高,而且团队开发中不易维护。
能否在xml中不用include 标题栏布局,只关注自己特有的一些布局。而且也不希望调用者关注标题栏中的各子视图的具体id
方法二 在根布局中动态添加标栏视图
自定义标题栏View 和 根容器View,在根容器中动态的把标题栏视图添加进去,这样,布局中就不需要标题栏了。
实现
- 自定义titleBarView
对外提供操作子元素方法 如 setTitle();
public class TitleBarView extends FrameLayout {
    public TitleBarView(Context context) {
        super(context);
        init();
    }
    private void init() {
        this.setId(R.id.titlebar_view);
        this.removeAllViewsInLayout();
        LayoutInflater layoutInflater = LayoutInflater.from(getContext());
        View view = layoutInflater.inflate(R.layout.titlebar_view, this, false);
        addView(view, new RelativeLayout.LayoutParams(FrameLayout.LayoutParams.MATCH_PARENT, FrameLayout.LayoutParams.WRAP_CONTENT));
    }
    /**
     * 设置标题栏文字
     */
     public void setTitle(CharSequence text){
        ((TextView)findViewById(R.id.titlebar_title_tv)).setText(text);
    }
}- 自定义根布局RootLinearLayout
初始化的时候,把TitleBarView添加到第一个元素的位子
public class RootLinearLayout extends LinearLayout {
    public RootLinearLayout(Context context, AttributeSet attrs) {
        super(context, attrs);
        init();
    }
    public RootLinearLayout(Context context, AttributeSet attrs, int defStyleAttr) {
        super(context, attrs, defStyleAttr);
        init();
    }
    @TargetApi(Build.VERSION_CODES.LOLLIPOP)
    public RootLinearLayout(Context context, AttributeSet attrs, int defStyleAttr, int defStyleRes) {
        super(context, attrs, defStyleAttr, defStyleRes);
    }
    private void init() {
        addView(new TitleBarView(getContext()), 0, new LinearLayoutCompat.LayoutParams(LinearLayout.LayoutParams.MATCH_PARENT, getResources().getDimensionPixelSize(R.dimen.titlebar_height)));
    }
}
3.在布局文件中使用RootLinearLayout 做为跟布局就可以了
<miao.t5.RootLinearLayout xmlns:android="http://schemas.android.com/apk/res/android"
    android:layout_width="match_parent"
    android:layout_height="match_parent">
    <TextView
        android:layout_width="wrap_content"
        android:layout_height="wrap_content"
        android:text="Hello World!" />
miao.t5.RootLinearLayout>
使用
public TitleBarView getTitleBar(){
        return (TitleBarView)findViewById(R.id.titlebar_view);
    }

    public void setTitle(CharSequence title) {
        getTitleBar().setText(title);
    }
缺陷
这种方法对于方法一有了很大进步,也解决了繁琐的include和需要知道标题栏子视图viewId的问题
但根布局必须是自定的RootLinearLayout,实际使用有局限性
方法三 根视图中加入自定义的xml布局
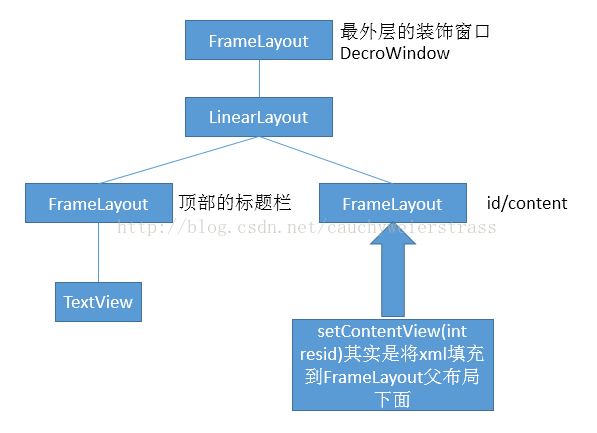
将通用型视图抽离(rootview + titlebarView + innerLoadingView + emptyView…)作为容器,各个页面的布局作为子视图被rootView动态 include,这样,各页面只需要处理自有的主业务布局了。类似于android窗口的构建方式。

图片来源于http://blog.csdn.net/cauchyweierstrass/article/details/44303657
我们在上图id/content-Fragment 里,局部再构建类似于DecroWindow的视图结构
实现
- 新建根视图布局layout_root.xml,作为根容器,被所有Activity加载
?xml version="1.0" encoding="utf-8"?>
<miao.t5.RootLinearLayout xmlns:android="http://schemas.android.com/apk/res/android"
    android:orientation="vertical" android:layout_width="match_parent"
    android:layout_height="match_parent">

    <FrameLayout
        android:id="@+id/root_content_fl"
        android:layout_width="match_parent"
        android:layout_height="match_parent">FrameLayout>
miao.t5.RootLinearLayout>
2.重写BaseActivity的setContentView( )函数,将activity_main.xml作为子视图add进root_content_fl 中
@Override
    public void setContentView(@LayoutRes int layoutResID) {
        super.setContentView(R.layout.layout_root);
        LayoutInflater.from(this).inflate(layoutResID,
        (ViewGroup) findViewById(R.id.root_content_fl), true);
    }
3.activity_main.xml就不需要关心titlebar了,正常编写自有的布局即可
<LinearLayout xmlns:android="http://schemas.android.com/apk/res/android"
    android:layout_width="match_parent"
    android:layout_height="match_parent">
    <TextView
        android:layout_width="wrap_content"
        android:layout_height="wrap_content"
        android:text="Hello World!" />
LinearLayout>
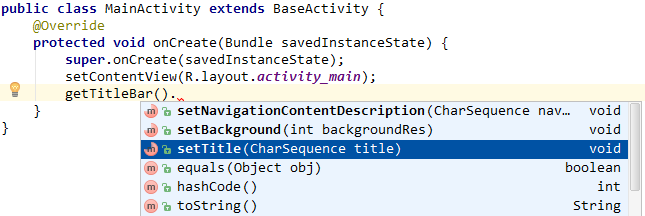
使用方式和图二一致
优化
对外TitleBar接口可见
方法二和方法三中,标题栏是以自定义组合控件 TitleBarView 的方式进行封装的,继承自FrameLayout,也就继承了所有父类的非私有函数。调用者可对其removeView,setVisable对外的安全性也降低了,使用起来也不方便。
实现
- 创建接口TitleBar 来规范我们的标题栏能够支持哪些操作
public interface TitleBar {
    void setNavigationContentDescription(CharSequence navigationContentDescription);
    void setTitle(CharSequence title);
    void setBackground(@DrawableRes int backgroundRes);
    ...
}
2.TitleBar来实现这些接口
public class TitleBarView extends FrameLayout implements TitleBar{
    public TitleBarView(Context context) {
        super(context);
        init();
    }
    private void init() {
        this.setId(R.id.titlebar_view);
        this.removeAllViewsInLayout();
        LayoutInflater layoutInflater = LayoutInflater.from(getContext());
        View view = layoutInflater.inflate(R.layout.titlebar_view, this, false);
        addView(view, new RelativeLayout.LayoutParams(FrameLayout.LayoutParams.MATCH_PARENT,
                FrameLayout.LayoutParams.WRAP_CONTENT));
    }
    @Override
    public void setNavigationContentDescription(CharSequence navigationContentDescription) {
        ((TextView)findViewById(R.id.titlebar_back_tv)).setText(navigationContentDescription);
    }
    @Override
    public void setTitle(CharSequence title) {
        ((TextView)findViewById(R.id.titlebar_title_tv)).setText(title);
    }
    @Override
    public void setBackground(@DrawableRes int backgroundRes) {
        this.setBackgroundResource(backgroundRes);
    }
}
在BaseActivity中得到TitleBar接口的实例TitleBarView,子Activity只对接口可见
public class BaseActivity extends AppCompatActivity {
    private TitleBar titleBar;
    @Override
    public void setContentView(@LayoutRes int layoutResID) {
        super.setContentView(R.layout.layout_root);
        titleBar = (TitleBarView)findViewById(R.id.titlebar_view);
        LayoutInflater.from(this).inflate(layoutResID, (ViewGroup) findViewById(R.id.root_content_fl), true);
    }
    protected TitleBar getTitleBar(){
        return titleBar;
    }
}部分界面不需要标题栏
1.使用java注解的方式
在对类进行声明是否需要标题栏,然后加载不同的layout_root视图,注解的简单使用介绍,注意:自定义的运行时注解,在获取值时会用到反射
2.通过不同的theme加载不同的根视图
类似源码中AppCompatDelegateImplV7.java#createSubDecor()函数实现
private ViewGroup createSubDecor() {
        TypedArray a = mContext.obtainStyledAttributes(R.styleable.AppCompatTheme);
        //...
        //得到theme中windowIsFloating 的值
        mIsFloating = a.getBoolean(R.styleable.AppCompatTheme_android_windowIsFloating, false);
        a.recycle();
        final LayoutInflater inflater = LayoutInflater.from(mContext);
        ViewGroup subDecor = null;
        //判断不同的style属性值加载不同的根布局
        if (!mWindowNoTitle) {
            if (mIsFloating) {
                // If we're floating, inflate the dialog title decor
                subDecor = (ViewGroup) inflater.inflate(
                        R.layout.abc_dialog_title_material, null);
            } else if (mHasActionBar) {
                subDecor = (ViewGroup) LayoutInflater.from(themedContext)
                        .inflate(R.layout.abc_screen_toolbar, null);
        } else {
            if (mOverlayActionMode) {
                subDecor = (ViewGroup) inflater.inflate(
                        R.layout.abc_screen_simple_overlay_action_mode, null);
            } else {
                subDecor = (ViewGroup) inflater.inflate(R.layout.abc_screen_simple, null);
            }
        //...
        }
        //
}
实现
自定义attrs来标注是否需要titleBarView
<declare-styleable name="CustomThemeAttrs">
        <attr name="NoTitleBar" format="boolean" />
    declare-styleable>
自定义theme
<style name="AppTheme" parent="Theme.AppCompat.Light.NoActionBar"> style> <style name="AppTheme.NoTitleBar"> <item name="NoTitleBar">falseitem> style>- 在BaseActivity的setContentView函数中处理
@Override
    public void setContentView(@LayoutRes int layoutResID) {
        //读取当前activity中的NoTitleBar属性值
        TypedArray a = obtainStyledAttributes(R.styleable.CustomThemeAttrs);
        boolean hasTitleBar = a.getBoolean(R.styleable.CustomThemeAttrs_NoTitleBar, false);
        a.recycle();
        //加载不同的根布局
        if(hasTitleBar) {
            super.setContentView(R.layout.layout_root);
            titleBar = (TitleBarView)findViewById(R.id.titlebar_view);
        }else{
            super.setContentView(R.layout.layout_root_no_titlebar);
        }
        //将页面的布局加载根布局的root_content_fl容器中
LayoutInflater.from(this).inflate(layoutResID, (ViewGroup) findViewById(R.id.root_content_fl), true);
    }
延展
结合上图中Android的窗口结构,我们再看看ActionBar在这个结构中的位置

ActionBar是插入DectorView下面,和我们contentView平级
最近看了标题栏和状态栏一体化/沉浸式状态栏 在Android 4.0~5.0上的解决方案
也是在DectorView中添加空的View占据statusbar
那么我们完全可以将titleBarView add进DectorView 中,和contentView平级,构造和上图一样的视图结构,这样 contentView 和 titeBarView完全隔离,可以达到和ActionBar同样的效果,我们就自己做了一个ActionBar!哈哈…

