ARKit学习之1.0版本基础
为了方便AR开发交流,博主建立了一个群 :891555732,欢迎一起讨论
目录
一.开发环境配置
二.ARKit实现原理
三.ARKit Remote
四.判断是否判断设备是否支持ARKit
五.打开摄像头并开启检测
1.在摄像机上挂如下脚本即可打开摄像头
2.在添加UnityARCameraManager脚本(会判断设备是否支持ARKit)
3.添加UnityARGeneratePlane并设置识别到平面添加的平面预制体
4.添加识别过程中添加的点云PointCloudParticleExample
5.控制识别的开始与暂停 :
6.获取检测到的平面信息并放置物体
7.叠加物体的阴影
8.物体遮挡
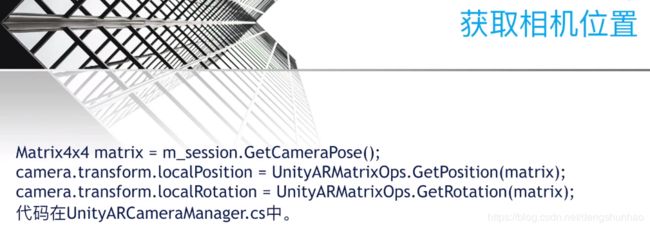
9.获取相机实时数据
六.API
一.开发环境配置
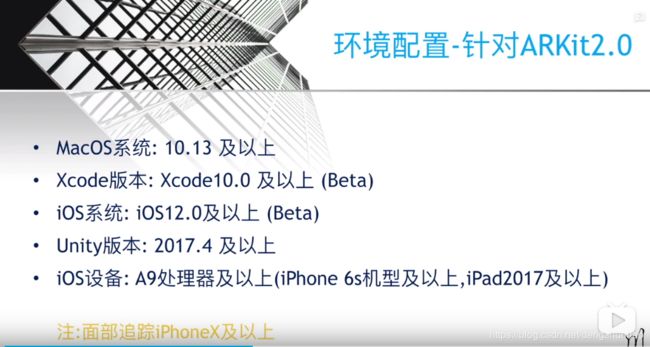
在此提一句,assetstore中Unity ARKit Plugin 不再有效。如果想获取之前版本的ARKit,请用sourcetree拉取,点击分支即可

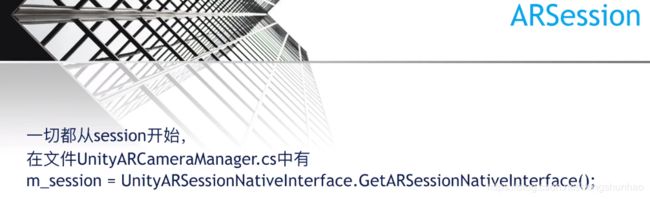
二.ARKit实现原理
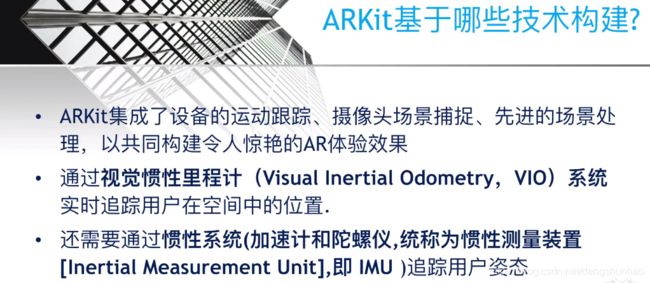
屏幕每一次刷新都会重新计算用户姿态并将现实生活中的点与摄像机拍到的画面进行像素匹配,上面两者相互独立相互弥补

三.ARKit Remote
1.将UnityARKitRemote场景添加至Build Settings中打包出Xcode工程并安装到手机上
2.Console - editor - 选择自己手机
带数字的时无限连接,会比较慢

3.运行
如果是自己新建的场景
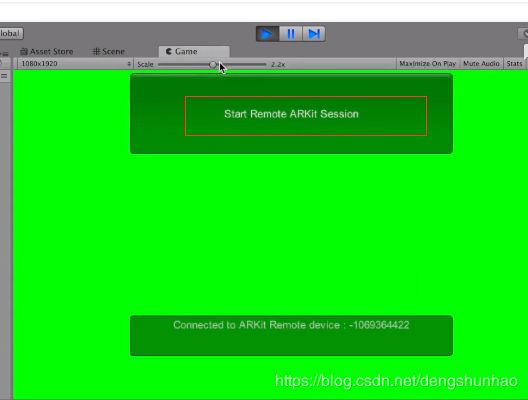
点击之后手机上即可查看运行
注意点:
①.但是2018之后的Remote版本非常卡顿,可以寻找之前的版本
②.如果运行之后报如下错误:

UnityARCameraManager中添加Bool变量,开启识别后再使用m_session,更改代码如如下:
private bool sessionStarted = false;
void FirstFrameUpdate(UnityARCamera cam)
{
    sessionStarted = true;
    UnityARSessionNativeInterface.ARFrameUpdatedEvent -= FirstFrameUpdate;
}
void Start () {

    m_session = UnityARSessionNativeInterface.GetARSessionNativeInterface();

    Application.targetFrameRate = 60;

    var config = sessionConfiguration;
    if (config.IsSupported) {
        m_session.RunWithConfig (config);
        UnityARSessionNativeInterface.ARFrameUpdatedEvent += FirstFrameUpdate;
    }

    if (m_camera == null) {
        m_camera = Camera.main;
    }
}
void Update () {
    if (m_camera != null && sessionStarted)
    {
        // JUST WORKS!
        Matrix4x4 matrix = m_session.GetCameraPose();
        m_camera.transform.localPosition = UnityARMatrixOps.GetPosition(matrix);
        m_camera.transform.localRotation = UnityARMatrixOps.GetRotation (matrix);

        m_camera.projectionMatrix = m_session.GetCameraProjection ();
     }
}
四.判断是否判断设备是否支持ARKit
using UnityEngine.XR.iOS;
void Start () {
ARKitFaceTrackingConfiguration Configuration = new ARKitFaceTrackingConfiguration();
Debug.Log(Configuration.IsSupported);
ARKitWorldTrackingSessionConfiguration Configuration1 = new ARKitWorldTrackingSessionConfiguration();
Debug.Log(Configuration1.IsSupported);
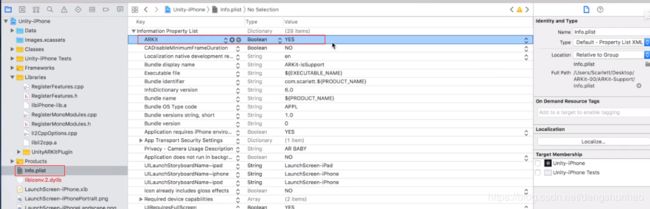
}如果你想用户手机不支持ARKit你就不允许其下载,可在Xcode中做如下设置:
五.打开摄像头并开启检测
1.在摄像机上挂如下脚本即可打开摄像头
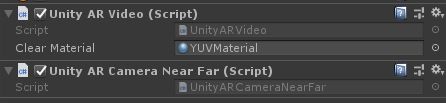
UnityARVideo : 将摄像头拍摄的画面渲染出来
2.在添加UnityARCameraManager脚本(会判断设备是否支持ARKit)
3.添加UnityARGeneratePlane并设置识别到平面添加的平面预制体
4.添加识别过程中添加的点云PointCloudParticleExample
其上预制体有两种方式:
①.粒子系统

②.预制体

5.控制识别的开始与暂停 :
private UnityARSessionNativeInterface m_session;
void Start () {

        m_session = UnityARSessionNativeInterface.GetARSessionNativeInterface();
}
public void OnPauseClick()
{
     m_session.Pause();
}
public void OnRunClick()
{
     m_session.Run();
     var config = sessionConfiguration;
     if (config.IsSupported) {
          m_session.RunWithConfig (config);
     }
}
public void ResetAndRun()
{
     var config = sessionConfiguration;
     if (config.IsSupported) {
            m_session.RunWithConfigAndOptions(config, UnityARSessionRunOption.ARSessionRunOptionResetTracking);
     }
}
public void RemoveAndRun()
{
     var config = sessionConfiguration;
     if (config.IsSupported) {
            m_session.RunWithConfigAndOptions(config, UnityARSessionRunOption.ARSessionRunOptionRemoveExistingAnchors);
     }
}
 public ARKitWorldTrackingSessionConfiguration sessionConfiguration
 {
        get
        {
            ARKitWorldTrackingSessionConfiguration config = new ARKitWorldTrackingSessionConfiguration ();
            config.planeDetection = UnityARPlaneDetection.Horizontal;   //检测平面类型,关闭检测设置为none即可
            config.alignment = UnityARAlignment.UnityARAlignmentGravity;   //检测类型
            config.getPointCloudData = true;  //是否获取点云
            config.enableLightEstimation = true;  //是否需要光照信息
            config.enableAutoFocus = true;    //是否自动聚焦
            config.maximumNumberOfTrackedImages = 0;  //图片最大追踪数量
            config.environmentTexturing = UnityAREnvironmentTexturing.UnityAREnvironmentTexturingNone;
            if (detectionImages != null)
                config.referenceImagesGroupName = detectionImages.resourceGroupName;

			if (detectionObjects != null)
			{
				config.referenceObjectsGroupName = "";  //lets not read from XCode asset catalog right now
				config.dynamicReferenceObjectsPtr = m_session.CreateNativeReferenceObjectsSet(detectionObjects.LoadReferenceObjectsInSet());
			}

            return config;
        }
 }
6.获取检测到的平面信息并放置物体
Touch GetTouch()
 {
#if UNITY_EDITOR
            var touch = new Touch();
            if (Input.GetMouseButtonDown(0))
                touch.phase = TouchPhase.Began;
            else if (Input.GetMouseButton(0) && m_LastTouchPosition != Input.mousePosition)
                touch.phase = TouchPhase.Moved;
            else
                touch.phase = TouchPhase.Stationary;

            touch.position = Input.mousePosition;
            m_LastTouchPosition = touch.position;
            return touch;
#else
            return Input.GetTouch(0);
#endif
}

bool touched
{
      get
      {
           return Input.GetMouseButton(0) || (Input.touchCount > 0);
      }
 }

void Update()
{
   if (touched)
   {
     var touch = GetTouch();
      switch (touch.phase)
       {
         case TouchPhase.Began:
              DoBegan(touch);
              break;
         case TouchPhase.Moved:
              DoMoved(touch);
              break;
       }
   }
}

void DoBegan(Touch touch)
{
     var screenPosition = Camera.main.ScreenToViewportPoint(touch.position);
            ARPoint point = new ARPoint()
            {
                x = screenPosition.x,
                y = screenPosition.y
            };
            //ARHitTestResultType有四种类型
            var hitResults = UnityARSessionNativeInterface.GetARSessionNativeInterface().HitTest(point, ARHitTestResultType.ARHitTestResultTypeExistingPlaneUsingExtent);
            if (hitResults.Count < 1)
                return;

            hitOut = hitResults[0];
             if(currentObj == null)
            {
               currentObj  = Instantiate(currentObj);
            }
            currentObj .transform.position = UnityARMatrixOps.GetPosition(hitOut.worldTransform);
            currentObj .transform.rotation = UnityARMatrixOps.GetRotation(hitOut.worldTransform);
}
如果想用Remote测试点击添加物体 :
将GeneratePlanes物体的层级变成ARKitPlane

7.叠加物体的阴影
将GeneratePlanes上的预制体设置为shadowPlanePrefab:

8.物体遮挡
将GeneratePlanes上的预制体设置为occlusionPlanePrefab:

原理是 : 识别到另外的平面,遮挡底下的平面
9.获取相机实时数据
 public void OnEnable()
 {
        UnityARSessionNativeInterface.ARFrameUpdatedEvent += ARFrameUpdate;
 }
 public void OnDisable()
 {
        UnityARSessionNativeInterface.ARFrameUpdatedEvent -= ARFrameUpdate;
 }
 public void ARFrameUpdate(UnityARCamera camera)
 {
        Matrix4x4 matrix4X4 = new Matrix4x4();
        matrix4X4.SetColumn(3, camera.worldTransform.column3);
        Vector3 pos = UnityARMatrixOps.GetPosition(matrix4X4);
 }
六.API