ARKit学习之1.5基础及案例解析
为了方便AR开发交流,博主建立了一个群 :891555732,欢迎一起讨论
目录
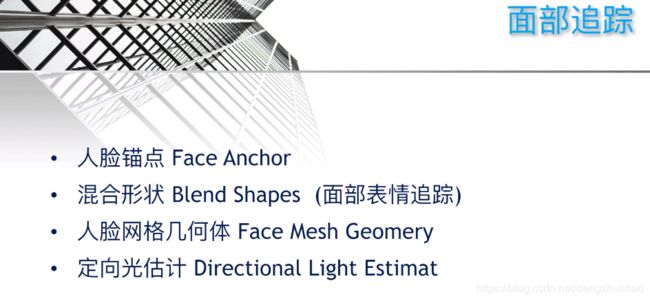
一.面部追踪
①配置ARKitSettings
②.Face Anchor
③.面部表情追踪
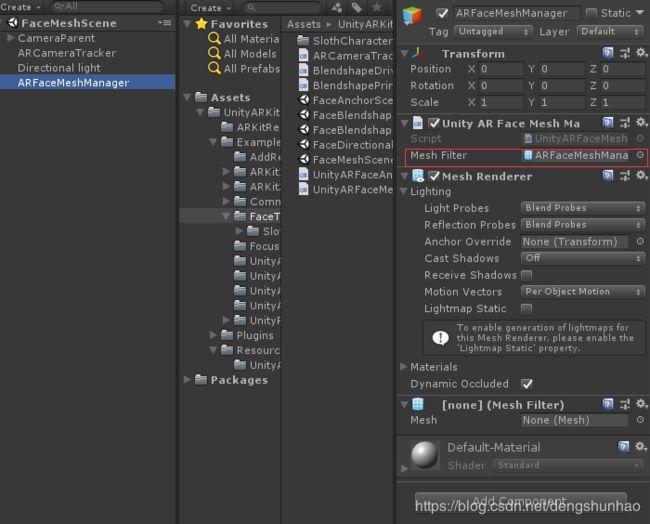
④.人脸拓扑结构
⑤.定向光估计(将脸做为场景中的定向探头,生成场景中的定向光)
二.垂直面检测
三.不规则平面(根据检测到的平面信息自定义绘制平面)
四.图片检测
五. 重定位
六.自动对焦
七.分辨率
八.重置世界中心
一.面部追踪
①配置ARKitSettings
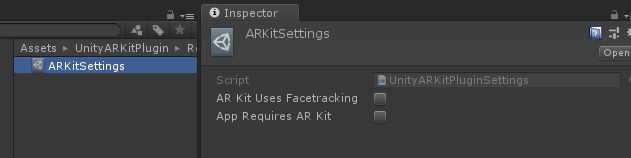
包括以下四种 :

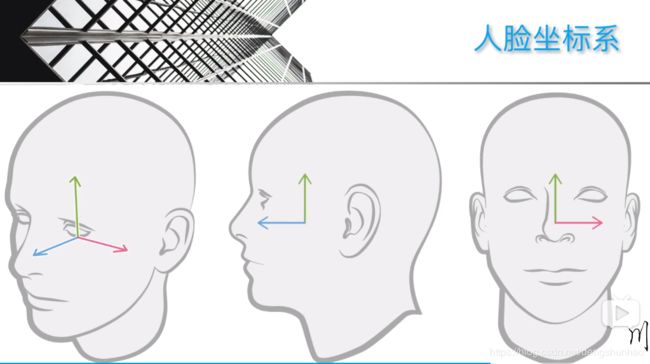
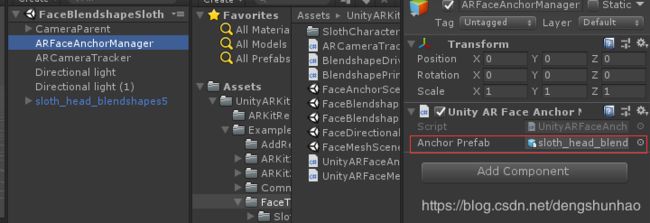
②.Face Anchor
人脸坐标系:
UnityARFaceMeshManager脚本中启动会话:
using System.Collections;
using System.Collections.Generic;
using UnityEngine;
using UnityEngine.XR.iOS;
public class UnityARFaceAnchorManager : MonoBehaviour {
[SerializeField]
private GameObject anchorPrefab;
private UnityARSessionNativeInterface m_session;
// Use this for initialization
void Start () {
m_session = UnityARSessionNativeInterface.GetARSessionNativeInterface();
Application.targetFrameRate = 60;
ARKitFaceTrackingConfiguration config = new ARKitFaceTrackingConfiguration();
config.alignment = UnityARAlignment.UnityARAlignmentGravity; //检测类型
config.enableLightEstimation = true;//是否启用环境光估计,将脸作为灯光探测器,获取环境光的照明方向/亮度等信息
if (config.IsSupported ) { //判断设备是否支持
m_session.RunWithConfig (config);
//传递ARFaceAnchor信息,包括 : 矩阵信息/面部表情/方向/拓扑结构/表情特征等
UnityARSessionNativeInterface.ARFaceAnchorAddedEvent += FaceAdded;
UnityARSessionNativeInterface.ARFaceAnchorUpdatedEvent += FaceUpdated;
UnityARSessionNativeInterface.ARFaceAnchorRemovedEvent += FaceRemoved;
}
}
void FaceAdded (ARFaceAnchor anchorData)
{
//根据anchorData.transform矩阵信息构建3D模型放在面部
anchorPrefab.transform.position = UnityARMatrixOps.GetPosition (anchorData.transform);
anchorPrefab.transform.rotation = UnityARMatrixOps.GetRotation (anchorData.transform);
anchorPrefab.SetActive (true);
}
void FaceUpdated (ARFaceAnchor anchorData)
{
if (anchorPrefab.activeSelf != anchorData.isTracked)
{
anchorPrefab.SetActive (anchorData.isTracked);
}
if (anchorData.isTracked)
{
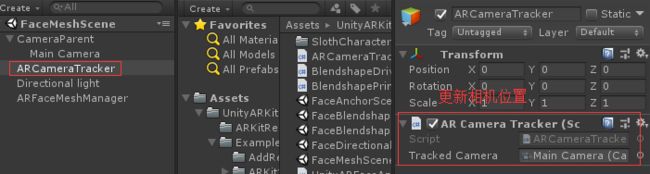
//更新位置
anchorPrefab.transform.position = UnityARMatrixOps.GetPosition (anchorData.transform);
anchorPrefab.transform.rotation = UnityARMatrixOps.GetRotation (anchorData.transform);
}
}
void FaceRemoved (ARFaceAnchor anchorData)
{
anchorPrefab.SetActive (false);
}
}
运行后脸上会有anchorPrefab
③.面部表情追踪
在②的基础上:
控制表情移动:
在anchorData.blendShapes是Dictionary
public class BlendshapeDriver : MonoBehaviour {
	SkinnedMeshRenderer skinnedMeshRenderer;
	Dictionary currentBlendShapes;

	void Start () {
		skinnedMeshRenderer = GetComponent ();

		if (skinnedMeshRenderer) {
			UnityARSessionNativeInterface.ARFaceAnchorAddedEvent += FaceAdded;
			UnityARSessionNativeInterface.ARFaceAnchorUpdatedEvent += FaceUpdated;
		}
	}
	void FaceAdded (ARFaceAnchor anchorData)
	{
		currentBlendShapes = anchorData.blendShapes;
	}
	void FaceUpdated (ARFaceAnchor anchorData)
	{
		currentBlendShapes = anchorData.blendShapes;
	}

	void Update () {
		if (currentBlendShapes != null) {
			foreach(KeyValuePair kvp in currentBlendShapes)
			{
				int blendShapeIndex = skinnedMeshRenderer.sharedMesh.GetBlendShapeIndex ("blendShape2." + kvp.Key); //注意名称
				if (blendShapeIndex >= 0 ) {
					skinnedMeshRenderer.SetBlendShapeWeight (blendShapeIndex, kvp.Value * 100.0f); //模型是0-100
				}
			}
		}
	}
}
④.人脸拓扑结构
void FaceAdded (ARFaceAnchor anchorData)
	{
        //根据anchorData.transform矩阵信息构建3D模型放在面部
        gameObject.transform.localPosition = UnityARMatrixOps.GetPosition (anchorData.transform);
		gameObject.transform.localRotation = UnityARMatrixOps.GetRotation (anchorData.transform);

		faceMesh = new Mesh ();
		faceMesh.vertices = anchorData.faceGeometry.vertices;
		faceMesh.uv = anchorData.faceGeometry.textureCoordinates;
		faceMesh.triangles = anchorData.faceGeometry.triangleIndices;

        //分配网格对象并更新它。
        faceMesh.RecalculateBounds();
		faceMesh.RecalculateNormals();
		meshFilter.mesh = faceMesh;
	}

	void FaceUpdated (ARFaceAnchor anchorData)
	{
		if (faceMesh != null) {
            //更新位置
			gameObject.transform.localPosition = UnityARMatrixOps.GetPosition (anchorData.transform);
			gameObject.transform.localRotation = UnityARMatrixOps.GetRotation (anchorData.transform);
			faceMesh.vertices = anchorData.faceGeometry.vertices;  //faceGeometry : 人体网格几何学
            faceMesh.uv = anchorData.faceGeometry.textureCoordinates;
			faceMesh.triangles = anchorData.faceGeometry.triangleIndices;
			faceMesh.RecalculateBounds();
			faceMesh.RecalculateNormals();
		}

	}
	void FaceRemoved (ARFaceAnchor anchorData)
	{
		meshFilter.mesh = null;
		faceMesh = null;
	}
可做一些换脸的应用
⑤.定向光估计(将脸做为场景中的定向探头,生成场景中的定向光)
public class UnityARKitLightManager : MonoBehaviour {

	Light [] lightsInScene;
	SphericalHarmonicsL2 shl;

	// Use this for initialization
	void Start () {
        //找到场景中的所有灯光
        lightsInScene = FindAllLights();
		shl = new SphericalHarmonicsL2 ();
        //订阅活动通知我们从AR灯光变化
        UnityARSessionNativeInterface.ARFrameUpdatedEvent += UpdateLightEstimations;
	}
	void OnDestroy()
	{
		UnityARSessionNativeInterface.ARFrameUpdatedEvent -= UpdateLightEstimations;
	}
	Light []  FindAllLights()
	{
		return FindObjectsOfType ();
	}
	void UpdateLightEstimations(UnityARCamera camera)
	{
        //lightData : 包含光源类型,光源估计等
        if (camera.lightData.arLightingType == LightDataType.LightEstimate) {
			UpdateBasicLightEstimation (camera.lightData.arLightEstimate);
		}
		else if (camera.lightData.arLightingType == LightDataType.DirectionalLightEstimate)
		{
			UpdateDirectionalLightEstimation (camera.lightData.arDirectonalLightEstimate);
		}
	}
	void UpdateBasicLightEstimation(UnityARLightEstimate uarle)
	{
		foreach (Light l in lightsInScene)
		{
            // 修复环境光
            // 将ARKit强度转换为单位强度
            // ARKit环境强度范围0-2000
            // 单位环境亮度范围0-8(超亮)
            float newai = uarle.ambientIntensity;
			l.intensity = newai / 1000.0f;

            //Unity Light具有过滤颜色以修正温度的功能
            //https://docs.unity3d.com/ScriptReference/Light-colorTemperature.html
            l.colorTemperature = uarle.ambientColorTemperature;
		}
	}

	void UpdateDirectionalLightEstimation(UnityARDirectionalLightEstimate uardle)
	{
		for (int colorChannel = 0; colorChannel < 3; colorChannel++) {
			for (int index = 0; index < 9; index++) {
				shl [colorChannel, index] = uardle.sphericalHarmonicsCoefficients [(colorChannel * 9) + index];
			}
		}
		if (LightmapSettings.lightProbes != null) {
			int probeCount = LightmapSettings.lightProbes.count;

            //我们在场景中至少有一个光探头
            if (probeCount > 0) {

                //用我们生成的球谐函数替换场景中所有烤焦的探针
                SphericalHarmonicsL2[] bakedProbes = LightmapSettings.lightProbes.bakedProbes;

				for (int i = 0; i < probeCount; i++) {
					bakedProbes [i] = shl;
				}
			}
		}
        //对于不受光探头影响的对象,设置环境探头
        RenderSettings.ambientProbe = shl;
		RenderSettings.ambientMode = AmbientMode.Custom;
	}
}
二.垂直面检测
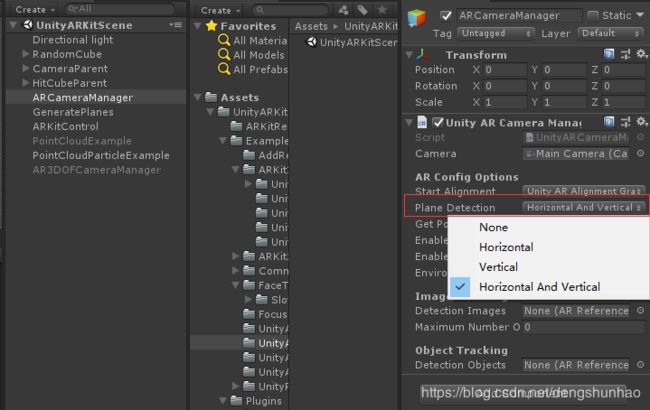
 public enum ARHitTestResultType : long
	{
        /**与最近的特征点相交得到的结果类型 . */
        ARHitTestResultTypeFeaturePoint = (1 << 0),

        /** 由搜索探测到的真实平面表面(没有相应的锚点),其方向垂直于重力.(水平面) */
        ARHitTestResultTypeEstimatedHorizontalPlane = (1 << 1),

        /** 由搜索探测到的真实平面表面,其方向与重力平行。(垂直面) */
        ARHitTestResultTypeEstimatedVerticalPlane = (1 << 2),

        /**与现有平面锚相交得到的结果类型。  */
        ARHitTestResultTypeExistingPlane = (1 << 3),

        /** 与现有平面锚点相交得到的结果类型,考虑到平面的范围。 */
        ARHitTestResultTypeExistingPlaneUsingExtent = ( 1 << 4),

        /** 已经在场景中的飞机锚(用飞机探测选项探测),根据飞机的估计大小和形状。**/
        ARHitTestResultTypeExistingPlaneUsingGeometry = (1 << 5)

	}
在点击时可以改变点击与检测面类型检测(在1.0版本中有介绍):
var hitResults = UnityARSessionNativeInterface.GetARSessionNativeInterface().HitTest(point, ARHitTestResultType.ARHitTestResultTypeExistingPlaneUsingExtent);
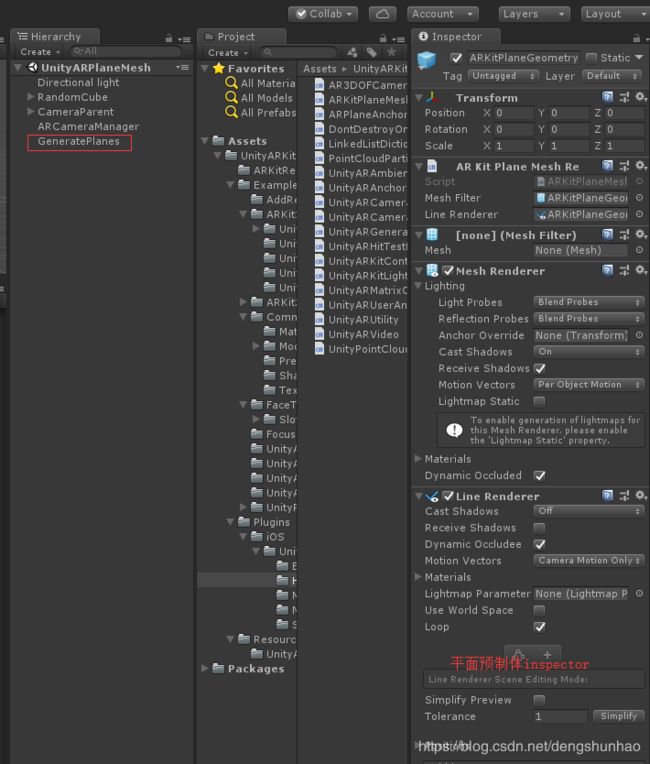
三.不规则平面(根据检测到的平面信息自定义绘制平面)
public class ARKitPlaneMeshRender : MonoBehaviour {

	[SerializeField]
	private MeshFilter meshFilter;
	[SerializeField]
	private LineRenderer lineRenderer;
	private Mesh planeMesh;

	public void InitiliazeMesh(ARPlaneAnchor arPlaneAnchor)
	{
		planeMesh = new Mesh ();
		UpdateMesh (arPlaneAnchor);
		meshFilter.mesh = planeMesh;

	}
    //更新mesh
	public void UpdateMesh(ARPlaneAnchor arPlaneAnchor)
	{
        //否则我们无法访问平面几何
        if (UnityARSessionNativeInterface.IsARKit_1_5_Supported())
        {
	        if (arPlaneAnchor.planeGeometry.vertices.Length != planeMesh.vertices.Length ||
	            arPlaneAnchor.planeGeometry.textureCoordinates.Length != planeMesh.uv.Length ||
	            arPlaneAnchor.planeGeometry.triangleIndices.Length != planeMesh.triangles.Length)
	        {
		        planeMesh.Clear();
	        }

            planeMesh.vertices = arPlaneAnchor.planeGeometry.vertices;
            planeMesh.uv = arPlaneAnchor.planeGeometry.textureCoordinates;
            planeMesh.triangles = arPlaneAnchor.planeGeometry.triangleIndices;

            lineRenderer.positionCount = arPlaneAnchor.planeGeometry.boundaryVertexCount;
            lineRenderer.SetPositions(arPlaneAnchor.planeGeometry.boundaryVertices);

            // 分配网格对象并更新它。
            planeMesh.RecalculateBounds();
            planeMesh.RecalculateNormals();
        }

	}
}
可以通过更改平面材质与linerender材质自定义显示的平面
如果不需要边界的话就将linerender组建enable为false
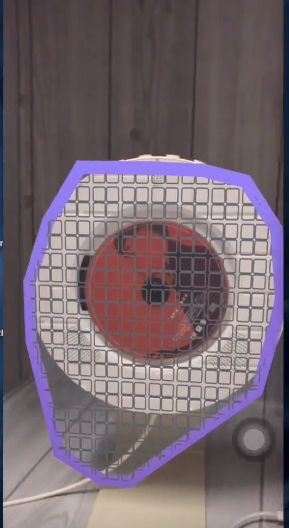
四.图片检测
需要创建以下两个 :
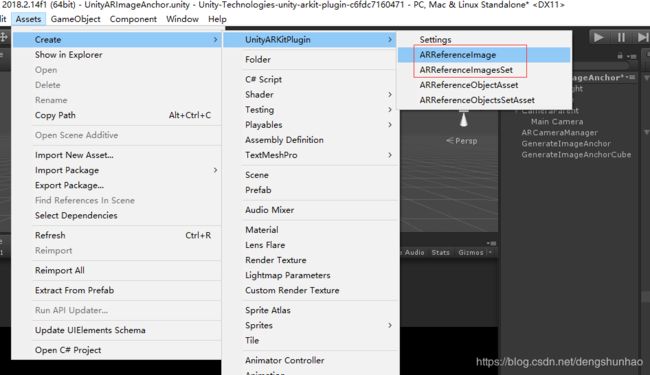
①.ARReferenceImage
pgysical size : 图片的物体大小,要尽可能的真实,ARKit通过此信息确定图片与相机的距离,不准确会导致识别放置位置不准确(imageanchor与相机位置不准确)

②.ARReferenceImagesSet
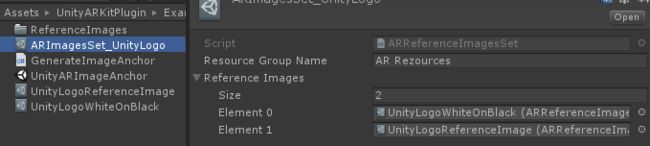
③.设置识别图集
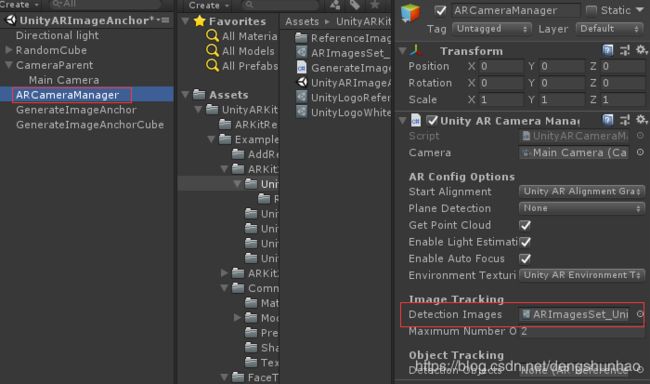
设置图片识别:

public class GenerateImageAnchor : MonoBehaviour {
	[SerializeField]
	private ARReferenceImage referenceImage;
	[SerializeField]
	private GameObject prefabToGenerate;
	private GameObject imageAnchorGO;

	void Start () {
		UnityARSessionNativeInterface.ARImageAnchorAddedEvent += AddImageAnchor;
		UnityARSessionNativeInterface.ARImageAnchorUpdatedEvent += UpdateImageAnchor;
		UnityARSessionNativeInterface.ARImageAnchorRemovedEvent += RemoveImageAnchor;
	}
    //会话启动只运行一次
	void AddImageAnchor(ARImageAnchor arImageAnchor)
	{
		Debug.LogFormat("image anchor added[{0}] : tracked => {1}", arImageAnchor.identifier, arImageAnchor.isTracked);
		if (arImageAnchor.referenceImageName == referenceImage.imageName) { //判断识别到的图片是不是本图
            //添加prefabToGenerate
            Vector3 position = UnityARMatrixOps.GetPosition (arImageAnchor.transform);
			Quaternion rotation = UnityARMatrixOps.GetRotation (arImageAnchor.transform);
			imageAnchorGO = Instantiate (prefabToGenerate, position, rotation);
		}
	}
	void UpdateImageAnchor(ARImageAnchor arImageAnchor)
	{
		Debug.LogFormat("image anchor updated[{0}] : tracked => {1}", arImageAnchor.identifier, arImageAnchor.isTracked);
		if (arImageAnchor.referenceImageName == referenceImage.imageName) {
            if (arImageAnchor.isTracked)
            {
                if (!imageAnchorGO.activeSelf)
                {
                    imageAnchorGO.SetActive(true);
                }
                imageAnchorGO.transform.position = UnityARMatrixOps.GetPosition(arImageAnchor.transform);
                imageAnchorGO.transform.rotation = UnityARMatrixOps.GetRotation(arImageAnchor.transform);
            }
            else if (imageAnchorGO.activeSelf)
            {
                imageAnchorGO.SetActive(false);
            }
        }
	}
    //调用remove image anchor才调用,如果识别丢失不会调用
	void RemoveImageAnchor(ARImageAnchor arImageAnchor)
	{
		Debug.LogFormat("image anchor removed[{0}] : tracked => {1}", arImageAnchor.identifier, arImageAnchor.isTracked);
		if (imageAnchorGO) {
			GameObject.Destroy (imageAnchorGO);
		}
	}
	void OnDestroy()
	{
		UnityARSessionNativeInterface.ARImageAnchorAddedEvent -= AddImageAnchor;
		UnityARSessionNativeInterface.ARImageAnchorUpdatedEvent -= UpdateImageAnchor;
		UnityARSessionNativeInterface.ARImageAnchorRemovedEvent -= RemoveImageAnchor;
	}
} 
五. 重定位
1.0版本如果应用切换到后台会丢失所有的识别及物体,1.5更新后会保留位置信息,能恢复切换到后台前的识别位置等信息
UnityARSessionNativeInterface.ARSessionShouldAttemptRelocalization = true;六.自动对焦
在UnityARCameraManager中可以设置:
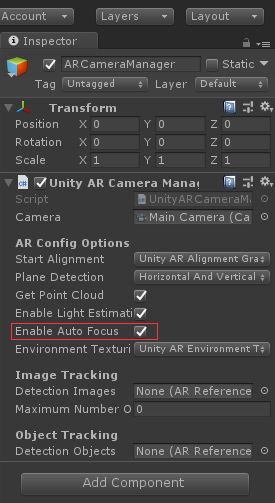
ARKitWorldTrackingSessionConfiguration config = new ARKitWorldTrackingSessionConfiguration ();
config.enableAutoFocus = enableAutoFocus;
七.分辨率
可以获取设备支持的所有分辨率,默认情况是最高分辨率
public class VideoFormatsExample : MonoBehaviour {
	public Transform formatsParent;
	public GameObject videoFormatButtonPrefab;

	void Start () {
		VideoFormatButton.FormatButtonPressedEvent += ExampletButtonPressed;
		PopulateVideoFormatButtons ();
	}
	void OnDestroy () {
		VideoFormatButton.FormatButtonPressedEvent -= ExampletButtonPressed;
	}
    //获取所有支持的分辨率
	void PopulateVideoFormatButtons()
	{
		foreach (UnityARVideoFormat vf in UnityARVideoFormat.SupportedVideoFormats())
		{
			GameObject go = Instantiate (videoFormatButtonPrefab, formatsParent);
			VideoFormatButton vfb = go.GetComponent ();
			if (vfb != null) {
				vfb.Populate (vf);
			}
		}
	}
	public void ExampletButtonPressed(UnityARVideoFormat videoFormat)
	{
        //在配置中以新的视频格式重新启动会话
        UnityARSessionNativeInterface session = UnityARSessionNativeInterface.GetARSessionNativeInterface();
		ARKitWorldTrackingSessionConfiguration config = new ARKitWorldTrackingSessionConfiguration();

		if (config.IsSupported) {
			config.planeDetection = UnityARPlaneDetection.HorizontalAndVertical;
			config.alignment = UnityARAlignment.UnityARAlignmentGravity;
			config.getPointCloudData = true;
			config.enableLightEstimation = true;
			config.enableAutoFocus = true;

			config.videoFormat = videoFormat.videoFormatPtr;
			Application.targetFrameRate = videoFormat.framesPerSecond;

			UnityARSessionRunOption runOption = UnityARSessionRunOption.ARSessionRunOptionRemoveExistingAnchors | UnityARSessionRunOption.ARSessionRunOptionResetTracking;
			session.RunWithConfigAndOptions (config, runOption);
		}
	}
}
八.重置世界中心
public class SetWorldOriginControl : MonoBehaviour {
	public Camera arCamera;
	public Text positionText;
	public Text rotationText;

	void Update () {
		positionText.text = "Camera position=" + arCamera.transform.position.ToString ();
		rotationText.text = "Camera rotation=" + arCamera.transform.rotation.ToString ();
	}
	public void SetWorldOrigin()
	{
		UnityARSessionNativeInterface.GetARSessionNativeInterface().SetWorldOrigin (arCamera.transform);
	}
}